yolo和voc格式之数据集标注和划分 |
您所在的位置:网站首页 › yolo数据集标注 › yolo和voc格式之数据集标注和划分 |
yolo和voc格式之数据集标注和划分
|
Contents
1. LabelImg Install1) dataset file2) Implement3) labelimg Introduction4) Configuration5) Hot key
2. Format Conversion Code3. Split Data CodeConclusion
1. LabelImg Install
打开Anaconda终端,输入即可安装完成: pip install labelimg -i https://pypi.tuna.tsinghua.edu.cn/simple 1) dataset file准备一个** data **的根目录文件夹,文件夹格式如下: data- --images #装有你待标注图像的子文件夹 --labels #等会需要保存标注txt文件的子文件夹 --class.txt #里面保存有你的标注类别class.txt格式如下,这是代表有四类文件: red gray blue other 2) Implement使用anaconda终端 ,依次输入: cd [data文件夹所在路径] labelimg images class.txt #即labelimg [待标注图像路径] [类别txt文件]即可用labelimg标注工具打开待标注图像 3) labelimg Introduction
如下图,选中这个选项即可: Auto Save mode:当你切换到下一张图片时,就会自动把上一张标注的图片标签自动保存下来,这样就不用每标注一样图片都按Ctrl+S保存一下了 Display Labels:标注好图片之后,会把框和标签都显示出来 Advanced Mode:这样标注的十字架就会一直悬浮在窗口,不用每次标完一个目标,再按一次W快捷键,调出标注的十字架。
W:调出标注的十字架,开始标注 A:切换到上一张图片 D:切换到下一张图片 Ctrl+S:保存标注好的标签 del:删除标注的矩形框 Ctrl+鼠标滚轮:按住Ctrl,然后滚动鼠标滚轮,可以调整标注图片的显示大小 Ctrl+u:选择要标注图片的文件夹 Ctrl+r:选择标注好的label标签存放的文件夹 ↑→↓←:移动标注的矩形框的位置 代码如下(示例): import numpy as np import pandas as pd import matplotlib.pyplot as plt import seaborn as sns import warnings warnings.filterwarnings('ignore') import ssl ssl._create_default_https_context = ssl._create_unverified_context 2. Format Conversion CodeYOLO转化为VOC格式完整代码如下,只需要在终端改成自己的路径即可: import os import cv2 import json from tqdm import tqdm from sklearn.model_selection import train_test_split import argparse parser = argparse.ArgumentParser() parser.add_argument('--root_dir', default='./data', type=str, help="root path of images and labels, include ./images and ./labels and classes.txt") parser.add_argument('--save_path', type=str, default='./test.json', help="if not split the dataset, give a path to a json file") parser.add_argument('--random_split', action='store_true', help="random split the dataset, default ratio is 8:1:1") parser.add_argument('--split_by_file', action='store_true', help="define how to split the dataset, include ./train.txt ./val.txt ./test.txt ") arg = parser.parse_args() def train_test_val_split_random(img_paths, ratio_train=0.8, ratio_test=0.1, ratio_val=0.1): # 这里可以修改数据集划分的比例。 assert int(ratio_train + ratio_test + ratio_val) == 1 train_img, middle_img = train_test_split(img_paths, test_size=1 - ratio_train, random_state=233) ratio = ratio_val / (1 - ratio_train) val_img, test_img = train_test_split(middle_img, test_size=ratio, random_state=233) print("NUMS of train:val:test = {}:{}:{}".format(len(train_img), len(val_img), len(test_img))) return train_img, val_img, test_img def train_test_val_split_by_files(img_paths, root_dir): # 根据文件 train.txt, val.txt, test.txt(里面写的都是对应集合的图片名字) 来定义训练集、验证集和测试集 phases = ['train', 'val', 'test'] img_split = [] for p in phases: define_path = os.path.join(root_dir, f'{p}.txt') print(f'Read {p} dataset definition from {define_path}') assert os.path.exists(define_path) with open(define_path, 'r') as f: img_paths = f.readlines() # img_paths = [os.path.split(img_path.strip())[1] for img_path in img_paths] # NOTE 取消这句备注可以读取绝对地址。 img_split.append(img_paths) return img_split[0], img_split[1], img_split[2] def yolo2coco(arg): root_path = arg.root_dir print("Loading data from ", root_path) assert os.path.exists(root_path) originLabelsDir = os.path.join(root_path, 'labels') originImagesDir = os.path.join(root_path, 'images') with open(os.path.join(root_path, 'classes.txt')) as f: classes = f.read().strip().split() # images dir name indexes = os.listdir(originImagesDir) if arg.random_split or arg.split_by_file: # 用于保存所有数据的图片信息和标注信息 train_dataset = {'categories': [], 'annotations': [], 'images': []} val_dataset = {'categories': [], 'annotations': [], 'images': []} test_dataset = {'categories': [], 'annotations': [], 'images': []} # 建立类别标签和数字id的对应关系, 类别id从0开始。 for i, cls in enumerate(classes, 0): train_dataset['categories'].append({'id': i, 'name': cls, 'supercategory': 'mark'}) val_dataset['categories'].append({'id': i, 'name': cls, 'supercategory': 'mark'}) test_dataset['categories'].append({'id': i, 'name': cls, 'supercategory': 'mark'}) if arg.random_split: print("spliting mode: random split") train_img, val_img, test_img = train_test_val_split_random(indexes, 0.8, 0.1, 0.1) elif arg.split_by_file: print("spliting mode: split by files") train_img, val_img, test_img = train_test_val_split_by_files(indexes, root_path) else: dataset = {'categories': [], 'annotations': [], 'images': []} for i, cls in enumerate(classes, 0): dataset['categories'].append({'id': i, 'name': cls, 'supercategory': 'mark'}) # 标注的id ann_id_cnt = 0 for k, index in enumerate(tqdm(indexes)): # 支持 png jpg 格式的图片。 txtFile = index.replace('images', 'txt').replace('.jpg', '.txt').replace('.png', '.txt') # 读取图像的宽和高 im = cv2.imread(os.path.join(root_path, 'images/') + index) height, width, _ = im.shape if arg.random_split or arg.split_by_file: # 切换dataset的引用对象,从而划分数据集 if index in train_img: dataset = train_dataset elif index in val_img: dataset = val_dataset elif index in test_img: dataset = test_dataset # 添加图像的信息 dataset['images'].append({'file_name': index, 'id': k, 'width': width, 'height': height}) if not os.path.exists(os.path.join(originLabelsDir, txtFile)): # 如没标签,跳过,只保留图片信息。 continue with open(os.path.join(originLabelsDir, txtFile), 'r') as fr: labelList = fr.readlines() for label in labelList: label = label.strip().split() x = float(label[1]) y = float(label[2]) w = float(label[3]) h = float(label[4]) # convert x,y,w,h to x1,y1,x2,y2 H, W, _ = im.shape x1 = (x - w / 2) * W y1 = (y - h / 2) * H x2 = (x + w / 2) * W y2 = (y + h / 2) * H # 标签序号从0开始计算, coco2017数据集标号混乱,不管它了。 cls_id = int(label[0]) width = max(0, x2 - x1) height = max(0, y2 - y1) dataset['annotations'].append({ 'area': width * height, 'bbox': [x1, y1, width, height], 'category_id': cls_id, 'id': ann_id_cnt, 'image_id': k, 'iscrowd': 0, # mask, 矩形是从左上角点按顺时针的四个顶点 'segmentation': [[x1, y1, x2, y1, x2, y2, x1, y2]] }) ann_id_cnt += 1 # 保存结果 folder = os.path.join(root_path, 'annotations') if not os.path.exists(folder): os.makedirs(folder) if arg.random_split or arg.split_by_file: for phase in ['train', 'val', 'test']: json_name = os.path.join(root_path, 'annotations/{}.json'.format(phase)) with open(json_name, 'w') as f: if phase == 'train': json.dump(train_dataset, f) elif phase == 'val': json.dump(val_dataset, f) elif phase == 'test': json.dump(test_dataset, f) print('Save annotation to {}'.format(json_name)) else: json_name = os.path.join(root_path, 'annotations/{}'.format(arg.save_path)) with open(json_name, 'w') as f: json.dump(dataset, f) print('Save annotation to {}'.format(json_name)) if __name__ == "__main__": yolo2coco(arg) 3. Split Data Code路径修改:需要把该代码的python文件和上面的data文件夹放在一起 将下方代码中label_txt_path 的data改成自己的data文件夹名字,即跟随我设置的data标注文件夹名,或者你自己设置的文件夹名。 str 是linux系统设置’/’,windows系统设置为’\\’ 其它的自行看代码 str = '/' #图像路径 label_txt_path = str + "data3": import os import random def data_split(full_list, ratio, shuffle=False): """ 数据集拆分: 将列表full_list按比例ratio(随机)划分为2个子列表sublist_1与sublist_2 """ n_total = len(full_list) offset = int(n_total * ratio) if n_total == 0 or offset |
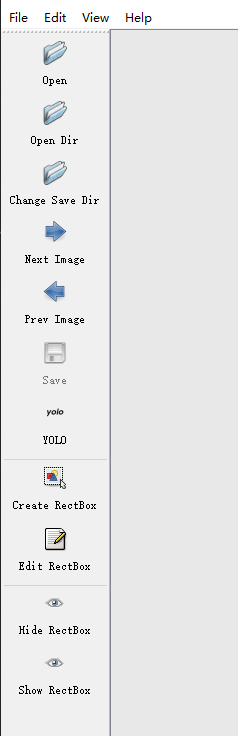 Open Dir:待标注图片数据的路径文件夹,即选择images文件夹 Change Save Dir:保存类别标签的路径文件夹,即选择labels文件夹 YOLO:标注的标签保存成YOLO格式,在鼠标点一下就变成PascalVOC,即此时就会把标注的标签变成VOC格式
【本文地址】
今日新闻 |
推荐新闻 |