服务器网卡bond0的制作 |
您所在的位置:网站首页 › 修改bond模式 › 服务器网卡bond0的制作 |
服务器网卡bond0的制作
|
按照业务要求,实现新上架的50台服务器网卡bond的制作 现在的服务器默认都配备 4 张 千兆网卡,在生产环境中,无论遇到多大的困难,都必须做到双网卡绑定(至少要实现主备模式),最基本的主备这是基本原则。因此在前期的规划,网络设备(交换机)是必须要考虑到的。 1.概念链路聚合常见的三种网络模式 mode0(平衡负载模式):两张网卡同时均衡工作,且自动备援,但是需要在与服务器本地网卡相连的交换机设备上进行端口聚合来支持绑定技术。mode1(自动备援模式):1张网卡工作,在工作网卡故障时,第二张网卡替换故障网卡,单纯的主备模式。mode6(平衡负载模式):两张网卡均衡工作,且自动备援,无需交换机设备提供辅助支持。重点:切记mode0 一定要在上游交换机上面做端口聚合技术。 2.网卡名称的修改带我的师傅告诉我,一个好的运维,必须要保持服务器环境的纯洁,必须要保持自己运行环境的洁癖,技术上的洁癖。这是一种好的习惯。 因为服务器网卡的名称都是不同的,所以修改成eth0 eth1 ethxxx,有几张网卡旧修改几个名称。 2.1 操作环境一台虚拟机
 2.3.1 修改配置信息
修改为 添加net.ifnames=p biosdevname=0 [root@zoey ~]# vim /etc/default/grub GRUB_TIMEOUT=2 5改为2 属于系统层面的优化,就是开机时间 GRUB_DISTRIBUTOR="$(sed 's, release .*$,,g' /etc/system-release)" GRUB_DEFAULT=saved GRUB_DISABLE_SUBMENU=true GRUB_TERMINAL_OUTPUT="console" GRUB_CMDLINE_LINUX="net.ifnames=0 biosdevname=0 crashkernel=auto rd.lvm.lv=centos/root rd.lvm.lv=centos/swap rhgb quiet" GRUB_DISABLE_RECOVERY="true" 2.3.2 加载配置信息如果虚拟机的启动模式为UEFI,启动文件所在的目录是:/boot/efi/EFI/centos/。 如果是BIOS启动模式,启动文件所在的目录为:/boot/grub2/。 加载修改后的信息 grub2-mkconfig -o /boot/efi/EFI/centos/grub.cfg 或者 加载到启动中 grub2-mkconfig -o /boot/grub2/grub.cfg 2.3.3 查看是什么启动方式[root@zoey ~]# [ -d /sys/firmware/efi ] && echo UEFI || echo BIOS BIOS [root@zoey ~]# [root@zoey ~]# grub2-mkconfig -o /boot/grub2/grub.cfg Generating grub configuration file ... Found linux image: /boot/vmlinuz-3.10.0-957.el7.x86_64 Found initrd image: /boot/initramfs-3.10.0-957.el7.x86_64.img Found linux image: /boot/vmlinuz-0-rescue-0cc2c6af8dad4af38bc7264960bfedce Found initrd image: /boot/initramfs-0-rescue-0cc2c6af8dad4af38bc7264960bfedce.img done [root@zoey ~]#重点: 重启服务器 查看是否为eth [root@zoey ~]# nmcli dev DEVICE TYPE STATE CONNECTION eth0 ethernet 连接的 eth0 eth1 ethernet 连接的 eth1 eth2 ethernet 连接的 eth2 lo loopback 未托管 -- [root@zoey ~]# [root@zoey ~]# nmcli conn NAME UUID TYPE DEVICE ens33 c96bc909-188e-ec64-3a96-6a90982b08ad ethernet ens33 有线连接 1 61014de7-c684-333e-a33b-46e10348550a ethernet ens36 有线连接 2 723fd97f-e254-35ac-8df1-679e1235709d ethernet ens37 [root@zoey ~]# 2.5 删除网卡信息 [root@zoey ~]# nmcli conn delete c96bc909-188e-ec64-3a96-6a90982b08ad 成功删除连接 'ens33'(c96bc909-188e-ec64-3a96-6a90982b08ad)。 [root@zoey ~]# nmcli conn delete 61014de7-c684-333e-a33b-46e10348550a 成功删除连接 '有线连接 1'(61014de7-c684-333e-a33b-46e10348550a)。 [root@zoey ~]# nmcli conn delete 723fd97f-e254-35ac-8df1-679e1235709d 成功删除连接 '有线连接 2'(723fd97f-e254-35ac-8df1-679e1235709d)。 [root@zoey ~]# 2.5 添加网卡信息
修改网卡dhcp为none ,修改不用的网卡启动为开机不启动 为什么修改dhcp为none 因为在真实环境中没有dhcp服务器的情况下 重启网卡会卡住 [root@zoey network-scripts]# sed -i 's/BOOTPROTO=dhcp/BOOTPROTO=none/g' ifcfg-eth0 [root@zoey network-scripts]# sed -i 's/BOOTPROTO=dhcp/BOOTPROTO=none/g' ifcfg-eth1 [root@zoey network-scripts]# sed -i 's/BOOTPROTO=dhcp/BOOTPROTO=none/g' ifcfg-eth2 [root@zoey network-scripts]# [root@zoey network-scripts]# sed -i 's/BOOTPROTO=dhcp/BOOTPROTO=none/g' ifcfg-eth2 [root@zoey network-scripts]# sed -i 's/ONBOOT=yes/ONBOOT=no/g' ifcfg-eth2 [root@zoey network-scripts]# sed -i 's/ONBOOT=yes/ONBOOT=no/g' ifcfg-eth1 [root@zoey network-scripts]# sed -i 's/ONBOOT=yes/ONBOOT=no/g' ifcfg-eth0 [root@zoey network-scripts]# 3.安排bond将eth1和eth2两张网卡做成bond 3.1 修改网卡配置文件 [root@zoey network-scripts]# vim ifcfg-eth1 TYPE=Ethernet PROXY_METHOD=none BROWSER_ONLY=no BOOTPROTO=none DEFROUTE=yes IPV4_FAILURE_FATAL=no NAME=eth1 UUID=f32f770e-d434-4232-b98b-92e821e64c83 DEVICE=eth1 ONBOOT=yes MASTER=bond0 [root@zoey network-scripts]# vim ifcfg-eth2 TYPE=Ethernet PROXY_METHOD=none BROWSER_ONLY=no BOOTPROTO=none DEFROUTE=yes IPV4_FAILURE_FATAL=no NAME=eth2 UUID=9da992fc-6063-4a91-aa97-5adcb22bd8cb DEVICE=eth2 ONBOOT=yes MASTER=bond0 [root@zoey network-scripts]# vim ifcfg-bond0 TYPE=Bond PROXY_METHOD=none BROWSER_ONLY=no BOOTPROTO=none DEFROUTE=yes IPV4_FAILURE_FATAL=no NAME=bond0 DEVICE=bond0 ONBOOT=yes IPADDR=192.168.1.100 NETMASK=255.255.255.0 GATEWAY=192.168.1.1 BONDING_OPTS='miimon=100 mode=6 fail_over_mac=1' 3.2 配置解释BONDING_OPTS=‘miimon=100 mode=6 fail_over_mac=1’ **miimon=100: **监视网络链接的频度,单位是毫秒 Fail_over_mac=1: 这个bond0获取mac地址有两种方式,一种是从第一个活跃网卡中获取mac地址,然后其余的SLAVE网卡的mac地址都使用该mac地址;另一种是使用fail_over_mac参数,是bond0使用当前活跃网卡的mac地址,mac地址或者活跃网卡的转换而变。 3.3 查看bond [root@zoey network-scripts]# ethtool bond0 Settings for bond0: Supported ports: [ ] Supported link modes: Not reported Supported pause frame use: No Supports auto-negotiation: No Supported FEC modes: Not reported Advertised link modes: Not reported Advertised pause frame use: No Advertised auto-negotiation: No Advertised FEC modes: Not reported Speed: 2000Mb/s 变为2000MB Duplex: Full Port: Other PHYAD: 0 Transceiver: internal Auto-negotiation: off Link detected: yes [root@zoey network-scripts]# cat /proc/net/bonding/bond0 Ethernet Channel Bonding Driver: v3.7.1 (April 27, 2011) Bonding Mode: adaptive load balancing Primary Slave: None Currently Active Slave: eth1 MII Status: up MII Polling Interval (ms): 100 Up Delay (ms): 0 Down Delay (ms): 0 Slave Interface: eth1 MII Status: up Speed: 1000 Mbps Duplex: full Link Failure Count: 0 Permanent HW addr: 00:0c:29:42:61:6d Slave queue ID: 0 Slave Interface: eth2 MII Status: up Speed: 1000 Mbps Duplex: full Link Failure Count: 0 Permanent HW addr: 00:0c:29:42:61:63 Slave queue ID: 0 [root@zoey network-scripts]# [root@zoey network-scripts]# ifconfig bond0 bond0: flags=5187 mtu 1500 inet 192.168.1.100 netmask 255.255.255.0 broadcast 192.168.1.255 inet6 fe80::20c:29ff:fe42:616d prefixlen 64 scopeid 0x20 ether 00:0c:29:42:61:6d txqueuelen 1000 (Ethernet) RX packets 38 bytes 5446 (5.3 KiB) RX errors 0 dropped 0 overruns 0 frame 0 TX packets 214 bytes 13016 (12.7 KiB) TX errors 0 dropped 0 overruns 0 carrier 0 collisions 0 [root@zoey network-scripts]# 3.4 测试
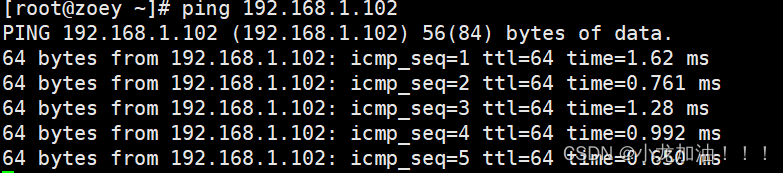
直接硬件关闭网卡 有短暂的丢包 证实 若一个网卡关掉另外一个网卡还是会继续工作自动备援 bond0 MAC不变 |


【本文地址】
今日新闻 |
推荐新闻 |