【鸿蒙开发细枝末节】自定义弹窗实现 |
您所在的位置:网站首页 › 鸿蒙开发者系统怎么关闭广告弹窗 › 【鸿蒙开发细枝末节】自定义弹窗实现 |
【鸿蒙开发细枝末节】自定义弹窗实现
|
前言
鸿蒙官方的文档写得很详细,也有Demo示例代码,但从《构建更加丰富的界面》这个章节起,大段大段地省略重要内容,包括但不限于“在代码片段里写一大堆省略号”、“只贴代码片段不说贴在什么位置”、“对另一个先前教学中没有提到过的内容只字不提或一笔带过”等情况,导致学习时不得不去翻文档看Demo自己试错。而Demo也做得非常复杂,根本不适合初学者阅读。 这个《细枝末节》系列算是作为官方教学的补充,给初学者看的,专门补充官方教学文档没说的细节。 实现效果原文的自定义窗口写得非常复杂,甚至用到了先前教程未提及的数据部分。 本文直接换用一个简单的例子。我们来实现第一部分《管理组件状态》那个界面下面的“添加子目标”弹窗。
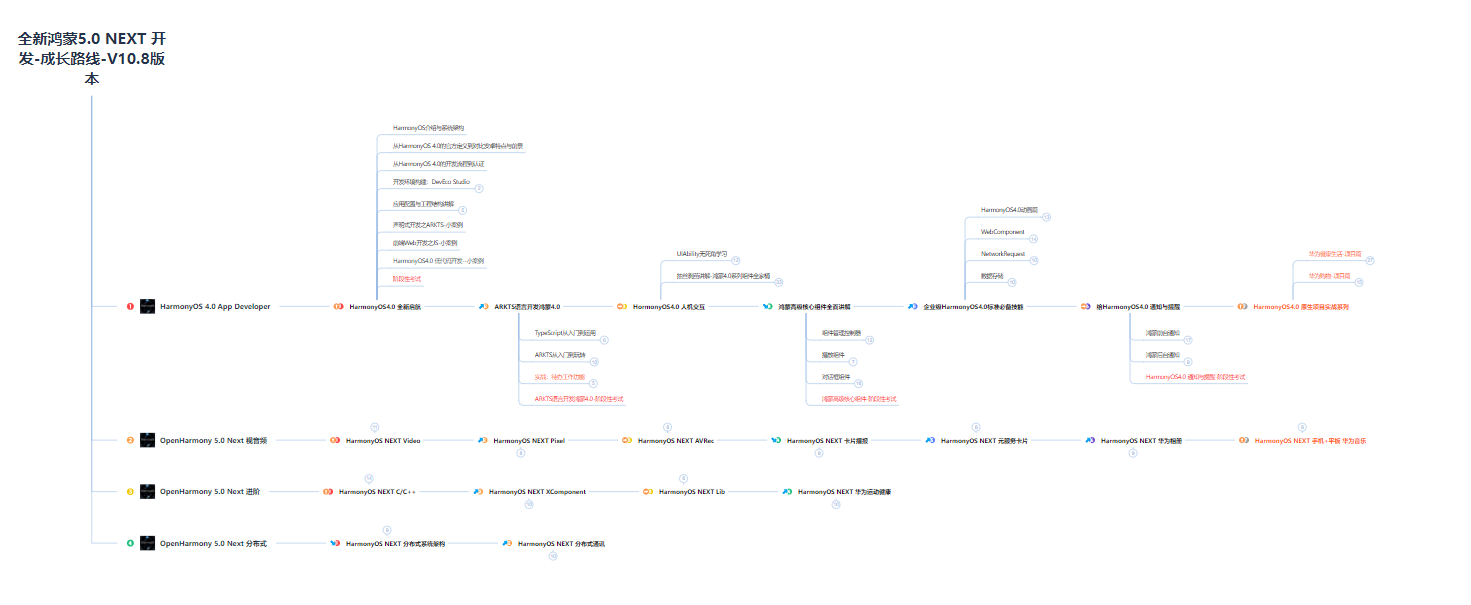
创建一个新文件,我这里起名叫OkCancelInputDialog 然后声明如下: @CustomDialog export default struct OkCancelInputDialog { build() { } }@CustomDialog这个注解表示这个控件是对话框 export default如果不写这个的话,无法被其他文件调用 接下来我们在build里面写界面,先分析一下效果图: 一个输入框TextInput,两个按钮Button水平排列,输入框和按钮竖直排列。 最外层使用Column排列输入框和按钮,两个按钮使用Row包起来横排,按钮中间用Blank填充空隙。 补全界面代码如下: build() { Column() { TextInput({ placeholder: '请输入内容' }) //输入框 .onChange((str) => { //TODO:更新输入内容 }) .margin({ left: 16, right: 16 }) Row() { Button("取消", { type: ButtonType.Capsule }) .onClick(() => { //TODO:点击取消按钮的事件 }) .backgroundColor(Color.White) .fontColor(Color.Blue) .width("45%") Blank() Button("确定", { type: ButtonType.Capsule }) .onClick(() => { //TODO:点击确定按钮的事件 }) .backgroundColor(Color.Blue) .fontColor(Color.White) .width("45%") } .width('100%') .margin({ top: 16, bottom: 16, left: 32, right: 32 }) } .margin({ left: 16, right: 16 }) .padding({ top: 24, bottom: 24 }) }然后再创建一个变量来保存输入的值,创建两个方法对应两个按钮的点击事件。最终这个类的代码如下: @CustomDialog export default struct OkCancelInputDialog { inputValue: string//存放输入内容的变量 controller: CustomDialogController cancel: () => void//取消按钮对应事件 confirm: (string) => void//确定按钮对应事件 build() { Column() { TextInput({ placeholder: '请输入内容' }) //输入框 .onChange((str) => { this.inputValue = str }) .margin({ left: 16, right: 16 }) Row() { Button("取消", { type: ButtonType.Capsule }) .onClick(() => { this.cancel(); }) .backgroundColor(Color.White) .fontColor(Color.Blue) .width("45%") Blank() Button("确定", { type: ButtonType.Capsule }) .onClick(() => { this.confirm(this.inputValue); }) .backgroundColor(Color.Blue) .fontColor(Color.White) .width("45%") } .width('100%') .margin({ top: 16, bottom: 16, left: 32, right: 32 }) } .margin({ left: 16, right: 16 }) .padding({ top: 24, bottom: 24 }) } } 调用弹窗来到要调用弹窗的界面,在文件头import自定义弹窗类,然后声明一个CustomDialogController (这个写法我是照着Demo抄的,我目前还不知道Controller到底是什么,只知道这玩意可以操作自定义弹窗对象。猜测是类似于 Android 的 Service 和 Binder 的关系。) import OkCancelInputDialog from './OkCancelInputDialog'; @Entry @Component struct Index { dialogController: CustomDialogController = new CustomDialogController({ builder: OkCancelInputDialog({ confirm: (str): void => this.onAccept(str), cancel: (): void => this.onCancel(), }) }); build() { Column() { //点击显示弹窗 Button('点击添加', { type: ButtonType.Capsule, stateEffect: true }) .borderRadius(8) .backgroundColor("#ff0078d2") .onClick(() => { if (this.dialogController != undefined) { this.dialogController.open()//显示弹窗 } }) .fontSize(20) .padding({ left: 32, right: 32, top: 16, bottom: 16 }) .margin({ bottom: 32 }) } .width('100%') .height('100%') .backgroundColor("#ffe0e0e0") } onAccept(str) { console.log(str); //打印输入的值 this.dialogController.close();//关闭弹窗 } onCancel() { this.dialogController.close();//关闭弹窗 } }这里的confirm和cancel是自定义弹窗类中定义的函数名,在自定义弹窗类中,括号里的 string 是参数的类型。此处调用的地方,括号里的 str 是参数的名字。有点类似于 Android 的 Listener 的写法。 注意这里不能这样写 cancel:this.oncancel//编译能过,但会报运行时异常。 或者 cancel:this.oncancel()//编译能过,但会报运行时异常。也可以不引用一个函数,而是直接写函数体 cancel: (): void => this.dialogController.close()//关闭弹窗 怎样学习鸿蒙?首先必学的是开发语言 ArkTS,这是重中之重,然后就是ArkUI声明式UI开发、Stage模型、网络/数据库管理、分布式应用开发、进程间通信与线程间通信技术、OpenHarmony多媒体技术……。中间还有许多的知识点,都整理成思维导图来分享给大家~ 【有需要的小伙伴,可以扫描下方二维码免费领取!!!】  快速入门
开发准备构建第一个ArkTS应用(Stage模型)构建第一个ArkTS应用(FA模型)构建第一个JS应用(FA模型)
快速入门
开发准备构建第一个ArkTS应用(Stage模型)构建第一个ArkTS应用(FA模型)构建第一个JS应用(FA模型)  开发基础知识
应用程序包基础知识应用配置文件(Stage模型)应用配置文件概述(FA模型)
开发基础知识
应用程序包基础知识应用配置文件(Stage模型)应用配置文件概述(FA模型)  资源分类与访问
创建资源目录和资源文件资源访问
资源分类与访问
资源分类与访问创建资源目录和资源文件资源访问  学习ArkTs语言
初识ArkTS语言基本语法状态管理其他状态管理渲染控制
学习ArkTs语言
初识ArkTS语言基本语法状态管理其他状态管理渲染控制  基于ArkTS声明式开发范式
UI开发(ArkTS声明式开发范式)概述开发布局添加组件显示图片使用动画支持交互事件性能提升的推荐方法
基于ArkTS声明式开发范式
UI开发(ArkTS声明式开发范式)概述开发布局添加组件显示图片使用动画支持交互事件性能提升的推荐方法
 Web组件
概述设置基本属性和事件并发窗口管理WebGL媒体安全网络与连接电话服务数据管理…
Web组件
概述设置基本属性和事件并发窗口管理WebGL媒体安全网络与连接电话服务数据管理…  应用模型
概述Stage模型开发指导FA模型开发指导
应用模型
概述Stage模型开发指导FA模型开发指导  2024完整鸿蒙学习资料领取方式:扫描下方二维码即可
|

 此外,小编精心准备了一份联合鸿蒙官方发布笔记整理收纳的《鸿蒙开发学习笔记》,内容包含ArkTS、ArkUI、Web开发、应用模型、资源分类…等知识点。
【本文地址】
今日新闻 |
推荐新闻 |