用了这招,复杂验证码识别率提高30% |
您所在的位置:网站首页 › 验证码识别代码大全 › 用了这招,复杂验证码识别率提高30% |
用了这招,复杂验证码识别率提高30%
|
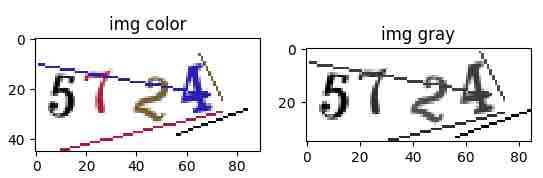
免责声明:本栏内容只供学习交流使用,切勿用于非法用途。 一.验证码特点分析 二.图片预处理 三.整体模型训练 四.验证码分割 五.切分验证码训练 六.总结 一.验证码特点分析
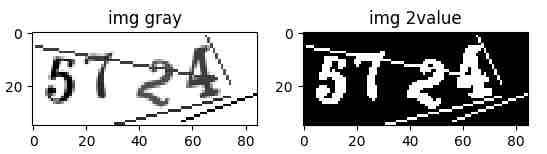
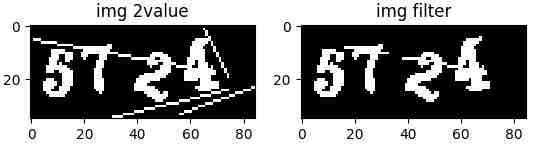
1、该验证码由4位0~9的彩色数字组成 2、背景色位纯白色,存在多条彩色干扰线 3、数字会进行旋转操作 4、数字因为旋转和干扰线会黏连到一起 二.图片预处理 step1: step2: step3: 1、搜索图中所有白色连通域,广度遍历+队列+4连通域搜索 2、把低于30个点的连通域置黑。 from queue import Queue ##广度搜索连通域少于30的点并进行删除 def search_del_point(img, noise_count=30): traveled = set() surround = [(-1, 0), (1, 0), (0, -1), (0, 1)] h, w = img.shape threshold = 127 for i in range(h): for j in range(w): if img[i][j] > threshold and (i, j) not in traveled: traveled.add((i, j)) q = Queue() q.put((i, j)) searcher = [(i, j)] while not q.empty(): point = q.get() for k in range(4): tar_x = point[0] + surround[k][0] tar_y = point[1] + surround[k][1] if tar_x >= 0 and tar_x < h and tar_y >= 0 and tar_y < w and \ img[tar_x, tar_y] > threshold and (tar_x, tar_y) not in traveled: traveled.add((tar_x, tar_y)) q.put((tar_x, tar_y)) searcher.append((tar_x, tar_y)) if len(searcher) =end_index: current_index=start_index current_file_name=list_name[current_index] train_image =cv2.imread(img_dir+current_file_name,cv2.IMREAD_UNCHANGED) th,train_image=cv2.threshold(train_image,127,1,cv2.THRESH_BINARY) main_str = current_file_name[current_file_name.rfind('_') + 1:current_file_name.rfind('.')] yield main_str,train_image,current_file_name current_index += 1step2:调用上步的生成器代码,批量生成训练数据和测试数据 ##批量获取神经网络数据 ##输入参数说明 ##conv_shape 神经网络输入层形状 ##batch_size 单次进入模型数据集大小 ##max_captcha 验证码位数,本例为4 ##img_width img_height 验证码图片长宽 ## generator 上一步的图片生成器 ##输出参数说明 ##X 图片集合 ##y label集合 ##返回3 ctc输入长度 ##返回4 ctc输出验证码长度 ##返回5 单次训练的图片数 def gen_batch_captcha(conv_shape, batch_size=256, max_captcha=MAX_CAPTCHA, img_width=IMAGE_WIDTH, img_height=IMAGE_HEIGHT, generator = gen_captcha_text_and_image(isTrain=True)): char_set=get_char_str() ##验证码的字符集,本例为'0123456789' X = np.zeros((batch_size, img_width, img_height, 1), dtype=np.ubyte) y = np.zeros((batch_size, max_captcha), dtype=np.uint8) while True: for i in range(batch_size): captcha_str,captch_img,current_file_name=next(generator) X[i] = captch_img.reshape(img_width, img_height, 1) y[i] = [char_set.index(x) for x in captcha_str] yield [X, y, np.ones(batch_size) * int(conv_shape[1]-2), np.ones(batch_size) * max_captcha], np.ones(batch_size)step3:把数据填入到模型里,每训练一个epoch,在测试数据上跑一遍。本例对完整图片的验证码识别使用的CRNN。原理可以参看这篇文章:一文读懂CRNN+CTC文字识别
step4:设定模型保存阈值,当模型准确率大于阈值,则保存模型 ##模型评估类 class Evaluate(Callback): ##base_model 前向传播网络 ##model_save_dir 模型保存路径 ##MAX_CAPTCHA 验证码位数 ##model_save_acc 测试集准确率大于多少保存模型 def __init__(self, base_model,model,generator,model_save_dir,MAX_CAPTCHA=4,model_save_acc=80): self.accs = [] self.base_model=base_model self.model=model self.generator=generator self.model_save_dir=model_save_dir self.model_save_acc=model_save_acc self.MAX_CAPTCHA=MAX_CAPTCHA ##预测准确率评估 def evaluate(self,base_model, generator, batch_num=1, MAX_CAPTCHA_=4): batch_acc = 0 for i in range(batch_num): [X_test, y_test, _, _], _ = next(generator) y_pred = base_model.predict(X_test) ##前向传播网络,进行图像编码 shape = y_pred[:, 2:, :].shape ##ctc把图像编码解析为字 out = K.get_value(K.ctc_decode(y_pred[:, 2:, :], input_length=np.ones(shape[0]) * shape[1])[0][0])[:,:MAX_CAPTCHA_] 符串 print('out_shape====', out.shape) if out.shape[1] == MAX_CAPTCHA_: batch_acc += ((y_test == out).sum(axis=1) == MAX_CAPTCHA_).mean() return batch_acc / batch_num def on_epoch_end(self, epoch, logs=None): acc = self.evaluate(self.base_model,self.generator,MAX_CAPTCHA_=self.MAX_CAPTCHA) * 100 self.accs.append(acc) print() print('acc: %f%%' % acc) if acc>self.model_save_acc: ##预测准确率大于某个阈值保存模型 model_save_path =self.model_save_dir+"ocr_model_{0}_{1}.hdf5".format(epoch, int(acc)) self.model.save(model_save_path, overwrite=True)step5:整体训练代码 def train_model(): ##输入 ##last_train_model 如果要提升模型训练效果,可以加载之前训练模型参数 ##输出 ##base_model 前向传播网络 ##model 网络加入ctc损失函数计算 ##conv_shape 前向传播网络输出shape base_model, model, conv_shape=get_whole_model(last_train_model=model_whole_dir+'ocr_model_481_610.hdf5') ##获得训练集数据生成器 train_generator=gen_batch_captcha(conv_shape=conv_shape,generator=gen_captcha_text_and_image(split=11000)) ##获得测试数据集生成器 test_generator=gen_batch_captcha(conv_shape=conv_shape,batch_size=500,generator=gen_captcha_text_and_image(isTrain=False,split=11000)) ##定义模型评估类 evaluator = Evaluate(base_model, model, test_generator, model_whole_gray_dir, max_captcha=MAX_CAPTCHA, model_save_acc=60) ##开始训练 model.fit_generator(train_generator, steps_per_epoch=43, nb_epoch=10000, callbacks=[EarlyStopping(patience=10), evaluator],workers=1) ##结果评估 evaluator.evaluate(base_model,test_generator)step6:整体训练结果展示
文件命名结构:ocr_model_训练轮数_测试集准确率.模型文件后缀 总共训练500 epoch,测试集最高准确率61%,继续训练无法继续提升效果。 step7:问题分析与解决方案
原因:数字旋转和黏连降低了识别的准确性 解决方案1:获得更多有标注的验证码。 解决方案2:对验证码进行切割,降低问题复杂度。 四.验证码分割 获得更多有标注的验证码不太现实,本文采取的优化方法是对验证码进行切割。 step1:图片切割展示
step2:图片切割方案
切割步骤: 1、计算图片垂直中心点,从左侧出发搜索获得连通图下标数组连通域。 2、使用numpy构建宽度30像素,原图高度的白板。 3、通过步骤1计算单个数字宽度,计算数字在白板中距离左侧距离。 ##panel_width 白板宽度30px ##digit_width 数字宽度,可以计算 offset=(panel_width+1)//2-(digit_width+1)//2 4、计算数字在白板中实际坐标:h1=h,w1=w-digit_left+offset step2:验证码切割异常1(3连通域,1黏连)
解决方案: 1、如果元素搜索目标连通域结果等于3,则出现了1个验证码的黏连。对宽度最大的元素进行超范围切割。 2、本例中分别截取左侧和右侧元素宽度的2/3映射到白板上 step3:验证码切割异常2(2连通域,2黏连)
解决方案: 1、如果元素搜索结果等于2,则可能1组3黏连或是2组2黏连,判断元素最大宽度,超过某个经验阈值则为3黏连。 2、2黏连情况按照异常2的切割方式切割分别切割。3黏连则在左侧、中间、右侧分别超范围切割出3个元素。 step4:切分结果展示
五.切分验证码训练 step1:验证码切分完毕后,提供数据的迭代器部分代码与完整训练基本相同。下面最提供Minist数据集识别用到的模型图与代码。
step2:切分验证码结果展示
总共训练不到30 epoch,测试集切分验证码准确率达到99.6%, 整张验证码识别准确率为98.4% (0.996^4=0.984)。 六.总结 通过字符切分和Minist识别网络,识别的准确率提升了37.4%(0.984-0.61=0.374)。CRNN网络是具有复杂的结构的强大算法,但最终却输给了简单的Minist单字符识别网络。可见在机器学习实践的过程中灵活变通的重要性。一些简单的算法,进行灵活的组合可以解决比较棘手的问题。 |


【本文地址】
今日新闻 |
推荐新闻 |