Spring框架 |
您所在的位置:网站首页 › 通俗易懂的理解 › Spring框架 |
Spring框架
|
首先打开idea,创建一个Maven工程 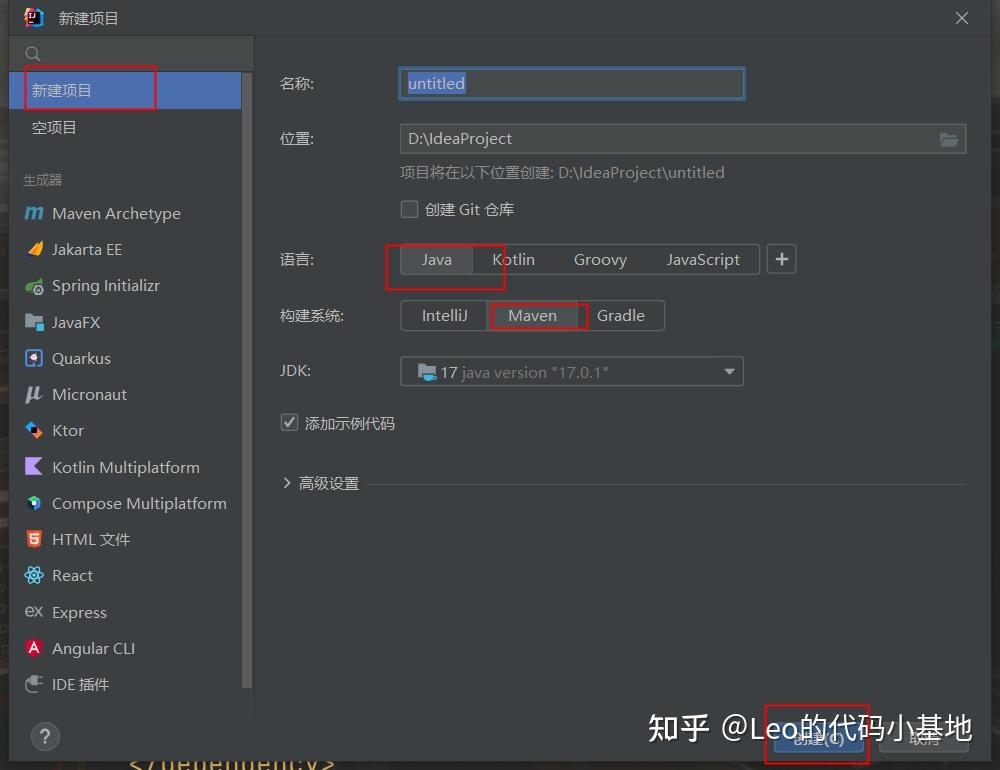 建工程 建工程工程名叫helloSpring 创建好之后,点开pom文件,导入有关Spring的基础包和依赖包  pom文件 pom文件需要导入的依赖: junit junit 4.12 test org.springframework spring-core 5.2.12.RELEASE org.springframework spring-beans 5.2.12.RELEASE org.springframework spring-expression 5.2.12.RELEASE org.springframework spring-context 5.2.12.RELEASE commons-logging commons-logging 1.2这些代码不用去记,写过一遍之后做项目直接复制粘贴就行 pom文件全部代码: 4.0.0 org.example helloSpring 1.0-SNAPSHOT 17 17 UTF-8 junit junit 4.12 test org.springframework spring-core 5.2.12.RELEASE org.springframework spring-beans 5.2.12.RELEASE org.springframework spring-expression 5.2.12.RELEASE org.springframework spring-context 5.2.12.RELEASE commons-logging commons-logging 1.2好了,现在pom文件配置完了 接下来要用这个东西,我们要建一个程序应用的组件,定义一个类——HelloSpring,模拟一个业务组件 下面开始代码演示, 我们要在java包下建一个类,叫HelloSpring 模拟一个属性叫username,String类型的变量 String userName;当我们要读值和赋值就要有set和get方法 不用自己手写,可以自动生成,步骤如下    public String getUserName() {
return userName;
}
public void setUserName(String userName) {
this.userName = userName;
} public String getUserName() {
return userName;
}
public void setUserName(String userName) {
this.userName = userName;
}组件里写一个方法,要输出一句话,把一个name传进去,然后打印出来一句话 public void show(){ System.out.println(userName+"努力必有收获! "); }这个类就模拟了一个业务操作 HelloSpring全部代码 public class HelloSpring { String userName; public String getUserName() { return userName; } public void setUserName(String userName) { this.userName = userName; } public void show(){ System.out.println(userName+"努力必有收获! "); } }我们刚学完java,如果不用spring容器的话应该怎么操作 首先你想运行得有个主函数吧? 然后声明一个HelloSpring类型的变量,去new一个对象 然后用这个对象调方法 Test类也在java包下建 public class Test { public static void main(String[] args) { HelloSpring spring = new HelloSpring(); spring.setUserName("张三"); spring.show(); } } 运行结果 运行结果这是纯java写法,没用到Spring,下面我们用Spring来做这个事 首先想Spring是一个容器、工厂,这个容器是用来实例化java组件,现在模拟的java组件HelloSpring,我们要在Spring框架下做的话,就不用实例化了,因为Spring容器已经把new的过程已经完成了,那么Spring如何知道我要想实例化这个组件呢?那我得告诉他,就像一个工厂想生产一个产品是不是得先告诉工人干啥,然后才能生产啊。同样Spring也要一个生产计划,这个东西叫applicationContext.xml核心配置文件。 这里面用bean标签去装配组件 代码演示: 首先得把这个配置文件创建出来 右键resources然后, 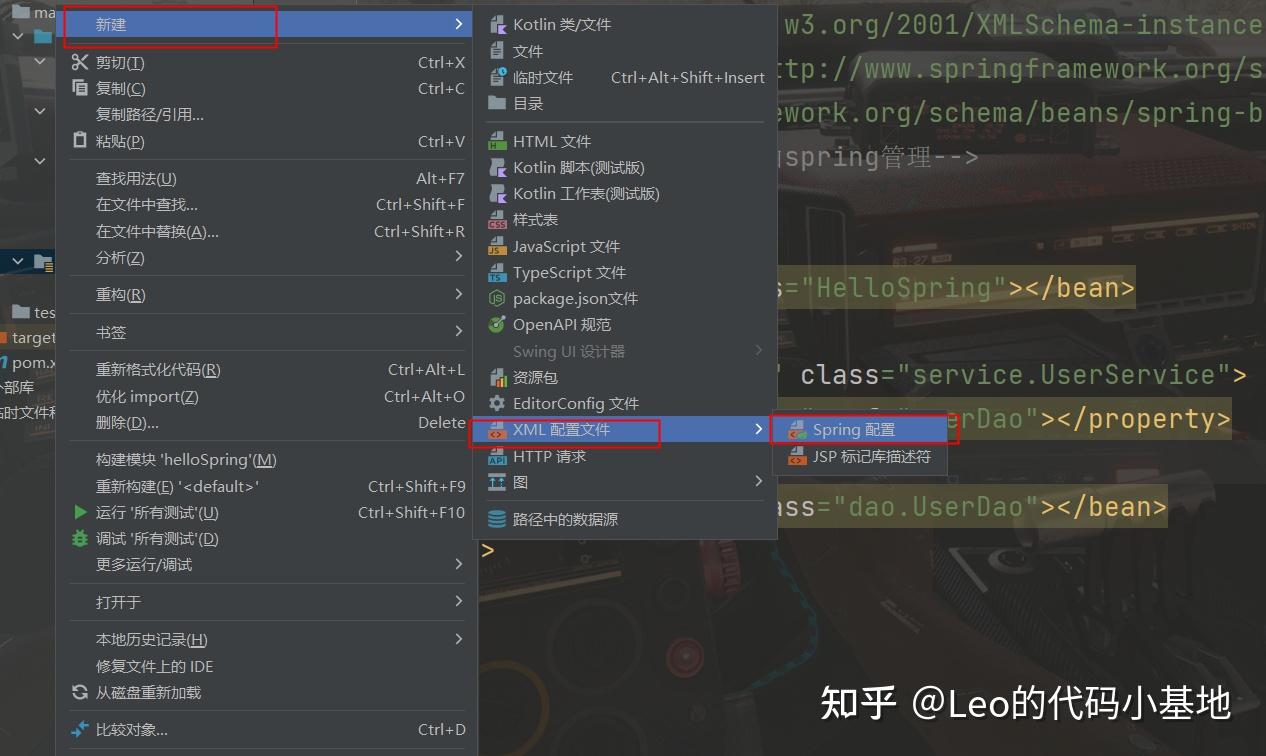 文件名:applicationContext 然后把这段代码粘贴过去 如果整个文件是工厂的话,工厂里有几条计划呢?有几组bean标签就是几条计划,也就是实例化几个对象 现在要实例化一个组件HelloSpring,用id属性来标记,class属性代表对象的类型 最后我们测试 工厂的计划清单有了,还得告诉工厂的工人去生产,所以我们得读取到这个计划文件的需求 // 初始化spring容器,加载applicationContext.xml配置文件,启动工厂机器(Spring容器) ApplicationContext applicationContext = new ClassPathXmlApplicationContext("applicationContext.xml");这个配置文件不管配置多少个bean,一启动全实例化好了 然后工人拿到工厂的计划之后就去生产组件,拿到生产好的实例(applicationContext)通过getBean方法找到想要调用的,传参写入id名,就能找到那个类了 // 通过容器获取配置中helloSpring的实例 HelloSpring helloSpring= (HelloSpring)applicationContext.getBean("hello");然后就可以调用方法了 helloSpring.setUserName("张三"); helloSpring.show();先给name赋个值,然后再调用  运行结果 运行结果测试类全部代码: import org.springframework.context.ApplicationContext; import org.springframework.context.support.ClassPathXmlApplicationContext; public class Test { public static void main(String[] args) { // 初始化spring容器,加载applicationContext.xml配置文件,启动工厂机器(Spring容器) ApplicationContext applicationContext=new ClassPathXmlApplicationContext("applicationContext.xml"); // 通过容器获取配置中helloSpring的实例 HelloSpring helloSpring= (HelloSpring)applicationContext.getBean("hello"); helloSpring.setUserName("张三"); helloSpring.show(); } }看似代码变得复杂了,实际上不是,而是这里面只用到了一个组件,但实际项目里会有很多个组件,而且还有组件和组件的实例化,以及组件与组件相互的调用,总之很复杂,如果你用纯java的话依赖程度就变高了,如果有一个实例化有问题的话程序就不能跑了,而如果你用bean组件,写错的话,程序能运行,只是没达到你要的效果 接下来讲Spring框架里的一个核心理念SpingIOC/DI——控制翻转 IOC意思是:自己要使用的对象由别人来创建 先把包建好,分别在java下把控制层dao和业务层service建好  建包 建包dao层建一个类叫UserDao,用来模拟一个添加用户的操作 不真正添加用户,就模拟一下 public class UserDao { public void addUser(){ System.out.println("用户已经添加成功! "); } }然后在业务层里面调用dao层的方法 建一个类叫UserService 写一个添加用户的方法,addUser()要调用UserDao里的方法来执行添加操作 如何能调用dao里的方法呢? 在UserService里声明一个UserDao类型的dao变量 public UserDao dao; public void addUser(){ dao.addUser(); }这么做行不行呢? 不行,因为工厂还没帮我们实例化的,得先告诉工厂 在配置文件里写bean 通过两个bean标签告诉工厂来实例化 还有一个问题,我们是要service调dao,他俩存在一个依赖关系,service依赖dao,要把dao注给service,需要一个标签,我们要把userDao注给UserService里的dao属性,那么name里写dao,ref里写dao引用的对象,也就是userDao。 这时候你会发现dao爆红,因为还没完事,思考,注的过程就相当于给属性赋值,读值和赋值就得定义set和get方法,所以我们在UserService里创建set和get方法 UserService类的全部代码: import dao.UserDao; import entity.User; public class UserService { public UserDao dao; public UserDao getDao() { return dao; } public void setDao(UserDao dao) { this.dao = dao; } public void addUser(){ dao.addUser(); } }测试类: import org.springframework.context.ApplicationContext; import org.springframework.context.support.ClassPathXmlApplicationContext; import service.UserService; public class Test { public static void main(String[] args) { ApplicationContext applicationContext=new ClassPathXmlApplicationContext("applicationContext.xml"); // 通过容器获取配置中helloSpring的实例 UserService service = (UserService) applicationContext.getBean("userService"); service.addUser(); } }最后就能执行出来那句话 加大点难度,我们要在这句话前面加上用户名 首先要创建一个实体对象的包entity  里面写一个实体对象的类——User 给一个id属性和username属性,然后读值和赋值还是get和set方法 public class User { String userid; String username; public String getUserid() { return userid; } public void setUserid(String userid) { this.userid = userid; } public String getUsername() { return username; } public void setUsername(String username) { this.username = username; } }在测试类里创建一个User对象 在user里面赋值,id是1,username是张三,要想把user作为参数传到addUser,那就得修改一下addUser里的方法,在addUser里添加一个形参User user,  然后还得把参数继续往里传到dao层,那操作方法一样, UserService代码: import dao.UserDao; import entity.User; public class UserService { public UserDao dao; public UserDao getDao() { return dao; } public void setDao(UserDao dao) { this.dao = dao; } public void addUser(User user){ dao.addUser(user); } } import entity.User;
public class UserDao {
public void addUser(User user){
System.out.println(user.getUsername()+"用户已经添加成功! ");
}
} import entity.User;
public class UserDao {
public void addUser(User user){
System.out.println(user.getUsername()+"用户已经添加成功! ");
}
}上面是dao层的代码,user调用一下get方法就拿到name张三的名字了 测试类: import entity.User; import org.springframework.context.ApplicationContext; import org.springframework.context.support.ClassPathXmlApplicationContext; import service.UserService; public class Test { public static void main(String[] args) { ApplicationContext applicationContext=new ClassPathXmlApplicationContext("applicationContext.xml"); // 通过容器获取配置中helloSpring的实例 UserService service = (UserService) applicationContext.getBean("userService"); User user = new User(); user.setUserid("1"); user.setUsername("张三"); service.addUser(user); } } 运行结果 运行结果本次工程的全部代码: 链接:https://pan.baidu.com/s/1VaRJhMvcs1OSva2LF84kCA 提取码:ymqv |
【本文地址】
今日新闻 |
推荐新闻 |