逐帧动画的制作步骤 |
您所在的位置:网站首页 › 逐帧动画flash › 逐帧动画的制作步骤 |
逐帧动画的制作步骤
|
css逐帧动画 
This article was peer reviewed by Giulio Mainardi. Thanks to all of SitePoint’s peer reviewers for making SitePoint content the best it can be! Giulio Mainardi对本文进行了同行评审。 感谢所有SitePoint的同行评审人员使SitePoint内容达到最佳状态! Imagine your designer asked you to implement a beautiful frame by frame animation for the awesome project you’ve been working on. As the front-end dev on the project, not only is it up to you to come up with a working animation, but also to deliver a silky smooth, performant and maintainable frame by frame animation that works great across different browsers, both on desktop and mobile. 想象一下,您的设计师要求您为您正在从事的令人敬畏的项目实施逐帧的漂亮动画。 作为该项目的前端开发人员,不仅需要您制作出动画,而且还需要提供柔滑,高性能和可维护的逐帧动画,这种动画在不同的浏览器上都可以很好地在台式机上使用和移动。 This tutorial shows you the various ways you can create this type of animation with HTML, CSS, and JavaScript, while improving on each iteration to achieve the best result for your project. 本教程向您展示了使用HTML,CSS和JavaScript创建此类动画的各种方法,同时改进了每次迭代以实现项目的最佳效果。 什么是逐帧动画? (What Is a Frame by Frame Animation?)According to this definition by Adobe, a frame by frame animation: 根据Adobe的定义 ,逐帧动画: … changes the contents of the Stage in every frame. It is best suited to complex animation in which an image changes in every frame instead of simply moving across the Stage. …在每一帧中更改舞台的内容。 它最适合于复杂的动画,其中图像在每一帧中都发生变化,而不是简单地在舞台上移动。 In other words, the subject of the animation is represented in a set of images. Each image in the set occupies an animation frame, and the rate of change with which each frame replaces the next produces the illusion of motion in the image. 换句话说,动画的主题以一组图像表示。 集合中的每个图像都占据一个动画帧,并且每个帧替换下一帧的变化率会在图像中产生运动的错觉。 I will demonstrate the whole workflow as you’ll be working on this great blinking eye animation from Zeiss website. 我将演示整个工作流程,您将在Zeiss网站上制作出色的眨眼动画。 This is the set of images you’ll be using to build the animation frames: 这是用于构建动画帧的一组图像: And here’s the final result: 这是最终结果: 
For this tutorial, I’ve chosen to use SVG images because they are great at scaling with different screen sizes for responsive web design. However, if for whatever reason you don’t want to use SVG graphics, you can create web animations with PNG, JPEG, and GIF image formats or use HTML5 Canvas. I will share my thoughts on these alternatives at the end of the article. 在本教程中,我选择使用SVG图像,因为它们非常适合缩放比例不同的屏幕以用于响应式Web设计。 但是,如果出于任何原因不想使用SVG图形,则可以创建具有PNG,JPEG和GIF图像格式的Web动画,也可以使用HTML5 Canvas。 我将在文章结尾分享对这些替代方案的看法。 For simplicity’s sake, in this tutorial you’ll be using the jQuery library and have Autoprefixer up and running, therefore the code will be free of browser-specific CSS prefixes. 为简单起见,在本教程中,您将使用jQuery库并启动并运行Autoprefixer ,因此该代码将不包含浏览器特定CSS前缀。 Now, let’s do some coding! 现在,让我们做一些编码! 1-通过更改图像源来逐帧动画 (1 — Frame by Frame Animation by Changing the Image’s Source)The first option is straightforward enough, and that’s one reason why I like it. 第一个选项很简单,这就是我喜欢它的原因之一。 In your HTML document, create an img element, which acts as container for the images, one at a time, as each animation frame is replaced by the next: 在HTML文档中,创建一个img元素,一次将其用作图像的容器,因为每个动画帧都被下一个替换: 
The CSS: CSS: .eye-animation { width: 300px; }The next step is to replace the existing image with the next one over a period of time dynamically, so as to create the illusion of movement. 下一步是在一段时间内动态地用下一幅图像替换现有图像,以创建运动的错觉。 You could do it with setTimeout but it’s better to use requestAnimationFrame. Doing so has some advantages from the point of view of performance. For example: 您可以使用setTimeout来做到这一点,但是最好使用requestAnimationFrame 。 从性能的角度来看,这样做有一些优势。 例如: The quality of other animations on the screen won’t be affected 屏幕上其他动画的质量不会受到影响 The browser will stop the animation if users navigate to another tab. 如果用户导航到另一个选项卡,则浏览器将停止动画。Here’s the jQuery code: 这是jQuery代码: const $element = $('.eye-animation'); const imagePath = '/images'; const totalFrames = 18; const animationDuration = 1300; const timePerFrame = animationDuration / totalFrames; let timeWhenLastUpdate; let timeFromLastUpdate; let frameNumber = 1; function step(startTime) { if (!timeWhenLastUpdate) timeWhenLastUpdate = startTime; timeFromLastUpdate = startTime - timeWhenLastUpdate; if (timeFromLastUpdate > timePerFrame) { $element.attr('src', imagePath + `/Eye-${frameNumber}.svg`); timeWhenLastUpdate = startTime; if (frameNumber >= totalFrames) { frameNumber = 1; } else { frameNumber = frameNumber + 1; } } requestAnimationFrame(step); }When the page loads, you call requestAnimationFrame for the first time and pass the step function to it, together with the animation’s startTime parameter built into the requestAnimationFrame function. 页面加载后,您将首次调用requestAnimationFrame并将step函数以及内置于requestAnimationFrame函数中的动画的startTime参数传递给该函数。 At each step the code checks how much time has passed from the last image source update and, if it’s longer than the required time per frame, then it refreshes the image. 在每个步骤中,代码都会检查自上一次图像源更新以来经过了多少时间,如果该时间长于每帧所需的时间,则它将刷新图像。 Because you’re building an infinite animation, the code above checks if it’s got to the last frame and if so, it resets the frameNumber to 1; if not, it increases the frameNumber by 1. 因为您正在构建一个无限动画,所以上面的代码检查它是否到达最后一帧,如果是,则将frameNumber重置为1;否则,将帧数重置为1。 如果不是,则将frameNumber增加1。 Images should have the same name structure made of an increasing number series and the same location (e.g., images/Eye-1.svg, images/Eye-2.svg, images/Eye-3.svg, etc.) so that the code can easily iterate through them. 图片应具有由递增的数字系列和相同位置组成的相同名称结构(例如,images / Eye-1.svg,images / Eye-2.svg,images / Eye-3.svg等),以便代码可以轻松地遍历它们。 Finally, call requestAnimationFrame again to continue the whole process. 最后,再次调用requestAnimationFrame以继续整个过程。 It looks good. However, if you try this you’ll see it won’t work because when the animation starts, only the first image gets loaded. The reason for this is that the browser knows nothing about the images you want to display until the code updates the image element’s src attribute in the middle of the animation loop. For a smooth animation, you need to preload the images before the loop starts. 看上去不错。 但是,如果尝试此操作,您将看到它不起作用,因为在动画开始时,只会加载第一张图像。 原因是浏览器对您要显示的图像一无所知,直到代码在动画循环的中间更新图像元素的src属性为止。 为了获得平滑的动画,您需要在循环开始之前预加载图像 。 There are different ways you can do this. Here’s the one I like best. It consists in appending hidden divs and setting their background-image property to point to the required images. 您可以通过不同的方式执行此操作。 这是我最喜欢的一个。 它包括附加隐藏的div并将其background-image属性设置为指向所需的图像。 The jQuery code: jQuery代码: $(document).ready(() => { for (var i = 1; i < totalFrames + 1; i++) { $('body').append(``); } });Here’s the full working demo on CodePen: 这是CodePen上的完整工作演示: See the Pen Frame by frame-animation-1-source by SitePoint (@SitePoint) on CodePen. 请参阅CodePen上的SitePoint ( @SitePoint ) 的逐帧动画-1源 笔架 。 Below I’ve listed some pros and cons to this approach. 下面,我列出了这种方法的利弊。 Cons: 缺点 : With HTTP v1.1, having to load multiple images can significantly increase page load time on the first visit 使用HTTP v1.1 ,必须加载多个图像可以大大增加首次访问时的页面加载时间 The animation can be janky on mobile devices. That’s because the browser has to perform a repaint each time the image element’s src attribute is updated (please check out Paul Lewis’ blog post for the details). 动画在移动设备上可能是混乱的。 这是因为每次图像元素的src属性更新时,浏览器都必须执行重新绘制(请查看Paul Lewis的博客文章以获取详细信息)。 Pros: 优点 : Declarative — the code just iterates through the set of images 声明式-代码仅遍历图像集 The image is fixed in one place — no jumping back and forth is visible (you’ll see why this is important below). 图像固定在一个位置-看不到来回跳跃(您将在下面看到为什么如此重要)。 2 —通过更改图像的不透明度进行逐帧动画 (2 — Frame by Frame Animation by Changing the Image’s Opacity)To avoid browser repaints, you could change the images’ opacity instead of changing their source. 为了避免浏览器重绘,您可以更改图像的不透明度而不是更改其来源。 You could render all the images with opacity: 0 at page load and then set opacity: 1 for exactly when you want to show that frame. 您可以在页面加载时以opacity: 0渲染所有图像,然后为要显示该帧的确切时间设置opacity: 1 。 That would improve rendering performance, but you’ll still have to preload all the images up front (which could be tricky if you have other images on the page as well and don’t want to wait for all of them to load). Also, because of multiple images, you’ll still have a longer first-time page load duration. 这样可以提高渲染性能,但是您仍然必须预先预加载所有图像(如果页面上还有其他图像并且不想等待所有图像加载,这可能会很棘手)。 另外,由于有多张图片,您的首次页面加载持续时间仍然更长。 Here’s the full code: 这是完整的代码: See the Pen Frame-by-frame-animation-2-opacity by SitePoint (@SitePoint) on CodePen. 请参阅CodePen上的SitePoint ( @SitePoint )通过Pen Frame-by-frame-animation-2-opacity 。 You can avoid HTML code duplication by leveraging the capabilities of template engines such as Pug, Twig, React, Angular etc., or by just appending the divs using JavaScript as you did in the previous example. 您可以通过利用模板引擎(例如Pug,Twig,React,Angular等)的功能来避免HTML代码重复,也可以像上一个示例中那样使用JavaScript附加div来避免重复。 3 —通过更改子画面的位置进行逐帧动画 (3 — Frame by Frame Animation by Changing the Sprite’s Position)The usual workaround to prevent having to download multiple images consists in using an image sprite. 避免必须下载多个图像的通常解决方法是使用图像精灵 。 So, let’s do that. 所以,让我们这样做。 Put all your images in one sprite by creating a line of frames that preserves the images’ order, i.e., the first image will be the leftmost and the last image will be the rightmost. Then, using CSS animations, move the sprite left to right frame by frame. 通过创建保留图像顺序的一帧框架,将所有图像放置在一个精灵中,即,第一个图像将是最左侧,最后一个图像将是最右侧。 然后,使用CSS动画,将精灵逐帧左右移动。 The HTML: HTML: The CSS: CSS: .eye-animation { width: 300px; height: 300px; background-image: url('/images/blinking-eye-sprite.svg'); background-size: 1800%, 100%; background-position: left; background-repeat:no-repeat; animation-name: eye-fill; animation-duration: 1.3s; animation-timing-function: steps(17); animation-iteration-count: infinite; } @keyframes eye-fill { from { background-position: left; } to { background-position: right; } }The code above sets the background-size property depending on the number of frames — because there are 18 frames, it sets it to 1800%. 上面的代码根据帧数设置background-size属性-因为有18帧,所以将其设置为1800% 。 The initial background-position is left so that at the beginning of the animation, the first image is shown. left初始background-position ,以便在动画开始时显示第一张图像。 Then, with keyframes animation, the code gradually changes the position of the background to right over the time set in the animation-duration property (1.3s in the example above). 然后,使用关键帧动画 ,代码会在animation-duration属性中设置animation-duration (上例中为1.3s )逐渐将背景位置更改为right的位置。 The animation-timing-function property allows you to build a step by step animation which ensures users won’t see half of one frame and half of the following frame both at the same time. This introduction to CSS sprite sheet animation by Chris Mabry is a perfect explanation of how this approach works. animation-timing-function属性允许您逐步构建动画,以确保用户不会同时看到一帧的一半和下一帧的一半。 克里斯·马布里(Chris Mabry) 对CSS Sprite Sheet动画的介绍很好地说明了这种方法的工作原理。 And you don’t need JavaScript. Yay! 而且您不需要JavaScript。 好极了! See the Pen Frame-by-frame-animation-3-position by SitePoint (@SitePoint) on CodePen. 请参阅CodePen上SitePoint ( @SitePoint )的Pen Frame-by-frame-animation-3-position 。 Cons: 缺点 : It requires a browser repaint each time the sprite’s position changes, which can lead to janky animation on mobile 每次更改精灵的位置时,浏览器都需要重绘,这可能导致移动设备上出现不稳定的动画 If the image’s width in pixels has many digits after the decimal point, the image can wobble left and right during the animation (though rounding the image’s size to 2 digits after the decimal point should be enough to fix the problem): 如果图像的宽度(以像素为单位)在小数点后有很多位数,则该图像可以在动画过程中左右摆动(尽管将图像的大小四舍五入到小数点后两位可以解决问题):
Example of worbbling animation. 令人不安的动画示例。 Pros: 优点 : No JavaScript 没有JavaScript Only one image to load, which is good for first-time page load performance. 仅加载一个图像,这对于首次页面加载性能很有帮助。 4 —通过变换移动精灵来进行逐帧动画 (4 — Frame by Frame Animation by Moving the Sprite with Transform)Same as previously, you’re now going to upgrade the solution implemented above in such a way as to avoid a browser repaint. You will do this by changing only the transform property of the element rather than its background-position. 与以前一样,您现在将以避免浏览器重绘的方式升级上面实现的解决方案。 您只需更改元素的transform属性而不是background-position 。 For this purpose, put the div you want to animate inside a wrapper. This enables you to translate the position of the whole HTML element instead of its background. 为此,请将要设置动画的div放入包装器中。 这使您能够转换整个HTML元素的位置,而不是其背景。 Next, position this div absolutely inside the wrapper and start animating it with the help of the translateX property. 接下来,将该div绝对定位在包装器内,并在translateX属性的帮助下对其进行动画处理。 The weird -94.44444444% comes from having 18 slides and moving the image only 17 slides from the first one (17 / 18 * 100%). 奇怪的-94.44444444%来自拥有18张幻灯片,而从第一张开始仅移动了17张幻灯片( -94.44444444% * 100%)。 The HTML: HTML: The Sass code (feel free to use CSS, if you prefer): Sass代码(如果愿意,可以随意使用CSS): .eye-animation { width: 1800%; height: 100%; background-image: url('/images/blinking-eye-sprite.svg'); background-size: 100%, 100%; background-repeat:no-repeat; animation-name: eye-fill; animation-duration: 1.3s; animation-timing-function: steps(17); animation-iteration-count: infinite; position: absolute; left: 0; top: 0; &__wrapper { overflow: hidden; position: relative; width: 300px; height: 300px; } } @keyframes eye-fill { from { transform: translateX(0); } to { transform: translateX(-94.44444444%); } }It definitely looks better now! 现在看起来肯定更好! However, there is one bug in IE, which doesn’t allow for the use of percentage values for the translate property inside animations. caniuse.com provides an example and explanation for that inside the known issues tab: 但是,IE中存在一个错误,该错误不允许在动画中为translate属性使用百分比值。 caniuse.com在“ 已知问题”选项卡中提供了示例和说明: IE10 and IE11 on Windows 7 have a bug where translate transform values are always interpreted as pixels when used in animations. Windows 7上的IE10和IE11有一个错误,即在动画中使用转换变换值时,始终将其解释为像素。 As fallback, you’ll need to detect the browser using JavaScript and provide a separate animation for this specific case. 作为后备,您需要使用JavaScript检测浏览器,并针对这种情况提供单独的动画。 transform: translate3d(0, 0, 0) below tells the browser to move the element into a separate compositing layer, which improves rendering performance. transform: translate3d(0, 0, 0)下面的transform: translate3d(0, 0, 0)告诉浏览器将元素移动到单独的合成层中,从而提高了渲染性能 。 Here’s the JavaScript code: 这是JavaScript代码: var isIE = /Edge\/\d./i.test(navigator.userAgent) || /trident/i.test(navigator.userAgent); if (_this.isIE) { $('html').addClass('ie'); }And the Sass code: 和Sass代码: // fallback for IE .ie { .eye-animation { transform: translate3d(0, 0, 0); animation-name: eye-fill-ie; } } @keyframes eye-fill-ie { from { left: 0; } to { left: -1700%; } }Have a play with the code in the live demo below: 在下面的实时演示中玩一下代码: See the Pen Frame-by-frame-animation-4-transform by SitePoint (@SitePoint) on CodePen. 见钢笔帧一帧的动画-4-变换由SitePoint( @SitePoint上) CodePen 。 Cons: 缺点 : Be aware of image quaking if sizes are too precise 如果尺寸过于精确,请注意图像震动 It doesn’t work in IE, though a fallback is available. 尽管可以使用备用功能,但它在IE中不起作用。Pros: 优点 : Only one image to load, which is good for first-time page load performance 仅加载一个图像,这对于首次页面加载性能很有帮助 No janky animation on mobile because no repaints are involved! 手机上没有混乱的动画,因为不涉及重新绘制! 对帧动画使用嵌入式SVG (Using Inline SVG for Your Frame by Frame Animation)One possible improvement would be inlining the SVG image (i.e., dumping the SVG code straight into your HTML page) instead of pointing to it as an external resource. 一种可能的改进是内联SVG图像(即,将SVG代码直接转储到HTML页面中),而不是将其指向外部资源。 Typically, external resources are cached by the browser. This way, on a repeated visit the browser uses the locally cached version of the file instead of making a new request to the server. 通常,外部资源由浏览器缓存。 这样,在反复访问时,浏览器将使用文件的本地缓存版本,而不是向服务器发出新请求。 However, if the probability of the page being revisited is low (say, a landing page), then it makes sense to use inline SVG, because doing so reduces the number of requests to the server and decreases the first-time page load time. 但是,如果重新访问该页面的可能性很低(例如,登录页面),则使用内联SVG是有意义的,因为这样做可以减少对服务器的请求数量并减少首次页面加载时间。 Sprite-Transform具有最佳的渲染性能 (Sprite-Transform Has the Best Rendering Performance)To be 100% sure about performance, I created a performance test for all four different approaches and this is the result I got using Chrome: 为了确保100%的性能,我针对所有四种不同的方法创建了性能测试,这就是我使用Chrome的结果: 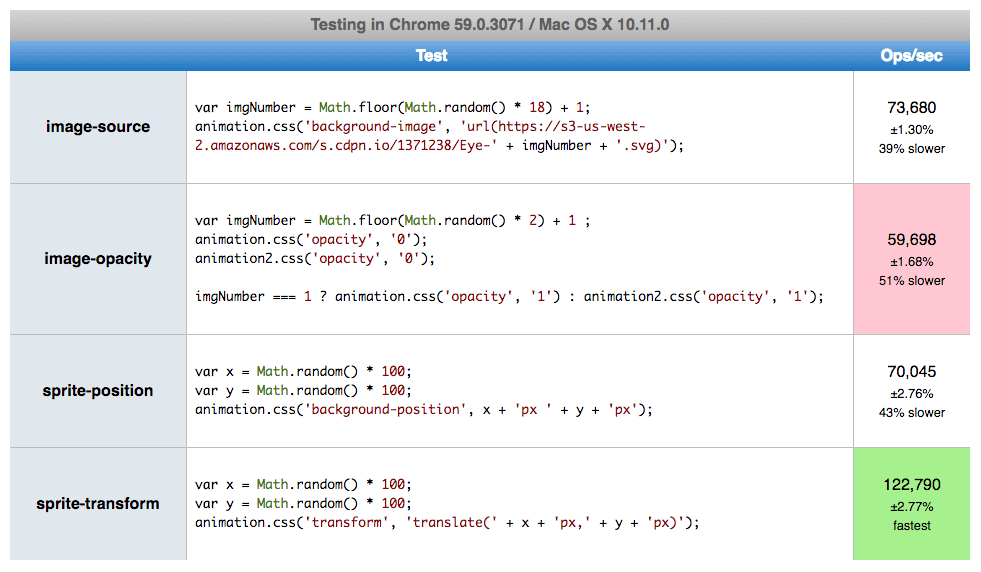
if you want to play with it, you can reproduce the tests using any other browser of your choice on jsPerf.com. 如果要使用它,可以使用jsPerf.com上选择的任何其他浏览器重现测试。 5 –为什么不为网络上的逐帧动画提供GIF? (5 – Why Not GIF for Frame by Frame Animation on the Web?)If the ability to scale with different screen sizes is not a requirement, then a GIF file could be an option too. But together with scalability, you’ll also lose the ability to control the animation flow like stop, reverse, or combine it with other animations. And you usually end up increasing the size of the asset, which affects performance. 如果不需要缩放具有不同屏幕尺寸的功能,那么也可以选择GIF文件。 但是,与可伸缩性一起,您还将失去控制动画流的能力,例如停止,倒转或将其与其他动画组合。 通常,您最终会增加资产的大小,从而影响性能。 If you want to deep dive into the reasons why SVG is preferable to GIF, then check out Sara Soueidan’s excellent article on the topic. 如果您想深入了解SVG优于GIF的原因,请查看Sara Soueidan关于该主题的出色文章 。 6 –为什么不为逐帧动画画布? (6 – Why Not Canvas for Frame by Frame Animation?)If you have a small screen and multiple animated objects at one time, Canvas would be an excellent choice. Performance is fabulous, but this approach comes with several drawbacks: 如果您同时拥有一个小屏幕和多个动画对象,那么Canvas将是一个不错的选择。 性能很棒,但是这种方法有几个缺点: In Canvas, you can’t use inline assets, which means this might not be the best choice for one-time visited pages 在Canvas中,您不能使用内联资源,这意味着对于单次访问的页面而言,这可能不是最佳选择 Canvas API knowledge is required to build such a solution, which adds to the application maintenance costs 建立这样的解决方案需要Canvas API知识,这增加了应用程序维护成本No support for DOM events — so, for example, you couldn’t do something with the DOM outside of the canvas element once the animation is finished. 不支持DOM事件-例如,动画完成后,您将无法对canvas元素外部的DOM进行任何操作。 There are a few more arguments for and against Canvas over SVG, but if you decide to go with Canvas, then head over to William Malone’s tutorial on this topic, which does an outstanding job at explaining how you can achieve the best results. 在SVG上还有其他一些支持和反对Canvas的论点 ,但是如果您决定使用Canvas,请继续阅读William Malone关于该主题的教程 ,该教程在解释如何获得最佳结果方面做得非常出色。 结论 (Conclusion)Nowadays, you have plenty of options for implementing frame by frame web animation. This is generally a good thing, but having to choose what works best could be confusing. The points below will help you make the right decision: 如今,您有许多实现逐帧Web动画的选项。 这通常是一件好事,但是必须选择最有效的方法可能会造成混淆。 以下几点将帮助您做出正确的决定: Use SVG over GIF/PNG/JPEG if you care about scalability and responsiveness 如果您关注可伸缩性和响应能力,请在GIF / PNG / JPEG上使用SVGAnimate the opacity and transform properties if you care about rendering performance 如果您关心渲染性能,请对opacity动画处理并transform属性 Use sprites and inline SVG over multiple external assets if you care about first-time page load performance 如果您担心首次页面加载性能,请在多个外部资产上使用Sprite和内联SVG Use sprites over inline SVG if you care about page load performance during repeated page visits 如果您担心重复访问期间的页面加载性能,请在嵌入式SVG上使用精灵 Use whatever solution you and your team feel comfortable with, if it keeps your code more readable and decreases maintenance costs inside the team. 如果可以使您的代码更具可读性并减少团队内部的维护成本,请使用您和您的团队感到满意的任何解决方案。Which method do you go for to create your frame by frame web animations? Let me know in the comments. 您采用哪种方法来逐帧创建Web动画? 在评论中让我知道。 翻译自: https://www.sitepoint.com/frame-by-frame-animation-css-javascript/ css逐帧动画 |
【本文地址】