Butterfly美化 |
您所在的位置:网站首页 › 触发qq聊天的句子特效图片 › Butterfly美化 |
Butterfly美化
|
Butterfly美化
Hexo系列文章已经完成上传: 一、Hexo准备---Node.js、Vue 二、Hexo、主题、部署上线 三、Butterfly美化 四、Hexo之更换背景及透明度 五、Hexo-使用阿里iconfont图标 六、PicGo:搭建图床 七、Hexo-域名设置+收录 首先提示,本文量特别大哦!基本上有所有的美化,还在持续更新ing,谨慎入坑......... 主题配置文件修改 基础配置最最最开始的,好不容易搭建了自己的个人博客,当然要写上自己的名字、签名......,证明身份。而且身为一个Chinese,还是中文舒服,所以主目录下_config.yml的配置文件: # Site title: FATE #标题名字 subtitle: '' description: '' #签名 keywords: author: MoYu-zc #作者名字 language: zh-CN #默认en 可以改为这个 timezone: ''主题支持以下三种语言: default(en) zh-CN (简体中文) zh-TW (繁体中文)
 导航栏修改
导航栏修改
主目录下\source\_data--butterfly.yml: (如果没有这个文件夹,创建一个_data,把\themes\butterfly也就是主题文件夹下的_config.yml移动到_data文件夹下,重命名为butterfly.yml,以后只需要修改这个文件。这样为了留个备份,你搞坏了配置,还可以重新换成最开始的状态) ↓: 名称: /xxxx/ || 图标 menu: 首页: / || fa fa-home 归档: /archives/ || fa fa-archive 标签: /tags/ || fa fa-tags 分类: /categories/ || fa fa-folder-open 留言板: /messageboard/ || fa fa-paper-plane 友链: /link/ || fa fa-link 日志: /timeline/ || fa fa-bell 菜单 || fa fa-list: - 关于 || /about/ || fa fa-sitemap - myself || /myself/ || fa fa-id-card - butterfly主题 || https://github.com/jerryc127/hexo-theme-butterfly/ || fa fa-heart
主目录下/source/_data--butterfly.yml: ## 代码块样式 highlight_theme: mac #default/darker/pale night/light/ocean/mac /false/ 前面的参数任选一项为代码块显示效果 highlight_copy: true # copy button 是否显示复制按钮 highlight_lang: true # show the code language 是否显示代码块语言 highlight_shrink: false #true:打开文章默认折叠代码块内容/false:打开文章默认展开代码块/none:关闭代码折叠按钮 code_word_wrap: false # 关闭滚动条然后找到 Hexo 配置文件_config.yml,将line_number改成false: highlight: enable: true line_number: false # 改为false auto_detect: false tab_replace:
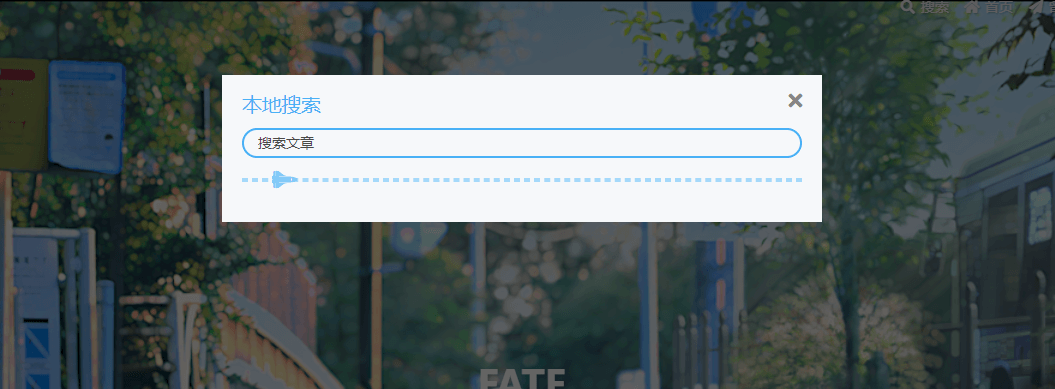
需要安装插件,不然hexo g直接报错: npm install hexo-generator-search --save
本次修改基于Butterfly主题 3.0.0 ! 将图标更换为“太空飞船”。 修改butterfly主题配置文件_data--_config.yml : hr_icon: enable: true icon: '\f197' # the unicode value of Font Awesome icon icon-top: -10pxicon-top常用数值: -20px:图标位于分割线上方 -10px:图标位于分割线中间 0px:图标位于分割线下方
会在\source中创建对应的文件夹和index.md 1.归档这个页面不用创建,自动已经带了 2.标签命令行输入: hexo new page tags出现source/tags/index.md文件: --- title: 标签 date: 2018-01-05 00:00:00 type: tags ---以后上传文章的md文件中,可以在标题头中加入tags,包含 标签 文章的例子: --- title: 标签测试 tags: - 1111 (这个就是文章的标签了) - 2222 (这个就是文章的标签了) --- 3.分类命令行输入: hexo new page categories出现source/categories/index.md文件: --- title: 分类 date: 2018-01-05 00:00:00 type: categories ---以后上传文章的md文件中,可以在标题头中加入categories,包含 分类 文章的例子: --- title: 分类测试 categories: - 1111 (这个就是文章的分类了) - 2222 (这个就是文章的分类了) --- 4.留言板命令行输入: hexo new page messageboard出现source/messageboard/index.md文件: --- title: 留言板 date: 2018-01-05 00:00:00 type: messageboard --- 5.友链 5.1、创建友情链接页面命令行输入: hexo new page link出现source/link/index.md文件: --- title: 友链 date: 2018-01-05 00:00:00 type: link --- 5.2、友情链接添加在Hexo目录中的source/_data,创建一个文件link.yml,内容如下: class: class_name: 友情链接 link_list: 1: name: 姓名 link: 链接 avatar: 图片 descr: 签名 2: name: 姓名 link: 链接 avatar: 图片 descr: 签名 6.日志命令行输入: hexo new page timeline出现source/timeline/index.md文件: --- title: 日志 date: 2018-01-05 00:00:00 type: timeline --- 7.关于命令行输入: hexo new page about出现source/about/index.md文件: --- title: 关于 date: 2018-01-05 00:00:00 type: about --- 8.myself命令行输入: hexo new page myself出现source/myself/index.md文件: --- title: This is me date: 2018-01-05 00:00:00 type: myself --- 标题样式 1.副标题设置如果没设置副标题,上面的description:签名,就是显示在主页面。而设置的话,签名自动不显示,副标题出现。 在\source\_data中的butterfly.yml: subtitle: enable: true sub: - 何其荣幸 何德何能 - 所有的不平凡都来自平凡这个他们可以设置以下,打字效果可以开启,个人感觉不错,但是需要注意: # 如果有英文逗号' , ',使用转义字元 , # 如果有英文双引号' " ',使用转义字元 ; # 开头不允許转义字元,如需要,請把整个句子用双引号包住 # 如果关闭打字效果,subtitle只会显示sub的第一行文字我尝试了转义字符,但是会到“,”时,可能会有点卡,可以用空格代替。  2.副标题字体大小颜色
在\themes\butterfly\source\css\_layout中的head.styl: #site-subtitle color: var(--white) 此处修改为白色 font-size: 1.05em 字体大小 +minWidth768() font-size: 1.40em 字体大小 图片设置图片可以使用网上的图片(即使用该图片链接),也可以使用\themes\butterfly\source\img下的图片。 1.网站图标 # Favicon(网站图标) favicon: /img/favicon.png 2.头像 # Avatar (头像) avatar: img: /img/tit.png effect: false 3.主页面图片 # The banner image of home page (主页的横幅图像) index_img: /img/index_img.jpg 4.子标签页图片 # The banner image of archive page archive_img: /img/tag.jpg 5.推荐 主页的顶部图可以在butterfly.yml设置index_img ``archives页的顶部图可以在Butterfly.yml设置archive_img` 其他page页的顶部图可以在各自的md页面设置front-matter中的top_img favicon: /img/favicon.png avatar: img: /img/tit.png effect: false index_img: /img/index_img.jpg default_top_img: /img/tag.jpg #这个推荐:不加入可能部分标签页不出现图片 archive_img: /img/tag.jpg tag_img: /img/tag.jpg category_img: /img/tag.jpg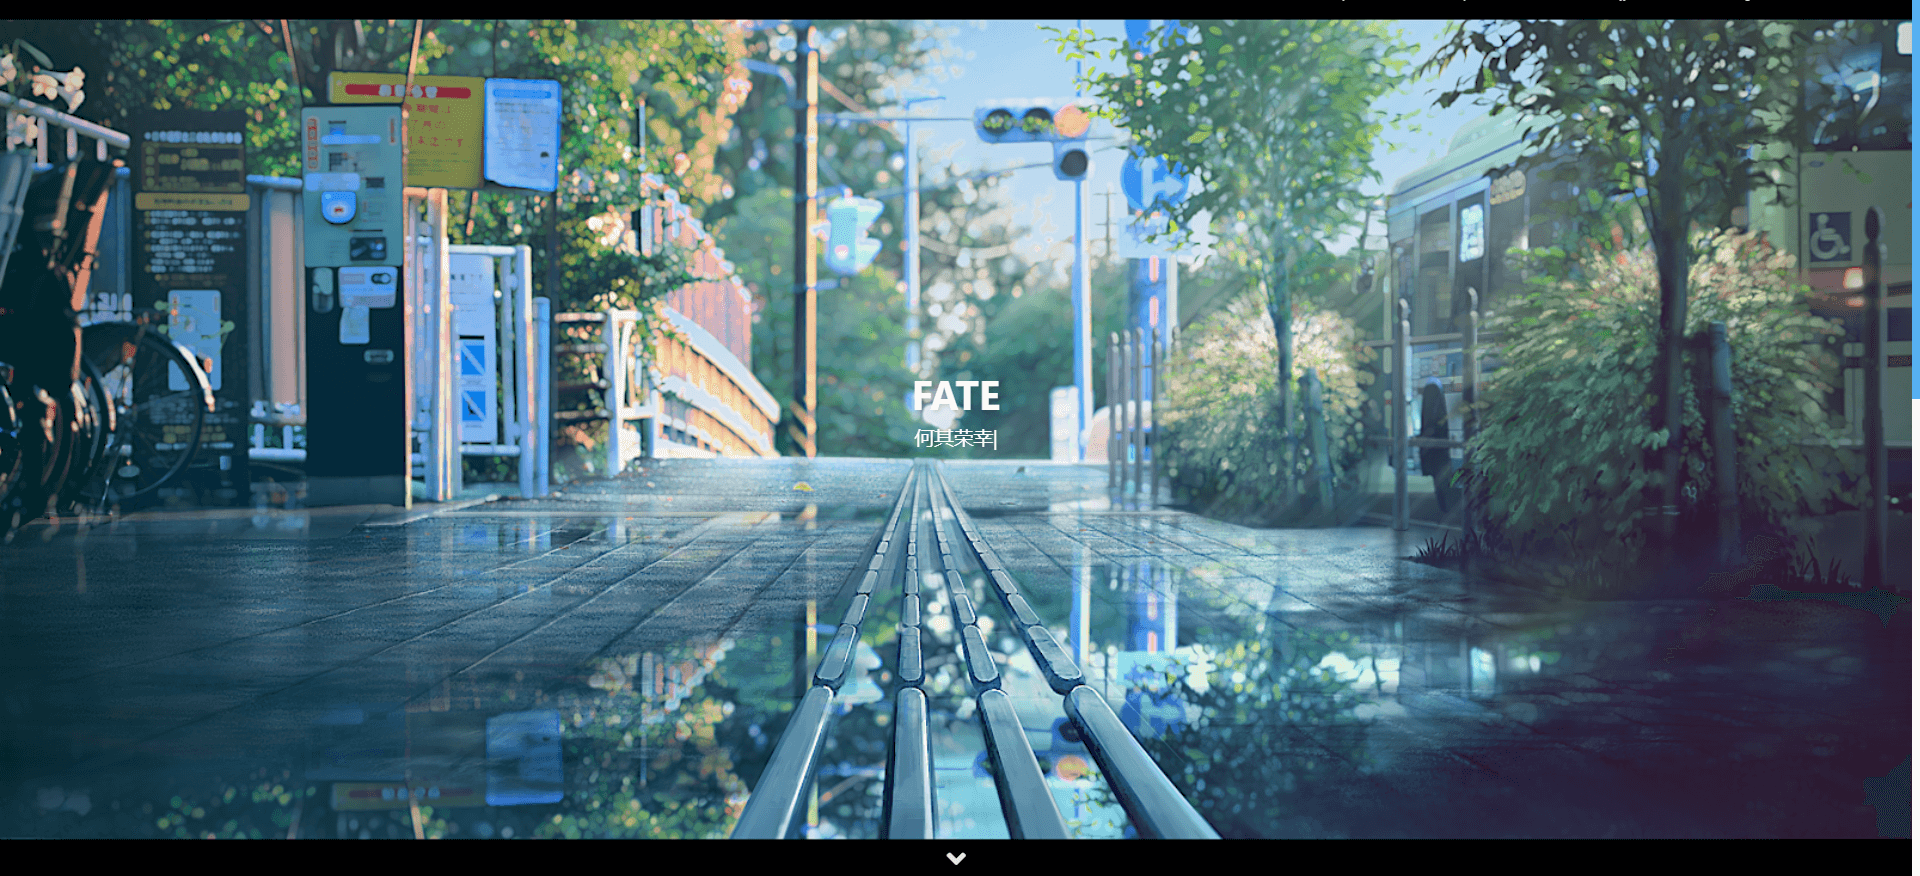
 6.文章列表图片
在\source\_data中的butterfly.yml修改: cover: # display the cover or not (是否顯示文章封面) index_enable: true aside_enable: true archives_enable: true # the position of cover in home page (封面顯示的位置) # left/right/both position: both default_cover:文章封面设置: 一个: default_cover: https://i.loli.net/2020/05/01/gkihqEjXxJ5UZ1C.jpg多个: 此时会随机选择一张。 default_cover: - https://i.loli.net/2020/05/01/gkihqEjXxJ5UZ1C.jpg - https://upimage.alexhchu.com/2020/10/21/671e773d973ae.jpg - https://upimage.alexhchu.com/2020/10/21/f5ac68ddaaf64.jpg - https://upimage.alexhchu.com/2020/10/21/5fecb0b094b73.jpgor文章内
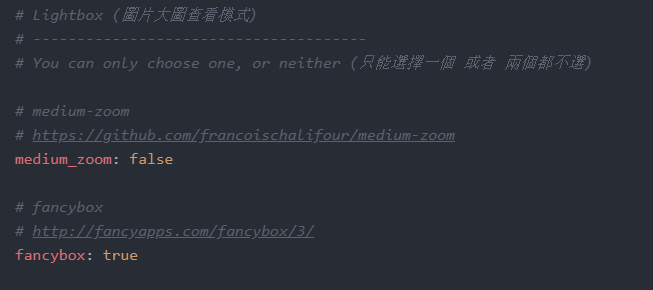
主目录下/source/_data--butterfly.yml: 这是两种方式,只能选择一个 或者 两个都不选
1.新增hexo-lazyload-image模块 npm install hexo-lazyload-image --save2.在主目录配置文件_config.yml增加配置 lazyload: enable: true loadingImg: /img/loading.gif这个就是图片没加载出来的时候,出现一个动图转转转。 文章页样式 1.复制的内容后面加上版权信息 # copy settings # copyright: Add the copyright information after copied content (复制的内容后面加上版权信息) copy: enable: true(↑这个相信大家都见过,不演示了) 2.文章版权信息在底部会出现对应的作者、链接、声明 在\source\_data中的butterfly.yml修改: post_copyright: enable: true decode: true license: CC BY-NC-SA 4.0 license_url: https://creativecommons.org/licenses/by-nc-sa/4.0/ 3.TOC目录
在文章页,会有一个目录,用于顯示TOC。 在\source\_data中的butterfly.yml修改: # toc (目錄) toc: enable: true number: true auto_open: true # auto open the sidebar 4.相关文章
在文章最下面,会出现相关信息文章的推送。 在\source\_data中的butterfly.yml修改: # Related Articles related_post: enable: true limit: 6 # Number of posts displayed 显示的文章数 date_type: created # or created or updated 文章日期顯示創建日或者更新日 5.打赏在你每篇文章的結尾,可以添加打赏按鈕。对应二維碼可以自行配置。 没有提供二维码的,可配置icon图片,然后在link上添加相应的打赏链接。用户点击图片就会跳转到对应链接去。 link可以不写,会默认为图片的链接。 在\source\_data中的butterfly.yml修改: # Sponsor/reward reward: enable: false QR_code: - img: /img/wechat.jpg link: text: wechat - img: /img/alipay.jpg link: text: alipay 侧边框样式
1.侧边框出现位置
侧边框样式
1.侧边框出现位置
在\source\_data中butterfly.yml修改: # aside (側邊欄) # -------------------------------------- aside: enable: true mobile: true # display on mobile position: left # left or rightleft:侧边框出现在左侧 right::侧边框出现在右侧  2.Follow me信息修改
在\source\_data中butterfly.yml修改: 
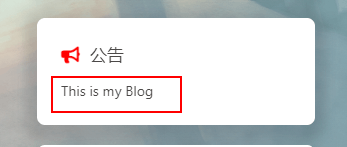
图中icon图标使用的阿里iconfont图标 具体可参考:本站文章--Hexo-使用阿里iconfont图标 3.公告在\source\_data中butterfly.yml修改: card_announcement: enable: true content: This is my Blog #修改此处
在\source\_data中butterfly.yml修改:  2.鼠标移动特效
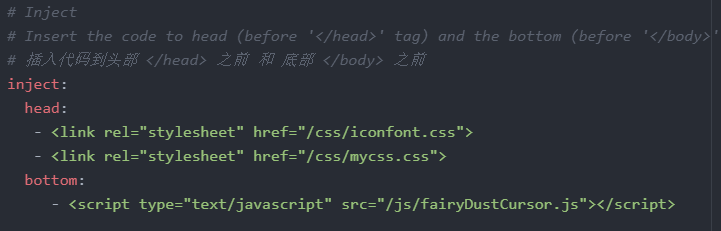
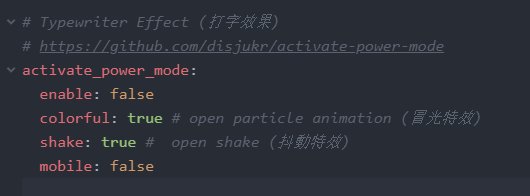
在\themes\butterfly\source\css中创建一个css文件,将以下代码复制进去: (function fairyDustCursor() { var possibleColors = ["#D61C59", "#E7D84B", "#1B8798"] var width = window.innerWidth; var height = window.innerHeight; var cursor = {x: width/2, y: width/2}; var particles = []; function init() { bindEvents(); loop(); } // Bind events that are needed function bindEvents() { document.addEventListener('mousemove', onMouseMove); document.addEventListener('touchmove', onTouchMove); document.addEventListener('touchstart', onTouchMove); window.addEventListener('resize', onWindowResize); } function onWindowResize(e) { width = window.innerWidth; height = window.innerHeight; } function onTouchMove(e) { if( e.touches.length > 0 ) { for( var i = 0; i < e.touches.length; i++ ) { addParticle( e.touches[i].clientX, e.touches[i].clientY, possibleColors[Math.floor(Math.random()*possibleColors.length)]); } } } function onMouseMove(e) { cursor.x = e.clientX; cursor.y = e.clientY; addParticle( cursor.x, cursor.y, possibleColors[Math.floor(Math.random()*possibleColors.length)]); } function addParticle(x, y, color) { var particle = new Particle(); particle.init(x, y, color); particles.push(particle); } function updateParticles() { for( var i = 0; i < particles.length; i++ ) { particles[i].update(); } for( var i = particles.length -1; i >= 0; i-- ) { if( particles[i].lifeSpan < 0 ) { particles[i].die(); particles.splice(i, 1); } } } function loop() { requestAnimationFrame(loop); updateParticles(); } function Particle() { this.character = "*"; this.lifeSpan = 120; //ms this.initialStyles ={ "position": "fixed", "top": "0", //必须加 "display": "block", "pointerEvents": "none", "z-index": "10000000", "fontSize": "20px", "will-change": "transform" }; this.init = function(x, y, color) { this.velocity = { x: (Math.random() < 0.5 ? -1 : 1) * (Math.random() / 2), y: 1 }; this.position = {x: x - 10, y: y - 20}; this.initialStyles.color = color; console.log(color); this.element = document.createElement('span'); this.element.innerHTML = this.character; applyProperties(this.element, this.initialStyles); this.update(); document.body.appendChild(this.element); }; this.update = function() { this.position.x += this.velocity.x; this.position.y += this.velocity.y; this.lifeSpan--; this.element.style.transform = "translate3d(" + this.position.x + "px," + this.position.y + "px,0) scale(" + (this.lifeSpan / 120) + ")"; } this.die = function() { this.element.parentNode.removeChild(this.element); } } function applyProperties( target, properties ) { for( var key in properties ) { target.style[ key ] = properties[ key ]; } } init(); })();接着,在\source\_data的butterfly.yml引入: bottom: -
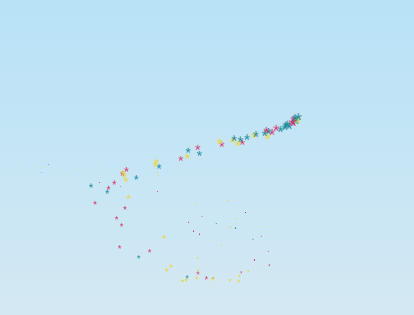
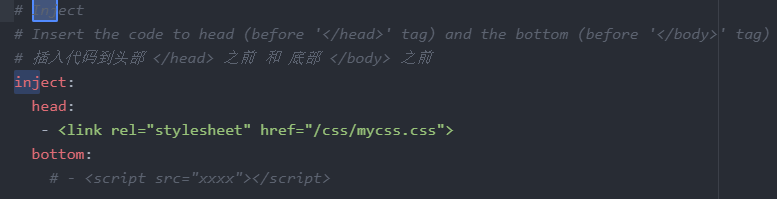
忽略以下图片,可以自行尝试。
在\source\_data中butterfly.yml修改:
静态彩带 在\source\_data中butterfly.yml修改: # canvas_ribbon (靜止彩帶背景) # See: https://github.com/hustcc/ribbon.js canvas_ribbon: enable: false size: 150 alpha: 0.6 zIndex: -1 click_to_change: true mobile: true点击页面,彩带会进行变化。 动态彩带 在\source\_data中butterfly.yml修改: # Fluttering Ribbon (動態彩帶) canvas_fluttering_ribbon: enable: true mobile: true这个彩带可以动态变换。 canvas_nest 在\source\_data中butterfly.yml修改: # canvas_nest # https://github.com/hustcc/canvas-nest.js canvas_nest: enable: false color: '0,0,255' #线条颜色, default: '0,0,0'; opacity: 0.7 # 线条的不透明度 (0~1), default: 0.5. zIndex: -1 # z-index property of the background, default: -1. count: 99 # 线条数量, default: 99. mobile: false这个可以鼠标自动吸附。 Snackbar 弹窗在\source\_data中butterfly.yml修改: # Snackbar (Toast Notification 彈窗) # position 彈窗位置 # 可選 top-left / top-center / top-right / bottom-left / bottom-center / bottom-right snackbar: enable: true position: top-right bg_light: '#49b1f5' # light 背景下的样式 bg_dark: '#121212' # dark 背景下的样式开启后,在你设置的位置会有可爱的小弹窗出现。 大家可以尝试一下,按个人爱好开启。  底部设置
底部设置
在 butterfly.yml中配置: # Footer Settings # -------------------------------------- footer: owner: enable: true since: 2020 custom_text: 11111 copyright: true # false: Hexo那句不显示 ICP: # Chinese ICP License #最后一句 enable: true url: http://www.beian.gov.cn text: 豫ICP备20001029号 icon: /img/icp.png
1.找到自己心仪的404页面,这个网站很多很多呦。 https://404.life/ 2.在\source中创建一个404文件夹和一个404.html 
3.修改404.html内容 红线的地方,可以自行选择是否修改 红框的地方,必须修改 (可以按照图片中修改) 

4.设置404跳过渲染,在主目录_config.yml中: skip_render: - 404.html5.butterfly.yml 可以关掉默认的404页面 # A simple 404 page error_404: enable: false # 关闭 subtitle: 'Page Not Found' background: https://i.loli.net/2020/05/19/aKOcLiyPl2JQdFD.png 修改滚动条
修改滚动条
1.创建一个css文件移动到\themes\butterfly\source\css目录下。 
2.引入方式
将以下代码复制到你所创建的css文件,引入即可。 /* 滚动条 */ ::-webkit-scrollbar { width: 8px; height: 8px; } ::-webkit-scrollbar-track { background-color: rgba(73, 177, 245, 0.2); border-radius: 2em; } ::-webkit-scrollbar-thumb { background-color: #49b1f5; background-image: -webkit-linear-gradient( 45deg, rgba(255, 255, 255, 0.4) 25%, transparent 25%, transparent 50%, rgba(255, 255, 255, 0.4) 50%, rgba(255, 255, 255, 0.4) 75%, transparent 75%, transparent ); border-radius: 2em; } ::-webkit-scrollbar-corner { background-color: transparent; } ::-moz-selection { color: #fff; background-color: #49b1f5; } 页脚渐变将以下代码复制到你所创建的css文件,引入即可。 可参考:修改滚动条部分中的引入方式 /* 页脚footer */ /* 渐变色滚动动画 */ @-webkit-keyframes Gradient { 0% { background-position: 0 50%; } 50% { background-position: 100% 50%; } 100% { background-position: 0 50%; } } @-moz-keyframes Gradient { 0% { background-position: 0 50%; } 50% { background-position: 100% 50%; } 100% { background-position: 0 50%; } } @keyframes Gradient { 0% { background-position: 0 50%; } 50% { background-position: 100% 50%; } 100% { background-position: 0 50%; } } #footer { background: linear-gradient(-45deg, #ee7752, #ce3e75, #23a6d5, #23d5ab); background-size: 400% 400%; -webkit-animation: Gradient 10s ease infinite; -moz-animation: Gradient 10s ease infinite; animation: Gradient 10s ease infinite; -o-user-select: none; -ms-user-select: none; -webkit-user-select: none; -moz-user-select: none; user-select: none; border-top-left-radius: 10px; border-top-right-radius: 10px; } #footer:before { background-color: rgba(0, 0, 0, 0); } 更换背景及透明度 1.透明度将以下代码复制到你所创建的css文件,引入即可。 可参考:修改滚动条部分中的引入方式 /* 文章页背景 */ .layout_post>#post { /* 以下代表白色透明度为0.3 */ background: rgba(255,255,255,.3); } /* 所有背景(包括首页卡片、文章页、页面页等) */ #aside_content .card-widget, #recent-posts>.recent-post-item, .layout_page>div:first-child:not(.recent-posts), .layout_post>#page, .layout_post>#post, .read-mode .layout_post>#post{ /* 以下代表白色透明度为0.3 */ background: rgba(255,255,255,.3); } 2.更换背景老规矩,复制到你所创建的css文件,引入即可。 #web_bg { background-image: linear-gradient(to top, #fff1eb 0%, #ace0f9 100%); }当然这是我的博客背景。 如果你想更改,具体可以参考本博客文章:Hexo之更换背景及透明度 移动端优化\themes\butterfly\source\css\_third-party\normalize.min.css添加如下css代码: /*移动端优化:去除归档、标签、最新文章、公告、、只保留网站统计*/ @media screen and (max-width: 800px) { #aside_content div:not(:last-child) { display: none; font-size: 13px; } } 查看网页RSS本次修改基于Butterfly主题 3.0.0 ! 实现:增加社交图标RSS,点击可查看网页RSS。 1.下载插件hexo-generator-feed npm install hexo-generator-feed --save2.在hexo的主配置文件_config.yml中任意位置添加以下代码: feed: type: atom path: atom.xml limit: 20 hub: content: content_limit: 140 content_limit_delim: ' ' order_by: -date icon: icon.png autodiscovery: true template:3.修改butterfly主题配置文件_config.yml ,添加RSS的图标: social: fa fa-rss: /atom.xml || RSS链接 社交信息设置在\source\_data中的butterfly.yml修改social: (可以选择使用fa fa-xxx图标,也可以选择使用阿里iconfont图标) 具体可参考:本站文章--Hexo-使用阿里iconfont图标 

此处要注意: 很多人不知道自己上方填的网址怎么找 RSS上面有教程,Giuhub、Github、CSDN、bilibili直接个人主页网址就可以 QQ:下方 xxxxxxx 填上对应的qq号码即可 tencent://AddContact/?fromId=45&fromSubId=1&subcmd=all&uin=xxxxxxx&website=www.oicqzone.com 标签外挂 1.Note语法 移植于next主题:可以在\source\_data中的butterfly.yml修改: note: # Note tag style values: # - simple bs-callout old alert style. Default. # - modern bs-callout new (v2-v3) alert style. # - flat flat callout style with background, like on Mozilla or style: flat icons: true #是否开启图片 border_radius: 3 # Offset lighter of background in % for modern and flat styles (modern: -12 | 12; flat: -18 | 6). # Offset also applied to label tag variables. This option can work with disabled note tag. light_bg_offset: 0 该标签有两种使用方法。 默认模板: {% note [class] [no-icon] [style] %} Any content (support inline tags too.io). {% endnote %} 名称 用法 class 【可选】标识,不同的标识有不同的配色( default / primary / success / info / warning / danger ) no-icon 【可选】不显示 icon style 【可选】可以覆盖配置中的 style(simple/modern/flat/disabled)一、simple {% note simple %} 默认 提示块 {% endnote %} {% note default simple %} default 提示块 {% endnote %} {% note primary simple %} primary 提示块 {% endnote %} {% note success simple %} success 提示块 {% endnote %} {% note info simple %} info 提示块 {% endnote %} {% note warning simple %} warning 提示块 {% endnote %} {% note danger simple %} danger 提示块 {% endnote %}更多可以在我的个人博客观看 2.图片放置可以根据图片长度自行排列 {% gallery %} markdown 图片格式 {% endgallery %}例如: {% gallery %}    {% endgallery %}因为这个功能是用在Hexo美化中,在此博客效果不显示,具体可移步我的博客(最下方链接) 3.tag-hide这个可以提供一个按钮,点击它,显示你隐藏的文字、图片等。 Inline 这个可以隐藏文字,仅限于此。( content不能包含英文逗號,可用‚) {% hideInline content,display,bg,color %}content: 文本內容 display: 按钮显示的文字(可选) bg: 按钮的背景颜色(可选) color: 按钮文字的颜色(可选) Demo 座右铭座右铭!! {% hideInline 何其荣幸 何德何能,别点我,#FF7242,#fff %} 平平无奇。。。 {% hideInline 上面太花里胡哨了,上面真秀 %}Block 这个也是提供一个按钮,而他可以隐藏文字、图片、代码块等。( dispaly不能包含英文逗號,可用‚) {% hideBlock display,bg,color %} content {% endhideBlock %}content: 文本內容 display: 按钮显示的文字(可选) bg: 按钮的背景颜色(可选) color: 按钮文字的颜色(可选) Demo 座右铭座右铭!! {% hideBlock 别点我,#FF7242,#fff %} 何其荣幸 何德何能 {% endhideBlock %} 平平无奇。。。 {% hideBlock 上面真秀 %} 上面太花里胡哨了 {% endhideBlock %}Toggle 如果你需要展示的內容太多,可以把它隐藏在收缩框里,需要时再把它展开。 {% hideToggle display,bg,color %} content {% endhideToggle %}Demo {% hideToggle Wecome to my Blog %} 欢迎欢迎欢迎 MoYu‘s Blog Gitee:https://moyu-zc.gitee.io/ Github:https://moyu-zc.github.io/ {% endhideToggle %}因为这个功能是用在Hexo美化中,在此博客效果不显示,具体可移步我的博客(最下方链接) 4.mermaidmermaid标签不允许嵌套于一些隐藏属性的标签外挂 例如: tag-hide內的标签外挂和tabs标签外挂,也不能压缩代码 这会导致mermaid图示无法正常显示,使用时请留意。 使用mermaid标签可以绘制Flowchart(流程图)、Sequence diagram(时序图 )、Class Diagram(类别图)、State Diagram(状态图)、Gantt(甘特图)和Pie Chart(圆形图),具体可以查看mermaid文檔 在\source\_data中的butterfly.yml中修改: mermaid: enable: true # built-in themes: default/forest/dark/neutral theme: default写法: {% mermaid %} 內容 {% endmermaid %}Demo {% mermaid %} pie Test X "A" : 50 "B" : 20 "C" : 10 "D" : 5 {% endmermaid %}因为这个功能是用在Hexo美化中,在此博客效果不显示,具体可移步我的博客(最下方链接) 5.TabsDemo1------默认方式 {% tabs test1 %} **This is Tab 1.** **This is Tab 2.** **This is Tab 3.** {% endtabs %}Demo2------预设选择``tabs` {% tabs test2, 3 %} **This is Tab 1.** **This is Tab 2.** **This is Tab 3.** {% endtabs %}Demo3------没有预设 {% tabs test3, -1 %} **This is Tab 1.** **This is Tab 2.** **This is Tab 3.** {% endtabs %}Demo4------自定义Tab名、 只有icon、icon和Tab名 {% tabs test4 %} **tab名字为第一个Tab** **只有图标 没有Tab名字** **名字+icon** {% endtabs %}因为这个功能是用在Hexo美化中,在此博客效果不显示,具体可移步我的博客(最下方链接) 6.Button模板: {% btn [url],[text],[icon],[color] [style] [layout] [position] [size] %} [url] : 链接 [text] : 按钮文字 [icon] : [可选] 图标 [color] : [可选] 按钮背景颜色(默认style时) 按鈕字體和邊框顔色(outline時) default/blue/pink/red/purple/orange/green [style] : [可选] 按钮样式 默认实心 outline/留空 [layout] : [可选] 按钮布局 默认为line block/留空 [position] : [可选] 按钮位置 前提是设置了layout為block 默认为左边 center/right/留空 [size] : [可选] 按钮大小 larger/留空 {% btn 'https://moyu-zc.gitee.io/',MoYu,far fa-hand-point-right,block %} {% btn 'https://moyu-zc.gitee.io/',MoYu,far fa-hand-point-right,block center larger %} {% btn 'https://moyu-zc.gitee.io/',MoYu,far fa-hand-point-right,block right outline larger %}More styles: {% btn 'https://moyu-zc.gitee.io/',MoYu,far fa-hand-point-right,larger %} {% btn 'https://moyu-zc.gitee.io/',MoYu,far fa-hand-point-right,blue larger %} {% btn 'https://moyu-zc.gitee.io/',MoYu,far fa-hand-point-right,pink larger %} {% btn 'https://moyu-zc.gitee.io/',MoYu,far fa-hand-point-right,red larger %} {% btn 'https://moyu-zc.gitee.io/',MoYu,far fa-hand-point-right,outline purple larger %} {% btn 'https://moyu-zc.gitee.io/',MoYu,far fa-hand-point-right,outline orange larger %} {% btn 'https://moyu-zc.gitee.io/',MoYu,far fa-hand-point-right,outline green larger %}因为这个功能是用在Hexo美化中,在此博客效果不显示,具体可移步我的博客(最下方链接) 分享功能分享功能有两种: 第一种: 如果你不知道 sharejs,可以查看说明 主目录下/source/_data--butterfly.yml中修改: sharejs: enable: true sites: facebook,twitter,wechat,weibo,qq #想要显示的內容
第二种: 如果你不知道addtoany,可以查看说明 主目录下/source/_data--butterfly.yml中修改: addtoany: enable: true item: facebook,twitter,wechat,sina_weibo,facebook_messenger,email,copy_link 在线聊天
在线聊天
通用设置 在butterfly中,有几种内置的在线聊天工具。 简单的,打开chat_btn,在右下角开启小按钮。 # Chat Button [recommend] # It will create a button in the bottom right corner of website, and hide the origin button chat_btn: true
为了不影响访客体验,可以开启chat_hide_show,开启后,只有向上滚动才会显示聊天按钮,向下滚动时会隐藏按钮。 # The origin chat button is displayed when scrolling up, and the button is hidden when scrolling down chat_hide_show: true如果使用工具自带的聊天按钮,位置可能会遮挡右下角图标,可以配置``rightside-bottom`调整右下角图标位置 chatra 在chatra中注册账号. 可以在Preferences中找到Public key 
之后/source/_data--butterfly.yml中修改: # chatra # https://chatra.io/ chatra: enable: true id: #这个就是Public keytidio 在tidio中注册账号。 可以在Preferences中找到Public key。 在设置中还可以设置样式。 
之后/source/_data--butterfly.yml中修改: # tidio # https://www.tidio.com/ tidio: enable: true public_key: #这个就是Public key
daovoice 在daovoice中注册。 在应用设置----安装到网站 之中的app id 可在聊天设置里可以配置聊天按钮等样式 
之后/source/_data--butterfly.yml中修改: # daovoice # http://daovoice.io/ daovoice: enable: true app_id: #这个就是app id
gitter 在gitter中登录上账号。 创建一個community或者room,复制名称到设置去。 # gitter # https://gitter.im/ gitter: enable: true room: MoYuzc/community #名称放这儿

crisp 打开crisp,注册账号。 在设置中,找到网站ID。 
之后,在butterflt.yml中修改: # crisp # https://crisp.chat/en/ crisp: enable: true website_id: #网站ID填写这儿 评论功能
评论功能
开启评论需要在butterfly.yml---comments---use中填写你需要的评论。 支持双评论显示,只需要配置两个评论(第一个为默认显示) comments: use: - Valine # - Disqus text: true lazyload: false count: false 参数 解释 use 使用的评论(填写的评论首字母需要大写。最多支持两个,不需要就留空) text 是否显示评论服务商的名字 lazyload 是否为评论开启lazyload,开启后,只有滚动到评论位置时才会加载评论所需要的资源(开启lazyload后,评论数将不显示) count 是否在文章顶部显示评论数livere 和 utterances 不支持评论数显示注意:双评论不能是 Disqus 和 Disqusjs 一起,由于其共用同一个 ID,会出错。 以下是举例的我在用的:Valine 1.在LeanCloud中注册账号,并进入。 
2.创建应用,命名就随便啦 
3.创建成功后,进入设置 
4.进入应用Keys 应用Keys中有AppID和AppKey,这两个需要填写到你的butterfly.yml中 
5.填写butterfly.yml # valine # https://valine.js.org valine: appId: # app id appKey: # app key pageSize: 10 avatar: monsterid lang: zh-CN placeholder: Please leave your footprints p guest_info: nick,mail,link recordIP: true serverURLs: bg: emojiCDN: enableQQ: true requiredFields: nick,mail
持续更新ing~~ 个人博客为: MoYu's Github Blog MoYu's Gitee Blog |


【本文地址】