|
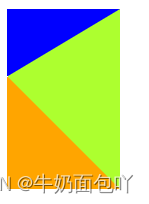
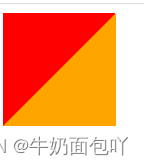
1.border边框原理
将border属性的值写大点,我们就可以观察到,其实一个盒子的border其实是由三角形组成的。
.triangle{
width: 0;
height: 0;
/*边框大小*/
border: 100px solid;
/*边框颜色*/
border-color: red orange yellow green;
}
效果图: 
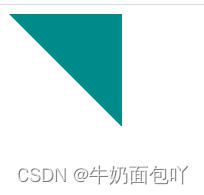
2.不同朝向的等腰直角三角形
利用transparent属性来设置边框颜色透明:
(1)方向向下的三角形:
.triangle{
width: 0;
height: 0;
/*边框大小、样式、颜色透明*/
border:100px solid transparent;
/*上边框颜色*/
border-top-color: red;
}
效果图:  (2)方向向右的三角形 (2)方向向右的三角形
.triangle{
width: 0;
height: 0;
border:100px solid transparent;
border-left-color: orange;
}
效果图:  (3)方向向上的三角形: (3)方向向上的三角形:
.triangle{
width: 0;
height: 0;
border:100px solid transparent;
border-bottom-color: green;
}
效果图:  (4)方向向左的三角形: (4)方向向左的三角形:
.triangle{
width: 0;
height: 0;
border:100px solid transparent;
border-right-color: yellow;
}
效果图:  (5) (5)
.triangle{
width: 0;
height: 0;
/*边框大小、样式、颜色透明*/
border-top: 100px solid transparent;
border-right: 100px solid pink;
}
效果图:  (6) (6)
.triangle{
width: 0;
height: 0;
/*边框大小、样式、颜色透明*/
border-left: 100px solid transparent;
border-top: 100px solid darkcyan;
}
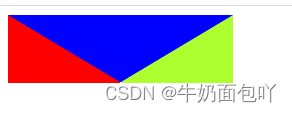
3.设置有无边框的不同三角形
(1)没有上边框
.triangle{
width: 0;
height: 0;
/*border-top: 60px solid blue;*/
border-left:100px solid red ;
border-bottom:100px solid orange ;
border-right:100px solid greenyellow ;
}
效果图:

(2)没有左边框
 没有左边框
(3)没有下边框 没有左边框
(3)没有下边框
 没有下边框
(4)没有右边框 没有下边框
(4)没有右边框
 没有右边框 没有右边框
(5)没有上左边框
.triangle{
width: 0;
height: 0;
border-bottom:100px solid orange ;
border-right:100px solid greenyellow ;
}

(6)没有上右边框
 没有上右边框
(7)没有左下边框 没有上右边框
(7)没有左下边框
 没有左下边框
(8)没有下右边框 没有左下边框
(8)没有下右边框
 没有下右边框
4.实现一个箭头 没有下右边框
4.实现一个箭头
写两个方向向上的三角形,对其中一个进行相对定位,使其与另一个只剩下要显示的“箭头”样式保留,对这一个三角形的颜色设置为白色,用这个白色的三角形掩盖掉另一个三角形即可。同时为了达到掩盖效果,将z-index的层级设置高一点。 --------1.在这里,使用伪类after,在伪类after里写一个三角形,背景颜色设置为红色。
.triangle{
width: 0;
height: 0;
border: 100px solid transparent;
border-bottom-color: black;
}
.triangle::after{
content: '';
width: 0;
height: 0;
border: 100px solid transparent;
border-bottom-color: red;
}
初始样子:  --------2.对triangle定位设置为相对定位,伪类after里的三角想设置为绝对定位。 --------2.对triangle定位设置为相对定位,伪类after里的三角想设置为绝对定位。
.triangle{
width: 0;
height: 0;
border: 100px solid transparent;
border-bottom-color: black;
/*相对定位*/
position: relative;
}
.triangle::after{
content: '';
/*绝对定位*/
position: absolute;
top: -80px;
right: -100px;
width: 0;
height: 0;
border: 100px solid transparent;
border-bottom-color: red;
}
效果图:  --------3.将伪类三角形背景颜色设置为白色,并且设置z-index,以此来吟唱黑色三角形的某些区域,只保留箭头样式 --------3.将伪类三角形背景颜色设置为白色,并且设置z-index,以此来吟唱黑色三角形的某些区域,只保留箭头样式
.triangle{
width: 0;
height: 0;
border: 100px solid transparent;
border-bottom-color: black;
/*相对定位*/
position: relative;
}
.triangle::after{
content: '';
/*绝对定位*/
position: absolute;
top: -80px;
right: -100px;
width: 0;
height: 0;
border: 100px solid transparent;
/*设置成白色*/
border-bottom-color: white;
/*设置层级*/
z-index: 2;
}
效果图: 
5.实现一个空心三角形
和实现箭头一样,也是用伪类before或者after,在伪类before或者after里绘制一个三角形,但是这个三角形要比另一个三角形小,采用一大一小三角形,进行相对定位和绝对定位,再将伪类里的三角形背景颜色设置为白色即可。 --------1.绘制一大一小的三角形,在伪类after里的三角形要小一些
.triangle{
width: 0;
height: 0;
border: 100px solid transparent;
border-bottom-color: #0A98D5;
}
.triangle::after{
content: '';
width: 0;
height: 0;
border: 80px solid transparent;
border-bottom-color: yellow;
}
起始样子:  --------2.进项相对定位和绝对定位,调整伪类里小三角形的位置 --------2.进项相对定位和绝对定位,调整伪类里小三角形的位置
.triangle{
width: 0;
height: 0;
border: 100px solid transparent;
border-bottom-color: #0A98D5;
/*相对定位*/
position: relative;
}
.triangle::after{
content: '';
width: 0;
height: 0;
border: 80px solid transparent;
border-bottom-color: yellow;
/*绝对定位:*/
position: absolute;
top: -70px;
right: -80px;
}
现在的样子:  --------3.将伪类的小三角的背景颜色设置为白色 --------3.将伪类的小三角的背景颜色设置为白色
.triangle{
width: 0;
height: 0;
border: 100px solid transparent;
border-bottom-color: #0A98D5;
/*相对定位*/
position: relative;
}
.triangle::after{
content: '';
width: 0;
height: 0;
border: 80px solid transparent;
/*更改背景颜色为白色*/
border-bottom-color: white;
/*绝对定位:*/
position: absolute;
top: -70px;
right: -80px;
}
效果图: 
|