|
转载于:https://www.cnblogs.com/lxyuuuuu/p/9717231.html
virtualbox centos7 使用正常!
一、使用背景 Linux根目录磁盘空间不够用了,当修改了虚拟机模版增加磁盘大小或者插入了一块新硬盘,但是发现系统里的大小还是没改变。 产生的原因是没有给磁盘格式化,没有增加分区。 二、操作方法
1.查看磁盘空间大小,使用df -h 命令,发现挂载根目录节点的/dev/mapper/vg_node003-lv_root 只有7.1G容量。
[root@node-002 ~]# df -h
Filesystem Size Used Avail Use% Mounted on
/dev/mapper/vg_node003-lv_root 18G 9.3G 7.1G 57% /
tmpfs 491M 0 491M 0% /dev/shm
/dev/sda1 477M 42M 411M 10% /boot
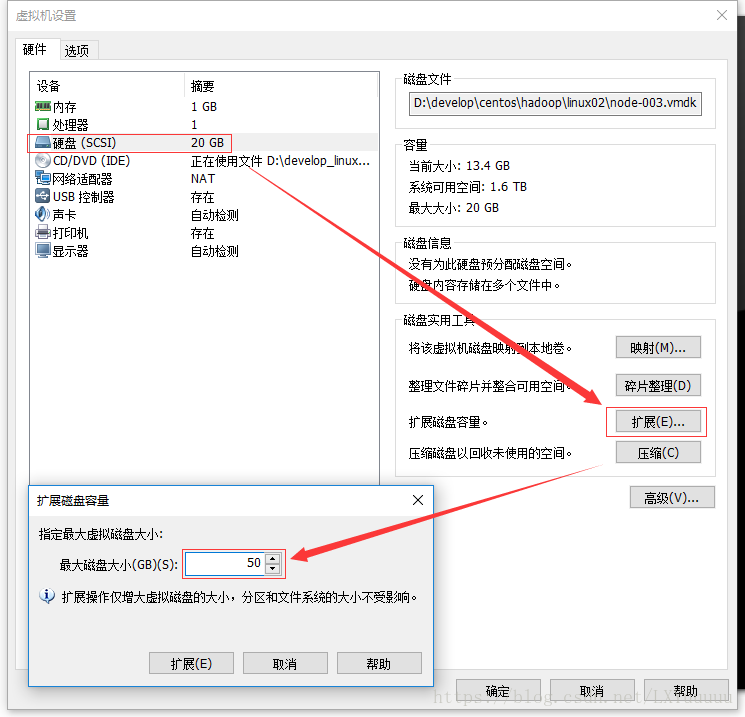
2.增加磁盘空间,例如下图使用VM虚拟机增加的方式。
3.使用fdisk -l命令查看磁盘信息。当看到第一行Disk /dev/sda: 53.7 GB与实际df -h显示内容不符时,说明增加磁盘成功了。

[root@node-002 ~]# fdisk -l
Disk /dev/sda: 53.7 GB, 53687091200 bytes
255 heads, 63 sectors/track, 6527 cylinders
Units = cylinders of 16065 * 512 = 8225280 bytes
Sector size (logical/physical): 512 bytes / 512 bytes
I/O size (minimum/optimal): 512 bytes / 512 bytes
Disk identifier: 0x00092cf6
Device Boot Start End Blocks Id System
/dev/sda1 * 1 64 512000 83 Linux
Partition 1 does not end on cylinder boundary.
/dev/sda2 64 2611 20458496 8e Linux LVM
Disk /dev/mapper/vg_node003-lv_root: 18.8 GB, 18798870528 bytes
255 heads, 63 sectors/track, 2285 cylinders
Units = cylinders of 16065 * 512 = 8225280 bytes
Sector size (logical/physical): 512 bytes / 512 bytes
I/O size (minimum/optimal): 512 bytes / 512 bytes
Disk identifier: 0x00000000
Disk /dev/mapper/vg_node003-lv_swap: 2147 MB, 2147483648 bytes
255 heads, 63 sectors/track, 261 cylinders
Units = cylinders of 16065 * 512 = 8225280 bytes
Sector size (logical/physical): 512 bytes / 512 bytes
I/O size (minimum/optimal): 512 bytes / 512 bytes
Disk identifier: 0x00000000
4.使用fdisk /dev/sda, 创建新分区。 注意:不同操作系统的磁盘命名方式不同,有些是/dev/vda。具体使用方式参考第三步中fdisk -l首行显示Disk。如笔者在该系统中首行显示为Disk /dev/sda: 53.7 GB, 53687091200 bytes ,故使用命令fdisk /dev/sda) 按照下面Linux操作进行分区。
[root@node-002 ~]# fdisk /dev/vda
命令(输入 m 获取帮助): m
命令操作
a toggle a bootable flag
b edit bsd disklabel
c toggle the dos compatibility flag
d delete a partition
l list known partition types
m print this menu
n add a new partition
o create a new empty DOS partition table
p print the partition table
q quit without saving changes
s create a new empty Sun disklabel
t change a partition's system id
u change display/entry units
v verify the partition table
w write table to disk and exit
x extra functionality (experts only)
命令(输入 m 获取帮助): n #new 新分区
Partition type:
p primary (1 primary, 1 extended, 2 free)
l logical (numbered from 5)
Select (default p): p #选择主分区
分区号 (1-4,默认为 3): 3 #分区序号
起始 sector (499712-314572799,默认为 499712): #分区开始回车默认
将使用默认值 499712
Last sector, +扇区 or +size{K,M,G} (499712-501757,默认为 501757):
将使用默认值 501757
命令(输入 m 获取帮助): n #new 新分区
Partition type:
p primary (2 primary, 1 extended, 1 free)
l logical (numbered from 5)
Select (default p): p #选择主分区
Selected partition 4 #分区序号
起始 sector (62912512-314572799,默认为 62912512): #分区开始回车默认
将使用默认值 62912512
Last sector, +扇区 or +size{K,M,G} (62912512-314572799,默认为 314572799):
将使用默认值 314572799
命令(输入 m 获取帮助): t #修改分区格式
分区号 (1-5): 4 #修改分区号
Hex code (type L to list codes): 8e #格式选择8e linux LVM
Changed system type of partition 4 to 8e (Linux LVM)
命令(输入 m 获取帮助): p #显示分区信息
Disk /dev/sda: 161.1 GB, 161061273600 bytes
16 heads, 63 sectors/track, 312076 cylinders, total 314572800 sectors
Units = 扇区 of 1 * 512 = 512 bytes
Sector size (logical/physical): 512 bytes / 512 bytes
I/O size (minimum/optimal): 512 bytes / 512 bytes
Disk identifier: 0x0001a023
设备 启动 起点 终点 块数 Id 系统
/dev/sda1 * 2048 499711 248832 83 Linux
/dev/sda2 501758 62912511 31205377 5 扩展
/dev/sda3 499712 501757 1023 83 Linux
Partition table entries are not in disk order
命令(输入 m 获取帮助): w #保存信息
The partition table has been altered!
Calling ioctl() to re-read partition table.
WARNING: Re-reading the partition table failed with error 16: 设备或资源忙.
The kernel still uses the old table. The new table will be used at
the next reboot or after you run partprobe(8) or kpartx(8)
Syncing disks.
5.重启Linux操作系统,使用reboot命令。
6.创建物理卷,使用pvcreate /dev/sda3命令。
[root@node-002 dev]# pvcreate /dev/sda3
Physical volume "/dev/sda3" successfully created
7.查看新建的物理卷和大小,使用pvdisplay命令。
[root@node-002 dev]# pvdisplay
--- Physical volume ---
PV Name /dev/sda2
VG Name vg_node003
PV Size 19.51 GiB / not usable 3.00 MiB
Allocatable yes (but full)
PE Size 4.00 MiB
Total PE 4994
Free PE 0
Allocated PE 4994
PV UUID UC4j5m-rJO4-DroW-E92L-n5Vj-SU0U-PJyfJf
"/dev/sda3" is a new physical volume of "30.00 GiB"
--- NEW Physical volume ---
PV Name /dev/sda3
VG Name
PV Size 30.00 GiB
Allocatable NO
PE Size 0
Total PE 0
Free PE 0
Allocated PE 0
PV UUID nng8Gx-51fP-DIBH-YeF4-Sw7B-S0jQ-oGXfpa
8.将添加新的物理卷,加载到vg_node003卷组,使用vgextend vg_node003 /dev/sda3命令。
[root@node-002 dev]# vgextend vg_node003 /dev/sda3
Volume group "vg_node003" successfully extended
9.查看卷组信息,使用vgdisplay命令。
[root@node-002 dev]# vgdisplay
--- Volume group ---
VG Name vg_node003
System ID
Format lvm2
Metadata Areas 2
Metadata Sequence No 4
VG Access read/write
VG Status resizable
MAX LV 0
Cur LV 2
Open LV 2
Max PV 0
Cur PV 2
Act PV 2
VG Size 49.50 GiB
PE Size 4.00 MiB
Total PE 12673
Alloc PE / Size 4994 / 19.51 GiB
Free PE / Size 7679 / 30.00 GiB
VG UUID v37e5T-4iPX-olm0-Claw-8EfO-axHf-evCAfc
10.增加vg_node003大小,增加30G。使用lvresize -L +30G /dev/mapper/vg_node003-lv_root命令。 注:vg_node003-lv_root在/dev/mapper里面查看
[root@node-002 mapper]# lvresize -L +29.99G /dev/mapper/vg_node003-lv_root
Rounding size to boundary between physical extents: 29.99 GiB
Size of logical volume vg_node003/lv_root changed from 17.51 GiB (4482 extents) to 47.50 GiB (12160 extents).
Logical volume lv_root successfully resized
11.重新识别vg_node003大小,使用resize2fs /dev/mapper/vg_node003-lv_root命令。
[root@node-002 mapper]# resize2fs /dev/mapper/vg_node003-lv_root
resize2fs 1.41.12 (17-May-2010)
Filesystem at /dev/mapper/vg_node003-lv_root is mounted on /; on-line resizing required
old desc_blocks = 2, new_desc_blocks = 3
Performing an on-line resize of /dev/mapper/vg_node003-lv_root to 12451840 (4k) blocks.
The filesystem on /dev/mapper/vg_node003-lv_root is now 12451840 blocks long.
如出现下列情况
resize2fs: Bad magic number in super-block 当尝试打开 /dev/mapper/vg_node003-lv_root 时 找不到有效的文件系统超级块.
请使用xfs_growfs /dev/mapper/vg_node003-lv_root
[root@node-002 ~]# xfs_growfs /dev/mapper/vg_node003-lv_root
meta-data=/dev/mapper/centos-root isize=512 agcount=4, agsize=2891264 blks
= sectsz=512 attr=2, projid32bit=1
= crc=1 finobt=0 spinodes=0
data = bsize=4096 blocks=11565056, imaxpct=25
= sunit=0 swidth=0 blks
naming = version 2 bsize=4096 ascii-ci=0 ftype=1
log = internal bsize=4096 blocks=5647, version=2
= sectsz=512 sunit=0 blks, lazy-count=1
realtime =none extsz=4096 blocks=0, rtextents=0
data blocks changed from 11565056 to 24672256
12.查看扩容后的大小 ,使用df -h命令。
[root@node-002 mapper]# df -h
Filesystem Size Used Avail Use% Mounted on
/dev/mapper/vg_node003-lv_root 47G 9.3G 36G 21% /
tmpfs 491M 0 491M 0% /dev/shm
/dev/sda1 477M 42M 411M 10% /boot
当看到/dev/mapper/vg_node003-lv_root 已经更新到新的大小时,则表示增加成功。 三、总结 以上所述是小编给大家介绍的Linux系统扩容根目录磁盘空间的操作方法,希望对大家有所帮助,如果大家有任何疑问请给我留言,小编会及时回复大家的。
|