Sheng Jian Bao (生煎包, Shanghai Pan |
您所在的位置:网站首页 › 怎么制作生煎包 › Sheng Jian Bao (生煎包, Shanghai Pan |
Sheng Jian Bao (生煎包, Shanghai Pan
|
Try this recipe for sheng jian bao – super juicy and incredibly flavorful pork stuffed into a fluffy yet crispy pan-fried wrapper that satisfies on every level. 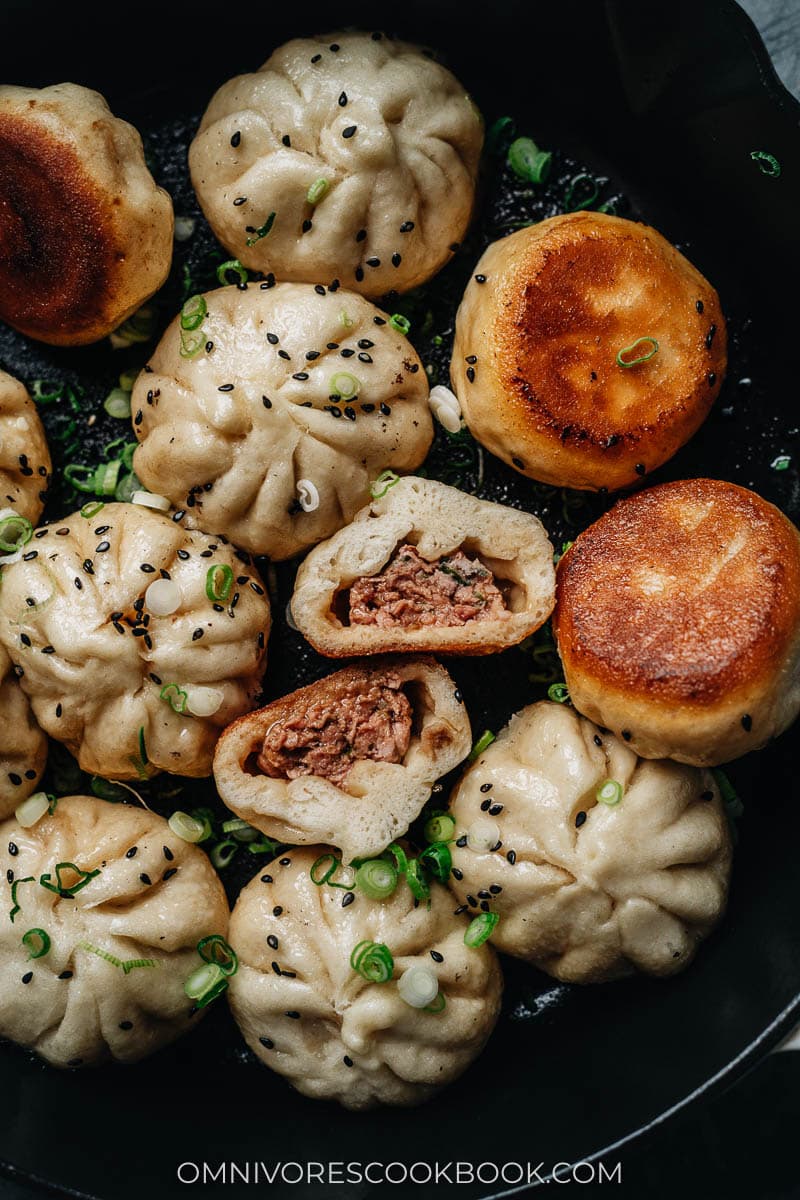 What is Sheng Jian Bao
Sheng Jian Bao (生煎包), or directly translated as raw fried buns, is one of the signature dishes from Shanghai. By “raw”, it means you pan fry the buns without steaming them first, in which process the dough will rise and the bottom crisp up at the same time. The pan-fried pork bun is different from the steamed stuffed buns (known as ‘baozi’), which is steamed only. The filling is savory pork and green onion with a soupy texture. Imagine crispy potstickers, soup dumplings, and fluffy bread all combined together! One bite into it, and it awakens your taste buds with all the different textures and a rich umami. Since the 1900s, the people of Shanghai have enjoyed this tasty bun for breakfast, and now you can enjoy it at any time you like in your own kitchen. 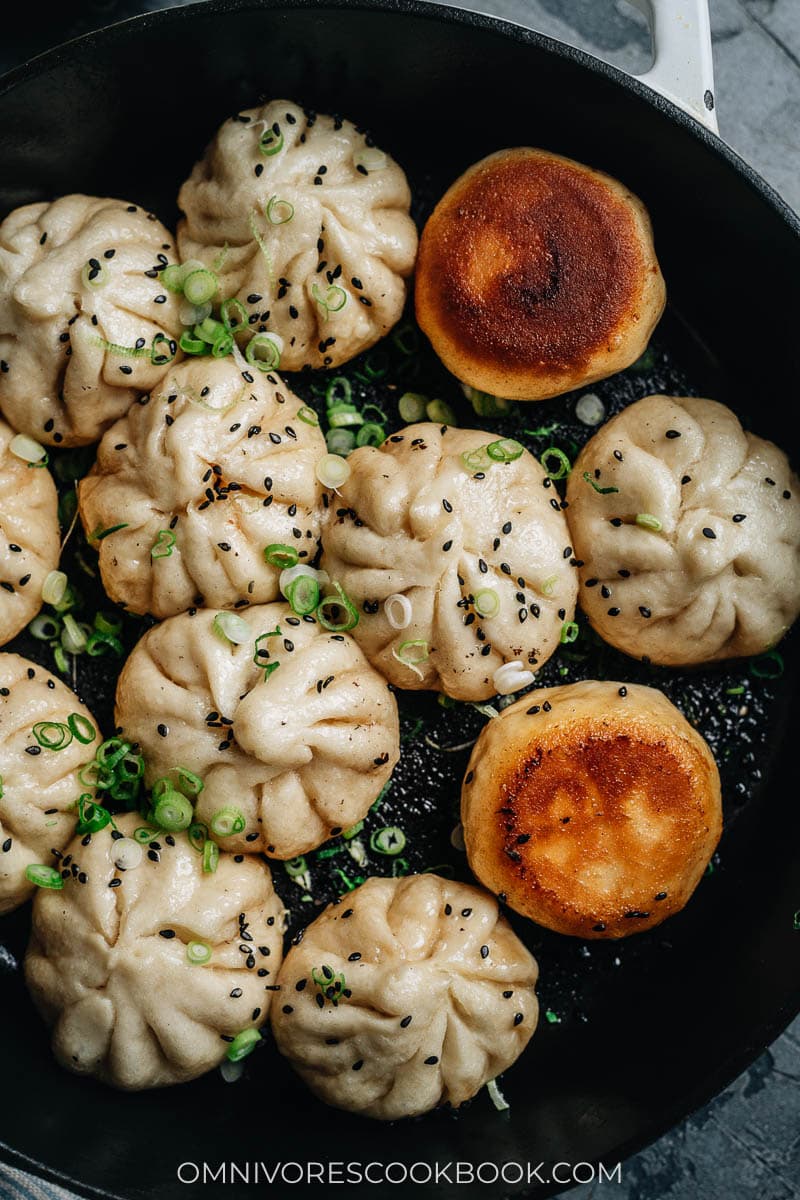 Why this recipe
No gelatin required yet very juicy
Why this recipe
No gelatin required yet very juicy
While many recipes for sheng jian bao use pork gelatin to create a soup-dumpling-like texture, it’s a time-consuming process. It requires pork skin or trotters, braised for many hours to get a rich soup, then chilled overnight. Plus, the yeast buns tend to absorb the soup during and after cooking, so they don’t even come out soupy. This version I have for you uses ginger-soaked water to increase the moisture in the filling so you get a juicy texture, yet it simplifies the cooking process. You can make it even juicier than that by using a fattier ground pork, like the type with 30% fat. Once cooked, the Sheng Jian Bao will have a very juicy and almost soupy filling. 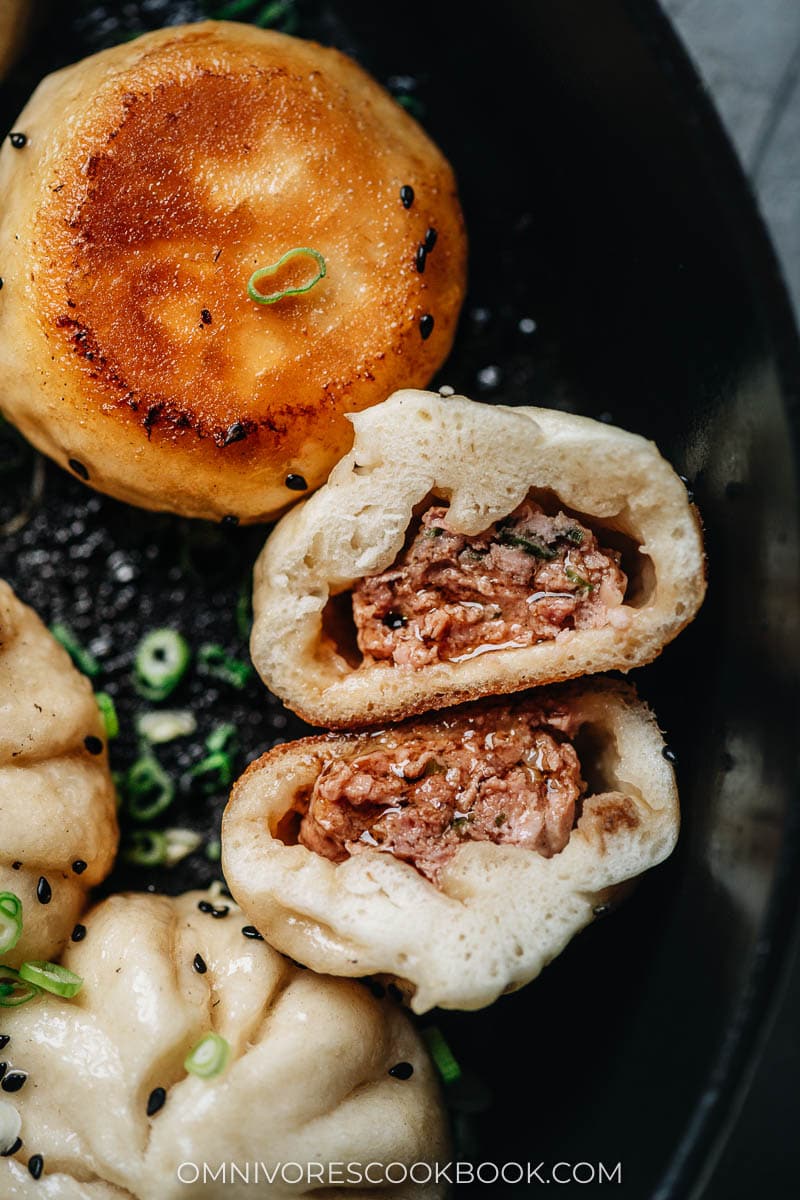
Also, you should know there are two ways to fry these sheng jian bao buns. The first method is to fry them pleat-side down. Or you can go with the flat-side down. I prefer using the latter method because it keeps the pleats pretty for a nice presentation and appearance.  Ingredients
The best part of making Sheng Jian Bao at home is that it requires very basic ingredients you probably already have in your pantry. NOTE: you will need to use instant yeast instead of dry active yeast. Because the yeast dough is a bit finicky when pan frying and steaming. Using instant yeast produces a more consistent result. I listed the ingredients below just so you can see everything. When you make the dish, you don’t need to lay everything out in small plates. 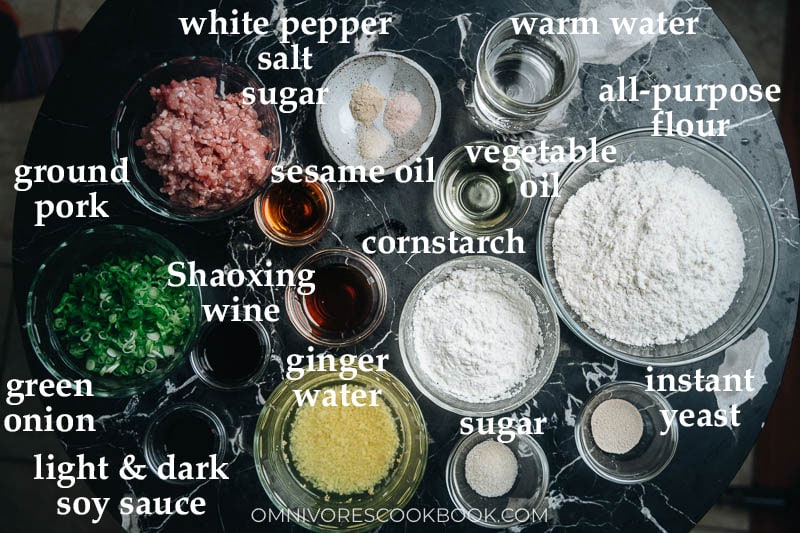 Cooking process
If you’ve made dumplings in the past, you’ll find the cooking process very straightforward. Even for a beginner, the dough is easy to put together. You don’t even need a stand mixer! To prepare the dough and filling Combine all the dry ingredientsSlowly add warm water and mix until the water is incorporatedKnead by hand for 15 to 20 minutesCover the dough with plastic wrap and let rest for 1 hourMix the filling ingredients together and beat until stickyAdd the green onion and sesame oil at the end, mix again. Cover and refrigerate until ready to useThe dough is ready when the size doublesGently knead for a minute to press out the air bubbles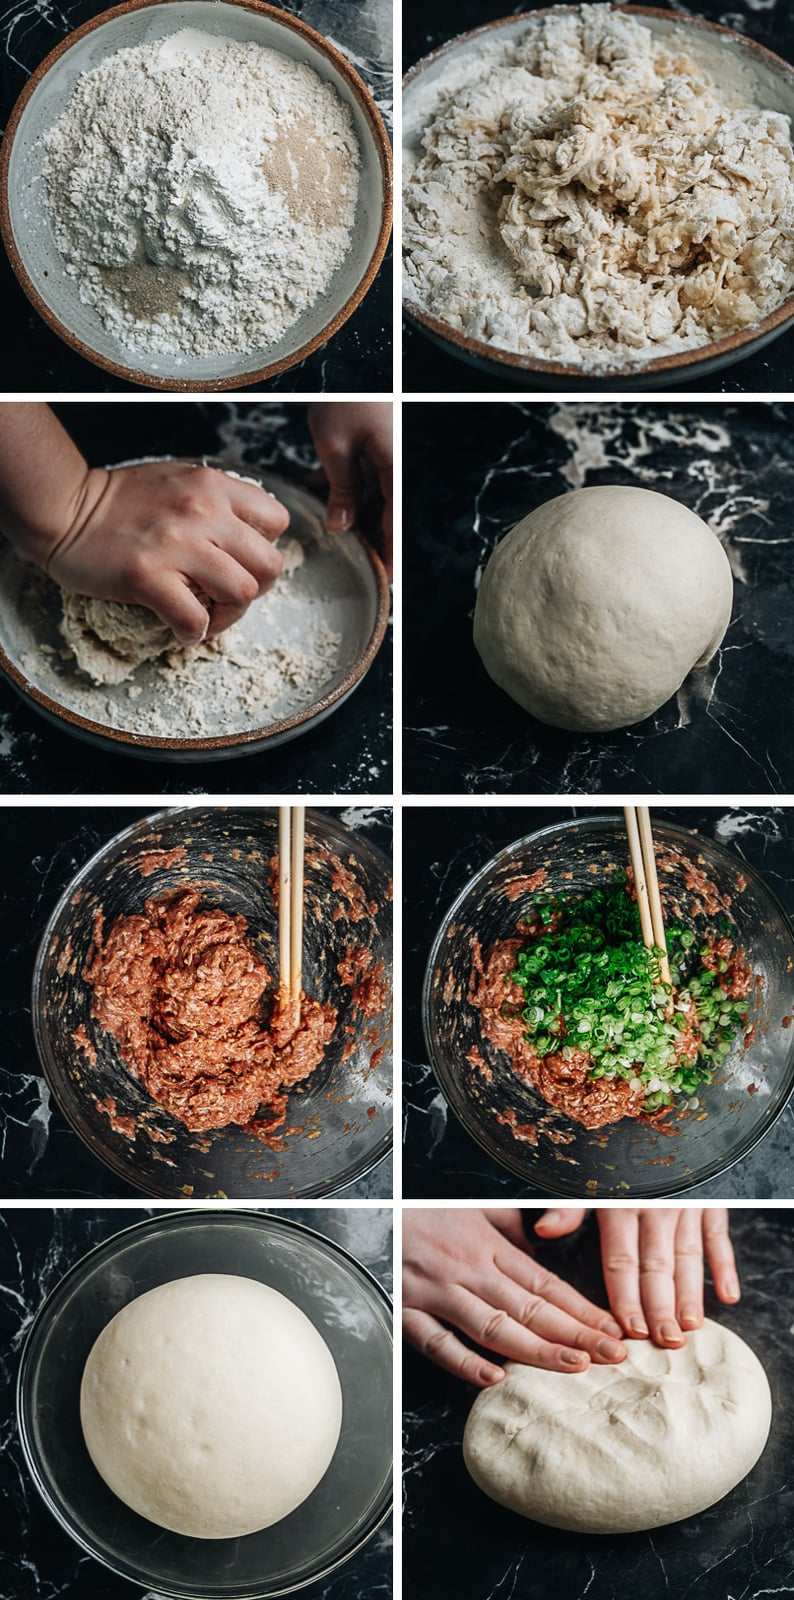 Assemble the buns
I highly recommend working on half a batch of buns at a time, so the dough won’t dry out and the filling won’t get soggy. Once you cut the dough in half and reserve the other half, make the half batch of dough into 12 pieces (see the video below for the detailed dough shaping method)Flatten the doughRoll it into a round diskPlace 1 tablespoon of the filling onto the diskStart wrapping by folding the edgesKeep folding until the bun is almost sealedPinch together the topSlightly twist and sealLet the buns rest for 10 minutes before cookingFry the buns to crisp up the bottomAdd water and cover, to steam the bunsMake sure you rest the buns once cooked, before you uncover and serve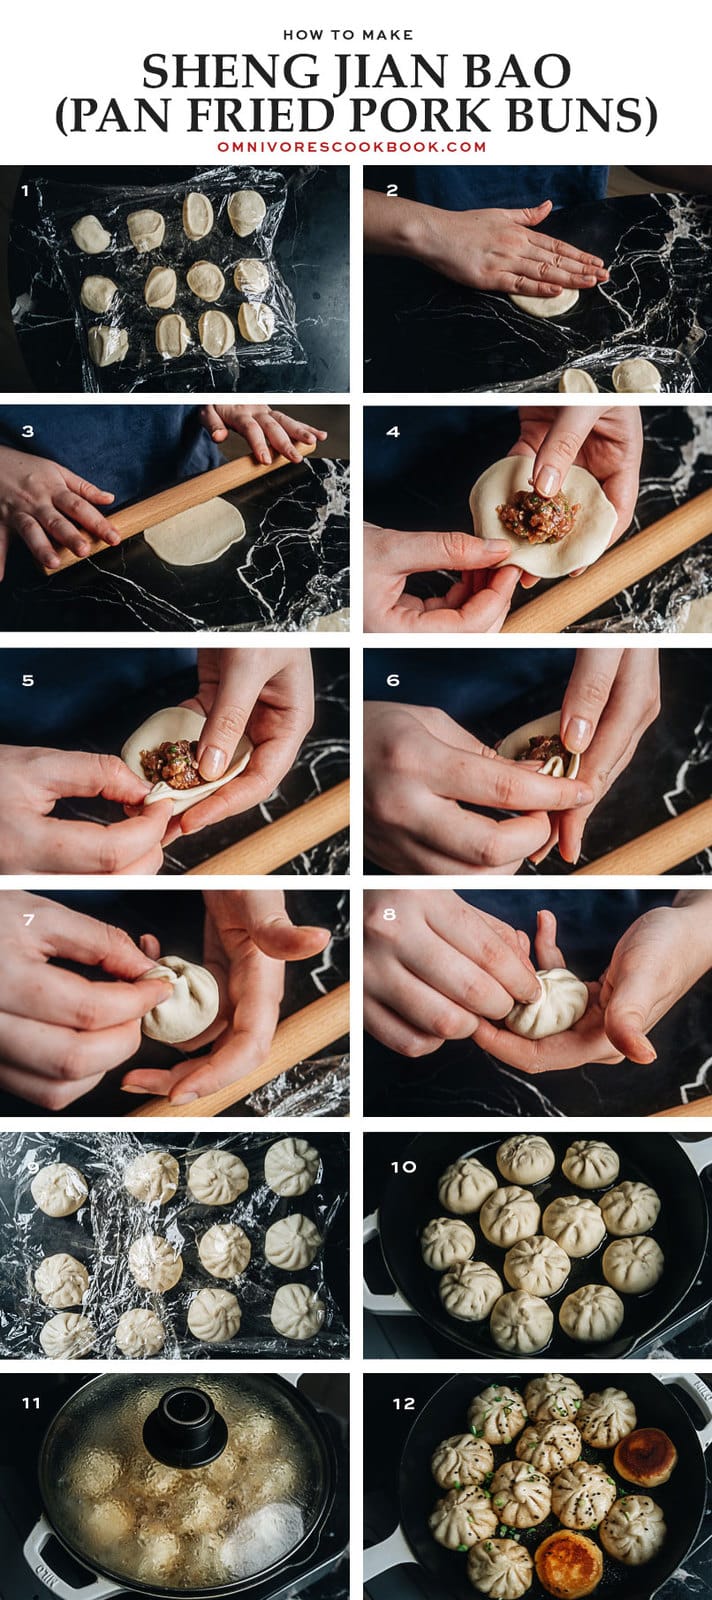
NOTE: I recommend serving the buns immediately after cooking, so the filling will be extra soupy. If you let the buns sit for a while, the juice will gradually be absorbed by the skin and lose its moisture. It will still taste delicious, but it won’t have the soup dumpling effect. AfterthoughtsYou can store your leftovers in the fridge or freezer. I like making a big batch and freezing them so my husband and I can enjoy them whenever the mood strikes! As mentioned, in Shanghai, sheng jian bao is served for breakfast. I know the American palate is a bit different, though, so if you’re not keen on trying them for breakfast, make them as an appetizer or side dish for lunch or dinner. They’re so satisfying that you can even serve them as a main dish. 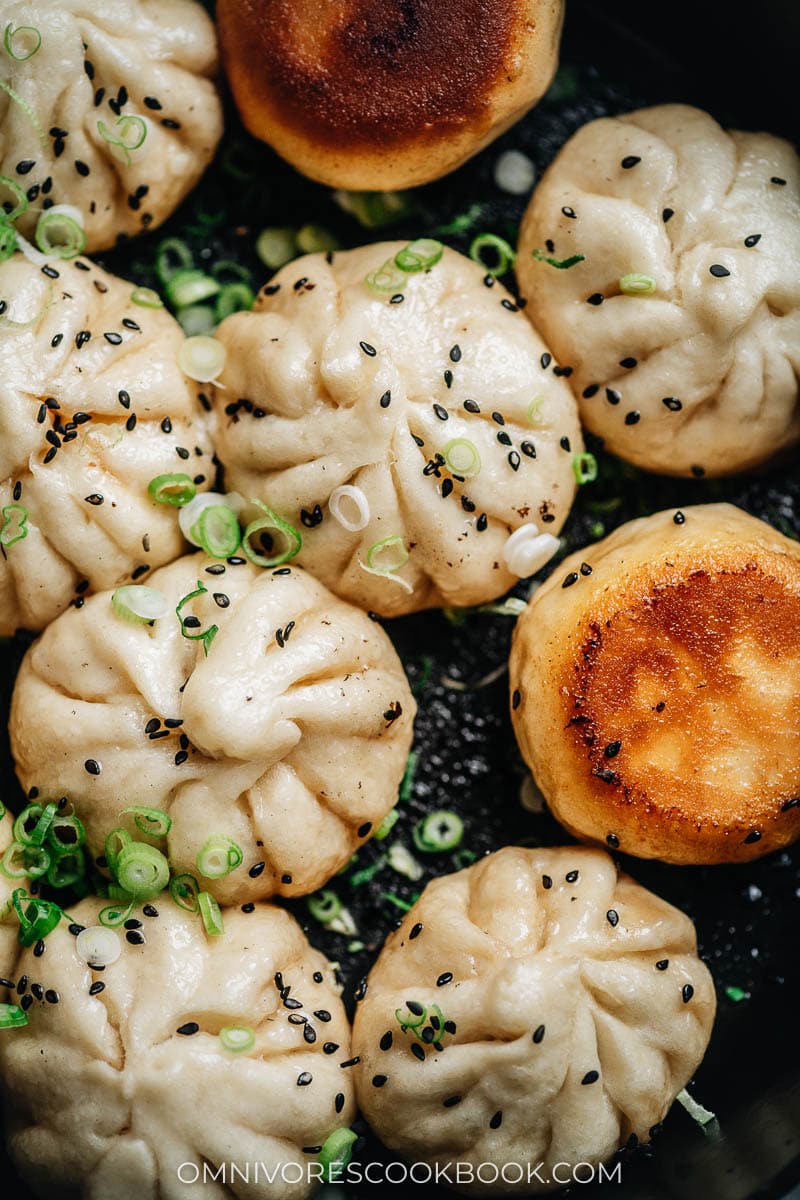
Want to learn more about Chinese Cooking? Sign up for my newsletter to receive the 5-Day Chinese Cooking Crash Course and recipe update! Want to Know More?Receive our 5-Day Chinese Cooking Crash Course & Recipe Updates! Subscribe Sheng Jian Bao (生煎包, Shanghai Pan-Fried Pork Buns)
5 from 25 votes
Try this recipe for sheng jian bao – super juicy and incredibly flavorful pork stuffed into a fluffy yet crispy pan-fried wrapper that satisfies on every level.
Author: Maggie Zhu
Course: AppetizerCuisine: ChineseKeyword: restaurant-style
Prep Time: 1 hour hourCook Time: 30 minutes minutesResting time: 1 hour hourTotal Time: 2 hours hours 30 minutes minutes
Servings: 24 buns
Print Recipe
Pin Recipe
Rate Recipe
IngredientsGinger water1 1/2 tablespoons ginger , minced1/4 cup hot waterDough250 g (1 2/3 cup) all-purpose flour50 g (1/3 cup + 1 tablespoon) cornstarch4 g (3/4 teaspoon) instant yeast5 g (1 teaspoon) sugar150 g (2/3 cup) warm water (*Footnote 1)15 g (1 tablespoon) vegetable oilFilling8 oz (227 g) ground pork (*Footnote 2)1 1/2 teaspoons light soy sauce1/2 teaspoon dark soy sauce (or soy sauce) (*Footnote 3)2 teaspoons Shaoxing wine1/2 teaspoon salt1/4 teaspoon sugar1/4 teaspoon ground white pepper4 green onions , sliced1 tablespoon toasted sesame oilCooking & Garnish4 tablespoons vegetable oil1/2 cup hot water , separatedChopped green onions , for garnish (Optional)Roasted sesame seeds , for garnish (Optional)
InstructionsPrepare ginger waterCombine the minced ginger and hot water in a small bowl. Stir to mix well and set aside.Prepare the doughIn a large tall plate or a big bowl, combine the all-purpose flour, cornstarch, instant yeast and sugar. Stir to mix well.Slowly pour in the warm water, a few tablespoons at a time, and mix with a pair of chopsticks (or a fork). Once all the water has been added, keep mixing and scrape off the dry flour on the side of the bowl, until it forms many small dough flakes.Pour in the vegetable oil. Keep mixing with the chopsticks until the oil is absorbed.Start kneading by hand while further incorporating the dry flour, until there’s no dry flour left in the bowl.Transfer the dough onto a working surface. Knead for 15 to 20 minutes, until the dough is quite smooth and elastic and there’s no dry flour left in the bowl. It’s OK if there’s some unevenness in the dough, which will smooth out after resting. The dough should be quite tough and not sticky to the touch. Cover and seal the bowl with plastic wrap. Let rest until it doubles in size, 1 hour or so.Prepare the fillingAdd the ginger water, light and dark soy sauce, Shaoxing wine, salt, sugar, and white pepper to the ground pork in a large bowl. Beat with a pair of chopsticks or a wooden spatula in a circular motion, until all the liquid is absorbed and the meat is sticky. This process might take a few minutes. (*Footnote 4)Add the green onions and sesame oil. Mix until they are incorporated. Cover the bowl with plastic wrap. Store in the fridge until ready to use.Assemble the bunsWhen the dough has rested, transfer to a work surface and punch it down. Knead for 1 minute to deflate the air out completely, then form it back into a ball.Cut the dough in half. Wrap half of the dough in plastic wrap and store in the fridge while working on the other half.Poke a hole in the center of the dough you’re working with. Stretch the dough into a large oval by running your fingers along the inside of the hole in a circular motion. Once the diameter of the dough is about 1” (2.5 cm), tear apart the ring so it creates a long, thin strip.Cut the dough strip into 12 even pieces by cutting it in half, then further cut each half into 6 pieces. Gently use a circular motion to round up each dough piece then flatten it with your palm. Cover them with plastic wrap to prevent drying out.Work on one piece of dough at a time – take one dough piece and place in front of you. Roll it with a rolling pin in one hand, using the other hand to rotate the dough while rolling, until the diameter reaches 5” (13 cm). You should keep the edges thinner than the center, so the wrapper of the bun will be even once you make the pleats.Place the rolled dough in your palm and add 1 tablespoon of filling in the center.Start wrapping the bun by folding and pinching the edge over itself, in one direction, until it is almost sealed. Then rotate and pinch the top of the pleats to fully seal the bun. (View my video for more details)Repeat with the remaining dough pieces to wrap all the buns. Keep the wrapped buns under a piece of plastic wrap to prevent drying out. Once done wrapping, let rest for 10 minutes. Once rested, you should cook the buns immediately. You can store the wrapped buns in a sealed container in the fridge for up to 1 hour before cooking.Repeat the wrapping steps to wrap the other half of the dough.To cook the buns:Add 2 tablespoons of oil and carefully place 12 wrapped buns into a 9” or 10” skillet. Heat over medium-high heat until hot. Turn to medium heat. Cook, uncovered, for 3 minutes, until the bottoms are lightly browned.Pour about 1/4 cup hot water into the pan, just enough to cover the buns halfway up. Cover the pan and cook over medium heat for about 8 minutes, until the water is completely evaporated.Turn the heat to medium-low and cook for another 2 to 3 minutes. Turn the heat off and remove the pan from the stove. Let the buns rest with the lid on for an additional 2 minutes. Remove the lid and transfer to a plate. Repeat the steps to cook the rest of the buns.Serve hot immediately. (*Footnote 5) Or you can store the cooked buns in an airtight container in the fridge for up to 4 days or in the freezer for up to 3 months.
Notes
The water should be slightly warmer than your body temperature.
Although you can use any type of ground pork, a fattier one (e.g. 30% fat) will produce a juicier result.
Dark soy sauce adds color to the filling, giving it the darker and more appetizing look once cooked. You can use soy sauce to replace dark soy sauce as well, but the color of the filling will come out lighter.
It’s important to beat the filling really well, so the meat will absorb all the liquid and bind together. Once done, the meat will be easily formed into balls for the wrapping process. And once cooked, the liquid will release and create a juicy filling.
The buns will be VERY juicy right after cooking. However, because the dough is very fluffy and it absorbs the juice fast, the buns will have less juice if you do not serve them immediately. The buns will still taste very delicious this way.
Video
NutritionServing: 1bun, Calories: 74kcal, Carbohydrates: 10.8g, Protein: 3.7g, Fat: 1.7g, Saturated Fat: 0.3g, Cholesterol: 7mg, Sodium: 85mg, Potassium: 67mg, Fiber: 0.5g, Sugar: 0.4g, Calcium: 5mg, Iron: 1mg
Did You Make This Recipe?Don’t forget the last step! Leave a comment below, and tag me @OmnivoresCookbook and #OmnivoresCookbook on Instagram!
Sheng Jian Bao (生煎包, Shanghai Pan-Fried Pork Buns)
5 from 25 votes
Try this recipe for sheng jian bao – super juicy and incredibly flavorful pork stuffed into a fluffy yet crispy pan-fried wrapper that satisfies on every level.
Author: Maggie Zhu
Course: AppetizerCuisine: ChineseKeyword: restaurant-style
Prep Time: 1 hour hourCook Time: 30 minutes minutesResting time: 1 hour hourTotal Time: 2 hours hours 30 minutes minutes
Servings: 24 buns
Print Recipe
Pin Recipe
Rate Recipe
IngredientsGinger water1 1/2 tablespoons ginger , minced1/4 cup hot waterDough250 g (1 2/3 cup) all-purpose flour50 g (1/3 cup + 1 tablespoon) cornstarch4 g (3/4 teaspoon) instant yeast5 g (1 teaspoon) sugar150 g (2/3 cup) warm water (*Footnote 1)15 g (1 tablespoon) vegetable oilFilling8 oz (227 g) ground pork (*Footnote 2)1 1/2 teaspoons light soy sauce1/2 teaspoon dark soy sauce (or soy sauce) (*Footnote 3)2 teaspoons Shaoxing wine1/2 teaspoon salt1/4 teaspoon sugar1/4 teaspoon ground white pepper4 green onions , sliced1 tablespoon toasted sesame oilCooking & Garnish4 tablespoons vegetable oil1/2 cup hot water , separatedChopped green onions , for garnish (Optional)Roasted sesame seeds , for garnish (Optional)
InstructionsPrepare ginger waterCombine the minced ginger and hot water in a small bowl. Stir to mix well and set aside.Prepare the doughIn a large tall plate or a big bowl, combine the all-purpose flour, cornstarch, instant yeast and sugar. Stir to mix well.Slowly pour in the warm water, a few tablespoons at a time, and mix with a pair of chopsticks (or a fork). Once all the water has been added, keep mixing and scrape off the dry flour on the side of the bowl, until it forms many small dough flakes.Pour in the vegetable oil. Keep mixing with the chopsticks until the oil is absorbed.Start kneading by hand while further incorporating the dry flour, until there’s no dry flour left in the bowl.Transfer the dough onto a working surface. Knead for 15 to 20 minutes, until the dough is quite smooth and elastic and there’s no dry flour left in the bowl. It’s OK if there’s some unevenness in the dough, which will smooth out after resting. The dough should be quite tough and not sticky to the touch. Cover and seal the bowl with plastic wrap. Let rest until it doubles in size, 1 hour or so.Prepare the fillingAdd the ginger water, light and dark soy sauce, Shaoxing wine, salt, sugar, and white pepper to the ground pork in a large bowl. Beat with a pair of chopsticks or a wooden spatula in a circular motion, until all the liquid is absorbed and the meat is sticky. This process might take a few minutes. (*Footnote 4)Add the green onions and sesame oil. Mix until they are incorporated. Cover the bowl with plastic wrap. Store in the fridge until ready to use.Assemble the bunsWhen the dough has rested, transfer to a work surface and punch it down. Knead for 1 minute to deflate the air out completely, then form it back into a ball.Cut the dough in half. Wrap half of the dough in plastic wrap and store in the fridge while working on the other half.Poke a hole in the center of the dough you’re working with. Stretch the dough into a large oval by running your fingers along the inside of the hole in a circular motion. Once the diameter of the dough is about 1” (2.5 cm), tear apart the ring so it creates a long, thin strip.Cut the dough strip into 12 even pieces by cutting it in half, then further cut each half into 6 pieces. Gently use a circular motion to round up each dough piece then flatten it with your palm. Cover them with plastic wrap to prevent drying out.Work on one piece of dough at a time – take one dough piece and place in front of you. Roll it with a rolling pin in one hand, using the other hand to rotate the dough while rolling, until the diameter reaches 5” (13 cm). You should keep the edges thinner than the center, so the wrapper of the bun will be even once you make the pleats.Place the rolled dough in your palm and add 1 tablespoon of filling in the center.Start wrapping the bun by folding and pinching the edge over itself, in one direction, until it is almost sealed. Then rotate and pinch the top of the pleats to fully seal the bun. (View my video for more details)Repeat with the remaining dough pieces to wrap all the buns. Keep the wrapped buns under a piece of plastic wrap to prevent drying out. Once done wrapping, let rest for 10 minutes. Once rested, you should cook the buns immediately. You can store the wrapped buns in a sealed container in the fridge for up to 1 hour before cooking.Repeat the wrapping steps to wrap the other half of the dough.To cook the buns:Add 2 tablespoons of oil and carefully place 12 wrapped buns into a 9” or 10” skillet. Heat over medium-high heat until hot. Turn to medium heat. Cook, uncovered, for 3 minutes, until the bottoms are lightly browned.Pour about 1/4 cup hot water into the pan, just enough to cover the buns halfway up. Cover the pan and cook over medium heat for about 8 minutes, until the water is completely evaporated.Turn the heat to medium-low and cook for another 2 to 3 minutes. Turn the heat off and remove the pan from the stove. Let the buns rest with the lid on for an additional 2 minutes. Remove the lid and transfer to a plate. Repeat the steps to cook the rest of the buns.Serve hot immediately. (*Footnote 5) Or you can store the cooked buns in an airtight container in the fridge for up to 4 days or in the freezer for up to 3 months.
Notes
The water should be slightly warmer than your body temperature.
Although you can use any type of ground pork, a fattier one (e.g. 30% fat) will produce a juicier result.
Dark soy sauce adds color to the filling, giving it the darker and more appetizing look once cooked. You can use soy sauce to replace dark soy sauce as well, but the color of the filling will come out lighter.
It’s important to beat the filling really well, so the meat will absorb all the liquid and bind together. Once done, the meat will be easily formed into balls for the wrapping process. And once cooked, the liquid will release and create a juicy filling.
The buns will be VERY juicy right after cooking. However, because the dough is very fluffy and it absorbs the juice fast, the buns will have less juice if you do not serve them immediately. The buns will still taste very delicious this way.
Video
NutritionServing: 1bun, Calories: 74kcal, Carbohydrates: 10.8g, Protein: 3.7g, Fat: 1.7g, Saturated Fat: 0.3g, Cholesterol: 7mg, Sodium: 85mg, Potassium: 67mg, Fiber: 0.5g, Sugar: 0.4g, Calcium: 5mg, Iron: 1mg
Did You Make This Recipe?Don’t forget the last step! Leave a comment below, and tag me @OmnivoresCookbook and #OmnivoresCookbook on Instagram!
If you give this recipe a try, let us know! Leave a comment, rate it (once you’ve tried it), and take a picture and tag it @omnivorescookbook on Instagram! I’d love to see what you come up with. Other dumplings and buns recipes Gua Bao (Taiwanese Pork Belly Buns, 割包)Baked BBQ Pork Buns (Char Siu Bao)Chinese Steamed Custard Buns (nai wong bao, 奶黄包)Addictive Kimchi Pork Steamed BunChinese Pork Belly Bun (Rou Jia Mo, 肉夹馍)Lilja Walter is a part of the Omnivore’s Cookbook team and worked closely with Maggie to develop and test this recipe. |
【本文地址】
今日新闻 |
推荐新闻 |