实例分割笔记(一): 使用YOLOv5 |
您所在的位置:网站首页 › 图像分析是一个从图像到什么的过程 › 实例分割笔记(一): 使用YOLOv5 |
实例分割笔记(一): 使用YOLOv5
|
文章目录
一、图像分割介绍二、YOLOv5-Seg介绍三、代码获取四、视频讲解五、环境搭建六、数据集准备6.1 数据集转换6.2 数据集验证
七、模型训练八、模型验证九、模型测试十、评价指标
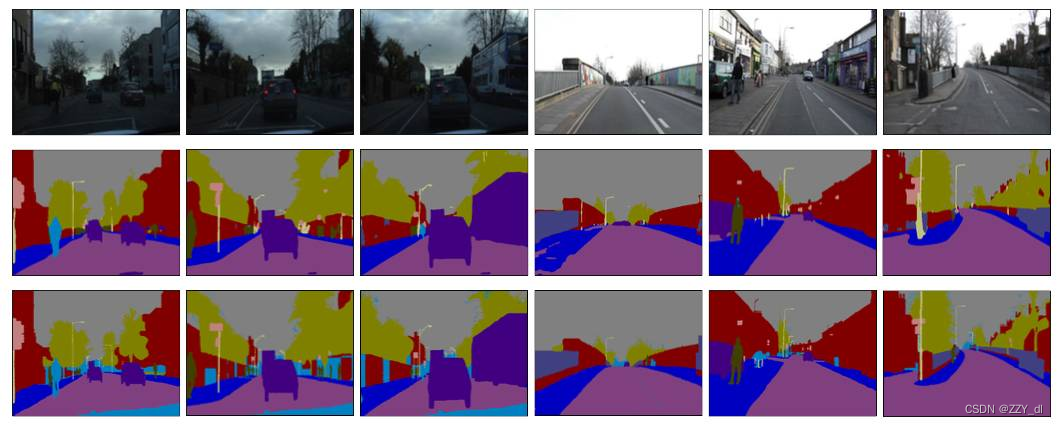
一、图像分割介绍
图像分割是指将一幅图像划分为若干个互不重叠的区域,每个区域内的像素具有相似的特征或属性。图像分割是图像处理和计算机视觉领域的一个重要任务,它在很多应用中起到关键作用,如目标检测、目标跟踪、图像编辑、医学图像分析等。 图像分割的目标是将图像中的目标从背景中分离出来,使得目标区域内的像素具有一致的特征,同时与背景区域有明显的差异。常见的图像分割方法包括基于阈值的方法、边缘检测方法、区域生长方法、基于图割的方法等。 基于阈值的方法是最简单的图像分割方法之一,它根据像素的灰度值与预先设定的阈值进行比较,将像素分为目标和背景两类。这种方法适用于目标与背景之间的灰度差异较大的情况。 边缘检测方法是通过检测图像中的边缘来进行分割的方法。边缘是图像中像素值变化较大的地方,通过检测边缘可以将目标与背景分开。常用的边缘检测算法包括Sobel算子、Canny算子等。 区域生长方法是基于像素相似性的图像分割方法,它从一个或多个种子像素开始,通过像素之间的相似性进行生长,将相似的像素合并为一个区域。这种方法适用于目标与背景之间的灰度差异较小的情况。 基于图割的方法是一种基于图论的图像分割方法,它将图像分割问题转化为图论中的最小割问题。通过构建一个图,将图像中的像素作为图的节点,将像素之间的相似性作为边的权重,然后通过最小割算法将图像分割为不同的区域。 总之,图像分割是图像处理和计算机视觉中的重要任务,它可以将图像中的目标从背景中分离出来,为后续的图像分析和处理提供基础。不同的图像分割方法适用于不同的应用场景,选择合适的方法可以提高分割的准确性和效果。 二、YOLOv5-Seg介绍YOLOv5-Seg是基于YOLOv5的图像分割模型。YOLOv5是一种基于深度学习的目标检测算法,它使用轻量级的网络结构和高效的推理算法,在保持准确性的同时大大提高了检测速度。YOLOv5-Seg通过对YOLOv5进行改进和扩展,将其应用于图像分割任务。 相对于YOLOv5,YOLOv5-Seg在以下方面进行了改进: 网络结构:YOLOv5-Seg在YOLOv5的基础上进行了扩展和改进,添加了分割头部,使得模型能够同时进行目标检测和图像分割。损失函数:YOLOv5-Seg使用了新的损失函数来适应图像分割任务。传统的YOLOv5使用的是目标检测任务的损失函数,而YOLOv5-Seg引入了分割任务的损失函数,以优化分割的准确性。数据标注:YOLOv5-Seg需要使用像素级别的标注数据进行训练,而不仅仅是目标的边界框标注。因此,相对于YOLOv5,YOLOv5-Seg需要更加精细和详细的标注数据。训练策略:由于YOLOv5-Seg同时进行目标检测和图像分割任务的训练,需要采用适当的训练策略来平衡两个任务之间的权重和损失函数。推理算法:YOLOv5-Seg在推理过程中需要进行目标检测和图像分割的计算,因此需要相应的推理算法来实现高效的分割。总之,YOLOv5-Seg相对于YOLOv5在网络结构、损失函数、数据标注、训练策略和推理算法等方面进行了改进和优化,使其能够更好地适应图像分割任务的需求。 三、代码获取https://github.com/z1069614715/yolov5-seg 四、视频讲解https://www.bilibili.com/video/BV1nV4y1P7HQ/?spm_id_from=333.337.search-card.all.click&vd_source=dda23f7bec965647e736cf2cc056bd59 五、环境搭建安装cuda、pytorch、torchvision,然后执行pip install -r requirements.txt -i https://pypi.tuna.tsinghua.edu.cn/simple 如果是cpu,则直接安装cpu对应的pytorch和torchvision,然后再执行后面的pip install -r requirements.txt -i https://pypi.tuna.tsinghua.edu.cn/simple。 参考这个博客:点击 六、数据集准备 6.1 数据集转换方式1:通过labelme自己标注生成一个个的小json文件,这样你就可以得到全部图片对应的json文件了,然后将图片放在一个文件夹,所有的标注信息放在一个文件夹;或者所有图片和JSON再一个文件夹的形式。然后我们通过下面的代码将其转换为TXT标签文件。 import glob import numpy as np import json import os import cv2 # 根据原图和JSON格式的标签文件生成对应的YOLO的TXT标签文件保存到json_path路径下(保存文件名字和原来文件的名字一样,后缀换成txt) json_path = r"./labelme/train2014" # 原始的JSON标签文件 TXT_path = r"./labelme/TXT_file" # 保存的TXT文件夹 image_path = r"./images/" # 原图 label_dict = {'mat': 0, 'class 2': 1, 'class 3': 2} # 类别情况 json_files = glob.glob(json_path + "/*.json") for json_file in json_files: f = open(json_file) json_info = json.load(f) img = cv2.imread(os.path.join(image_path, json_info["imagePath"][0])) height, width, _ = img.shape np_w_h = np.array([[width, height]], np.int32) txt_file = json_file.split("\\")[-1].replace(".json", ".txt") txt_file = os.path.join(TXT_path, txt_file) f = open(txt_file, "a") for point_json in json_info["shapes"]: txt_content = "" np_points = np.array(point_json["points"], np.int32) label = point_json["label"] label_index = label_dict.get(label, None) np_points = np.array(point_json["points"], np.int32) norm_points = np_points / np_w_h norm_points_list = norm_points.tolist() txt_content += f"{label_index} " + " ".join([" ".join([str(cell[0]), str(cell[1])]) for cell in norm_points_list]) + "\n" f.write(txt_content)或者图片和JSON在一个文件夹的形式,通过下面的代码会再相同文件夹下生成对应的txt文件 import os, cv2, json import numpy as np classes = ['square', 'triangle'] # 修改成对应的类别 base_path = '../dataset/labelme_dataset' # 指定json和图片的位置 path_list = [i.split('.')[0] for i in os.listdir(base_path)] for path in path_list: image = cv2.imread(f'{base_path}/{path}.jpg') h, w, c = image.shape with open(f'{base_path}/{path}.json') as f: masks = json.load(f)['shapes'] with open(f'{base_path}/{path}.txt', 'w+') as f: for idx, mask_data in enumerate(masks): mask_label = mask_data['label'] if '_' in mask_label: mask_label = mask_label.split('_')[0] mask = np.array([np.array(i) for i in mask_data['points']], dtype=np.float) mask[:, 0] /= w mask[:, 1] /= h mask = mask.reshape((-1)) if idx != 0: f.write('\n') f.write(f'{classes.index(mask_label)} {" ".join(list(map(lambda x:f"{x:.6f}", mask)))}')方式2:如果我们下载的数据集是COCO格式的,只有一个很大的JSON文件,然后还有对应的图片文件,这时候我们就需要将大的JSON文件转换一个个小的JSON文件,然后再按照方式1的方法来进行处理。转换代码如下: import json import os def coco_to_labelme(coco_file, output_dir): with open(coco_file, 'r') as f: data = json.load(f) images = data['images'] annotations = data['annotations'] categories = {category['id']: category['name'] for category in data['categories']} for image in images: image_id = image['id'] image_file = image['file_name'] print(image['file_name'].rsplit('\\', 1)) # dir, image_file_1 = image['file_name'].rsplit('\\', 1) # 如果包含路径则需要通过这种方式获取文件名 image_file_1 = image['file_name'].rsplit('\\', 1) image_width = image['width'] image_height = image['height'] labelme_data = { "version": "5.0.1", "flags": {}, "shapes": [], "imagePath": image_file_1, "imageData": None, "imageHeight": image_height, "imageWidth": image_width } for annotation in annotations: if annotation['image_id'] == image_id: category_id = annotation['category_id'] category_name = categories[category_id] bbox = annotation['bbox'] segmentation = annotation['segmentation'][0] # Convert segmentation to polygon format polygon = [] for i in range(0, len(segmentation), 2): x = segmentation[i] y = segmentation[i + 1] polygon.append([x, y]) shape_data = { "label": category_name, "points": polygon, "group_id": None, "shape_type": "polygon", "flags": {} } labelme_data['shapes'].append(shape_data) image_name = os.path.splitext(os.path.basename(image_file))[0] labelme_output_file = os.path.join(output_dir, image_name + '.json') with open(labelme_output_file, 'w') as f: json.dump(labelme_data, f, indent=4) print(f"Converted {image_file} to {labelme_output_file}") # 使用示例 coco_file = r'annotations/instances_train2014.json' # 这里是原始的COCO大JSON文件 output_dir = r'labelme/train2014' # 这里是保存的位置 coco_to_labelme(coco_file, output_dir) 6.2 数据集验证转换之后我们就可以得到一个原始图片文件夹,还有就是用于YOLO训练的TXT标签文件夹,这时候我们应该先考虑标签转换的正确性,如果不正确后续的训练肯定是有问题的,验证代码如下: 针对单个图片和标签可视化 import cv2 import numpy as np # 只需要给定图片和txt标签文件即可(单独的) pic_path = r"./images/2023060111212345_11.jpg" txt_path = r"./labelme/TXT_file/2023060111212345_11.txt" img = cv2.imread(pic_path) img0 = img.copy() height, width, _ = img.shape file_handle = open(txt_path) cnt_info = file_handle.readlines() new_cnt_info = [line_str.replace("\n", "").split(" ") for line_str in cnt_info] color_map = [(0, 255, 255), (255, 0, 255), (255, 255, 0)] for new_info in new_cnt_info: s = [] for i in range(1, len(new_info), 2): b = [float(tmp) for tmp in new_info[i:i + 2]] s.append([int(b[0] * width), int(b[1] * height)]) class_ = new_info[0] index = int(class_) cv2.polylines(img, [np.array(s, np.int32)], True, color_map[index], thickness = 3) img = cv2.resize(img, (800,416)) img0 = cv2.resize(img0, (800,416)) cv2.imshow('ori', img0) cv2.imshow('result', img) cv2.waitKey(0)针对文件夹下的多个图片和标签可视化 import cv2 import numpy as np import glob # 只需要给定图片文件夹和txt标签文件夹即可 pic_path = r"./images/" txt_path = r"./labelme/TXT_file/" pic = glob.glob(pic_path + "*.jpg") for pic_file in pic: img = cv2.imread(pic_file) # print("***:",pic_file) substrings = pic_file.split('/') substrings = substrings[-1].split('.') # print("***:",substrings) num=substrings[0].split("\\")[1] height, width, _ = img.shape txt_file = txt_path + num + ".txt" file_handle = open(txt_file) cnt_info = file_handle.readlines() print("***:",cnt_info) new_cnt_info = [line_str.replace("\n", "").split(" ") for line_str in cnt_info] # print("***:",new_cnt_info) color_map = [(0, 255, 255), (255, 0, 255), (255, 255, 0)] for new_info in new_cnt_info: s = [] for i in range(1, len(new_info), 2): b = [float(tmp) for tmp in new_info[i:i + 2]] s.append([int(b[0] * width), int(b[1] * height)]) class_ = new_info[0] index = int(class_) cv2.polylines(img, [np.array(s, np.int32)], True, color_map[index], thickness = 3) save_path = 'labelme/all/' + num + '.jpg' # cv2.imwrite(save_path, img) img = cv2.resize(img, (800,416)) cv2.imshow("{}".format(num), img) cv2.waitKey(0)
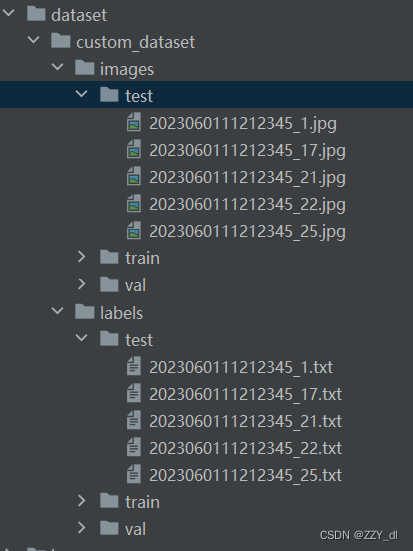
经过上面的操作,我们的数据集转换是没有问题的,但是我们还不能直接用于网络的训练,需要划分数据集,这时候就需要通过下面的代码操作(只需要指定原图和标签TXT图片的位置,还有保存的目标位置): import os, shutil, random import numpy as np TXT_path = 'labelme/TXT_file' # 原TXT文件 Image_path = 'images' # 原图片文件 dataset_path = 'dataset/custom_dataset' # 保存的目标位置 val_size, test_size = 0.1, 0.2 os.makedirs(dataset_path, exist_ok=True) os.makedirs(f'{dataset_path}/images', exist_ok=True) os.makedirs(f'{dataset_path}/images/train', exist_ok=True) os.makedirs(f'{dataset_path}/images/val', exist_ok=True) os.makedirs(f'{dataset_path}/images/test', exist_ok=True) os.makedirs(f'{dataset_path}/labels/train', exist_ok=True) os.makedirs(f'{dataset_path}/labels/val', exist_ok=True) os.makedirs(f'{dataset_path}/labels/test', exist_ok=True) path_list = np.array([i.split('.')[0] for i in os.listdir(TXT_path) if 'txt' in i]) random.shuffle(path_list) train_id = path_list[:int(len(path_list) * (1 - val_size - test_size))] val_id = path_list[int(len(path_list) * (1 - val_size - test_size)):int(len(path_list) * (1 - test_size))] test_id = path_list[int(len(path_list) * (1 - test_size)):] for i in train_id: shutil.copy(f'{Image_path}/{i}.jpg', f'{dataset_path}/images/train/{i}.jpg') shutil.copy(f'{TXT_path}/{i}.txt', f'{dataset_path}/labels/train/{i}.txt') for i in val_id: shutil.copy(f'{Image_path}/{i}.jpg', f'{dataset_path}/images/val/{i}.jpg') shutil.copy(f'{TXT_path}/{i}.txt', f'{dataset_path}/labels/val/{i}.txt') for i in test_id: shutil.copy(f'{Image_path}/{i}.jpg', f'{dataset_path}/images/test/{i}.jpg') shutil.copy(f'{TXT_path}/{i}.txt', f'{dataset_path}/labels/test/{i}.txt')
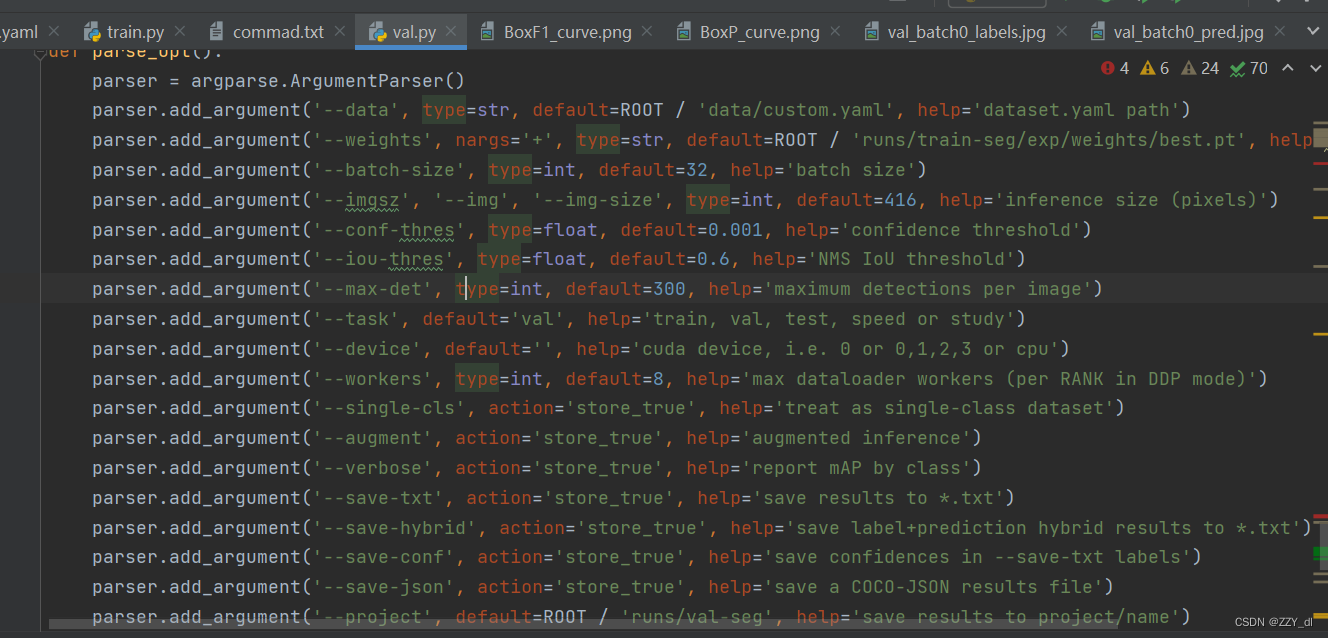
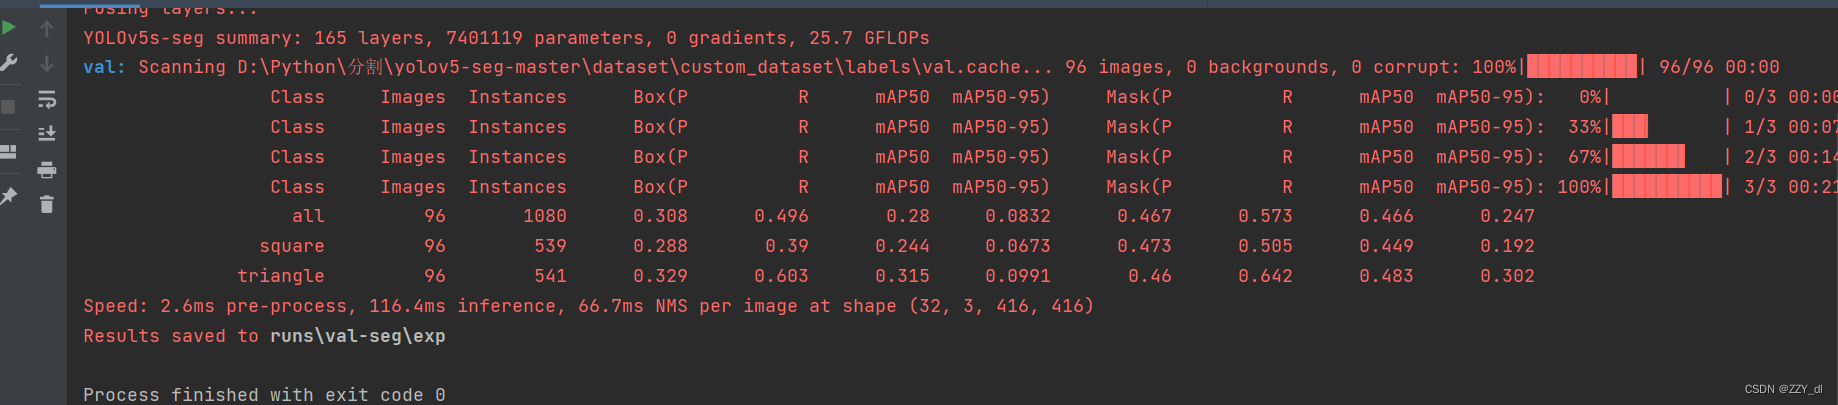
主要看mask的P、R、[email protected]和[email protected]:95。 P(Precision):在图像分割中,P表示预测的像素被正确分类为目标的比例。换句话说,P衡量了模型对于像素级别分割的准确性。R(Recall):在图像分割中,R表示实际为目标的像素被正确预测为目标的比例。换句话说,R衡量了模型对于像素级别分割的召回率。[email protected]:在图像分割中,[email protected]是指在IoU阈值为0.5时的平均精度。mAP是对P-R曲线下的面积进行计算,用于综合评估模型的性能。[email protected]衡量了模型在像素级别分割中的平均准确性。[email protected]:95:在图像分割中,[email protected]:95是指在IoU阈值从0.5到0.95变化时的平均精度。与[email protected]相比,[email protected]:95更全面地评估了模型在不同IoU阈值下的性能,对于更严格的分割要求提供了评估。 |
 划分好了之后我们就可以重写配置文件
 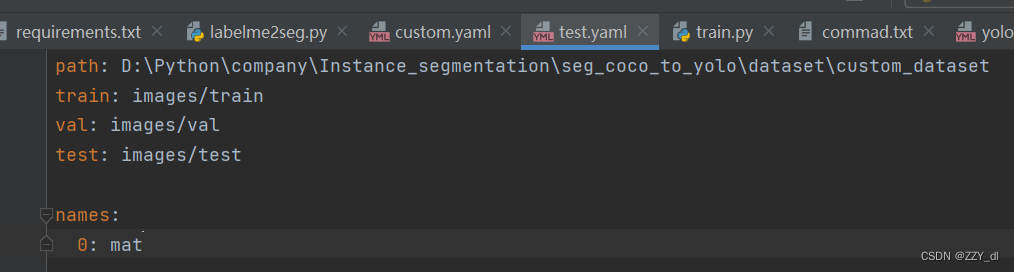 写好之后就可以通过train文件来进行训练了,指定我们重写的yaml文件
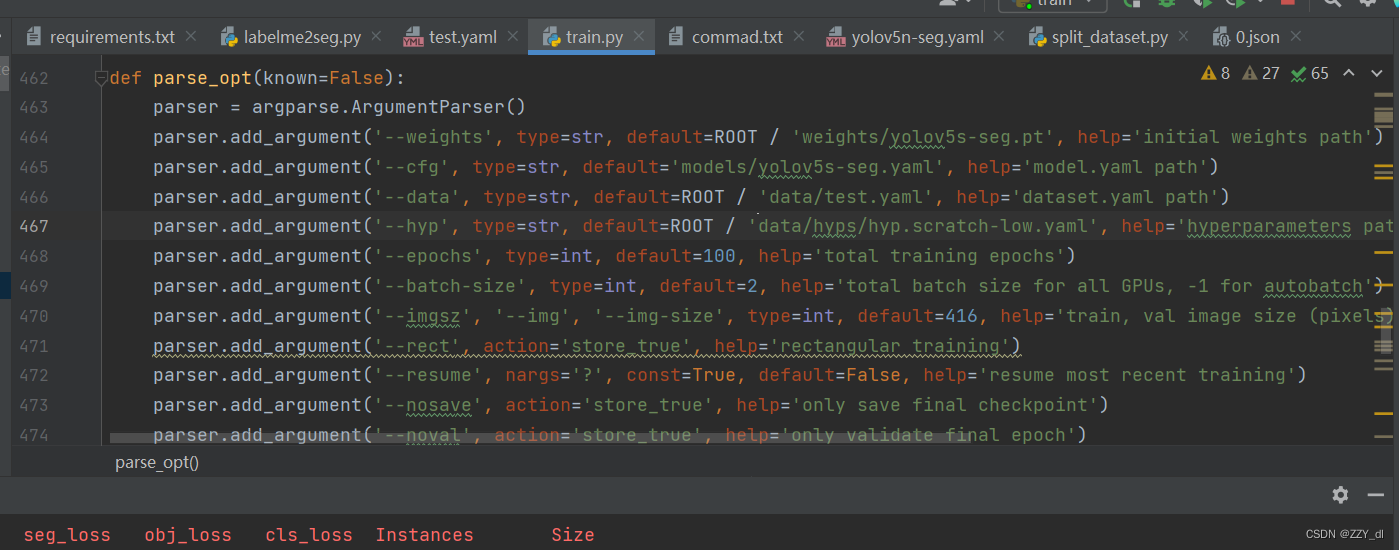
【本文地址】