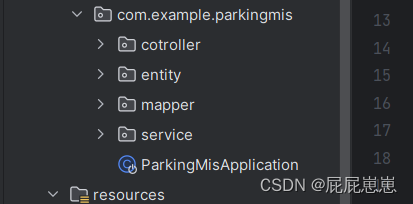
SpringBoot简单停车场的车辆管理项目搭建(前端页面 + 数据库 + 实现源码) |
您所在的位置:网站首页 › 前端如何搭建项目管理系统 › SpringBoot简单停车场的车辆管理项目搭建(前端页面 + 数据库 + 实现源码) |
SpringBoot简单停车场的车辆管理项目搭建(前端页面 + 数据库 + 实现源码)
|
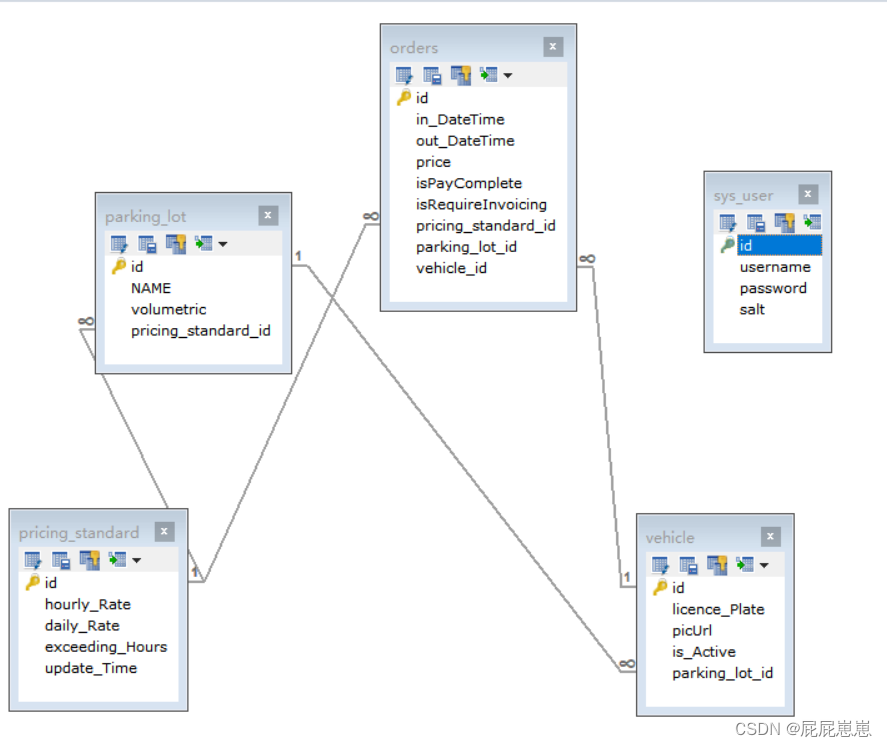
目录 一、项目简介 1.1前言 1.2 技术选型 二、Mysql数据库搭建准备 三、IDEA环境搭建准备 四、后端代码 五、前端代码与界面 一、项目简介 1.1前言致各位感兴趣了解本项目的各位人士: 因为课程要求也是自己的想法,想通过写一个博客可以方便自己回顾所学的知识。我现在要介绍的是老师在课堂所教的停车场项目。项目内容主要有SysUser(用户管理系统)、parkingLot(停车场管理)、pricingStandard(停车场收费管理)、vehicle(车辆管理)、order(订单管理)等几个类。 1.2 技术选型下面我将分模块对本项目进行讲解 工具名称开发语言IDEA语言JDK17、HTML、CSS、JQ模板引擎Themleaf数据库SQLyog - 64 bit项目框架SpringBootORDMybatis plus项目构建Maven 二、Mysql数据库搭建准备我这里一共有五张表分别是:Vehicle(车辆)、PricingStandard(收费标准)、ParkingLot(停车场)、Order(订单)、SysUser(系统用户)。 他们之间的联系下图可以明确的解释说明。
建立外键的时候遇到了个小bug,错误提示是: 错误代码:1452 Cannot add or update a child row: a foreign key constraint fails (`2022soft`.`#sql-1480_170`, CONSTRAINT `pricing_standard_id` FOREIGN KEY (`pricing_standard_id`) REFERENCES `pricing_standard` (`id`)) 发现1452的错误主要原因就是:有外键的子表对应的主表中没有数据。 原来是我主表没有子表的写有数据,产生了bug无法建立外键。给他添加了相对于的数据之后就好了。 三、IDEA环境搭建准备pom.xml文件依赖注入如下: 导入项目所需的依赖坐标等待idea自动下载jar包即可。 4.0.0 org.springframework.boot spring-boot-starter-parent 3.1.4 com.example parkingMIS 0.0.1-SNAPSHOT parkingMIS parkingMIS 17 org.springframework.boot spring-boot-starter-web org.springframework.boot spring-boot-devtools runtime true org.projectlombok lombok true org.springframework.boot spring-boot-starter-test test com.mysql mysql-connector-j 8.0.33 com.baomidou mybatis-plus-boot-starter 3.5.3.1 org.springframework.boot spring-boot-starter-thymeleaf org.webjars bootstrap 5.3.0 org.webjars jquery 3.6.4 org.webjars webjars-locator-core org.mybatis.spring.boot mybatis-spring-boot-starter 3.0.2 com.mysql mysql-connector-j org.apache.tomcat.embed tomcat-embed-core 10.1.13 org.springframework.boot spring-boot-maven-plugin org.projectlombok lombok我们可以使用yml格式的配置文件(更简洁)和properties文件功能相同,编写格式不同。
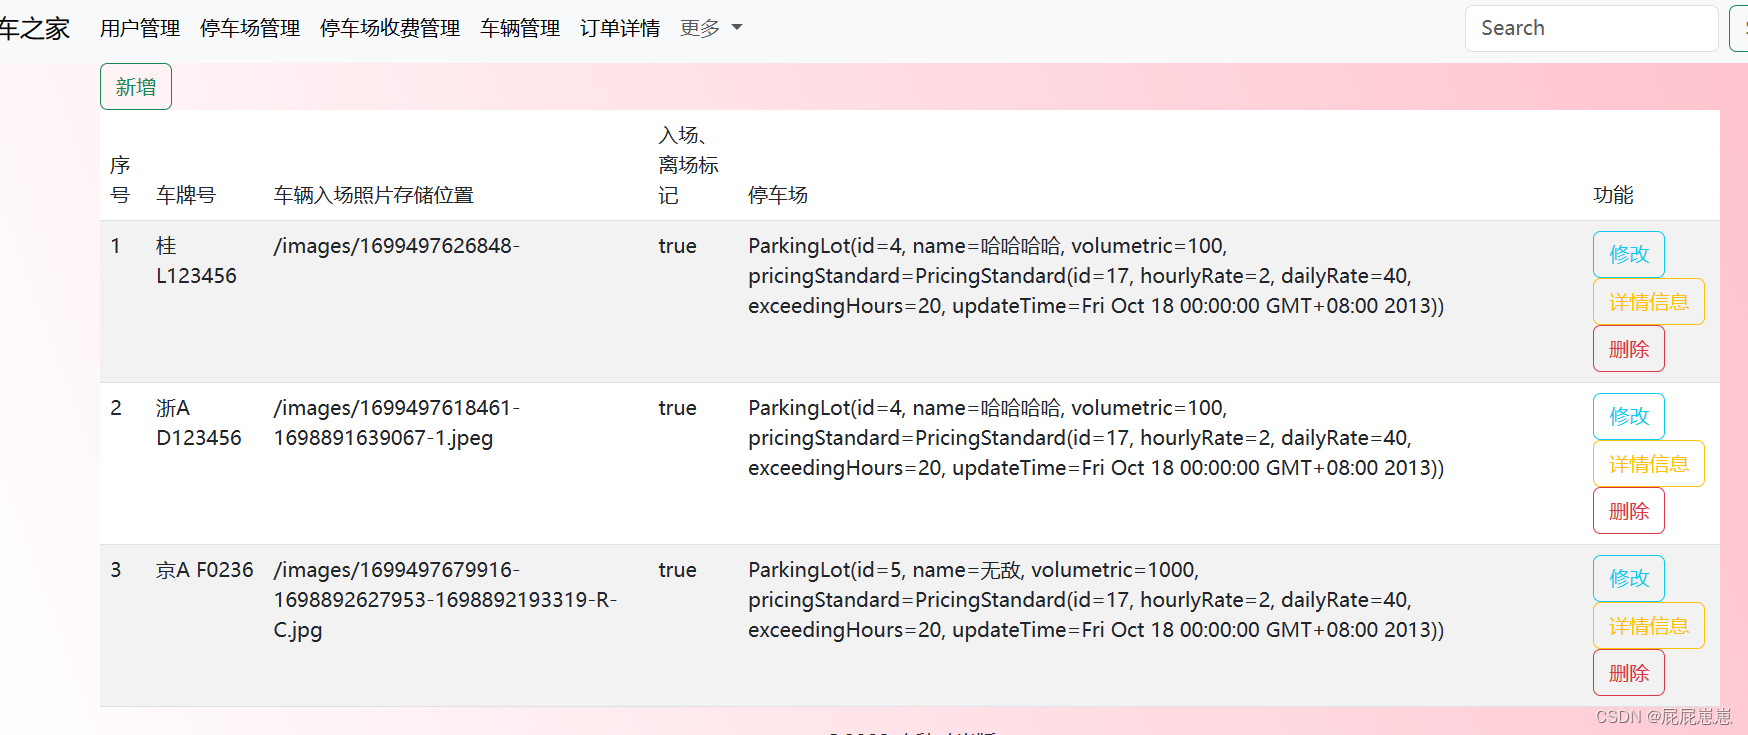
vehicle的实体类: 注意事项:创建数据库时要看好自己在实体类对应的字段。 @TableName:在MyBatis框架中,@TableName注解用于指定映射的数据库表名。在这个例子中,@TableName("vehicle")表示该注解所在的类将映射到数据库中的"vehicle"表。这是一种常见的做法,用于在Java代码和数据库表之间建立映射关系。 @TableId(type = IdType.AUTO):在MyBatis框架中,@TableId(type = IdType.AUTO)注解用于指定主键列的自动生成策略。IdType.AUTO表示根据数据库的类型自动选择生成策略,具体取决于数据库的约束和配置。 @TableField:在MyBatis框架中,@TableField注解用于指定映射的数据库字段名。它通常与@TableName注解一起使用,以明确指定表名和字段名。 @TableName("vehicle") /*车辆实体*/ @Data public class Vehicle { @TableId(type = IdType.AUTO) private Long id; @TableField("licence_Plate") private String licencePlate;//车牌号 private String picUrl;//车辆入场照片存储位置 @TableField("is_Active") private boolean isActive;//入场、离场标记,true:入场,否则是离场 @TableField("parking_lot_id") private ParkingLot parkingLot;//关联的停车场 public Vehicle(){ this.isActive=true; }; public Vehicle(Vehicle entity){ this.id=entity.id; this.licencePlate=entity.licencePlate; this.isActive=entity.isActive; this.picUrl=entity.picUrl; Optional.ofNullable(entity.parkingLot) .ifPresent(x->{ this.parkingLot=new ParkingLot(); this.parkingLot.setId(x.getId()); this.parkingLot.setName(x.getName()); this.parkingLot.setVolumetric(x.getVolumetric()); }); } }Vehicle的持久化层: 注意事项:SQL语句一定先去MySQL使用一下,少一个空格都能让你找疯掉。 @Mapper:是MyBatis框架中定义的一个注解,用于描述数据层接口。它起到描述性作用,告诉Spring框架此接口的实现类由MyBatis负责创建,并将其实现类对象存储到Spring容器中。在实际开发中,通常使用@Mapper继承basemapper,自动实例化生成很多增删改查的 方法,不用自己去写实现类和实现方法。 @Mapper public interface VehicleMapper extends BaseMapper { @Results({ @Result(column = "id",property = "id"), @Result(column = "parking_lot_id",property = "parkingLot",one = @One(select = "com.example.parkingmis.mapper.ParkingLotMapper.getById")) }) @Select("SELECT * FROM vehicle JOIN parking_Lot ON parking_Lot.id=vehicle.parking_lot_id") List getAll(); @Select("SELECT * FROM vehicle JOIN parking_Lot ON parking_lot_id=parking_Lot.id where vehicle.id=#{id}") Vehicle getById(Long id); @Insert("insert into vehicle set licence_Plate=#{licencePlate},picUrl=#{picUrl},is_Active=#{isActive},parking_lot_id=#{parkingLot.id}") int insert(Vehicle entity); @Update("update vehicle set licence_Plate=#{licencePlate},picUrl=#{picUrl},is_Active=#{isActive},parking_lot_id=#{parkingLot.id} where id=#{id}") int update(Vehicle entity); }Vehicle的服务层: @Service:在Spring框架中,使用@Service注解标注的类通常包含一些业务逻辑方法,这些方法用于实现具体的业务功能。这些服务类通常会依赖其他DAO类或其他服务类,以完成数据的访问或业务逻辑的实现。 @Service public class VehicleService extends ServiceImpl { VehicleMapper mapper; @Autowired public VehicleService(VehicleMapper mapper){ this.mapper=mapper; } public List getAll(){ return mapper.getAll(); } public Vehicle getById(Long id) { return mapper.getById(id); } public boolean insert(Vehicle entity) { int result=mapper.insert(entity); return result>0?true:false; } public boolean update(Vehicle entity) { int result=mapper.update(entity); return result>0?true:false; } public boolean delete(Long id) { int result=mapper.deleteById(id); return result>0?true:false; } }Vehicle的控制器层: 注意事项:若代码是复制前面做过的项目请一定一定要改好类名,返回的是前端链接的话先按好CTRL试试能不能跳转。 @Controller:可以标记一个类为控制器类,该类通常包含处理HTTP请求的方法。这些方法通常使用@RequestMapping注解来指定请求的URL映射和HTTP方法。当一个HTTP请求与@RequestMapping注解匹配时,相应的控制器方法将被调用,以处理该请求。 @RequestMapping:将不同的URL路径和HTTP方法映射到不同的处理方法。 @Value:需要指定注入属性的值。这个值可以是常量、环境变量、配置文件中的值等。例如,可以使用@Value("${my.property}")将配置文件中名为"my.property"的值注入到Java类中。 @Autowired:它用于自动装配bean。使用@Autowired注解可以将Spring容器中的bean自动装配到需要使用该bean的类中。 @Controller @RequestMapping("/vehicle") public class VehicleController { @Value("${save.path}") String savePath;//图片存储路径 VehicleService service; ParkingLotService parkingLotService; @Autowired public VehicleController(VehicleService service,ParkingLotService parkingLotService){ this.service=service; this.parkingLotService=parkingLotService; } @RequestMapping("/list") public String list(Model model){ List list=service.getAll(); model.addAttribute("list",list);//model打包成list属性完成list对象的值传递 return "/vehicle/list"; } @RequestMapping(value="/insert") public String insert(Model model){ model.addAttribute("vehicle",new Vehicle()); List parkingLots=parkingLotService.getAll(); model.addAttribute("parkingLots",parkingLots); return "/vehicle/edit"; } @RequestMapping(value="/edit/{id}") public String edit(@PathVariable("id") Long id, Model model){ Vehicle entity=service.getById(id); model.addAttribute("vehicle",entity); List parkingLots=parkingLotService.getAll(); model.addAttribute("parkingLots",parkingLots); return "/vehicle/edit"; } @RequestMapping(value = "/detail/{id}") public String detail(@PathVariable("id") Long id, Model model){ Vehicle entity=service.getById(id); model.addAttribute("vehicle",entity); return "/vehicle/detail"; } @RequestMapping(value = "/delete/{id}") public String delete(@PathVariable("id") Long id){ boolean result=service.delete(id); return "redirect:/vehicle/list"; } @RequestMapping(value = "/save",method = RequestMethod.POST) public String save(@ModelAttribute("vehicle") Vehicle entity , @RequestParam("isActive") boolean isActive , @RequestParam("parkingLotId") Long parkingLotId , @RequestParam("file")MultipartFile file)throws Exception{ entity.setActive(isActive); ParkingLot parkingLot=parkingLotService.getById(parkingLotId); entity.setParkingLot(parkingLot); //上传图片文件指定目录 String fileName= System.currentTimeMillis()+"-"+file.getOriginalFilename();//生成文件名 Path saveTo= Paths.get(savePath,fileName);//设置文件存储的路径 Files.write(saveTo,file.getBytes());//完成存储文件 //存储图片url entity.setPicUrl("/images/"+fileName); boolean result=entity.getId()!=null?service.update(entity):service.insert(entity); return "redirect:/vehicle/list"; } } 五、前端代码与界面本博客界面使用themleaf模板引擎进行页面渲染,Thymeleaf 是一个现代的服务器端Java模板引擎,适用于Web和独立环境。它被SpringBoot官方推荐使用,可以整合Spring MVC,用于Web和独立环境。Thymeleaf的主要目标是提高页面和代码的复用性,同时带来优雅自然的模板。使用Thymeleaf可以避免在页面上编写Java代码,使得Java代码和前端代码绝对的分离。 注意事项:链接js,css,jq的时候一定要检查好,稍有不慎就链接失败 以下是前端的list界面代码与效果图: 列表页面 新增 序号 车牌号 车辆入场照片存储位置 入场、离场标记 停车场 功能 修改 详情信息 删除
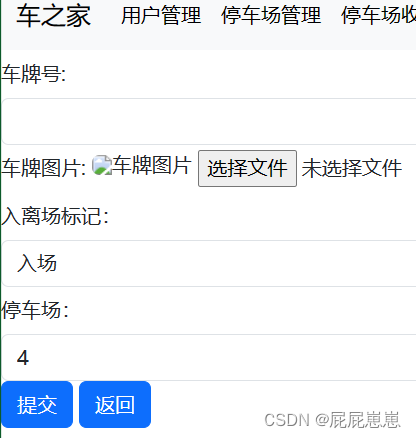
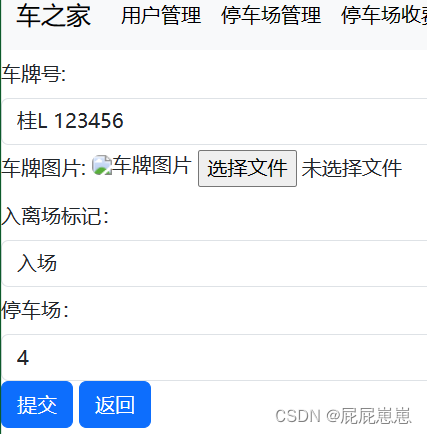
************************************************************************************************************* 以下是前端的edit界面代码与效果图: 修改or插入 车牌号: 车牌图片:
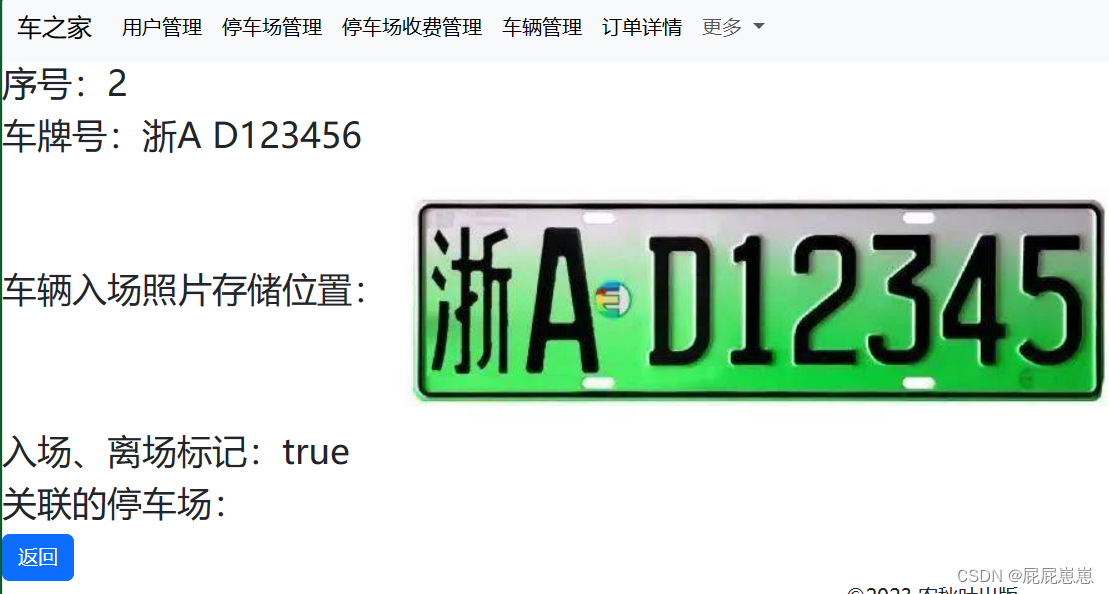
************************************************************************************************************* 以下是前端的detail界面代码与效果图: 详情 序号: 车牌号: 车辆入场照片存储位置:
************************************************************************************************************* 以上就是我自己简单停车场车辆项目,整整写了两天,很词穷,谢谢各位同行赏脸看完~ |


【本文地址】
今日新闻 |
推荐新闻 |