Linux操作系统分析学习总结 |
您所在的位置:网站首页 › 保护模式段寄存器的内容包括 › Linux操作系统分析学习总结 |
Linux操作系统分析学习总结
|
一、学习收获
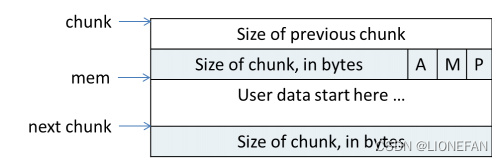
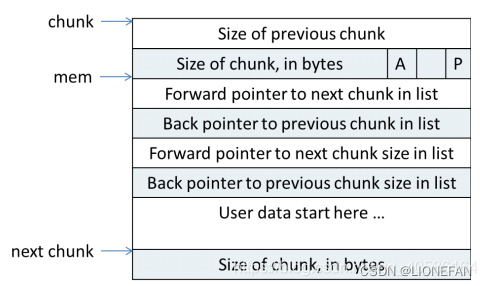
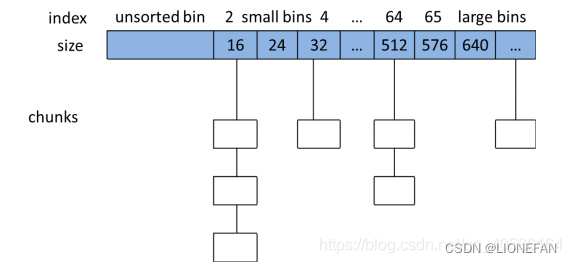
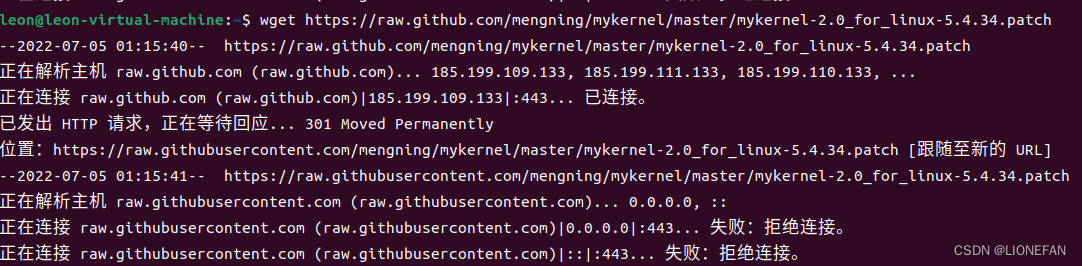
这学期选修了孟宁老师和李春杰老师的《Linux操作系统分析》这门课,一个学期结束之后感觉收获还是比较大的。 老师的一句话让我印象非常深刻,“纸上学来终觉浅”。 像我们学计算机的同学,肯定不能仅仅学会了理论知识就觉得自己掌握了,而是要真正的运用起来。很多理论知识,其实去看ppt和讲解视频的话会觉得晦涩难懂。但是如果自己真正去实践了一下的话,会有一种茅塞顿开的感觉。 比如之前在学习函数调用的时候,仅仅知道需要进行压栈操作,但是当自己真正去进行汇编代码的编译,并对汇编代码进行理解的时候,才准确的掌握了它是如何一步步进行的。(RISC-V指令示例分析) 同时,课程也让我学到了很多知识点。 计算机有"3大法宝":存储程序计算机、函数调用堆栈、中断;操作系统有“两把宝剑”:中断上下文和进程上下文。 在学习Linux内核源码的时候,明白了虽然drivers和arch目录下的代码占比最多,但是其实其中重复的代码居多,比较繁杂。而核心的部分,比如init、kernel、mm、ipc、net等目录虽然代码量很小,但是要理解这部分代码需要的知识很多,比较复杂。 而在李老师的课程中,也让我对计算机底层知识的理解更加深刻了。比如我终于意识到程序计数器的当前值是由eip和cs寄存器共同组成的,之前我一直认为程序计数器的值直接指向了下一条指令的物理地址,现在看来还是认识的比较肤浅。 还让我印象深刻的是如果发生了一个中断或异常,那么CPU会执行下述的操作: 确定与中断或异常关联的向量i读idtr寄存器指向的IDT表中的第i项从gdtr寄存器中取出GDT的基地址,并且在GDT中查找IDT表项中的段选择符所标识的段描述符。确定中断是由授权的发生源发出的。然后检查是否发生了特权级的变化,也就是是否由用户态陷入内核态。因为如果是从用户态陷入内核态的话,控制单元必须使用新的内核堆栈。如果发生的是故障,那么需要用引起异常的指令地址修改cs和eip寄存器的值,以使得这条指令在异常处理结束后能被再次执行在栈中保存eflags、cs和eip的内容如果异常产生一个硬件出错码,需要将它保存在栈中装在cs和eip寄存器,其值分别是IDT表中第i项门描述符的段选择符和偏移量字段。除此以外,还跟孟老师学到了一些小技巧,比如在进行Linux内核源码阅读的时候,可以把arch目录下除了x86架构的其他目录删除掉,这样为了避免在搜索一个函数的时候出现很多同名函数。 二、操作系统大赛情况 大赛选题https://github.com/oscomp/proj28-3RMM 调研学习该选题需要完成一个内存分配器,由于对该选题不太了解,所以第一步做的就是调研学习。 所以我们便对glibc/Ptmalloc2、mimalloc 、tcmalloc、jemalloc等已有的内存分配器进行学习。 以Ptmalloc2为例学习总结如下所示: glibc中malloc采用的是ptmalloc2内存池管理方式,使用边界标记法将内存划分成很多块,从而对内存的分配与回收进行管理。 ptmalloc使用两类分配区:主分配区main_area和非主分配区no_main_area。 主分配区和非主分配区形成一个环形链表进行管理。每一个分配区利用互斥锁使线程对于该分配区的访问互斥。每个进程只有一个主分配区,可以有多个非主分配区。当一个线程需要使用malloc分配内存的时候,会先查看该线程的私有变量中是否已经存在一个分配区。若存在,会尝试对其进行加锁操作。 若加锁成功,就在使用该分配区分配内存,若失败,就会遍历循环链表中获取一个未加锁的分配区。 若整个链表中都没有未加锁的分配区,则malloc会开辟一个新的分配区,将其加入全局的循环链表并加锁,然后使用该分配区进行内存分配。当释放这块内存时,同样会先获取待释放内存块所在的分配区的锁。若是有其他线程正在使用该分配区,则必须等待其他线程释放该分配区互斥锁之后才能进行释放内存的操作。 结构 chunkptmalloc使用chunk结构体描述内存块,内部包含大小、前后chunk指针、前一个 chunk 是否在使用中、前一个 chunk 的大小等成员。 空闲chunk在内存中的结构: 相似大小的chunk在free后被malloc用双向链表链接起来,这样一个链表被称为一个bin,一共有128个bin。基于chunk的大小,bin一共有四种: Fast bin ( < 64B )Unsorted binSmall binLarge bin这些bins被保存在数组fastbinsY(fast bin)和bins(其他bin)中。 当用户调用malloc的时候,能很快找到用户需要分配的内存大小是否在维护的bin上,如果在某一个bin上,就可以通过双向链表去查找合适的chunk内存块给用户使用。 fast binsfast bins 记录着大小以8字节递增的 Fast bin链表。fast bin用来存储较小( size < 默认max_fast 64B)的内存,其中chunk一般不会合并,因此速度很快。 unsorted binunsorted bin 的队列使用 bins 数组的第一个,相当于small bins和large bins的一个缓冲区,存放最近释放的大小 > max_fast 的chunk、合并后的chunk以及切割剩余的chunk等,无尺寸上限,可以快速找到最近free的chunk。如果找不到合适大小的chunk,ptmalloc会清空unsorted bin,将其中的chunks 按大小分类放进合适的其他bin中。 small binssmall bin保存大小小于512字节的chunk,从2开始编号,一共有63个,相邻的small bin之间相差8字节。同一个small bin中的chunk具有相同大小。 在free一个chunk的时候,检查其前或其后的chunk是否空闲,若是则合并,也即把它们从所属的链表中摘除并合并成一个新的chunk,新chunk会添加在unsorted bin链表的前端。 large binslarge bin保存大小大于等于512字节的chunk,位于small bin后面。每一个bin包含了一个给定范围内的chunk,其中的chunk按大小递减排序。 分配chunk时,寻找大小最合适的chunk,并且进行切割,剩余部分放进unsorted bin。free类似small bin,满足条件时会进行合并。 除以上类型的chunk外还有 mmaped chunk 和 top chunk : mmaped chunk当分配的内存非常大(大于分配阀值,默认128K)的时候,直接使用mmaped进行匿名内存映射申请内存,当释放mmaped chunk上的内存的时候会直接交还给操作系统。 top chunktop chunk相当于分配区的顶部空闲内存,当bins上都不能满足内存分配要求且小于mmap分配阈值的时候,就会来top chunk上分配。 当top chunk大小比用户所请求大小还大的时候,top chunk会被切割为两个部分:User chunk(用户请求大小)和Remainder chunk(剩余大小)。其中Remainder chunk成为新的top chunk。当top chunk大小小于用户所请求的大小时,top chunk就通过sbrk(主分配区)或mmap(非主分配区)系统调用来扩容。 Last remainderLast remainder是另外一种特殊的chunk,就像top chunk和mmaped chunk一样,不会在任何bins中找到这种chunk。 当需要分配一个small chunk,但在small bins中找不到合适的chunk,如果last remainder chunk的大小大于所需的small chunk大小,last remainder chunk被分裂成两个chunk,其中一个chunk返回给用户,另一个chunk变成新的last remainder chuk。 同时我们也对mimalloc 、tcmalloc、jemalloc等内存分配器进行调研学习,在此不再赘述。 解决方案通过对资料的学习,我们也尝试自己设计并实现一个内存分配器。 公共的Heap结构 typedef struct Heap { size_t size; void* allocated; Array_t* array_Chunk[16]; Chunk_t* linked_Chunk[4]; // 8k 32k 64k 128k }Heap_t;array_Chunk是指的用bit图实现的连续的小内存的分配 从8字节到128字节 typedef struct Array { size_t bitmap; word_t data[1]; } Array_t;地址形式如下 |Addr |bitmap| 1 | 2 | 3 | linked_Chunk有4种类型:8KB、32KB、64KB、128KB。 typedef struct Chunk { struct Chunk* next; size_t size; Block_t* Head; } Chunk_t; typedef struct Block { struct Block* parent; struct Block* left; struct Block* right; size_t size; size_t prev_size; word_t data[1]; } Block_t;以16位的机器字长为例 地址形式如 0xfffffff70,下一个地址就是 0xfffffff80 末4位可以空间复用 末四位安排 : | 0 | 0 | 1 | 0 | 前两位可以表示4个数 即表示该Block 位于哪一个chunk队列中的chunk第三位表示当前是否在使用,在垃圾回收的时候可以通过当前地址减去前一个Block的大小得到前一个Block的Header再通过使用位判断该Block是否在使用,如果没有那么可以合并这两个Block第四位用作判断当前Block是红状态还是黑状态 默认0为红。Chunk是一个单向链表, 每次申请内存的时候先找到内存足够的chunk然后再从Chunk中找到合适的Block。 alloc->alloc_T(判断大小 使用array 还是chunk)->调用相对应的内存分配函数,并且维护相应数据->返回地址 free->先判断在不在ArrayChunk的范围内(1:释放bitmap即可 0:继续)->(通过地址获得Header)->判断是否合并->放回Chunk中。 部分代码如下。 allocator.c #include "allocator.h" /* * small chunk are array like , every small chunk gets 2k bytes and * there are total 126 chunks vary from 8byte to 1024byte * At the same time the array struct contains a size_t and word_t where store data exactly * * so every array size is 8+chunk size; * for 16byte array * Assume the start array at 0x00000000 the next should start at 0x00000018 * 16 in hex is 0x10 in bin is 0b10000 the last 4 bit is not used. * * So the last four bit is control bit * * ------------------------- * | 0 | 0 | 0 | 1 | * ------------------------- * prev rb * * * represents in using. * */ word_t* alloc_t(size_t size, Block_t*(*func)(size_t)) { if(Heap == NULL) { /* Check the pointer address before continue */ Heap = sbrk(0); printf("Heap: %p\n",Heap); sbrk(align(allocSizeHeap(HEAP_MIN))); Heap->allocated = (void*)Heap + sizeof(Heap_t); printf("allocated: %p\n",Heap->allocated); } if(Heap->size /* find chunk in the array */ unsigned char index = find_array(size); data = find_array_chunk(index); if(data == NULL) { /* process there is no small area */ } } else { // printf("Find a block\n"); /* find chunk in the linked-list */ data = find_block(size); } return data; } word_t* alloc(size_t size) { return alloc_t(size,NULL); }fit.c #include "fit.h" unsigned char find_array(size_t size) { size = size if(size & (pos /* check validation */ if(Heap->array_Chunk[index] == NULL) { /* create a new array_Chunk */ /* Need (index + 2) * 8 * 64 >> (index>>1) */ size_t array_size = align((((index + 1) * 8 ) allocated; Heap->allocated = (void*)Heap->allocated + array_size; Heap->array_Chunk[index]->bitmap ^= 0b1; return (void*)Heap->array_Chunk[index] + sizeof(size_t); } else { /* use bitmap to find the free block */ if(Heap->array_Chunk[index]->bitmap == 0xffffffffffffffff) { printf("NULL Reached\n"); return NULL; } unsigned char flag = check_bitmap(Heap->array_Chunk[index]); return (void*)Heap->array_Chunk[index] + sizeof(size_t) + flag * ((index + 1) * 8); } /* Should be error */ return NULL; } /* Find a Vlock from the Chunk to fit the size */ void* find_block(size_t size) { /* 8k 32k 64k 128k */ Block_t* get_block; Chunk_t* temp = NULL; if(size temp = Heap->linked_Chunk[1]; } else if(size temp = Heap->linked_Chunk[3]; } while(temp && temp->size temp = create_chunk(MINI); /* Allocate memory in the temp chunk */ if(temp == NULL) { /* not enough space */ /* error occured */ return NULL; } Block_t* new_block = create_first_block(temp,size); // printf("add a first chunk\n"); // printf("first chunk addr: %p\n",temp); // printf("sizeof chunk : %zu\n",sizeof(Chunk_t)); // printf("first chunk size: %zu\n",temp->size); Heap->linked_Chunk[0] = add_chunk(Heap->linked_Chunk[0],temp); /* add the chunk to the chunk list */ return (void*)new_block + sizeof(Block_t) - 8; } // printf("Exist \n"); // printf(“) /* First Chunk has been created */ /* check if the chunk still has enough space */ /* If not, create a chunk and attach it to the linked list */ get_block = best_fit_block(size,temp->Head); Delete_Block_rb(temp->Head,get_block); if(get_block->size - size - sizeof(Block_t) > 0) { /* Large Block needs to be cut */ Block_t* small_block = (void*)get_block + size + sizeof(Block_t) - 8; small_block->size = get_block->size - size - sizeof(Block_t) + 8; get_block->size = size; temp->size -= (size + sizeof(Block_t) - 8); printf("temp->size : %zu\n",get_block->size); Add_Block_rb(temp->Head,small_block); } else { temp->size -= get_block->size; } /* update the chunk in the chunk list */ Heap->linked_Chunk[0] = sort_chunk(Heap->linked_Chunk[0],temp); return (void*)get_block + sizeof(Block_t) - 8; } Block_t* best_fit_block(size_t size,Block_t* block) { /* (pseudo)best fit */ return Find_Block_rb(block,size); } Block_t* create_first_block(Chunk_t* temp, size_t size) { size_t allocated_size = align(sizeof(Block_t) + size); Block_t* new_block = (void*)temp + sizeof(Chunk_t); new_block->left = NULL; new_block->right = NULL; new_block->prev_size = 0; new_block->size = size; new_block->size += 2; /* new_block will be returned We need to set up a new block */ temp->size -= allocated_size; if(temp->size > sizeof(Block_t)-8) { Block_t* next_block = (void*)new_block + sizeof(Block_t) + size-8; next_block->left = NULL; next_block->right = NULL; next_block->prev_size = size; next_block->size = temp->size + 2; /*10 prev is using; cur unusing*/ temp->Head = next_block; // printf("prev size : %zu\n",size); // printf("next block : %p\n",next_block); } else { new_block->size += temp->size; temp->size = 0; } return new_block; } Chunk_t* add_chunk(Chunk_t* start_chunk,Chunk_t* temp_chunk) { if(start_chunk == NULL) return temp_chunk; /* Some problems might occured DOUBLE CHECK! */ if(start_chunk->size size) { temp_chunk->next = start_chunk; start_chunk = temp_chunk; return start_chunk; } Chunk_t* cur = start_chunk->next; Chunk_t* prev = start_chunk; while(cur != NULL) { if(cur->size > temp_chunk->size) { cur = cur->next; prev = prev->next; } else break; } if(cur) { prev->next = temp_chunk; temp_chunk->next = cur; return start_chunk; } else { prev->next = temp_chunk; return start_chunk; } } Chunk_t* create_chunk(size_t size) { if(Heap->size if(start_chunk == temp_chunk) { if(start_chunk->next == NULL) return start_chunk; start_chunk = temp_chunk->next; temp_chunk->next = NULL; return add_chunk(start_chunk,temp_chunk); } Chunk_t* cur = start_chunk; /* if cur == NULL error occurs need to be handle */ while(cur->next != temp_chunk) { cur = cur->next; } cur->next = cur->next->next; temp_chunk->next = NULL; return add_chunk(start_chunk,temp_chunk); } 三、实验 实验一 mykernel 实验环境本实验是在VMware Workstation 16 Pro + Unbuntu22.04环境下运行。 实验过程实验的环境详细配置如下所示: //下载mykernel2.0补丁 wget https://raw.github.com/mengning/mykernel/master/mykernel-2.0_for_linux-5.4.34.patch //安装axel sudo apt install axel //下载linux-5.4.34内核源码 axel -n 20 https://mirrors.edge.kernel.org/pub/linux/kernel/v5.x/linux-5.4.34.tar.xz //解压 xz -d linux-5.4.34.tar.xz tar -xvf linux-5.4.34.tar //进入linux内核源码目录 cd linux-5.4.34 //patch一下补丁 patch -p1 < ../mykernel-2.0_for_linux-5.4.34.patch //安装调试工具 sudo apt install build-essential gcc-multilib sudo apt install qemu sudo apt install libncurses5-dev bison flex libssl-dev libelf-dev //配置文件 make defconfig //编译 make -j$(nproc) qemu-system-x86_64 -kernel arch/x86/boot/bzImage安装调试工具gcc的过程如下图所示。 1.在用wget下载补丁的时候,报错如下。 但是最后都无法解决这个问题,最终输入sudo vim /etc/hosts指令,然后在文档最后追加如下内容: 192.30.253.112 github.com 199.232.28.133 raw.githubusercontent.com
本实验和实验一相同,是在VMware Workstation 16 Pro + Unbuntu22.04环境下运行。 实验过程安装vscode在官网https://code.visualstudio.com/Download下载并安装 安装VSCode插件C/C++ Intellisense和C/C++ Themes。 然后使用如下命令安装GNU Global。 sudo apt install global然后修改VScode的配置文件c_cpp_properties.json使得VSCode能自动搜索跳转到函数定义了,阅读代码会方便很多。 修改配置文件settings.json,配置文件的路径是.config/Code/User/seetings.json。 配置文件见https://github.com/mengning/linuxkernel/tree/master/src/kerneldebuging 然后安装调试工具 sudo apt install build-essential gcc-multilib sudo apt install qemu # install QEMU sudo apt install libncurses5-dev bison flex libssl-dev libelf-dev在Linux源代码目录下直接运行如下命令来生成 compile_commands.json python ./scripts/gen_compile_commands.py然后配置内核选项 接着生成initramfs根文件系统镜像,从https://www.busybox.net下载 busybox源代码解压,解压完成后安装。 代码如下 axel -n 20 https://busybox.net/downloads/busybox-1.31.1.tar.bz2 tar -jxvf busybox-1.31.1.tar.bz2 cd busybox-1.31.1 make menuconfig # 编译成静态链接 Settings ---> [*] Build static binary (no shared libs) # 编译安装 make -j$(nproc) && make install然后制作内存根文件系统镜像,大致过程如下 mkdir rootfs cd rootfs cp ../_install/* ./ -rf mkdir dev proc sys home sudo cp -a /dev/{null,console,tty,tty1,tty2,tty3,tty4} dev/准备init脚本文件放在根文件系统跟目录下(rootfs/init),添加如下内容到init文件。 #!/bin/sh mount -t proc none /proc mount -t sysfs none /sys echo "Wellcome MengningOS!" echo "--------------------" cd home /bin/sh给init脚本添加可执行权限 chmod +x init打包成内存根文件系统镜像 find . -print0 | cpio --null -ov --format=newc | gzip -9 > ../rootfs.cpio.gz测试挂载根文件系统,看内核启动完成后是否执行init脚本 qemu-system-x86_64 -kernel linux-5.4.34/arch/x86/boot/bzImage -initrd rootfs.cpio.gz然后在命令行输入 qemu-system-x86_64 -kernel linux-5.4.34/arch/x86/boot/bzImage -initrd rootfs.cpio.gz -S -s -nographic -append "console=ttyS0"再打开一个窗口,启动gdb,把内核符号表加载进来,建立连接: gdb vmlinux (gdb) target remote:1234 (gdb) b start_kernel c、bt、list、next、step....
[1] 庖丁解牛Linux操作系统分析 https://gitee.com/mengning997/linuxkernel [2] 拉取github内容时显示无法建立SSL连接 [3] malloc原理分析:ptmalloc2 |
 最后的结果如下图所示
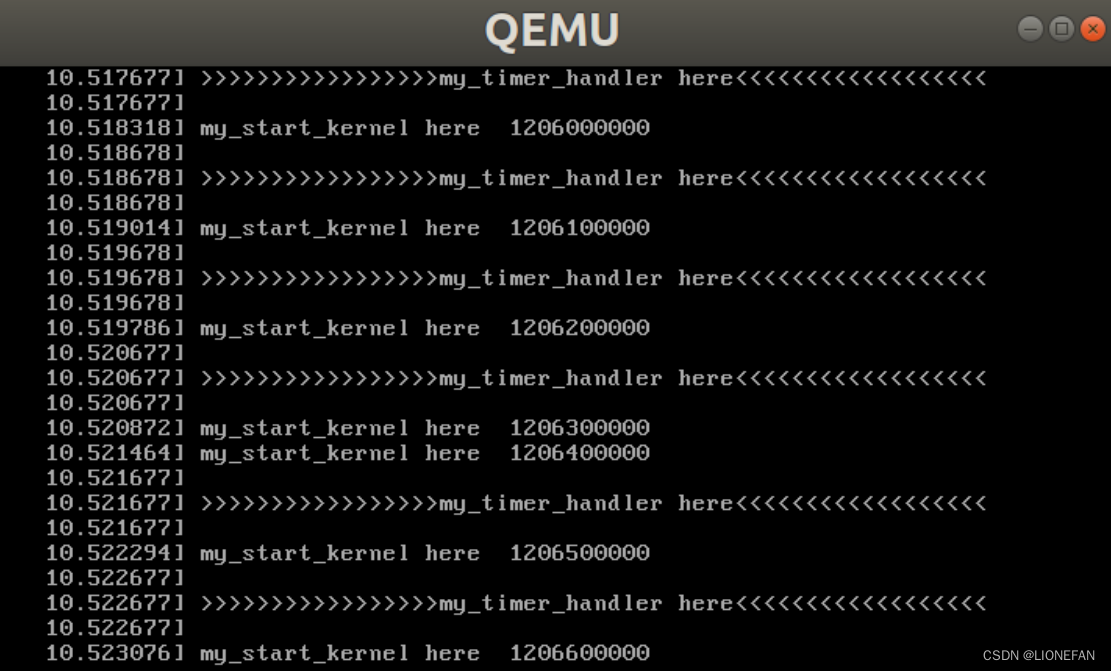
 通过搜集资料,发现大概有两种解决方案,分别需要将指令修改为如下:
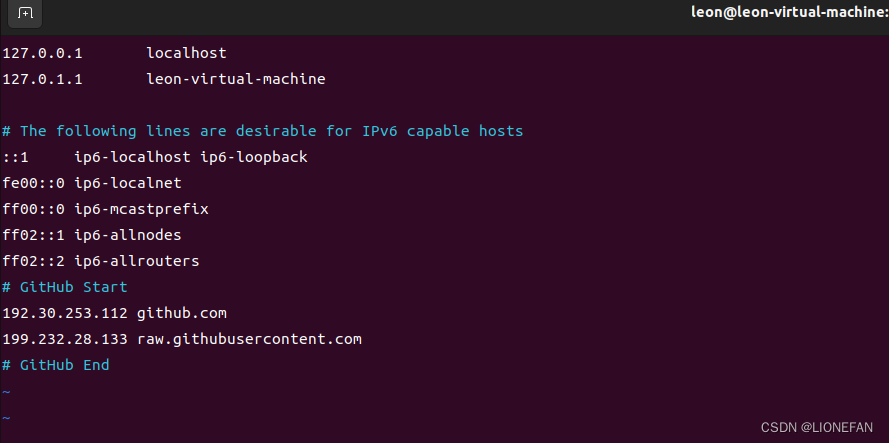 最终成功解决这个问题!
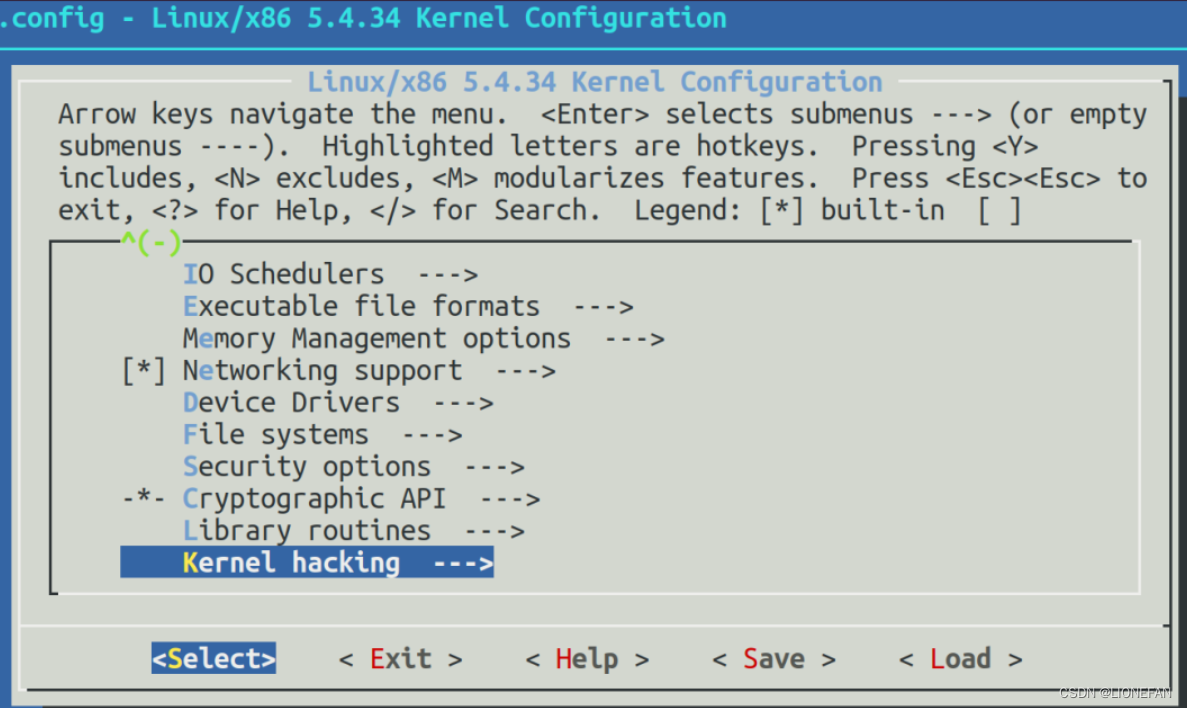 配置如下
配置如下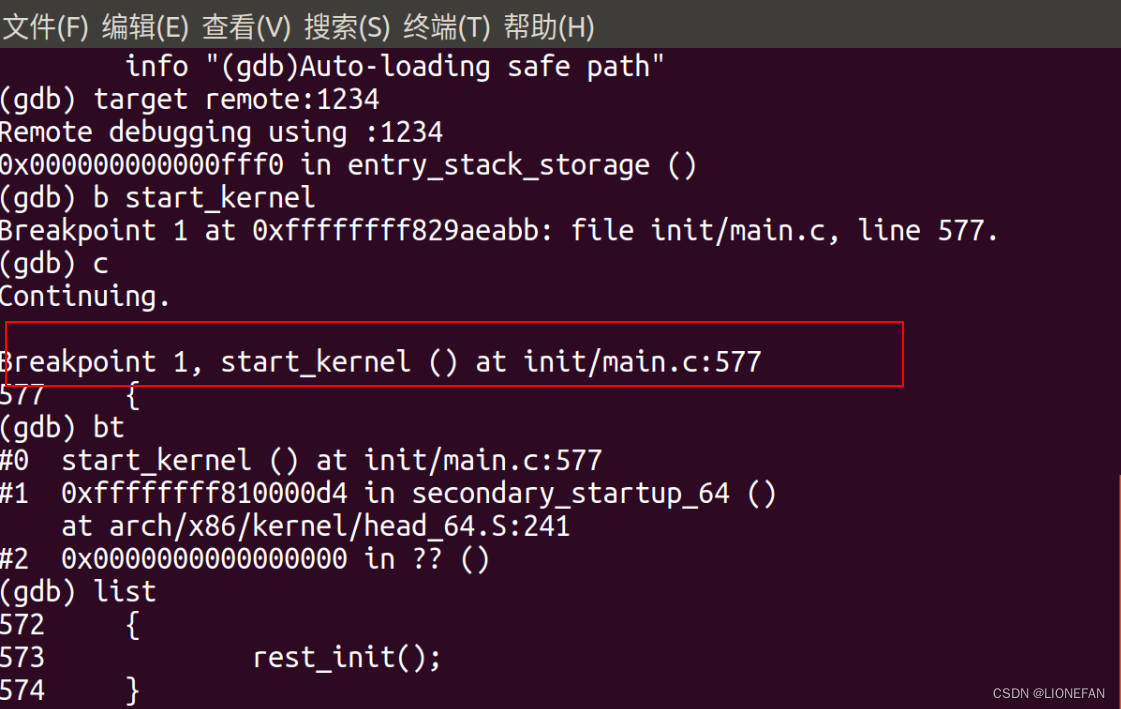 然后也可以配置VSCode来调试Linux内核,需要配置.vscode/tasks.json和.vscode/launch.json。 配置文件参见https://github.com/mengning/linuxkernel/tree/master/src/kerneldebuging
【本文地址】
今日新闻 |
推荐新闻 |