Word VBA:批量给Word文件添加水印 |
您所在的位置:网站首页 › 为word文档添加自定义属性 › Word VBA:批量给Word文件添加水印 |
Word VBA:批量给Word文件添加水印
|
目录 一、新建文档、录制宏 1.图片水印 (1)录制的宏代码 (2)分析 2.文字水印 (1)录制的代码 (2)分析 二、思路分享 1.从头开始 2.统一为插入图片 三、示例代码 1.准备 2.代码 因为平时几乎用不到添加水印的功能,所以对于我来说,也需要录制宏先分析一下。下面是思路: 本文所讨论的是Word自带的水印功能。此功能可以通过【设计】选项卡-【页面背景】-【水印】找到。
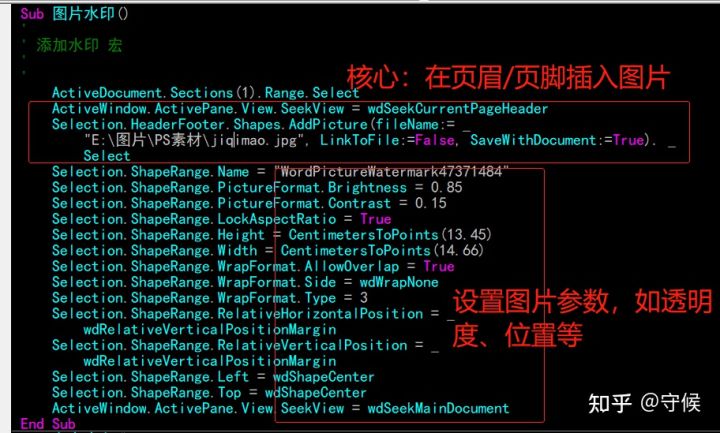
Word水印功能导航 一、新建文档、录制宏Word水印功能里面具体有的【图片水印】和【文字水印】两种: 1.图片水印 (1)录制的宏代码 Sub 图片水印() ' ' 添加水印 宏 ' ' ActiveDocument.Sections(1).Range.Select ActiveWindow.ActivePane.View.SeekView = wdSeekCurrentPageHeader Selection.HeaderFooter.Shapes.AddPicture(fileName:= _ "E:\图片\PS素材\jiqimao.jpg", LinkToFile:=False, SaveWithDocument:=True). _ Select Selection.ShapeRange.Name = "WordPictureWatermark47371484" Selection.ShapeRange.PictureFormat.Brightness = 0.85 Selection.ShapeRange.PictureFormat.Contrast = 0.15 Selection.ShapeRange.LockAspectRatio = True Selection.ShapeRange.Height = CentimetersToPoints(13.45) Selection.ShapeRange.Width = CentimetersToPoints(14.66) Selection.ShapeRange.WrapFormat.AllowOverlap = True Selection.ShapeRange.WrapFormat.Side = wdWrapNone Selection.ShapeRange.WrapFormat.Type = 3 Selection.ShapeRange.RelativeHorizontalPosition = _ wdRelativeVerticalPositionMargin Selection.ShapeRange.RelativeVerticalPosition = _ wdRelativeVerticalPositionMargin Selection.ShapeRange.Left = wdShapeCenter Selection.ShapeRange.Top = wdShapeCenter ActiveWindow.ActivePane.View.SeekView = wdSeekMainDocument End Sub (2)分析
代码功能 代码的核心是要在每节的页眉/页脚插入一个图片,而我们在插入时设置的其他参数如透明度都是在插入图片后的代码里体现的。
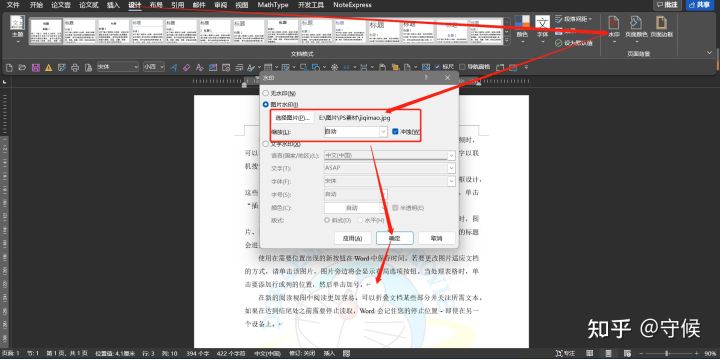
图片水印添加步骤及效果 (3)图片水印的实质 我们双击进入已经添加水印的节的页眉,然后点击图片,从【图片格式】菜单里查看属性,可以知道:
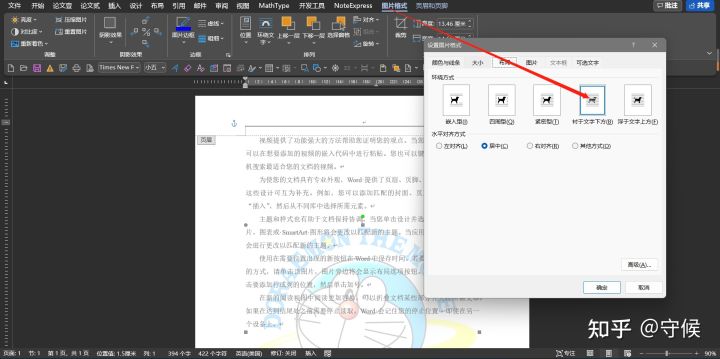
A.该水印图片是一幅衬于文字下方的
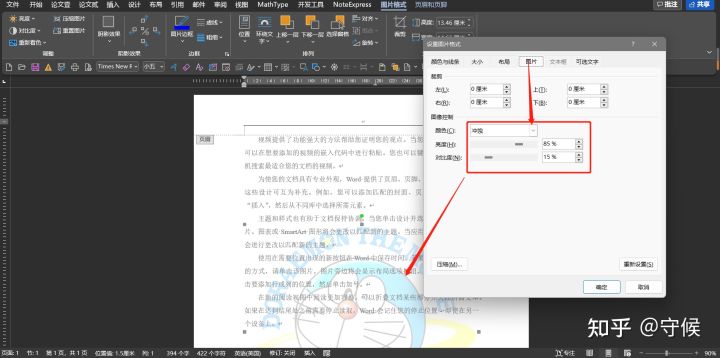
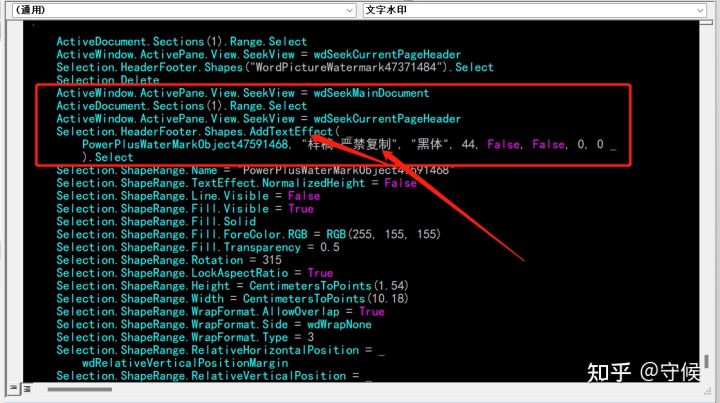
B.设置过亮度、对比度等参数的图片 这些参数设置在录制的代码里都能清楚地看到。 由此可以总结:图片水印实质上是往页眉/页脚中添加一张经过处理过和图片。 2.文字水印 (1)录制的代码 Sub 文字水印() ' ' 文字水印 宏 ' ' ActiveDocument.Sections(1).Range.Select ActiveWindow.ActivePane.View.SeekView = wdSeekCurrentPageHeader Selection.HeaderFooter.Shapes("WordPictureWatermark47371484").Select Selection.Delete ActiveWindow.ActivePane.View.SeekView = wdSeekMainDocument ActiveDocument.Sections(1).Range.Select ActiveWindow.ActivePane.View.SeekView = wdSeekCurrentPageHeader Selection.HeaderFooter.Shapes.AddTextEffect( _ PowerPlusWaterMarkObject47591468, "样稿 严禁复制", "黑体", 44, False, False, 0, 0 _ ).Select Selection.ShapeRange.Name = "PowerPlusWaterMarkObject47591468" Selection.ShapeRange.TextEffect.NormalizedHeight = False Selection.ShapeRange.Line.Visible = False Selection.ShapeRange.Fill.Visible = True Selection.ShapeRange.Fill.Solid Selection.ShapeRange.Fill.ForeColor.RGB = RGB(255, 155, 155) Selection.ShapeRange.Fill.Transparency = 0.5 Selection.ShapeRange.Rotation = 315 Selection.ShapeRange.LockAspectRatio = True Selection.ShapeRange.Height = CentimetersToPoints(1.54) Selection.ShapeRange.Width = CentimetersToPoints(10.18) Selection.ShapeRange.WrapFormat.AllowOverlap = True Selection.ShapeRange.WrapFormat.Side = wdWrapNone Selection.ShapeRange.WrapFormat.Type = 3 Selection.ShapeRange.RelativeHorizontalPosition = _ wdRelativeVerticalPositionMargin Selection.ShapeRange.RelativeVerticalPosition = _ wdRelativeVerticalPositionMargin Selection.ShapeRange.Left = wdShapeCenter Selection.ShapeRange.Top = wdShapeCenter ActiveWindow.ActivePane.View.SeekView = wdSeekMainDocument End Sub (2)分析
删除图片水印 开头这些代码主要是删除页眉中第一次添加的图片水印
核心:添加艺术字形状 核心语句是这块代码在这一节的页眉处用【AddTextEffect】方法,将艺术字形状添加进去。
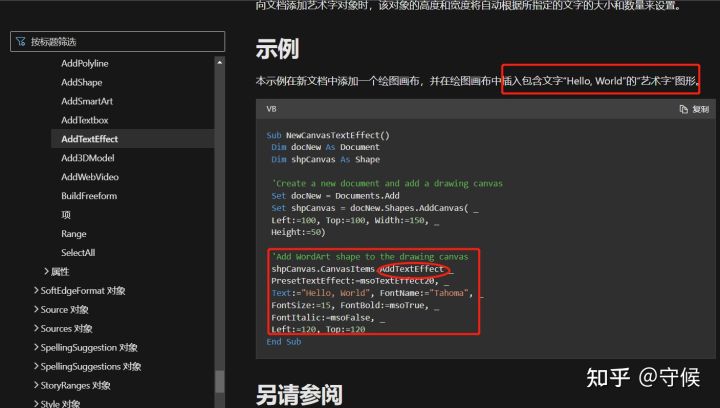
官网说明示例 通过微软官方的说明示例也能再次得到印证:文字水印从根本或者根源上讲,是往页眉或页脚中添加形状,而且这个形状是一个特殊的【艺术字形状】。 而后面其他代码都是在设置上面添加的艺术字形状的其他参数比如亮度、透明度等等。 二、思路分享从前面分析可以知道,Word里添加水印,就是在文档每节的页眉/页脚插入图片或艺术字形状。 那么大致有两种思路: 1.从头开始代码中每次从头开始选择图片进行处理或每次重新添加艺术字形状及设置好其各种效果。
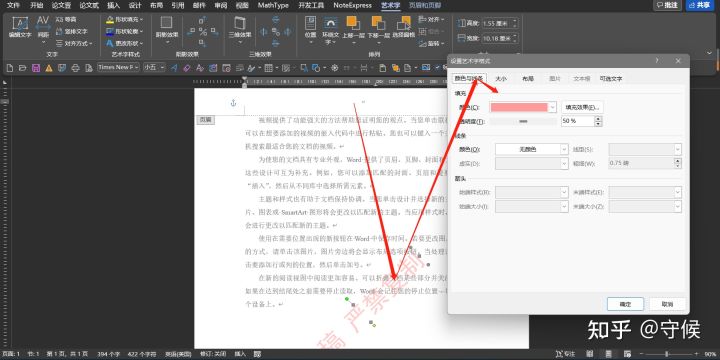
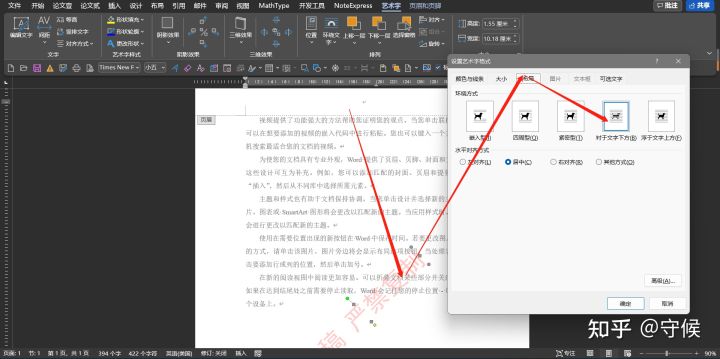
文字艺术字参数展示1
文字艺术字参数展示2 但是这种方法设计程序,要么需要使用者自己调整代码,就算用InputBox()等方式让用户传递参数,用户也不能提前预览效果。所以对于编写简单上手的程序不推荐此方法 2.统一为插入图片将图片或艺术字效果提前统一设置为图片,这样使用都批量插入时参数就越少。 因为不是做完美的插件,是做一个马上可以上手用,而且操作简便的小程序。所以,我推荐用这种方式,只需要选择存放Word文件的主文件夹或者选择多个文件,就可以马上完成工作。 三、示例代码这里主要是以【统一插入图片】的方法,设计的简单程序 1.准备使用者的准备工作:提前将水印效果的图片处理好(用Word、PPT、PS都可以) 2.代码 Rem 这里是主程序 Sub 批量获取文件路径() Dim fd As FileDialog Dim fso As Object Dim arr() '存储每次遍历到的文件夹的子文件夹 Dim brr() '临时存储每次遍历到的文件夹的子文件夹 Dim crr() '存储所有文件夹 Dim drr() '存储所有Word文件路径 Dim myFolder As Object Dim subFolder As Variant Dim i As Long Dim j As Long Dim m As Long Dim myFile As Object Dim 后缀 As String Dim t0 As Single Dim fd1 As FileDialog Dim 水印图片路径 As String t0 = Timer i = 0: j = 0: m = 0 Set fd = Application.FileDialog(msoFileDialogFolderPicker) Set fso = CreateObject("Scripting.FileSystemObject") With fd .Title = "选择主文件夹" If .Show Then i = i + 1 ReDim Preserve crr(1 To i) crr(i) = .SelectedItems(1) arr = crr Set fd1 = Application.FileDialog(msoFileDialogFilePicker) With fd1 .AllowMultiSelect = False .Title = "选择图片水印文件" .Filters.Clear .Filters.Add "图片文件", "*.png;*.jpeg;*.jpg", 1 .Filters.Add "所有文件", "*.*", 2 If .Show Then 水印图片路径 = .SelectedItems(1) End If End With Set fd1 = Nothing On Error Resume Next Do While Err.Number = 0 For j = LBound(arr) To UBound(arr) Set myFolder = fso.GetFolder(arr(j)) If myFolder.subFolders.Count > 0 Then For Each subFolder In myFolder.subFolders i = i + 1 ReDim Preserve crr(1 To i) crr(i) = subFolder.Path m = m + 1 ReDim Preserve brr(1 To m) brr(m) = subFolder.Path Next End If Next m = 0 arr = brr Erase brr Loop On Error GoTo 0 i = 0 For j = LBound(crr) To UBound(crr) ' Debug.Print j, crr(j) Set myFolder = fso.GetFolder(crr(j)) For Each myFile In myFolder.Files 后缀 = fso.GetExtensionName(myFile.Path) If 后缀 Like "doc*" And Not 后缀 Like "*~$*" Then i = i + 1 ReDim Preserve drr(1 To i) drr(i) = myFile.Path End If Next Next For j = LBound(drr) To UBound(drr) Rem 此处以下为调用的处理过程 Application.ScreenUpdating = False Call 遍历节(drr(j), 水印图片路径) Application.ScreenUpdating = True Rem 此处以上为调用的处理过程 Debug.Print Format(j, String(Len(CStr(UBound(drr))), "0")), drr(j), "添加水印完成" Next End If End With Set fd = Nothing Set fso = Nothing Set myFolder = Nothing Debug.Print "完成 共对" & UBound(drr) & "个文件添加了水印 用时" & Timer - t0 & "秒" End Sub Sub 遍历节(文件名, 水印图片路径 As String) Dim aDoc As Document Dim sec As Section Dim hf As HeaderFooter Dim fso As Object Dim fName As String Dim fNewName As String Set aDoc = Documents.Open(文件名) Set fso = CreateObject("Scripting.FileSystemObject") fNewName = aDoc.Path & "\" & fso.GetBaseName(文件名) & "-水印后." & fso.GetExtensionName(文件名) For Each sec In aDoc.Sections For Each hf In sec.Headers Call 添加图片水印(hf, 水印图片路径) Next Next aDoc.SaveAs2 fileName:=fNewName, FileFormat:=aDoc.SaveFormat aDoc.Close wdSaveChanges Set aDoc = Nothing Set fso = Nothing End Sub Sub 添加图片水印(hf As HeaderFooter, 水印图片路径 As String) Dim 线型 As Long 线型 = hf.Range.ParagraphFormat.Borders.InsideLineStyle hf.Shapes.AddPicture(fileName:=水印图片路径, linktofile:=False, savewithdocument:=True).Select With Selection.ShapeRange .LockAspectRatio = True .WrapFormat.Side = wdWrapNone .WrapFormat.Type = wdWrapBehind .RelativeHorizontalPosition = wdRelativeHorizontalPositionPage .RelativeVerticalPosition = wdRelativeVerticalPositionPage .Left = wdShapeCenter .Top = wdShapeCenter End With hf.Range.ParagraphFormat.Borders.InsideLineStyle = 线型 End Sub |


【本文地址】
今日新闻 |
推荐新闻 |