Appium实现爬取oppo应用商店评论 |
您所在的位置:网站首页 › oppo软件商店自己的评论怎么删除啊 › Appium实现爬取oppo应用商店评论 |
Appium实现爬取oppo应用商店评论
|
Appium实现爬取oppo应用商店评论
环境配置具体实现连接到你想要爬取的APP模拟人操作并拿取部分字段点击搜索框并输入搜索内容点击到详情页点击评论开始循环拿评论
解析并合并结果
环境配置
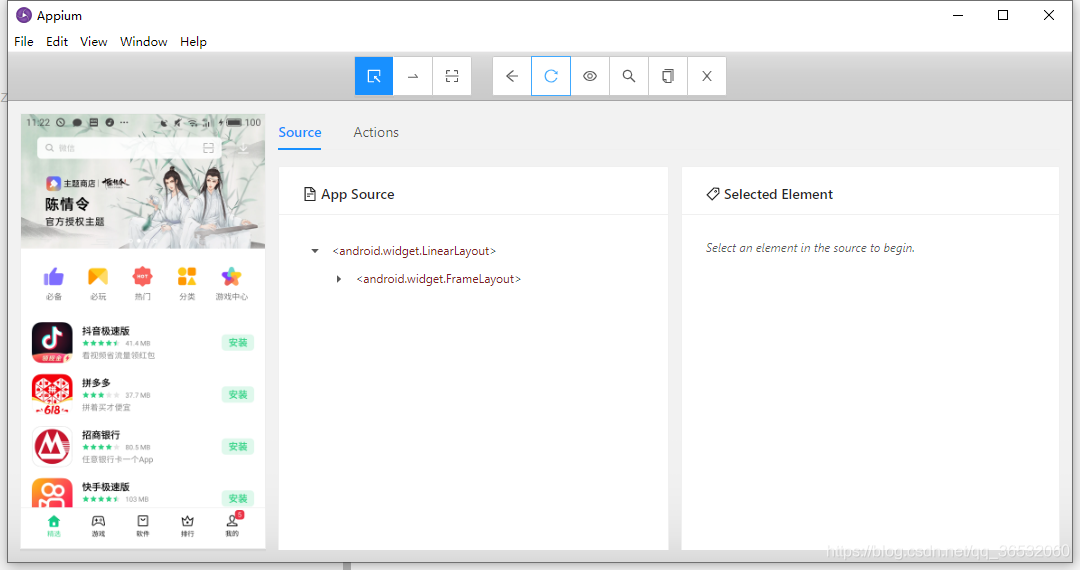
可以直接参考知乎大佬的文章 Appium环境搭建超详细教程 具体实现 连接到你想要爬取的APPAppiumDesktop控制手机和安卓模拟器 专门为伸手党们整理了oppo应用商店的对应配置 { “platformName”: “Android”, “platformVersion”: “6.0”, “deviceName”: “Andriod2”, “noReset”: true, “appPackage”: “com.oppo.market”, “appActivity”: “.activity.MainActivity” } 此处写给出我自己写的一个基于python的appium的辅助工具类 from time import sleep from appium import webdriver from selenium.webdriver.support.ui import WebDriverWait from PIL import Image class App(object): def __init__(self,appPackage,appActivity,no_reset=True,platformVersion="6.0",deviceName="android_first",wait_time=None,udid=None): self.desired_caps = { 'platformName': 'Android', 'platformVersion': platformVersion, 'deviceName': deviceName, "appPackage":appPackage, 'appActivity':appActivity } if udid: self.desired_caps['udid']=udid if no_reset: self.desired_caps['noReset']=no_reset self.driver = webdriver.Remote('http://localhost:4723/wd/hub', self.desired_caps) # 当资源未加载出时,最大等待时间20S if wait_time: self.driver.implicitly_wait(wait_time) def click_by_id(self,id): self.driver.find_element_by_id(id).click() def close_app(self): self.driver.close_app() def back(self): self.driver.back() def click_by_xpath(self,xpath): self.driver.find_element_by_xpath(xpath).click() def click_by_name(self,name): self.driver.find_element_by_name(name).click() def click_by_class_name(self,class_name): self.driver.find_element_by_class_name(class_name).click() def send_keys_by_id(self,id,key): self.driver.find_element_by_id(id).send_keys(key) def send_keys_by_xpath(self,id,key): self.driver.find_element_by_xpath(id).send_keys(key) def send_keys_by_name(self,name,key): self.driver.find_element_by_name(name).send_keys(key) def send_keys_by_class_name(self,class_name,key): self.driver.find_element_by_class_name(class_name).send_keys(key) def tap_by_position(self,x_position,y_position,x_length=10,y_length=10,time=500): self.driver.tap([(x_position-x_length/2,y_position-y_length*2),(x_position+x_length/2,y_position+y_length*2)],time) def get_page_source(self): return self.driver.page_source def swipe(self,y_start,y_end,x_start=500,x_end=500,duration=1000): self.driver.swipe(x_start,y_start,x_end,y_end,duration) #获取方位和坐标,左上角和右下角的列表 @staticmethod def get_bounds(element): rect=element.rect return [{'x':rect['x'],'y':rect['y']},{'x':rect['x']+rect['width'],'y':rect['y']+rect['height']}] def get_text_by_x_path(self,x_path): return str(self.driver.find_element_by_xpath(x_path).text) #method为enum,xpath或者id或者name或者class_name def swipe_by_element(self,method,value): if method=='xpath': element=self.driver.find_element_by_xpath(value) elif method=='id': element=self.driver.find_element_by_id(value) elif method=='name': element=self.driver.find_element_by_name(value) elif method=='class_name': element=self.driver.find_element_by_class_name(value) else: raise Exception("输入参数错误") bounds=self.get_bounds(element) x_start=x_end=(bounds[0]['x']+bounds[1]['x'])/2 y_start=bounds[1]['y'] y_end=bounds[0]['y'] try: self.swipe(y_start,y_end,x_start,x_end) except Exception: self.swipe(500+abs(y_start-y_end),500) @staticmethod def screenshot_by_element(driver, element, out_image: str): """ 对指定元素截图 :param driver: :param element: 元素 :param out_image: 截图输出路径(验证码.png) """ # step1 全屏图 global_image = '全屏图.png' driver.get_screenshot_as_file(global_image) # step2 获取元素的四个坐标 min_x = element.location['x'] min_y = element.location['y'] max_x = min_x + element.size['width'] max_y = min_y + element.size['height'] # step3 从全屏图中裁剪出目的元素的图片 im = Image.open(global_image) im.save(global_image) im = Image.open(global_image) im = im.crop((min_x, min_y, max_x, max_y)) # 裁剪(左上至右下) print(min_x, min_y, max_x, max_y) im.save(out_image)下面是程序主代码 from appium_utils.app import App import time import pandas as pd def keywords_search(keyword): app=App('com.oppo.market','.activity.MainActivity',wait_time=30) list_title=[] time.sleep(10) #点击搜索框并输入值 app.tap_by_position(347,145) app.send_keys_by_id("com.oppo.market:id/et_search",keyword) app.click_by_id("com.oppo.market:id/search_clear") app.send_keys_by_id("com.oppo.market:id/et_search",keyword) app.click_by_id("com.oppo.market:id/tv_search_text") #点击到详情页 app.click_by_xpath("/hierarchy/android.widget.FrameLayout/android.widget.LinearLayout/android.widget.FrameLayout/android.widget.LinearLayout/android.widget.FrameLayout/android.widget.RelativeLayout/android.widget.ViewAnimator/android.widget.FrameLayout/android.widget.ViewAnimator/android.view.ViewGroup/android.widget.FrameLayout/android.widget.ListView/android.widget.LinearLayout[1]/android.widget.RelativeLayout/android.widget.LinearLayout") time.sleep(10) #点击评论按钮 app.click_by_xpath("/hierarchy/android.widget.FrameLayout/android.widget.LinearLayout/android.widget.FrameLayout/android.widget.LinearLayout/android.widget.FrameLayout/android.widget.RelativeLayout[1]/android.widget.ScrollView/android.widget.LinearLayout/android.widget.RelativeLayout[2]/android.widget.LinearLayout/android.widget.TextView[2]") time.sleep(10) app.swipe(1330, 740) k=0 #开始循环拿评论 while True: k=k+1 for i in range(1,5): try: element=app.driver.find_element_by_xpath("/hierarchy/android.widget.FrameLayout/android.widget.LinearLayout/android.widget.FrameLayout/android.widget.LinearLayout/android.widget.FrameLayout/android.widget.RelativeLayout[1]/android.widget.ScrollView/android.widget.LinearLayout/com.heytap.cdo.client.detail.ui.detail.widget.ColorViewPager/android.widget.ListView/android.widget.RelativeLayout[{}]/android.widget.LinearLayout[2]".format(i)) user_name=app.get_text_by_x_path("/hierarchy/android.widget.FrameLayout/android.widget.LinearLayout/android.widget.FrameLayout/android.widget.LinearLayout/android.widget.FrameLayout/android.widget.RelativeLayout[1]/android.widget.ScrollView/android.widget.LinearLayout/com.heytap.cdo.client.detail.ui.detail.widget.ColorViewPager/android.widget.ListView/android.widget.RelativeLayout[{}]/android.widget.FrameLayout/android.widget.LinearLayout/android.widget.TextView[1]".format(i)) desc=app.get_text_by_x_path("/hierarchy/android.widget.FrameLayout/android.widget.LinearLayout/android.widget.FrameLayout/android.widget.LinearLayout/android.widget.FrameLayout/android.widget.RelativeLayout[1]/android.widget.ScrollView/android.widget.LinearLayout/com.heytap.cdo.client.detail.ui.detail.widget.ColorViewPager/android.widget.ListView/android.widget.RelativeLayout[{}]/android.widget.TextView[2]".format(i)) publish_time=app.get_text_by_x_path("/hierarchy/android.widget.FrameLayout/android.widget.LinearLayout/android.widget.FrameLayout/android.widget.LinearLayout/android.widget.FrameLayout/android.widget.RelativeLayout[1]/android.widget.ScrollView/android.widget.LinearLayout/com.heytap.cdo.client.detail.ui.detail.widget.ColorViewPager/android.widget.ListView/android.widget.RelativeLayout[{}]/android.widget.LinearLayout[1]/android.widget.TextView".format(i)) like_num=app.get_text_by_x_path("/hierarchy/android.widget.FrameLayout/android.widget.LinearLayout/android.widget.FrameLayout/android.widget.LinearLayout/android.widget.FrameLayout/android.widget.RelativeLayout[1]/android.widget.ScrollView/android.widget.LinearLayout/com.heytap.cdo.client.detail.ui.detail.widget.ColorViewPager/android.widget.ListView/android.widget.RelativeLayout[{}]/android.widget.TextView[1]".format(i)) print(user_name+'_'+desc) key=hash(user_name+'_'+desc) data={"user_name":user_name,"desc":desc,"publish_time":publish_time,"like_num":like_num,"key":key} df=pd.DataFrame(data,index=[0]) df.to_excel(r"data/excel/{}_{}.xlsx".format(keyword,key),index=False) app.screenshot_by_element(app.driver,element,"data/photo/{}_{}.png".format(keyword,key)) list_title.append(key) except Exception as e: print(e) continue app.swipe(1330, 540) if k>20: # app.close_app() return if __name__ == '__main__': # keywords_search("平安银行") # keywords_search("招商银行") keywords_search("中国建设银行") #keywords_search("浦发手机银行") 点击搜索框并输入搜索内容此处我直接使用的tap_by_position方法,根据位置点击屏幕 此处需要注意一个点(可能是oppo应用商店自己的bug)在第一次输入值的时候会带上一些奇怪的东西 没啥好说的,由于是精确搜索直接点击第一个元素就行了 同样没啥好说的,点就完事了 由于我的方案是通过XPATH拿的,通常应用商店的评论的格式都是一样的,因此只需要替换XPATH中的某一个或者某几个参数,从1-5循环就可以了 代码中几个变量分别为 element:星级对应的那一块,用来截图的 user_name:评论者 desc:评论内容 publish_time;评论时间 like_num:点赞数 key:我自己定义的一个唯一键
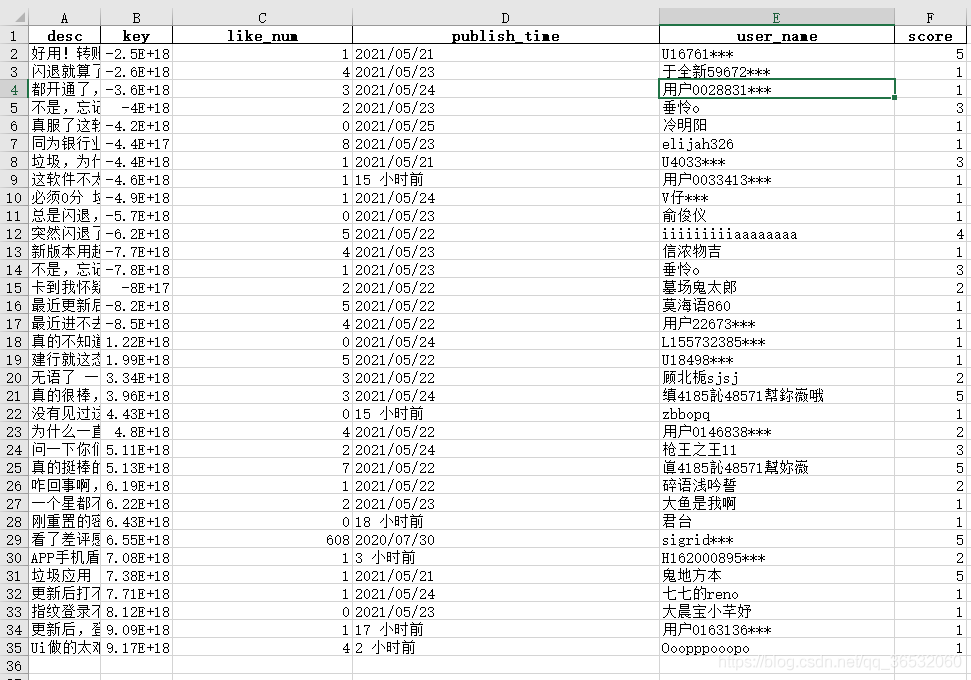
之前那一步已经获得了除了评分之外的字段了,这一步要做的就是合并所有的单条数据,并附加上评分 话不多说,直接上代码 import os from utils import io import pandas as pd from appium_utils.score_utils import score def process(keyword): total_df=pd.DataFrame() for root,dirs,files in os.walk(r"data\excel"): for file in files: total_path=os.path.join(root,file) if keyword in total_path: df=pd.read_excel(total_path,encoding='utf8') photo_path=r"data/photo/{}.png".format(total_path.split("\\")[2].split(".xlsx")[0]) df['score']=score(photo_path,10,10,30,215,215,215,255)# 要识别像素的坐标 total_df=pd.concat([total_df,df],axis=0) io.move_file(total_path, r"data/checked") total_df.to_excel(r"data/final/{}.xlsx".format(keyword),index=False) if __name__ == '__main__': # process("浦发手机银行") # process("平安银行") # process("招商银行") process("中国建设银行")其中io.move_file的作用是把检查完的数据丢到另一个文件夹下,其对应代码为 def move_file(file, folder_tgt, suffix=0): if os.path.isdir(folder_tgt) is False: os.mkdir(folder_tgt) # if os.path.isfile(file): file_name = os.path.split(file)[1] file_type = file_name.split(".")[-1] new_name = os.path.join(folder_tgt, file_name) while os.path.isfile(new_name): suffix += 1 new_name = os.path.join( folder_tgt, "{fn}({sfx}).{ft}".format( fn=file_name[:-(len(file_type) + 1)], sfx=suffix, ft=file_type ) ) shutil.copy(file, new_name) os.remove(file)score的作用是打分(根据像素点识别)其代码如下 from PIL import Image def score(path,fist_x,first_y,delta_x,r,g,b,d): level=0 image = Image.open(path) for i in range(5): x=fist_x+i*delta_x y=first_y r_i,g_i,b_i,d_i=image.getpixel((x, y)) if r_i!=r or g_i!=g or b_i!=b or d_i!=d: level=level+1 else: break return levelpath为文件路径,fist_x和first_y分别为第一颗星星中间点的坐标(偏一点没事),delta_x为每颗星星中间点的距离,rgbd分别为暗掉的星星中间点对应的rgbd值(不考虑颜色渐变的情况) 最终结果生成如下
|
 如图中输入值其实是浦发手机银行,但前面带上了抖音火山般,因此在程序中有两次输入,即第一次输入之后按删除键,再进行第二次输入
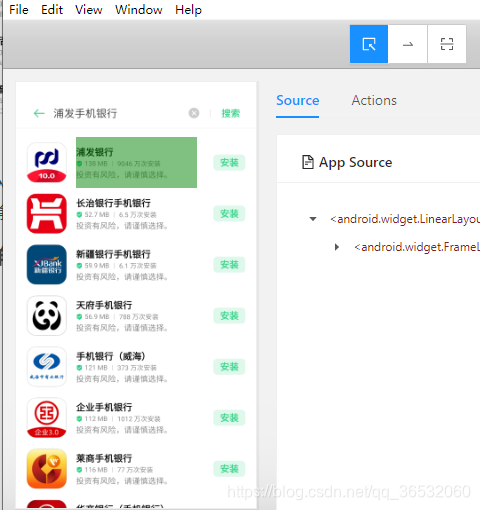
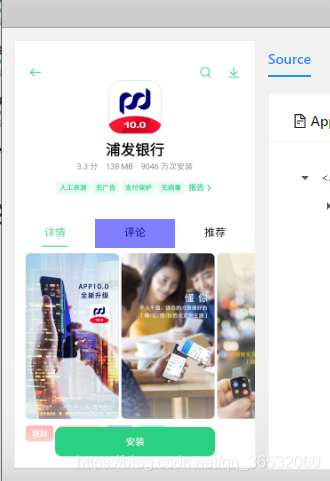
 再根据自己定义的key值存成单个单个的excel(文件名按照keyword_key命名,后续要用),将星级截图也存下来。 photo截图长这样
【本文地址】
今日新闻 |
推荐新闻 |