Nginx + Keepalived(主备模式)实现负载均衡高可用浅析 |
您所在的位置:网站首页 › nginx负载均衡配置主备服务器怎么设置 › Nginx + Keepalived(主备模式)实现负载均衡高可用浅析 |
Nginx + Keepalived(主备模式)实现负载均衡高可用浅析
|
概述 目前关于负载均衡和高可用的架构方案能找到相当多且详尽的资料,此篇是自己学习相关内容的一个总结,防止将来遗忘再次重新查找资料,也避免踩相同的坑。 此次配置的负载均衡与高可用架构:Nginx + Keepalived(主备模式),Nginx 使用反向代理实现七层负载均衡。 众所周知,Nginx 是一款自由的、开源的、高性能HTTP服务器和反向代理服务器,也是一个IMAP、POP3、SMTP代理服务器。 也就是说Nginx本身就可以托管网站(类似于Tomcat一样),进行HTTP服务处理,也可以作为反向代理服务器使用。 Keepalived 是一个基于VRRP协议来实现的服务高可用方案,可以利用其来避免IP单点故障,类似的工具还有heartbeat、corosync、pacemaker。 但是它一般不会单独出现,而是与其它负载均衡技术(如lvs、haproxy、nginx)一起工作来达到集群的高可用。 相关原理对于理解整个架构的工作方式以及之后的troubleshooting都非常重要。
关于负载均衡,Nginx + Keepalived(主备模式)实现负载均衡高可用的架构方式,可参考另一篇相当不错的博客: http://www.cnblogs.com/kevingrace/p/6138185.html 关于虚拟路由冗余协议(VRRP),可参考: https://www.cnblogs.com/yechuan/archive/2012/04/17/2453707.html http://network.51cto.com/art/201309/412163.htm http://zhaoyuqiang.blog.51cto.com/6328846/1166840/
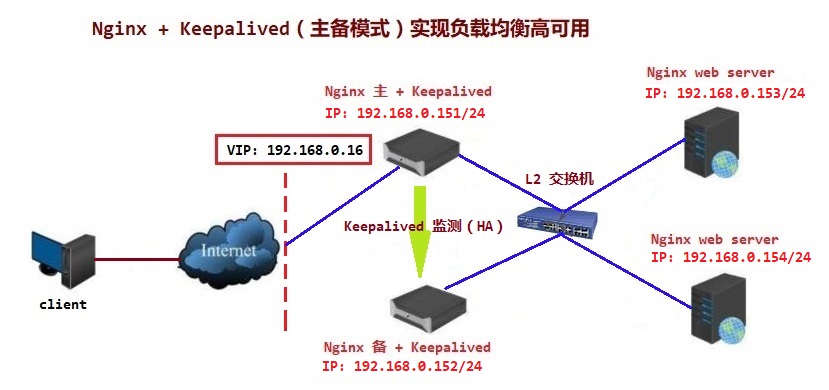
一.环境说明 系统环境: 4台 Red Hat Enterprise Linux Server release 7.0 (Maipo) master节点:192.168.0.151/24 backup节点:192.168.0.152/24 虚拟IP(VIP):192.168.0.16 nginx web服务器:192.168.0.153/24 nginx web服务器:192.168.0.154/24 架构示意图:
二.软件版本 Nginx stable version:nginx-1.12.2 Keepalived version:keepalived-1.3.9
三.环境安装部署 4个节点均进行以下操作: 1. 关闭firewalld防火墙,此处将使用iptables防火墙管理软件。 [root@rhel7-vm1 ~]# systemctl stop firewalld # 停止firewalld服务,关闭firewalld防火墙。 [root@rhel7-vm1 ~]# systemctl disable firewalld # 取消firewalld开机自启动2. 关闭selinux [root@rhel7-vm1 ~]# vim /etc/selinux/config # 配置selinux为permissive模式 ... SELINUX=permissive # 第7行 ... [root@rhel7-vm1 ~]# setenforce 0 # 使selinux即时生效并使开机依然为permissive模式 [root@rhel7-vm1 ~]# getenforce # 查看当前selinux模式 Permissive3. 节点间时间同步并添加入周期性任务中(此处使用的是阿里的ntp时间同步服务器) [root@rhel7-vm1 ~]# crontab -u root -e */1 * * * * root /usr/sbin/ntpdate 120.25.108.114. 开启自定义iptables防火墙规则(此处为虚拟机上实验,只配置了一张网卡ens3;实际生产环境还要更加复杂,可以指定多个网卡接口) [root@rhel7-vm1 ~]# vim iptables_cfg.sh #!/bin/bash # # Edited : 2017.11.12 08:05 by hualf. # Usage : Used to configure firewall by 'iptables'. # iptables -F iptables -P INPUT DROP iptables -P OUTPUT ACCEPT iptables -P FORWARD ACCEPT iptables -I INPUT -i ens3 -m state --state RELATED,ESTABLISHED -j ACCEPT iptables -A INPUT -i lo -j ACCEPT iptables -A INPUT -i ens3 -s 192.168.0.0/24 -p icmp -j ACCEPT # 添加icmp协议,能够使用ping命令 iptables -A INPUT -i ens3 -s 192.168.0.0/24 -p tcp --dport 22 -j ACCEPT # 添加ssh服务端口,能够远程登陆 # web service # 添加web服务端口 iptables -A INPUT -i ens3 -p tcp --dport 80 -j ACCEPT # 80端口:master节点与backup节点用于监听nginx负载均衡服务 iptables -A INPUT -i ens3 -p tcp --dport 8080 -j ACCEPT # 8080端口:2个nginx web服务器的监听端口 # dns service and keepalived(vrrp) iptables -A INPUT -i ens3 -p udp --sport 53 -j ACCEPT # 注意:允许来源为53端口(DNS服务)的数据包进入主机,避免yum安装rpm软件包时无法解析yum源地址! iptables -A INPUT -i ens3 -p vrrp -j ACCEPT # 注意:添加vrrp协议,确保能使用keepalived主备间的正常通信,否则会发生脑裂! nginx web服务器节点可取消该规则。 service iptables save # 保存防火墙规则使开机自启动在运行 iptables_cfg.sh 时,出现报错如下: The service command supports only basic LSB actions (start, stop, restart, try-restart, reload, force-reload, status). For other actions, please try to use systemctl. 解决方法: 如果之前没有停止firewalld服务的话,将其停止服务并取消开机自启动;安装iptables-services软件包及相关依赖;重启iptables服务,并实现开机自启动。 [root@rhel7-vm1 ~]# systemctl stop firewalld [root@rhel7-vm1 ~]# systemctl disable firewalld [root@rhel7-vm1 ~]# yum install -y iptables-services [root@rhel7-vm1 ~]# systemctl restart iptables[root@rhel7-vm1 ~]# systemctl enable iptables再次运行 iptables_cfg.sh 时,防火墙规则被重新定义。 **************************************************************************
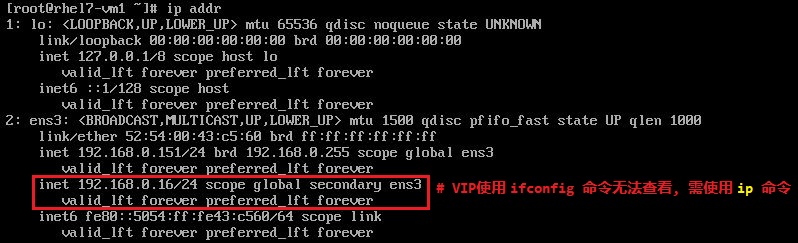
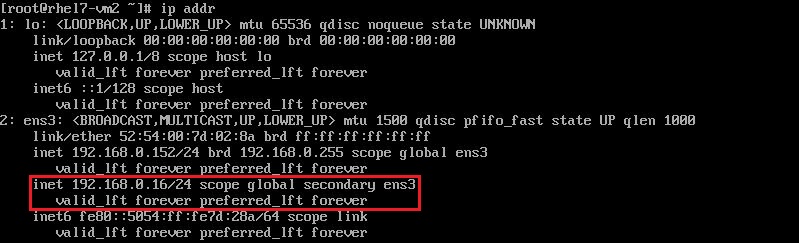
master节点: 1. 安装及配置nginx 1)安装 nginx 相关的依赖包 [root@rhel7-vm1 ~]# yum install -y gcc gcc-c++ pcre pcre-devel openssl openssl-devel zlib zlib-devel acpid依赖包相关说明: gcc / gcc-c++:gcc编译器,编译nginx需要。 pcre / pcre-devel:Perl 语言兼容正则表达式(Perl Compatible Regular Expressions,用C语言编写的正则表达式函数库),nginx的rewrite模块正则表达式使用。 openssl / openssl-devel:nginx的ssl模块使用。 zlib / zlib-devel:nginx的gzip模块使用。 acpid:电源管理软件包 注意:以上软件包在编译安装nginx时必须安装,否则报错。 2)下载nginx-1.12.2,解压及源码安装 [root@rhel7-vm1 ~]# tar zxvf nginx-1.12.2.tar.gz -C /usr/local # 解压nginx源码包至/usr/local目录中 [root@rhel7-vm1 ~]# cd /usr/local/nginx-1.12.2 [root@rhel7-vm1 nginx-1.12.2]# ./configure --with-http_ssl_module --with-http_flv_module --with-http_stub_status_module # nginx安装检查配置 ... skipping ... Configuration summary # 列出nginx所需的系统库及配置的相关信息 + using system PCRE library + using system OpenSSL library + using system zlib library nginx path prefix: "/usr/local/nginx" nginx binary file: "/usr/local/nginx/sbin/nginx" nginx modules path: "/usr/local/nginx/modules" nginx configuration prefix: "/usr/local/nginx/conf" nginx configuration file: "/usr/local/nginx/conf/nginx.conf" nginx pid file: "/usr/local/nginx/logs/nginx.pid" nginx error log file: "/usr/local/nginx/logs/error.log" nginx http access log file: "/usr/local/nginx/logs/access.log" nginx http client request body temporary files: "client_body_temp" nginx http proxy temporary files: "proxy_temp" nginx http fastcgi temporary files: "fastcgi_temp" nginx http uwsgi temporary files: "uwsgi_temp" nginx http scgi temporary files: "scgi_temp"[root@rhel7-vm1 nginx-1.12.2]# make && make install # 编译安装 检查配置完毕,即可编译安装。安装过中一般不会出现报错。 3)配置nginx实现开机自启动 方法一:直接编辑自定义开机启动脚本 /etc/rc.d/rc.local [root@rhel7-vm1 ~]# cp /usr/local/nginx/sbin/nginx /usr/sbin/ [root@rhel7-vm1 ~]# vim /etc/rc.d/rc.local #!/bin/bash # THIS FILE IS ADDED FOR COMPATIBILITY PURPOSES # # It is highly advisable to create own systemd services or udev rules # to run scripts during boot instead of using this file. # # In contrast to previous versions due to parallel execution during boot # this script will NOT be run after all other services. # # Please note that you must run 'chmod +x /etc/rc.d/rc.local' to ensure # that this script will be executed during boot. touch /var/lock/subsys/local /usr/local/nginx/sbin/nginx # 将nginx的可执行文件写入开机自定义启动脚本中 [root@rhel7-vm1 ~]# chmod 755 /etc/rc.d/rc.local # 添加可执行权限,实现开机自启动[root@rhel7-vm1 ~]# ls -lh /etc/rc.d/rc.local -rwxr-xr-x. 1 root root 473 Nov 17 23:51 /etc/rc.d/rc.local方法二:编辑 /etc/init.d/nginx 脚本(该脚本由nginx官方提供,根据配置进行相应更改),使用chkconfig命令来实现开机自启动。 该方法可以使用 /etc/init.d/nginx {start|stop|status|restart|condrestart|try-restart|reload|force-reload|configtest} 或 service 命令集中式管理。 [root@rhel7-vm1 ~]# vim /etc/init.d/nginx #!/bin/sh # # nginx - this script starts and stops the nginx daemin # # chkconfig: - 85 15 # description: Nginx is an HTTP(S) server, HTTP(S) reverse \ # proxy and IMAP/POP3 proxy server # processname: nginx # config: /usr/local/nginx/conf/nginx.conf # pidfile: /usr/local/nginx/logs/nginx.pid # Source function library. . /etc/rc.d/init.d/functions # Source networking configuration. . /etc/sysconfig/network # Check that networking is up. [ "$NETWORKING" = "no" ] && exit 0 nginx="/usr/local/nginx/sbin/nginx" prog=$(basename $nginx) NGINX_CONF_FILE="/usr/local/nginx/conf/nginx.conf" lockfile=/var/lock/subsys/nginx start() { [ -x $nginx ] || exit 5 [ -f $NGINX_CONF_FILE ] || exit 6 echo -n $"Starting $prog: " daemon $nginx -c $NGINX_CONF_FILE retval=$? echo [ $retval -eq 0 ] && touch $lockfile return $retval } stop() { echo -n $"Stopping $prog: " killproc $prog -QUIT retval=$? echo [ $retval -eq 0 ] && rm -f $lockfile return $retval } restart() { configtest || return $? stop start } reload() { configtest || return $? echo -n $"Reloading $prog: " killproc $nginx -HUP RETVAL=$? echo } force_reload() { restart } configtest() { $nginx -t -c $NGINX_CONF_FILE } rh_status() { status $prog } rh_status_q() { rh_status >/dev/null 2>&1 } case "$1" in start) rh_status_q && exit 0 $1 ;; stop) rh_status_q || exit 0 $1 ;; restart|configtest) $1 ;; reload) rh_status_q || exit 7 $1 ;; force-reload) force_reload ;; status) rh_status ;; condrestart|try-restart) rh_status_q || exit 0 ;; *) echo $"Usage: $0 {start|stop|status|restart|condrestart|try-restart|reload|force-reload|configtest}" exit 2 esac [root@rhel7-vm1 ~]# chmod 755 /etc/init.d/nginx[root@rhel7-vm1 ~]# chkconfig --level 35 nginx on # chkconfig命令更改nginx运行级别,设置开机自启动 [root@rhel7-vm1 ~]# service nginx restart # 重启nginx服务 Restarting nginx (via systemctl): [ OK ] [root@rhel7-vm1 ~]# /etc/init.d/nginx status # 查看nginx服务状态4)添加nginx系统用户与系统用户组 从安全角度考虑,如果nginx遭受攻击并被获取权限,使用nginx系统用户将降低主机被入侵的风险。也可以使用除root外的其他系统用户与系统用户组。 [root@rhel7-vm1 ~]# groupadd -r nginx # 添加系统用户组nginx [root@rhel7-vm1 ~]# useradd -r -g nginx -M nginx -s /sbin/nologin # -r:添加系统用户nginx;-g:添加到系统用户组nginx;-M:不创建用户家目录;-s:指定登陆的shell为/sbin/nologin(不允许登陆)5)配置nginx反向代理与负载均衡 此次的配置文件使用基本的反向代理与负载均衡,较为详细的配置文件说明可参考: https://segmentfault.com/a/1190000002797601 http://www.nginx.cn/76.html [root@rhel7-vm1 ~]# vim /usr/local/nginx/conf/nginx.conf user nginx nginx; # 使用nginx系统用户与nginx系统用户组 worker_processes 4; # nginx对外提供web服务时的worker进程数,通常设置成与cpu的核心数相等 error_log logs/error.log; #error_log logs/error.log notice; #error_log logs/error.log info; pid logs/nginx.pid; events { use epoll; # 使用epoll事件模型;epoll是多路复用IO(I/O Multiplexing)的一种方式,仅用于linux2.6以上内核,可以大大提高nginx的性能。 worker_connections 1024; # 每一个worker进程能并发处理(发起)的最大连接数(包含与客户端或后端被代理服务器间等所有连接数)。 } http { # http全局块 include mime.types; default_type application/octet-stream; #log_format main '$remote_addr - $remote_user [$time_local] "$request" ' # '$status $body_bytes_sent "$http_referer" ' # '"$http_user_agent" "$http_x_forwarded_for"'; #access_log logs/access.log main; sendfile on; #tcp_nopush on; #keepalive_timeout 0; keepalive_timeout 65; #gzip on; upstream nginx-static.com { # 加载负载均衡模块;域名指向后端web服务器集群 # ip_hash; # 默认情况下使用轮询(round-robin)模式,也可配置为ip_hash模式 server 192.168.0.153:8080 max_fails=3 fail_timeout=30s; # max_fails: 允许失败的次数,默认值为1 server 192.168.0.154:8080 max_fails=3 fail_timeout=30s; # fail_timeout: 当max_fails次失败后,暂停将请求分发到后端web服务器的时间 } server { listen 80; # 监听master负载均衡节点80端口 server_name lb-ngx.com; # master负载均衡节点的域名 charset utf-8; # 使用utf-8字符串编码格式 root /var/www; # 定义nginx服务的根目录: /var/www #access_log logs/host.access.log main; location / { # index index.html index.htm; # 定义首页索引文件的名称,即/var/www下的索引文件。 proxy_pass http://nginx-static.com; # 加载反向代理模块: 将访问http://lb-ngx.com根目录文件的请求,全部代理分发到后端服务器。 proxy_redirect off; proxy_set_header Host $host; proxy_set_header REMOTE-HOST $remote_addr; proxy_set_header X-Real-IP $remote_addr; proxy_set_header X-Forwarder-For $proxy_add_x_forwarded_for; proxy_connect_timeout 300; proxy_send_timeout 300; proxy_read_timeout 600; proxy_buffer_size 256k; proxy_buffers 4 256k; proxy_busy_buffers_size 256k; proxy_temp_file_write_size 256k; proxy_next_upstream error timeout invalid_header http_500 http_503 http_404; proxy_max_temp_file_size 128m; } location /test { proxy_pass http://nginx-static.com/test; # 加载反向代理模块: 将访问http://lb-ngx.com/test的请求,全部代理分发到后端服务器。 proxy_redirect off; proxy_set_header Host $host; proxy_set_header REMOTE-HOST $remote_addr; proxy_set_header X-Real-IP $remote_addr; proxy_set_header X-Forwarder-For $proxy_add_x_forwarded_for; } #error_page 404 /404.html; # redirect server error pages to the static page /50x.html # error_page 500 502 503 504 /50x.html; # 错误页面 location = /50x.html { root html; } }6)重启nginx服务使配置生效,查看nginx运行状态及端口使用。 [root@rhel7-vm1 ~]# /etc/init.d/nginx restart Restarting nginx (via systemctl): [ OK ] [root@rhel7-vm1 ~]# /etc/init.d/nginx status [root@rhel7-vm1 ~]# netstat -tunlp | grep 802. 安装及配置keepalived 1)下载并解压keepalived-1.3.9 [root@rhel7-vm1 ~]# tar zxvf keepalived-1.3.9.tar.gz2)编译安装keepalived及安装排错 [root@rhel7-vm1 ~]# cd keepalived-1.3.9 [root@rhel7-vm1 keepalived-1.3.9]# ./configure检查配置过程中报错如下: *** WARNING - this build will not support IPVS with IPv6. Please install libnl/libnl-3 dev libraries to support IPv6 with IPVS. 解决方法: [root@rhel7-vm1 ~]# yum install -y libnl libnl-devel # 安装libnl及libnl-deve依赖包再次检查配置./configure,报错如下: configure: error: libnfnetlink headers missing 解决方法: [root@rhel7-vm1 ~]# yum install -y libnfnetlink-devel编译安装: [root@rhel7-vm1 keepalived-1.3.9]# ./configure [root@rhel7-vm1 keepalived-1.3.9]# make && make install [root@rhel7-vm1 ~]# cp /usr/local/keepalived-1.3.9/keepalived/keepalived /usr/sbin # 拷贝keepalived可执行文件 [root@rhel7-vm1 ~]# cp /usr/local/keepalived-1.3.9/keepalived/etc/sysconfig/keepalived /etc/sysconfig # 拷贝keepalived的systemctl配置文件,可由systemctl命令控制 [root@rhel7-vm1 ~]# cp -r /usr/local/keepalived-1.3.9/keepalived/etc/keepalived /etc # 拷贝keepalived的全部配置文件,否则配置完keepalived并启动将报错3)keepalived高可用基本配置 keepalived的高可用通过vrrp的虚拟IP(VIP)来实现。 keepalived可以通过自定义脚本来跟踪nginx负载均衡服务的状态。当master节点的nginx负载均衡服务down掉后,可通过脚本结束keepalived进程。 此时backup节点的keepalived侦测到原master节点的keepalived进程已停止,master节点的VIP漂移到backup节点上,即backup节点的keepalived由BACKUP状态转换为MASTER状态。 [root@rhel7-vm1 ~]# vim /etc/keepalived/keepalived.conf ! Configuration File for keepalived global_defs { notification_email { # [email protected] # [email protected] # [email protected] } notification_email_from [email protected] # smtp_server 192.168.200.1 # smtp_connect_timeout 30 router_id LVS_DEVEL vrrp_skip_check_adv_addr vrrp_strict vrrp_garp_interval 0 vrrp_gna_interval 0 } vrrp_script chk_http_port { # vrrp_script定义脚本检测nginx服务是否在运行 script "/opt/chk_ngx.sh" # 自定义脚本所在的路径,并将脚本添加可执行权限。 interval 2 # 脚本执行的时间间隔;此处为2s检查一次 weight -5 # 脚本结果导致的优先级变更 fall 2 # 检测2次失败才算是真的失败 rise 1 # 检测1次成功就算是真的成功 } vrrp_instance VI_1 { # vrrp实例;keepalived的virtual_router_id中priority(0-255)最大的成为MASTER,也就是接管虚拟IP(VIP) state MASTER # 指定keepalived的状态为MASTER,但决定MASTER状态的为priority参数,该参数的权限值需要比BACKUP节点的设的要高,才能成为真正的MASTER,否则会被BACKUP抢占。 interface ens3 # 侦听HA的网卡接口,防火墙规则需对该网卡指定vrrp协议。 virtual_router_id 51 # 虚拟路由标志,该标志是一个数字;在同一个vrrp实例中使用同一个标志,即同一个vrrp实例中的MASTER和BACKUP使用相同的virtual_router_id。 priority 100 # 配置优先级;在同一个vrrp实例中,MASTER的优先级必须大于BACKUP的优先级,否则即使state定义为MASTER,也会被优先级定义更高的BACKUP所抢占。 advert_int 1 # 配置MASTER与BACKUP节点间互相检查的时间间隔,单位是秒。 authentication { # 配置MASTER和BACKUP的验证类型和密码,两者必须一样。 auth_type PASS # 配置vrrp验证类型,主要有PASS和AH两种。 auth_pass 1111 # 配置vrrp验证密码,在同一个vrrp_instance下,MASTER和BACKUP必须使用相同的密码才能正常通信。 } virtual_ipaddress { # vrrp虚拟IP(VIP),如果有多个VIP的话,可以写成多行。 192.168.0.16/24 } track_script { chk_http_port # 引用vrrp_script中定义的脚本,定时运行,可实现MASTER和BACKUP间的切换。 } } [root@rhel7-vm1 ~]# vim /opt/chk_ngx.sh # 监测nginx负载均衡服务的脚本,可根据nginx进程状态来切换keepalived的状态。 #!/bin/bash # # Edited : 2017.11.12 16:16 by hualf. # Usage : checking status of nginx. If nginx has been down, # master node will restart nginx again. When nginx has started # failedly, keepalived will be killed, and backup node will # replace the master node. # status=$(ps -C nginx --no-headers | wc -l) if [ $status -eq 0 ]; then # nginx服务停止后,再次启动nginx。 /usr/local/nginx/sbin/nginx sleep 2 counter=$(ps -C nginx --no-headers | wc -l) if [ "${counter}" -eq 0 ]; then # nginx再次启动失败后,停止master节点的keepalived,切换并启用backup节点。 systemctl stop keepalived fi fi4)查看nginx及keepalived进程运行状态 在master节点上均已开启nginx及keepalived服务,keepalived此时为MASTER状态并与backup节点保持通信。 master节点的虚拟IP(VIP)只能通过ip addr命令查看,无法使用ifconfig命令查看。
********************************************************************************
backup节点: 1. 安装及配置nginx 与master节点方法类似,参照master节点配置。 2. keepalived高可用基本配置 配置文件中只列出与master节点的差异项 ! Configuration File for keepalived global_defs { notification_email { # [email protected] # [email protected] # [email protected] } notification_email_from [email protected] # smtp_server 192.168.200.1 # smtp_connect_timeout 30 router_id LVS_DEVEL vrrp_skip_check_adv_addr vrrp_strict vrrp_garp_interval 0 vrrp_gna_interval 0 } vrrp_script chk_http_port { script "/opt/chk_ngx.sh" interval 2 weight -5 fall 2 rise 1 } vrrp_instance VI_1 { state BACKUP # backup节点的keepalived状态必须配置为BACKUP interface ens3 virtual_router_id 51 # 在同一个vrrp实例中,master节点与backup节点的virtual_router_id必须相同。 priority 50 # backup节点的优先级必须小于master节点的优先级 advert_int 1 authentication { auth_type PASS auth_pass 1111 } virtual_ipaddress { 192.168.0.16/24 } track_script { chk_http_port } }3. 重启nginx及keepalived服务 ********************************************************************************
2个节点nginx web服务器: 1. 安装及配置nginx(以192.168.0.153/24为例) 安装与master节点方法相似,具体配置如下: [root@rhel7-vm3 ~]# vim /usr/local/nginx/conf/nginx.confuser nginx nginx; worker_processes 2; error_log logs/error.log; #error_log logs/error.log notice; #error_log logs/error.log info; pid logs/nginx.pid; events { use epoll; worker_connections 1024; } http { include mime.types; default_type application/octet-stream; #log_format main '$remote_addr - $remote_user [$time_local] "$request" ' # '$status $body_bytes_sent "$http_referer" ' # '"$http_user_agent" "$http_x_forwarded_for"'; #access_log logs/access.log main; sendfile on; #tcp_nopush on; #keepalive_timeout 0; keepalive_timeout 65; #gzip on; server { listen 8080; # nginx web服务器监听8080端口 server_name 192.168.0.153; charset utf-8; root /var/www; # 配置虚拟主机的根目录: /var/www #access_log logs/host.access.log main; location / { # 根目录中首页的索引文件 index index.html index.htm; } location /test { # 根目录中test子目录首页的索引文件 index index.html; } #error_page 404 /404.html; # redirect server error pages to the static page /50x.html # error_page 500 502 503 504 /50x.html; location = /50x.html { root html; } } [root@rhel7-vm3 ~]# vim /var/www/index.html Welcome to nginx! Welcome to nginx! 192.168.0.153 [root@rhel7-vm3 ~]# vim /var/www/test/index.html Welcome to nginx! Welcome to test nginx! 192.168.0.1532. 重启nginx服务 2个nginx web服务器配置完成并重启后,进行负载均衡与高可用测试。 ********************************************************************************
负载均衡和高可用测试: 1. 当master节点的nginx及keepalived均正常提供服务时,在此次配置中nginx负载均衡使用轮询模式,即192.168.0.153/24与192.168.0.154/24能够以相似的几率被访问。 master节点的keepalived为MASTER状态,虚拟IP(VIP)在master节点上。 通过浏览器访问http://lb-ngx.com与http://lb-ngx.com/test,分别能够访问位于153站点及154站点上的主页,并且通过刷新能够轮询访问两个站点。
2. 当master节点的nginx负载均衡服务停止,并且再次尝试重启失败后,keepalived进程也被停止,此时由backup节点来接管master节点的nginx负载均衡服务,backup节点keepalived 状态转变为MASTER,虚拟IP(VIP)漂移到了backup节点上。通过浏览器访问上述网站依然能够访问,在这里不再展示。可以通过查看日志/var/log/messages来确定master节点与backup节点 keepalived的状态。
至此,Nginx + Keepalived(主备模式)的负载均衡高可用架构的基本配置已完成,该架构属于轻量级负载均衡高可用架构。之后还会学习haproxy/pacemaker的原理及配置方法。 |


【本文地址】
今日新闻 |
推荐新闻 |