How to Access My Book Live When Connected Directly to a Computer |
您所在的位置:网站首页 › mymylive › How to Access My Book Live When Connected Directly to a Computer |
How to Access My Book Live When Connected Directly to a Computer
|
How to Access My Book Live When Connected Directly to a Computer
This answer explains how to access a My Book Live when connected directly to a computer.
*END
Important:
WD My Book Live End of Support Notice!
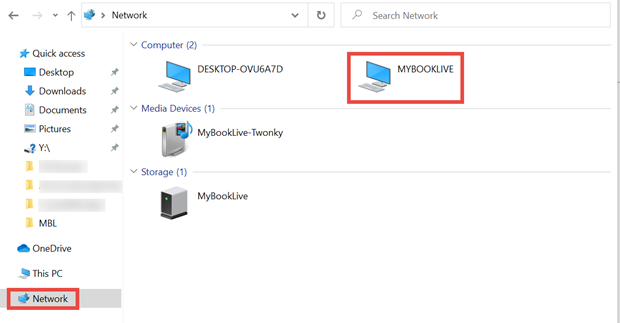
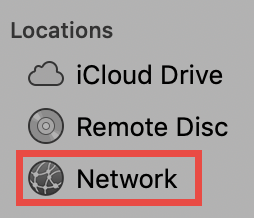
WD My Book Live has reached its end of support life cycle. WDC-21008 Recommended Security Measures for WD My Book Live and WD My Book Live Duo For more details, please refer to Answer ID 28917: WD My Book Live: End of Support and Answer ID 28740: Western Digital Product Lifecycle Support Policy. My Book Live can be accessed when the device is powered on and connected to a computer using the Ethernet cable for direct access. Important: An Ethernet cross-over cable is not required. The computer and the My Book Live must be configured for DHCP. If you are unaware of the My Book Live IP address settings, perform a 4 second reset. For more information, refer to Answer ID 5323 How to Reset a My Book Live or My Book Live Duo Windows 10 troubleshooting assistance, please refer to to Answer ID 3842: WD My Cloud Home and Passport Wireless Not Detected on Windows Network. Enable Windows Network Discovery, please refer to Answer ID 13943: Instructions for Enabling Network Discovery on Windows. Topic Instructions Disconnect from Internet Click here for Instructions Connect to the Computer Click here for Instructions Access Shares On Windows Click here for Instructions Access Shares On macOS Click here for Instructions Access Dashboard In Web Browser Click here for Instructions My Book Live Not Detected Click here for Instructions Connect the My Book Live to the Computer If the computer has a WiFi Connection, turn off the wireless, refer to Microsoft Support: Turn airplane mode on or off. Insert one end of the Ehternet cable into the network port of a My Book Live. Insert the other end of the Ethernet cable into the network port of a computer. If the computer does not have a Ethernet port, use a USB to Ethernet adapter. Or Use different computer. Or connect the computer and My Book Live and Duo to a Router without an Internet connection. Reboot, or Power On the computer. Log In as the computer's Admin user. Power On the My Book Live and wait for a Solid Green LED. Access My Book Live Shares On Windows Open File Exlorer. Click Network, then double click the My Book Live to access the shares.
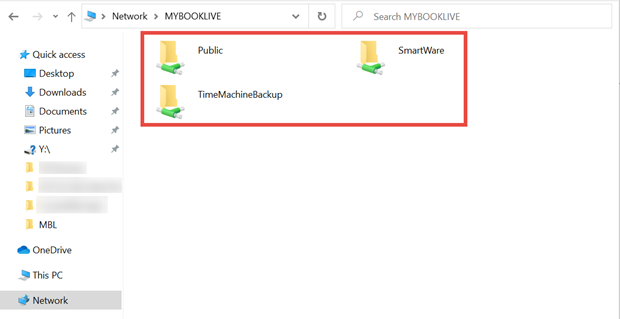
 Double click on a My Book Live Share.
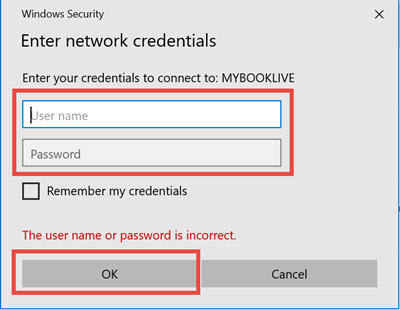
If clicking into a private share, enter your credentials and click the OK button.
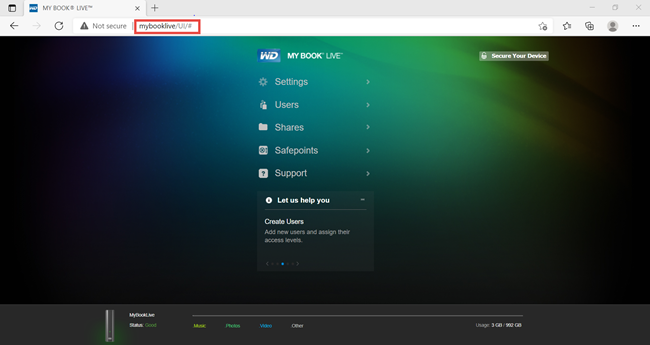
Follow the steps below to access the My Book Live in a web browser using the default device name. Open a Web Browser on the computer Enter the device name of the My Book Live into the URL field of the web browser. Refer to the table below for the correct device name per My Book Live model. Important: If the My Book Live device name was changed, please use that name instead of 'MyBookLive'. If the name of the device is unknown or the Dashboard is not accessible, the My Book Live device can be reset by following the instructions, please refer to Answer ID 5323 How to Reset a My Book Live or My Book Live Duo My Book Live My Book Live Duo Windows http://mybooklive Windows http://mybookliveduo MacOS http://mybooklive.local MacOS http://mybookliveduo.local
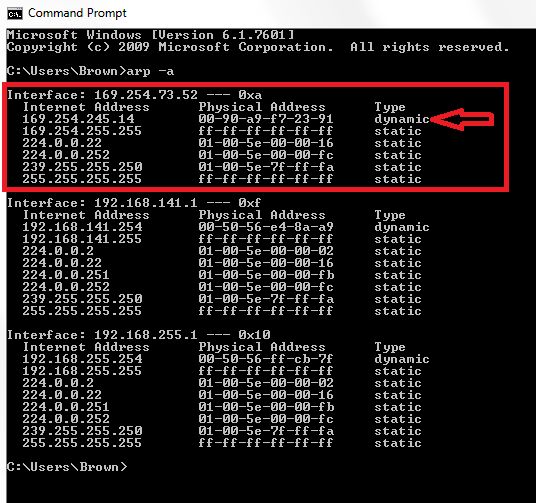
Follow the steps below if the My Book Live is not detected by the computer. Power Off the computer. Power Off the My Book Live. Double check the Ethernet cable connections or replace the Ethernet cable. Power on the computer and Sign In. Power on the My Book Live and wait until the LED is solid Green. If the LED is not Solid Green it will not be detected. Windows Open a Command Prompt (DOS) and type arp -a to get the list of connected devices. In the Windows Search box type cmd. Click on Command Prompt. Type arp -a to get the list of connected devices. The My Book Live should appear at the top of the list with an IP address of 169.254.245.XX as indicated by the example listed below.The Physical Address should match the MAC address on the My Book Live label located on the bottom of the unit.
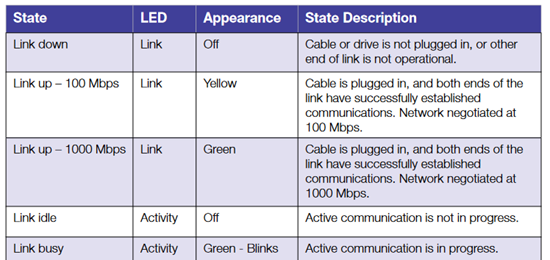
If the My Book Live is not seen in the ARP table verify the Network Interface Card LED status from the table below. Try replacing the Ethernet cable. Ensure that the Ethernet cable is securely inserted in the computer and the My Book Live Ethernet port.
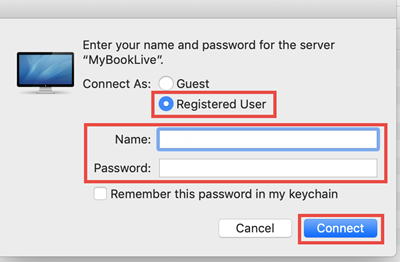
If clicking into a private share, select Registered User, enter your credentials and click the Connect button.
To disconnect your My Book Live from the Internet follow the steps below. Identify the Etherent port on the back of the My Book Live. Disconnect the Ethernet cable from the My Book Live and the Internet connected router.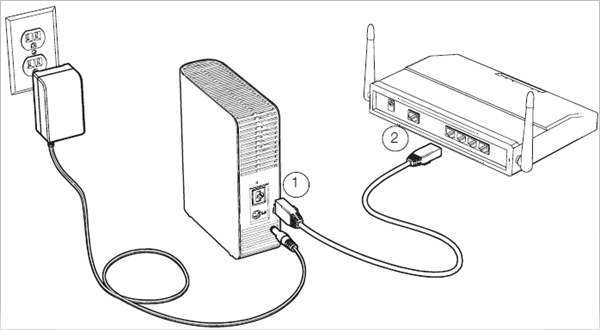
Your My Book live is now disconnected from the Internet. Return to Top |


【本文地址】