k8s资源类型详解 |
您所在的位置:网站首页 › k8s工作负载类型 › k8s资源类型详解 |
k8s资源类型详解
|
k8s资源类型
一、k8s资源类型简介二、deployment资源类型三、service资源类型四、k8s资源的回滚操作五、用label控制pod的位置六、namespace简介七、pod资源类型八、健康检测的相关应用九、ReplicaSet的相关介绍十、DaemonSet资源类型十一、job资源对象十二、CronJob资源类型
一、k8s资源类型简介
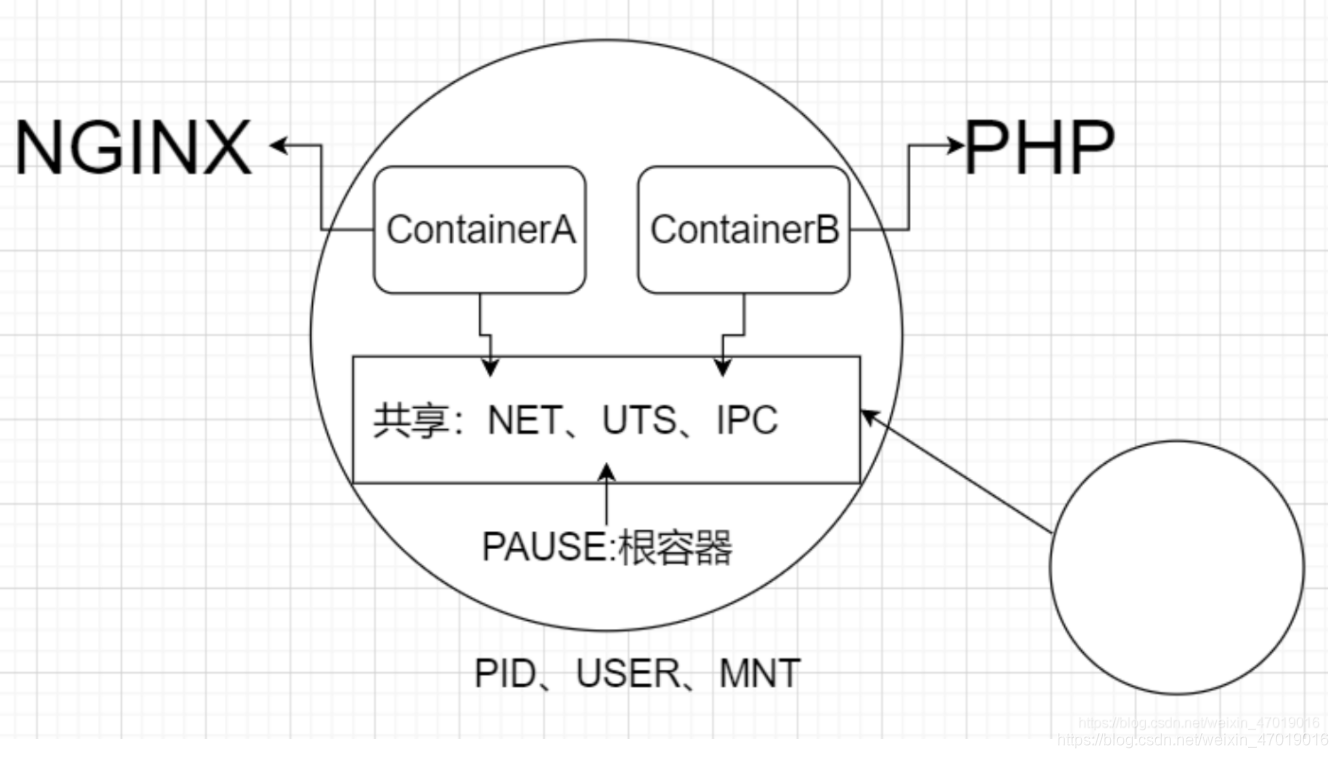
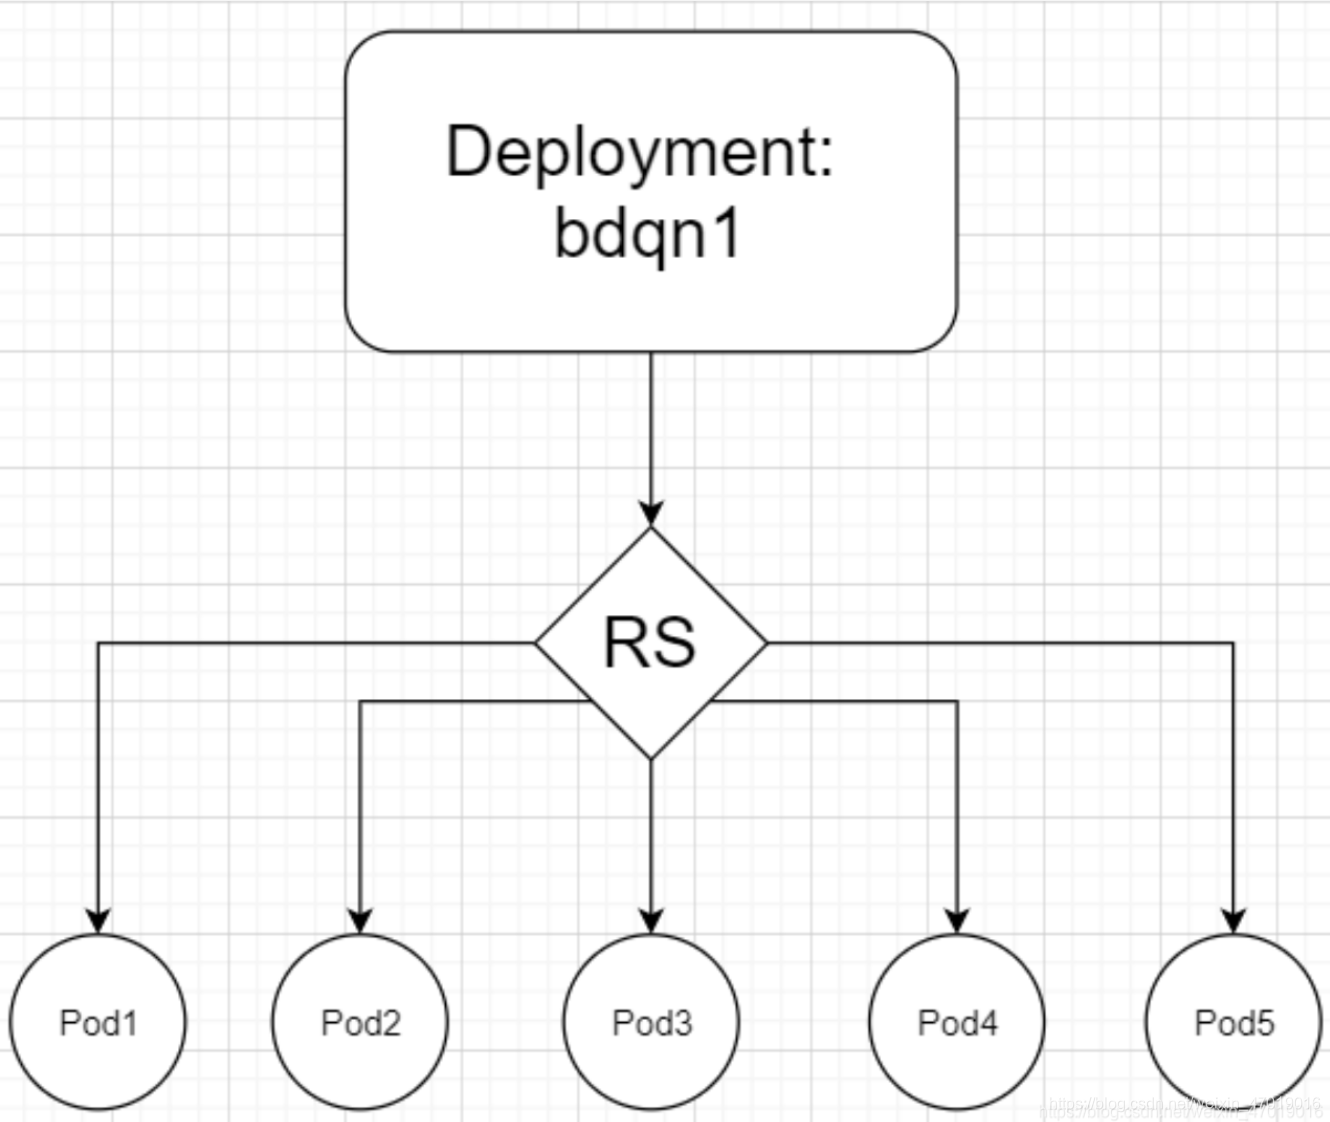
Deployment、Service、Pod是k8s最核心的3个资源对象。 Deployment:最常见的无状态应用的控制器,支持应用的扩缩容、滚动更新等操作。 Servcie:为弹性变动且存在生命周期的Pod对象提供了一个固定的访问接口,用于服务发现和服务访问。 Pod:是运行容器以及调度的最小单位。同一个Pod可以同时运行多个容器,这些容器共享NET、UTS、IPC。除此之外还有USER、PID、MOUNT。 创建一个Deployment资源对象,名称为bdqn1,replicas:5个,镜像使用httpd。 kind: Deployment apiVersion: extensions/v1beta1 metadata: name: test1 spec: replicas: 5 template: metadata: labels: app: test1 spec: containers: - name: test1 image: httpd ports: - containerPort: 80分析Deployment为什么被称为高级的Pod控制器? [root@master yaml]# kubectl describe deployments. test1 ... Events: Type Reason Age From Message ---- ------ ---- ---- ------- Normal ScalingReplicaSet 3m5s deployment-controller Scaled up replica set test1-644db4b57b to 4注意:events属于事件提示,它描述了整个资源从开始到现在所经历的全部过程。Deployment没有像我们想象中直接创建并控制后端的Pod,而是又创建了一个新的资源对象:ReplicaSet(test1-644db4b57b)。 查看该RS的详细信息,会看到RS整个的Events。 [root@master yaml]# kubectl describe rs test1-644db4b57b ... Events: Type Reason Age From Message ---- ------ ---- ---- ------- Normal SuccessfulCreate 9m53s replicaset-controller Created pod: test1-644db4b57b-4688l Normal SuccessfulCreate 9m53s replicaset-controller Created pod: test1-644db4b57b-72vhc Normal SuccessfulCreate 9m53s replicaset-controller Created pod: test1-644db4b57b-rmz8v Normal SuccessfulCreate 9m53s replicaset-controller Created pod: test1-644db4b57b-w25q8此时查看任意一个Pod的详细信息,能够看到此Pod的完整的工作流程。 [root@master yaml]# kubectl describe pod test1-644db4b57b-4688l ... Events: Type Reason Age From Message ---- ------ ---- ---- ------- Normal Scheduled 11m default-scheduler Successfully assigned default/test1-644db4b57b-4688l to node1 Normal Pulled 11m kubelet, node1 Container image "192.168.229.187:5000/httpd:v1" already present on machine Normal Created 11m kubelet, node1 Created container test1 Normal Started 11m kubelet, node1 Started container test1
创建一个Service资源,要求与上述test1进行关联。 kind: Service apiVersion: v1 metadata: name: test-svc spec: selector: app: test1 ports: - protocol: TCP port: 80 targetPort: 80默认情况下Service的资源类型Cluster IP,上述YAML文件中,spec.ports.port:描述的是Cluster IP的端口。只是为后端的Pod提供了一个统一的访问入口(在k8s集群内有效)。 [root@master yaml]# kubectl get svc NAME TYPE CLUSTER-IP EXTERNAL-IP PORT(S) AGE kubernetes ClusterIP 10.96.0.1 443/TCP 23d test-svc NodePort 10.103.159.206 80:32767/TCP 6s [root@master yaml]# curl 10.103.159.206 11111如果想要让外网能够访问到后端Pod,这里应该将Service的资源类型改为NodePort。 kind: Service apiVersion: v1 metadata: name: test-svc spec: type: NodePort selector: app: test1 ports: - protocol: TCP port: 80 targetPort: 80 nodePort: 32034 #nodePort的有效范围是:30000-32767上面我们看到了访问Cluster IP ,后端的Pod会轮替着为我们提供服务,也就是有负载均衡,如果没有Service资源,KUBE-PROXY组件也不会生效,因为它就是负责负载均衡,那么现在有了Service资源,它到底是怎么做到负载均衡的?底层的原理是什么? 表面上来看,通过describe命令,查看SVC资源对应的Endpoint,就能够知道后端真正的Pod。 [root@master yaml]# kubectl describe svc test-svc ... Endpoints: 10.244.1.33:80,10.244.1.34:80,10.244.2.27:80 + 1 more... ...通过查看iptables规则,可以了解一下具体的负载均衡过程。 [root@master yaml]# kubectl get svc NAME TYPE CLUSTER-IP EXTERNAL-IP PORT(S) AGE kubernetes ClusterIP 10.96.0.1 443/TCP 23d test-svc NodePort 10.103.159.206 80:32767/TCP 8m11s [root@master yaml]# iptables-save | grep 10.103.159.206 -A KUBE-SERVICES ! -s 10.244.0.0/16 -d 10.103.159.206/32 -p tcp -m comment --comment "default/test-svc: cluster IP" -m tcp --dport 80 -j KUBE-MARK-MASQ -A KUBE-SERVICES -d 10.103.159.206/32 -p tcp -m comment --comment "default/test-svc: cluster IP" -m tcp --dport 80 -j KUBE-SVC-W3OX4ZP4Y24AQZNW #如果目标地址是10.103.159.206/32的80端口,并且走的是TCP协议,那么就把这个流量跳转到KUBE-SVC-W3OX4ZP4Y24AQZNW [root@master yaml]# iptables-save | grep KUBE-SVC-W3OX4ZP4Y24AQZNW -A KUBE-SVC-W3OX4ZP4Y24AQZNW -m statistic --mode random --probability 0.25000000000 -j KUBE-SEP-UNUAETQI6W3RVNLM -A KUBE-SVC-W3OX4ZP4Y24AQZNW -m statistic --mode random --probability 0.33332999982 -j KUBE-SEP-QNYBCG5SL7K2IM5K -A KUBE-SVC-W3OX4ZP4Y24AQZNW -m statistic --mode random --probability 0.50000000000 -j KUBE-SEP-NP7BZEGCZQZXEG4R -A KUBE-SVC-W3OX4ZP4Y24AQZNW -j KUBE-SEP-5KNXDMFFQ4CLBFVI [root@master yaml]# iptables-save | grep KUBE-SEP-UNUAETQI6W3RVNLM :KUBE-SEP-UNUAETQI6W3RVNLM - [0:0] -A KUBE-SEP-UNUAETQI6W3RVNLM -s 10.244.1.33/32 -j KUBE-MARK-MASQ -A KUBE-SEP-UNUAETQI6W3RVNLM -p tcp -m tcp -j DNAT --to-destination 10.244.1.33:80 -A KUBE-SVC-W3OX4ZP4Y24AQZNW -m statistic --mode random --probability 0.25000000000 -j KUBE-SEP-UNUAETQI6W3RVNLM参数解释 SNAT:Source NAT(源地址转换); DNAT:Destination NAT(目标地址转换); MASQ:动态的源地址转换; Service实现的负载均衡:默认使用的是iptables规则; 四、k8s资源的回滚操作准备3个版本所使用的私有镜像,来模拟每次升级不同的镜像。 [root@master yaml]# vim test1.yaml kind: Deployment apiVersion: extensions/v1beta1 metadata: name: test1 spec: replicas: 4 template: metadata: labels: test: test spec: containers: - name: test1 image: 192.168.229.187:5000/httpd:v1 [root@master yaml]# vim test2.yaml kind: Deployment apiVersion: extensions/v1beta1 metadata: name: test1 spec: replicas: 4 template: metadata: labels: test: test spec: containers: - name: test1 image: 192.168.229.187:5000/httpd:v2 [root@master yaml]# vim test3.yaml kind: Deployment apiVersion: extensions/v1beta1 metadata: name: test1 spec: replicas: 4 template: metadata: labels: test: test spec: containers: - name: test1 image: 192.168.229.187:5000/httpd:v3此处3个yaml文件指定不同版本的镜像。 运行一个服务,并记录一个版本信息。 [root@master yaml]# kubectl apply -f test1.yaml --record查看有哪些版本信息 [root@master yaml]# kubectl rollout history deployment test1 deployment.extensions/test1 REVISION CHANGE-CAUSE 1 kubectl apply --filename=test1.yaml --record=true运行并升级Depoyment资源,并记录版本信息。 [root@master yaml]# kubectl apply -f test2.yaml --record [root@master yaml]# kubectl apply -f test3.yaml --record把test1的版本进行升级 [root@master yaml]# kubectl set image deploy test1 test1=192.168.229.187:5000/httpd:v2此时可以运行一个关联的Service资源去做验证,升级是否成功。 [root@master yaml]# kubectl apply -f test-svc.yaml [root@master yaml]# kubectl get deployments. test1 -o wide回滚到指定版本 [root@master yaml]# kubectl rollout undo deployment test1 --to-revision=1 五、用label控制pod的位置添加节点标签 [root@master yaml]# kubectl label nodes node2 disk=ssd node/node2 labeled [root@master yaml]# kubectl get nodes --show-labels删除节点标签 [root@master yaml]# kubectl label nodes node2 disk- ... spec: revisionHistoryLimit: 10 replicas: 3 template: metadata: labels: app: web spec: containers: - name: test-web image: 192.168.1.10:5000/httpd:v1 ports: - containerPort: 80 nodeSelector: #添加节点选择器 disk: ssd #和标签内容一致 六、namespace简介默认的名称空间:Default 查看名称空间 [root@master yaml]# kubectl get ns NAME STATUS AGE default Active 25d kube-node-lease Active 25d kube-public Active 25d kube-system Active 25d test Active 22m查看名称空间详细信息 [root@master yaml]# kubectl describe ns default Name: default Labels: Annotations: Status: Active No resource quota. No resource limits.创建名称空间 [root@master yaml]# kubectl create ns test [root@master yaml]# vim test.yaml apiVersion: v1 kind: Namespace metadata: name: test注意:namespace资源对象仅用于资源对象的隔离,并不能隔绝不同名称空间的Pod之间的通信,那是网络策略资源的功能。 查看指定名称空间的资源可以使用–namespace或者-n选项 [root@master yaml]# kubectl get pod -n test NAME READY STATUS RESTARTS AGE test 1/1 Running 0 28m删除某个名称空间 [root@master yaml]# kubectl delete ns test注意:在执行删除某个名称空间的时候,千万注意,轻易不执行此操作。如果执行之后,默认会将所在此名称空间之下资源全部删除。 七、pod资源类型1.利用yaml文件创建pod资源 [root@master yaml]# vim pod.yaml kind: Pod apiVersion: v1 metadata: name: test-pod spec: containers: - name: test-app image: httpd单个pod运行多个容器 [root@master yaml]# vim pod.yaml kind: Pod apiVersion: v1 metadata: name: test-pod spec: containers: - name: test-app image: httpd - name: test-web image: busybox2.Pod中镜像获取策略 将上述Pod资源的镜像下载策略改为IfNotPresent。 [root@master yaml]# vim pod.yaml kind: Pod apiVersion: v1 metadata: name: test-pod spec: containers: - name: test-app image: httpd imagePullPolicy: IfNotPresentk8s默认根据镜像的TAG的不同,有3中不同策略。 Always:镜像标签为"latest"或镜像标签不存在时,总是从指定的仓库(默认的官方仓库、或者私有仓库)中获取最新镜像。 IfNotPresent:仅当本地镜像不存在时才从目标仓库中下载。也就意味着,如果本地存在,直接使用本地镜像,无需再联网下载。 Never:禁止从仓库中下载镜像,即只使用本地镜像。注意:对于标签为“latest”或者这标签不存在,其默认镜像下载策略为“Always”,而对于其他标签的镜像,默认则使用了“IfNotPresent”。 上述语句中提到的"本地"是指:docker images命令能够给查看到的镜像。 3.容器的重启策略 将上述Pod资源添加重启策略为OnFailure。 [root@master yaml]# vim pod.yaml kind: Pod apiVersion: v1 metadata: name: test-pod spec: restartPolicy: OnFailure containers: - name: test-app image: httpd imagePullPolicy: IfNotPresent策略如下: Always:但凡Pod对象终止就将其重启,此为默认设定; OnFailure:仅在Pod对象出现错误时才将其重启; Never:从不重启;简便方法: 同一个yaml文件内,可以同时存在多种资源对象,但最好是同一个服务相关的资源。并且在写的时候,不同的资源需要用“—”将资源隔离。其实默认是一个资源的yaml,最上方也有“—"不过是通常会省略不写。 [root@master yaml]# vim pod.yaml --- apiVersion: v1 kind: Namespace metadata: name: test --- kind: Pod apiVersion: v1 metadata: name: test-pod namespace: test spec: restartPolicy: OnFailure containers: - name: test-app image: httpd imagePullPolicy: IfNotPresent4.Pod的默认健康检查 根据Pod的默认重启策略,对Pod进行健康检查 [root@master yaml]# vim pod.yaml kind: Pod apiVersion: v1 metadata: name: healthcheck namespace: test spec: restartPolicy: OnFailure containers: - name: test-app image: httpd imagePullPolicy: IfNotPresent args: - sh - -c - sleep 10; exit 1监控pod的运行状态 [root@master yaml]# kubectl get pod -n test -w如果此时我们将退出状态码改为0,也就是正常退出,仍使用OnFailure策略,但它就不会重启Pod了。 [root@master yaml]# vim pod.yaml kind: Pod apiVersion: v1 metadata: name: healthcheck namespace: test spec: restartPolicy: OnFailure containers: - name: test-app image: httpd imagePullPolicy: IfNotPresent args: - sh - -c - sleep 10; exit 0监控pod的运行状态 [root@master yaml]# kubectl get pod -n test -w5.livenessprobe(活跃度、存活性) kind: Pod apiVersion: v1 metadata: name: liveness labels: test: liveness spec: restartPolicy: OnFailure containers: - name: liveness image: busybox args: - sh - -c - touch /tmp/test; sleep 30; rm -rf /tmp/test; sleep 300 livenessProbe: exec: command: - cat - /tmp/test initialDelaySeconds: 10 #pod运行10秒后开始探测 periodSeconds: 5 #每5秒探测一次注意:Liveness活跃度探测,根据探测某个文件是否存在,来确认某个服务是否正常运行,如果存在则正常,否则,它会根据你设置的Pod的重启策略操作Pod。 6.readiness(敏捷探测、就绪性探测) kind: Pod apiVersion: v1 metadata: name: readiness labels: test: readiness spec: restartPolicy: OnFailure containers: - name: readiness image: busybox args: - sh - -c - touch /tmp/test; sleep 30; rm -rf /tmp/test; sleep 300 readinessProbe: exec: command: - cat - /tmp/test initialDelaySeconds: 10 periodSeconds: 5注意 (1)liveness和readiness是两种健康检查机制,如果不特意配置,k8s将两种探测采取相同的默认行为,即通过判断容器启动进程的返回值是否为零,来判断探测是否成功。 (2)两种探测配置方法完全一样,不同之处在于探测失败后的行为: liveness探测是根据Pod重启策略操作容器,大多数是重启容器; readiness则是将容器设置为不可用,不接收Service转发的请求; (3)两种探测方法可以独立存在,也可以同时使用。 用liveness判断容器是否需要重启实现自愈; 用readiness判断容器是否已经准备好对外提供服务; 八、健康检测的相关应用1.在扩容中的应用 kind: Deployment apiVersion: extensions/v1beta1 metadata: name: web spec: replicas: 5 template: metadata: labels: run: web spec: containers: - name: web image: httpd ports: - containerPort: 80 readinessProbe: httpGet: scheme: HTTP path: /healthy port: 80 initialDelaySeconds: 10 periodSeconds: 5 --- kind: Service apiVersion: v1 metadata: name: web-svc spec: type: NodePort selector: run: web ports: - protocol: TCP port: 90 targetPort: 80 nodePort: 30321总结:服务扩容中,如果没有针对性就绪探测,往往扩容之后,表面看Pod的状态是没有问题的,但其实Pod内的服务是否运行正常也是我们要关注的,而Readiness的关注点就在这,如果Pod内的服务运行有问题,那么,这些新扩容的Pod就不会被添加到Service资源的转发中,从而保证用户能够有最起码正常的服务体验。 2.在更新过程中的应用 [root@master yaml]# vim update1.yaml kind: Deployment apiVersion: extensions/v1beta1 metadata: name: update spec: replicas: 10 template: metadata: labels: app: update spec: containers: - name: update image: 192.168.229.187:5000/httpd:v1 args: - sh - -c - sleep 10; touch /tmp/health; sleep 300 readinessProbe: exec: command: - cat - /tmp/health initialDelaySeconds: 10 periodSeconds: 5复制update1的yaml文件,命名update2.yaml,并更改镜像和args的命令部分,这里我们确定,更新肯定会失败,因为它没有符合readiness探测文件。 [root@master yaml]# vim update2.yml kind: Deployment apiVersion: extensions/v1beta1 metadata: name: update spec: replicas: 10 template: metadata: labels: app: update spec: containers: - name: update image: 192.168.229.187:5000/httpd:v2 args: - sh - -c - sleep 300 readinessProbe: exec: command: - cat - /tmp/health initialDelaySeconds: 10 periodSeconds: 5在更新的过程中,Readiness探测同样重要,想象一下,如果更新完成的Pod内没有更新的内容,并且也没有相对应的探测,那么有可能我们更新的Pod全部都会是不可用的。 其实在更新过程中,为了保证,即使更新失败,至少也有相对数量的副本数量仍能正常提供服务,其实是有数值可以设置的。 maxSurge:此参数控制滚动更新过程中,副本总数超过预期数的值。可以是整数,也可以是百分比,默认是1。 maxUnavailable:不可用Pod的值。默认为1。可以是整数,也可以是百分比。测试题: 在更新过程中,期望的Replicas值为10个,更改rollingupdate策略,要求在更新过程中,最大不可用Pod的值为4个,允许同时出现的Pod的总数量为13个。 kind: Deployment apiVersion: extensions/v1beta1 metadata: name: update spec: strategy: rollingUpdate: maxSurge: 3 maxUnavailable: 4 replicas: 10 template: metadata: labels: app: update spec: containers: - name: update image: 192.168.229.187:5000/httpd:v2 args: - sh - -c - sleep 300 readinessProbe: exec: command: - cat - /tmp/healthy initialDelaySeconds: 10 periodSeconds: 5 九、ReplicaSet的相关介绍Deployment是一种高级的Pod控制器,这种高级Pod控制器,并不是像想象中直接管理后端的Pod,而是又创建了RS这种Pod控制器,然后由RS控制后端的Pod,那么为什么这么做?因为RS资源并不支持滚动更新策略。 RC:Replication Controller(老一代的Pod控制器) 用于确保由其管控的Pod对象副本数量,能够满足用户期望,多则删除,少则通过模板创建。 特点 确保Pod资源对象的数量精准; 确保Pod健康运行; 弹性伸缩;同样它也可以通过yaml或json格式的资源清单来创建。其中spec字段一般嵌套以下字段。 replicas:期望的Pod对象副本数量; selector:当前控制器匹配Pod对象副本的标签选择器; template:Pod副本的模板;与RC相比而言,RS不仅支持基于等值的标签选择器,而且还支持基于集合的标签选择器。 1.labels与selector的关系 (1)现在有一个Pod资源,且是拥有2个标签。还有svc资源,selector选择器,仅有一个符合。 kind: Pod apiVersion: v1 metadata: name: pod1 labels: test: web app: httpd spec: containers: - name: pod1 image: httpd --- kind: Service apiVersion: v1 metadata: name: test-svc1 spec: selector: app: httpd ports: - port: 80svc资源是否能成功的关联到上述的Pod资源? (2)现在有一个Pod资源,且是拥有1个标签。还有svc资源,selector选择器,需要2个满足条件。 kind: Pod apiVersion: v1 metadata: name: pod1 labels: test: web spec: containers: - name: pod1 image: httpd --- kind: Service apiVersion: v1 metadata: name: test-svc1 spec: selector: app: httpd test: web ports: - port: 80svc资源是否能成功的关联到上述的Pod资源? 结论:selector是拥有选择权的,而labels只能够被选择,所以labels必须全部满足selector的要求,才能被匹配。 常用标签 标签:解决同类型的资源对象越来越多,为了更好的管理,按照标签分组。 常用标签分类 release(版本):stable(稳定版)、canary(金丝雀版本)、beta(测试版); environment(环境变量):dev(开发)、qa(测试)、production(生产); application(应用):ui、as(application software应用软件)、pc、sc; tier(架构层级):frontend(前端)、backend(后端)、cache(缓存); partition(分区):customerA(客户A)、customerB(客户B); track(品控级别):daily(每天)、weekly(每周);示例:写一个Pod的yaml文件。 kind: Pod apiVersion: v1 metadata: name: pod-labels labels: env: qa tier: frontend spec: containers: - name: myapp image: httpd通过下面命令显示资源对象的标签 [root@master ~]# kubectl get pod --show-labels通过-l查看仅包含某个标签的资源 [root@master ~]# kubectl get pod -l env给pod资源添加标签 [root@master ~]# kubectl label pod pod-labels release=v1 [root@master ~]# kubectl get pod pod-labels --show-labels删除标签 [root@master ~]# kubectl label pod pod-labels release-修改标签 [root@master ~]# kubectl label pod pod-labels env=dev --overwrite [root@master ~]# kubectl get pod -l tier --show-labels如果标签有多个,标签选择器选择其中一个,也可以关联成功。相反,如果选择器有多个,那么标签必须完全满足条件,才可以关联成功。 2.标签选择器 标签的查询过滤条件。 基于等值关系(equality-based):"=","==","!="前边两个都是相等,最后是不等; 基于集合关系(set-based):"in"、"notin"、"exists"三种;示例: pod标签pod1app: nginx、name: zhangsan、age: 18pod2app: nginx、name: lisi、age: 20pod3name: wangwu、age: 30 ... selector: matchLabels: app: nginx matchExpressions: #pod中有name这个关键字的,并且对应的值是:zhangsan或者lisi,那么此处会关联到Pod1、Pod2 - {key: name,operator: In,values: [zhangsan,lisi]} #所有关键字是age的,并且忽略它的值,都会被选中,此处会关联到Pod1、Pod2、Pod3 - {key: age,operator: Exists,values:} ... matchLabels:指定键值对表示的标签选择器; matchExpressions:基于表达式来指定的标签选择器;选择器列表间为“逻辑与”关系;使用In或者NotIn操作时,其values不强制要求为非空的字符串列表,而使用Exists或DostNotExist时,其values必须为空。 3.使用标签选择器的逻辑 1.同时指定的多个选择器之间的逻辑关系为“与“操作; 2.使用空值的标签选择器意味着每个资源对象都将被选择中; 3.空的标签选择器无法选中任何资源; 十、DaemonSet资源类型它也是一种Pod控制器。 特点:它会在每一个Node节点上都会生成并且只能生成一个Pod资源。 使用场景:如果必须将Pod运行在固定的某个或某几个节点,且要优先于其他Pod的启动。通常情况下,默认每一个节点都会运行,并且只能运行一个Pod。这种情况推荐使用DaemonSet资源对象。 监控程序; 日志收集程序; 运行一个web服务,在每一个节点都运行一个Pod。 kind: DaemonSet apiVersion: extensions/v1beta1 metadata: name: test-ds spec: template: metadata: labels: name: test-ds spec: containers: - name: test-ds image: httpdRC、RS、Deployment、DaemonSet都是Pod控制器。–> Controllermanager(维护集群状态,保证Pod处于期望的状态。) 十一、job资源对象 服务类的Pod容器:RC、RS、DS、Deployment.(Pod内运行的服务,要持续运行); 工作类的Pod容器:Job--->执行一次或者批量执行处理程序,完成就会退出容器;1.编写一个job.yaml文件 [root@master ~]# vim job.yaml kind: Job apiVersion: batch/v1 metadata: name: test-job spec: template: metadata: name: test-job spec: containers: - name: hello image: busybox command: ["echo","hello k8s job!"] restartPolicy: Never注意:如果容器内执行任务有误,会根据容器的重启策略操作容器,不过这里的容器重启策略只能是:Never和OnFailure。 2.提高Job的执行效率 我们可以在Job.spec字段下加上parallelism选项。表示同时运行多少个Pod执行任务。 我们可以在Job.spec字段下加上completions选项。表示总共需要完成Pod的数量。 举例将上述Job任务进行更改。提示,更改Job任务的时候,需要先将原来的Job资源对象删除。 [root@master ~]# vim job.yaml kind: Job apiVersion: batch/v1 metadata: name: test-job spec: parallelism: 2 completions: 8 template: metadata: name: test-job spec: containers: - name: hello image: busybox command: ["echo","hello k8s job!"] restartPolicy: Neverjob的作用和之前提到的at命令有些相似,在K8s集群中,如果需要用到运行一次性工作任务的需求,可以考虑job资源对象。下面的cronjob和之前的crontab也是十分相似。 十二、CronJob资源类型1.如何定时执行Job 编写一个cronjob.yaml文件 [root@master ~]# vim cronjob.yaml kind: CronJob apiVersion: batch/v1 metadata: name: test-cronjob spec: schedule: "*/1 * * * *" #分、时、日、月、周 jobTemplate: spec: template: spec: containers: - name: hello image: busybox command: ["echo","hello cronjob!"] restartPolicy: Never此时查看Pod的状态,会发现每分钟都会运行一个新的Pod来执行命令规定的任务。 注意:如果规定具体时间,可能并不会执行任务。cronjob资源对象,开发还未完成此功能。 2.添加apiVersion库 [root@master job]# vim /etc/kubernetes/manifests/kube-apiserver.yaml 在yaml文件中command指令下添加 - --runtime-config=batch/v2alpha1=true重启kubelet服务,重新识别api yaml文件内容即可。 查看api版本库 [root@master job]# kubectl api-versions注意:此时仍然不能正常运行指定时间的CronJob,这是因为K8s官方在cronjob这个资源对象的支持中还没有完善此功能,还待开发。 跟Job资源一样在cronjob.spec.jobTemplate.spec下同样支持并发Job参数:parallelism,也支持完成Pod的总数参数:completions。 |
【本文地址】
今日新闻 |
推荐新闻 |