Android 获取APK中的所有类 或 指定接口的所有实现类 |
您所在的位置:网站首页 › java中的所有类都是javalang的子类 › Android 获取APK中的所有类 或 指定接口的所有实现类 |
Android 获取APK中的所有类 或 指定接口的所有实现类
|
文章目录
方案1:ServiceLoader原理demo1. 整体结构2. 接口和实现类3. 查找实现类
AutoService1. 添加依赖2. 为实现类添加注解
使用`fat-aar`不打包配置文件的解决方案解决方案
可优化点
方案2:遍历Dex(不推荐)问题分解1. 获取所有的类如何获取DexFile2. 筛选出实现指定接口的类
工具类
方案比较
方案1:ServiceLoader
原理
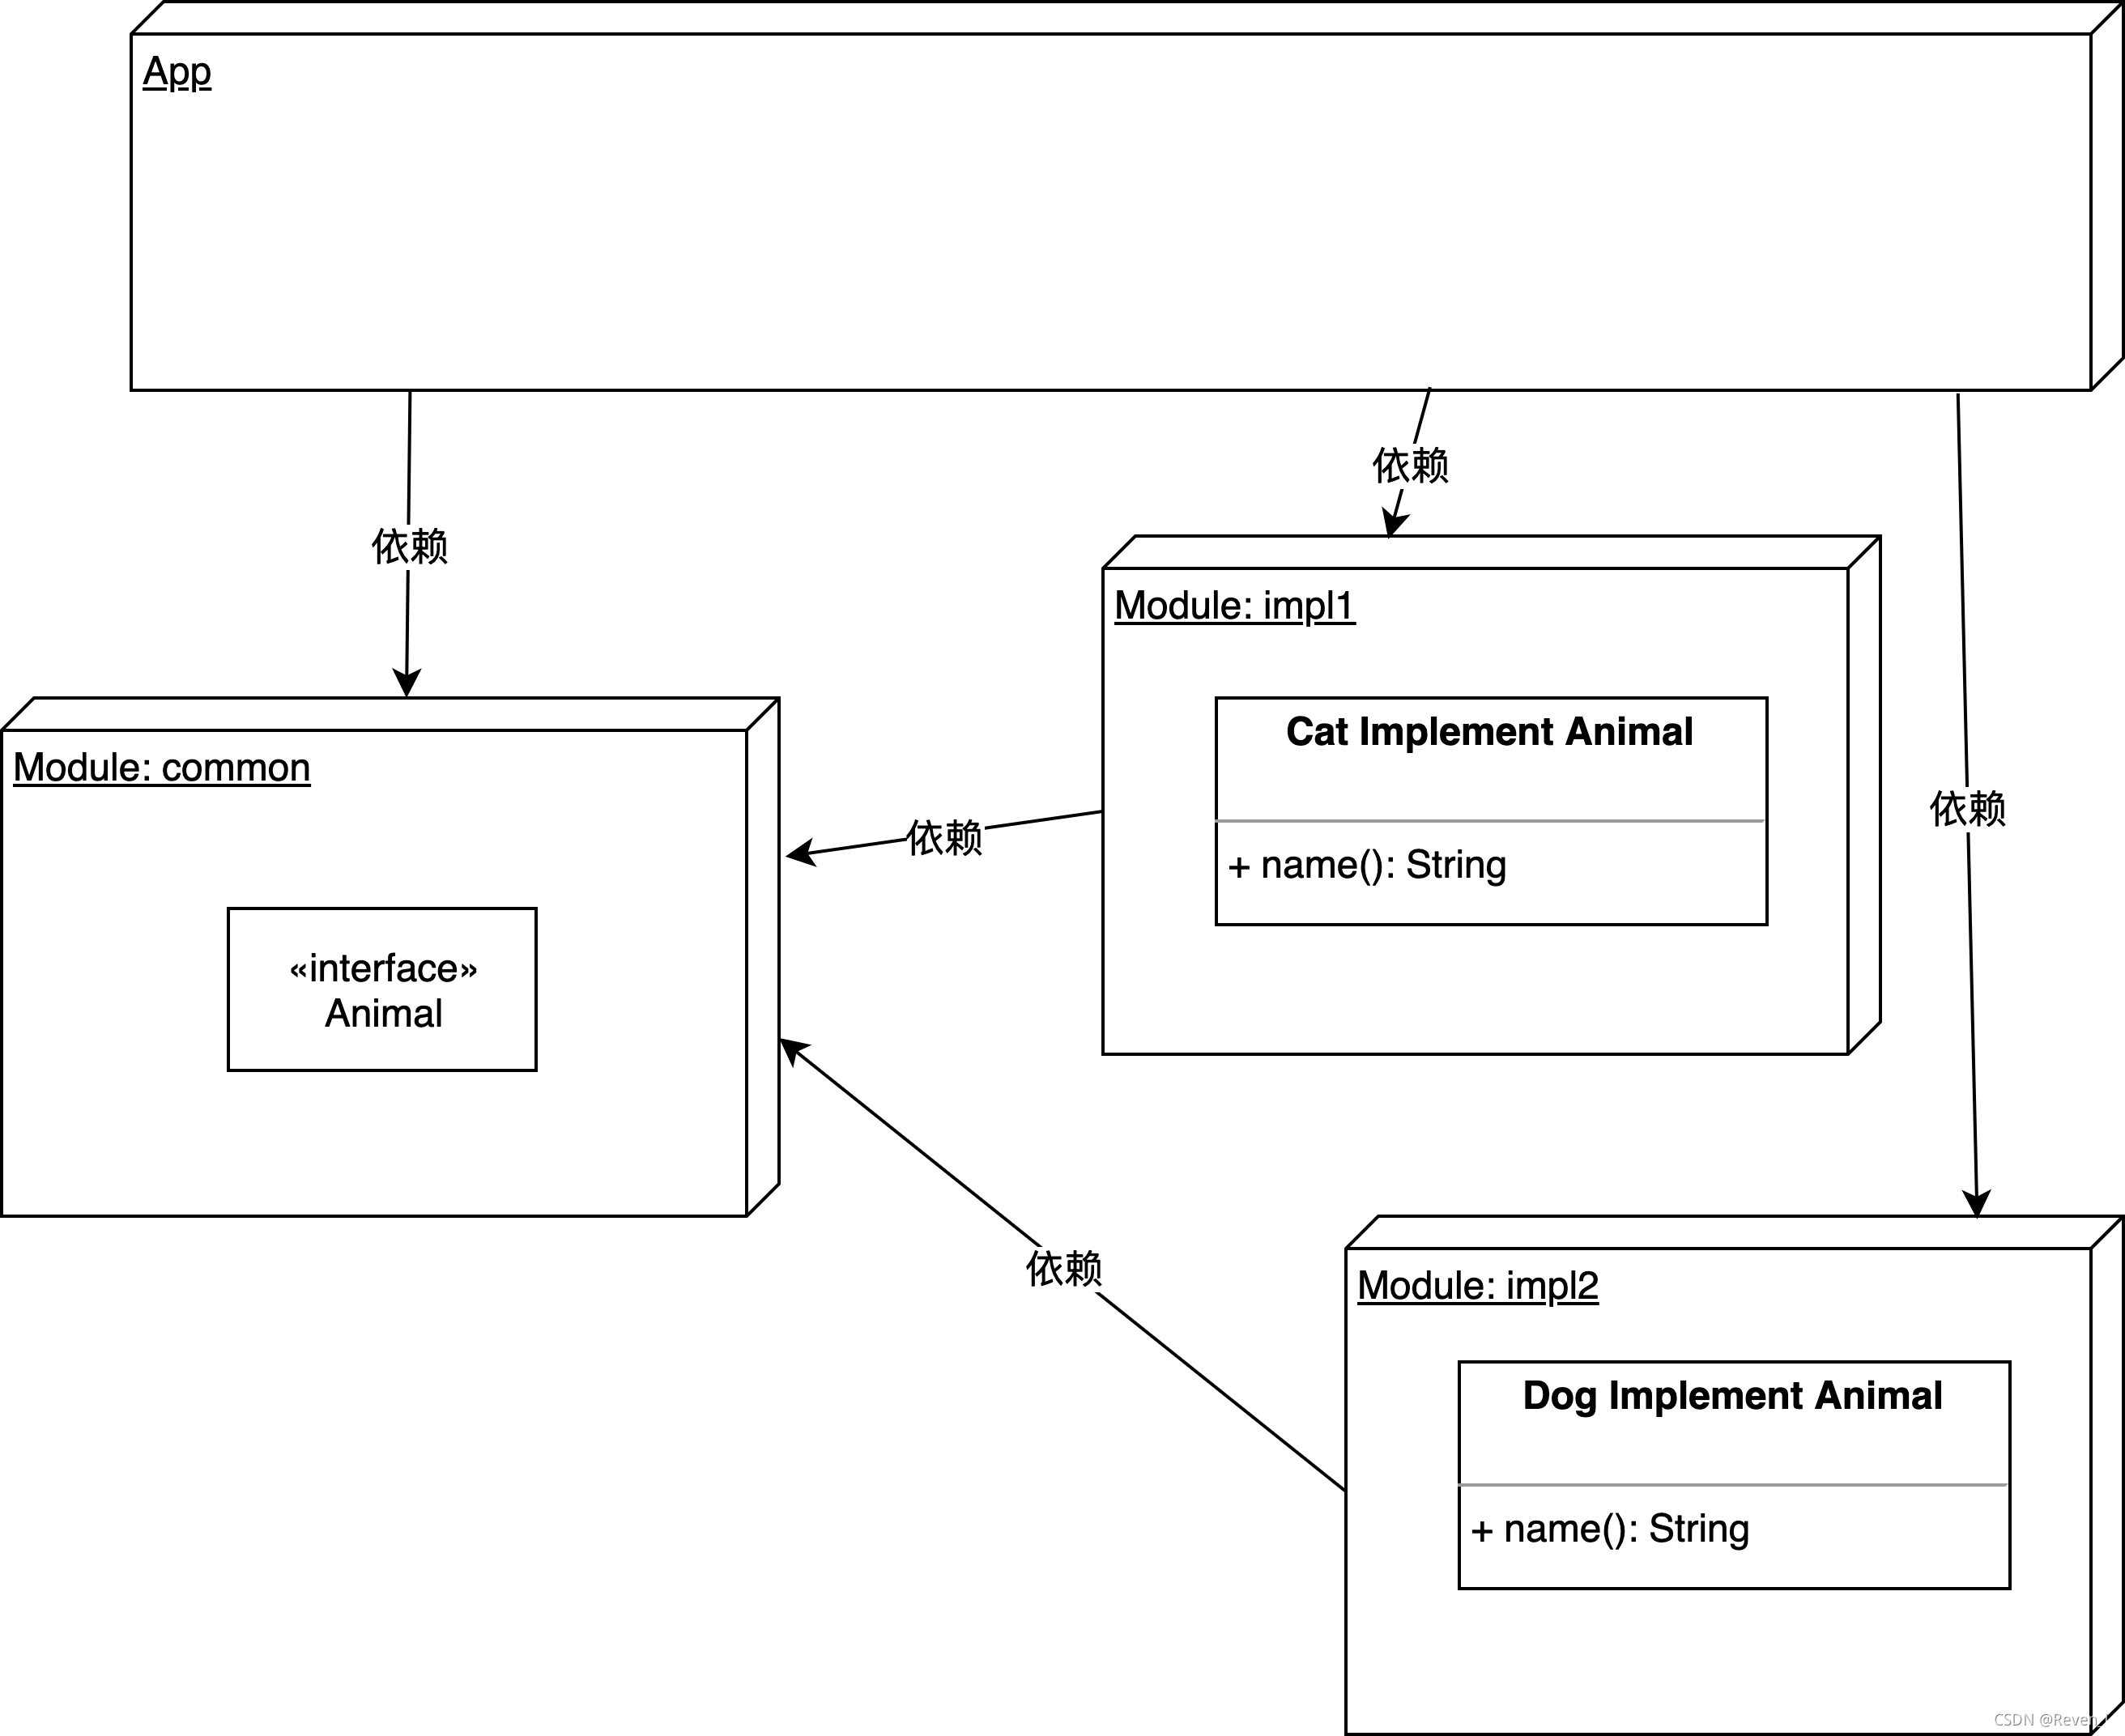
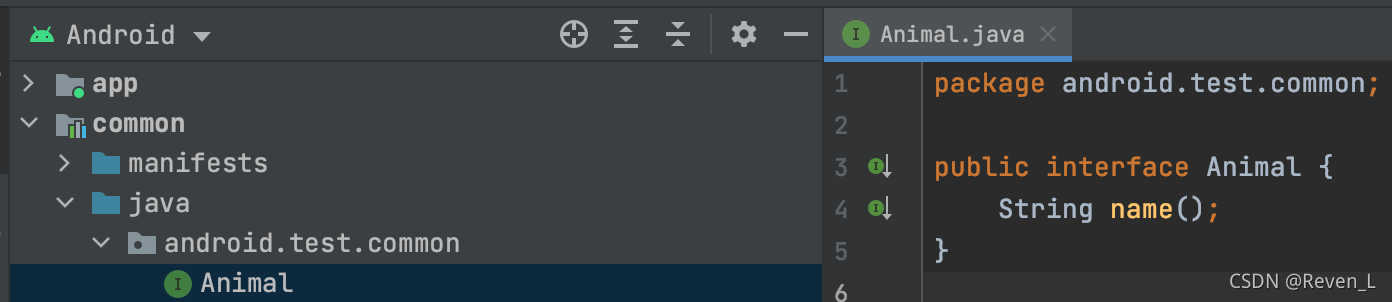
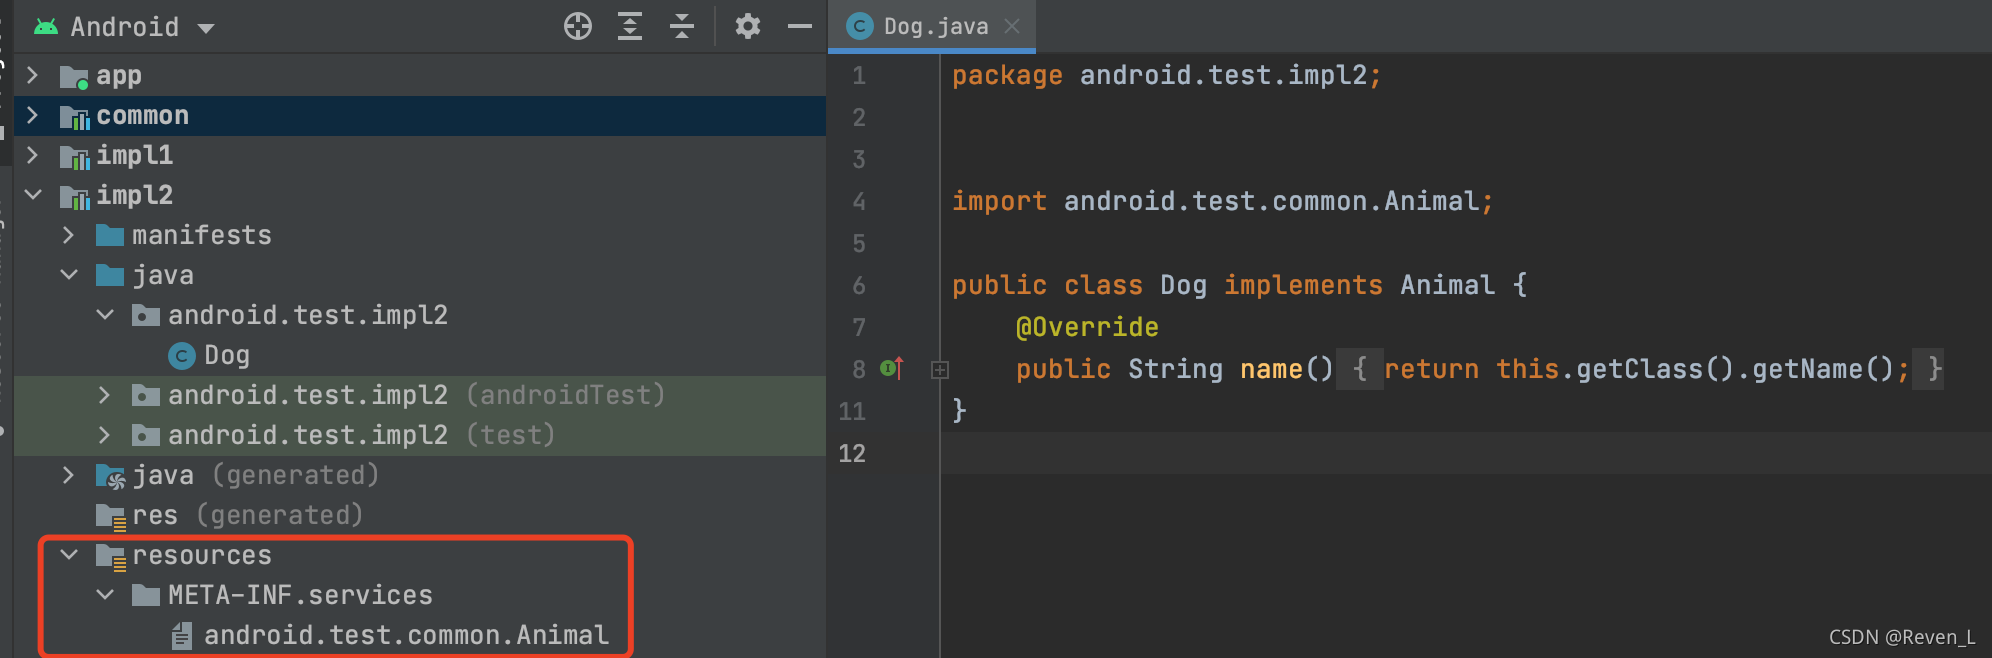
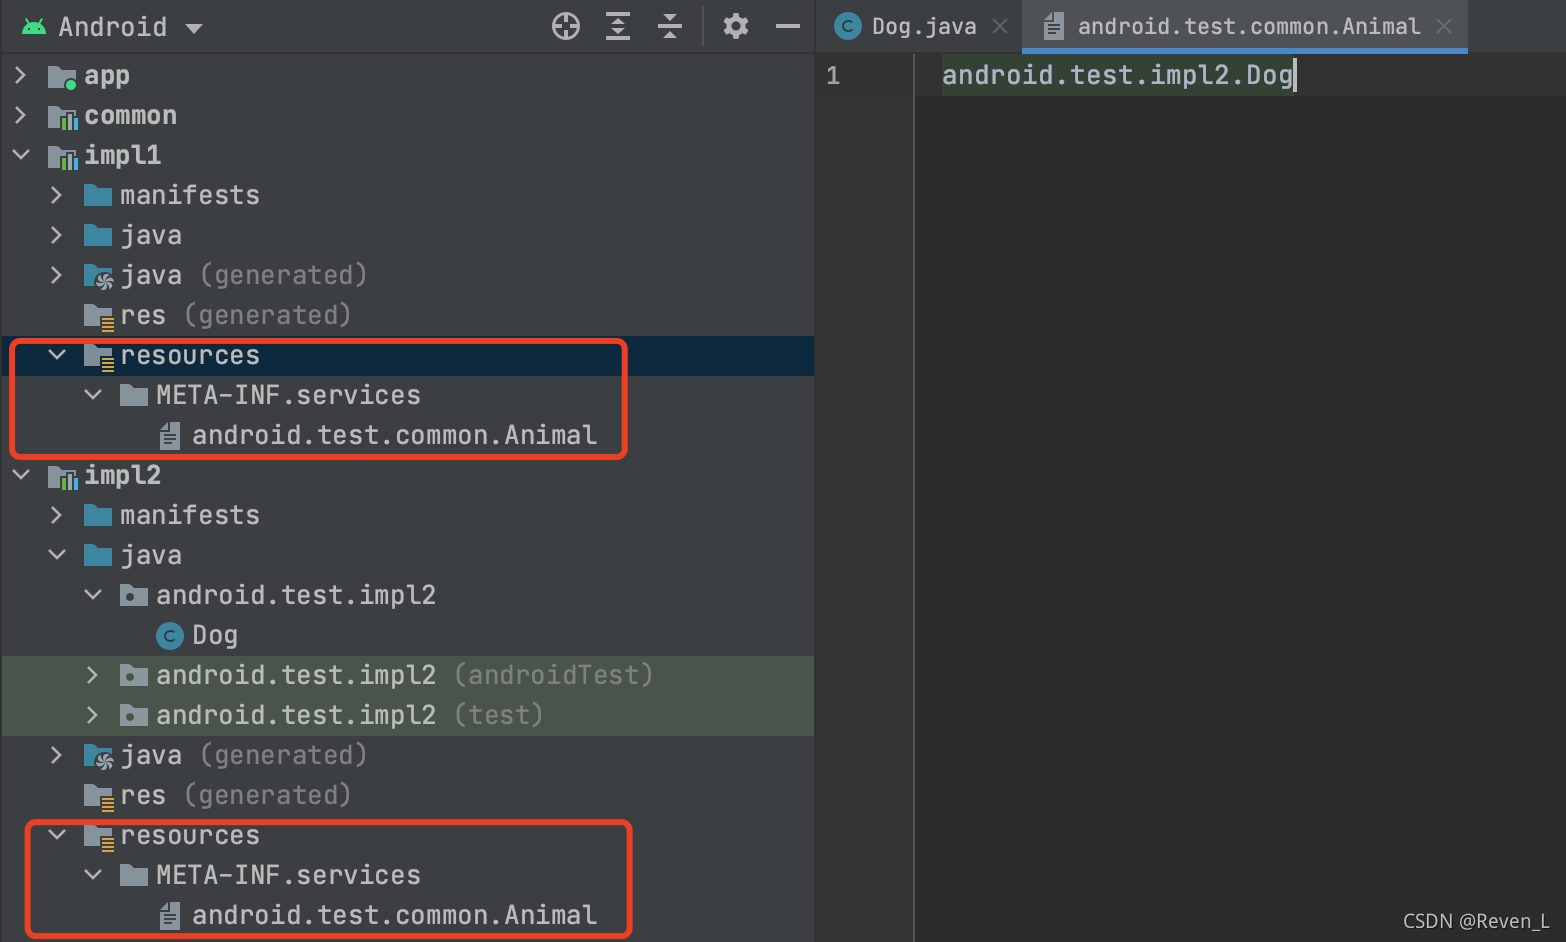
通过将实现类的全类名写入特定路径的配置文件中, 生成APK会, 这些配置文件会进行合并. 读取配置文件中的类名, 使用类加载器获取Class对象, 用反射其实例化. demo 1. 整体结构新建工程, 新建common模块\impl1模块\impl2模块. 其中common是放置公用接口,imp1和2放置具体的实现类. 方案的依赖,如下图: 注:app中一定要依赖所有Module, 没有依赖的Module不会参与编译, 其中的类不能被找到. dependencies { ... implementation project(path: ':common') implementation project(path: ':impl1') implementation project(path: ':impl2') } 2. 接口和实现类common中的Animal接口: impl中的实现: 生成配置文件: 一定要在与java同级的文件夹建立/resources/META-INF/services目录(不是在res目录下),在该目录下创建以实现的接口的全名(包名+类名)为名字的文本文件, 里面是该Module中实现类的全名. Log输出: 可见获取了实现类的实例. AutoService上面的方案, 要手动生成配置文件, 非常不方便. 于是Google给了我们一个解决方案: 通过给实现类加注解, 编译时自动生成配置文件, 简化这个过程. 1. 添加依赖 // 依赖 autoService 库 implementation 'com.google.auto.service:auto-service:1.0-rc7' annotationProcessor 'com.google.auto.service:auto-service:1.0-rc7' 需要加implementation,不然找不到AutoService注解 2. 为实现类添加注解 import android.test.common.Animal; import com.google.auto.service.AutoService; //添加注解,参数是实现的接口类 @AutoService(Animal.class) public class Cat implements Animal { @Override public String name() { return this.getClass().getName(); } } 这样, AutoService就会自动生成配置文件, 不需要我们自己创建目录添加配置文件. 使用fat-aar不打包配置文件的解决方案 问题: 使用embed引入的包的META-INF文件夹不会合并到主工程的aar.但打包出来的aar还是包含有主工程的META-INF文件夹的. 解决方案 思路: 将引入的包的配置文件手动合并放到主工程的META-INF文件夹中, 从而打包进aar. 在子工程(被embed引入的工程)中的build.gradle中新增任务: afterEvaluate { assembleRelease.doLast { copy { from "build/outputs/aar/" into "主工程目录/libs/" } //合并配置文件 //AutoServer生成的文件在build目录 FileTree srcDir = fileTree(dir: 'build/intermediates/javac/release/compileReleaseJavaWithJavac/classes/META-INF/services') //如果手动填写文件, 使用下面这个路径 // FileTree srcDir = fileTree(dir: 'src/main/resources/META-INF/services') FileTree desDir = fileTree(dir: "主工程目录/src/main/resources/META-INF/services") Iterator iterator = desDir.dir.listFiles().iterator() for (File srcFile : srcDir.dir.listFiles()) { boolean isWritten = false while (iterator.hasNext()) { File nowFile = iterator.next() if (nowFile.name == srcFile.name) { //添加到已有文件的末端 //Set去重,避免多次打包时出现重复 Set toWriteLines = srcFile.readLines() - nowFile.readLines() if (!toWriteLines.isEmpty()) { BufferedWriter writer = nowFile.newWriter(true) for (String line : toWriteLines) { writer.newLine() writer.append(line) } writer.flush() writer.close() } iterator.remove() isWritten = true break } } if (isWritten) continue //复制 copy { from srcFile.path into desDir.dir.path } } } } 在主工程的依赖中引入aar: dependencies { ... if(file('libs/subProject.aar').exists()) { embed(name: 'subProject', ext: 'aar') } } ... } 创建一个依次打包的脚本作为总调用: //build.sh # reset bin rm -rf ../bin mkdir -p ../bin # clean build file sh gradlew clean rm -rf 主工程目录/libs # build sub module arr sh gradlew :subProject::assembleRelease # build main module aar sh gradlew :mainProject::assembleRelease # mv result cp ./../../../../主工程目录/build/outputs/aar/moyuSDK2-release.aar ../bin/MoyuSDK.aar cd ../bin 该脚本作用是依次调用子工程的构建, 将配置文件合并入主工程文件下, 最后调用主工程的构建, 从而打包出完整配置文件的aar. 再将其复制到bin目录方便管理. 可优化点 方案1中每次都需要读取配置文件进行实例化, 但其实编译完成后, 配置文件其实是不会变的, 所以我们没必要每次都读取.可以通过gradle插件, 利用注解生成新的java文件,这个文件中包含了具体的实现类. 这样程序在运行时,就已经知道了所有的具体服务类, 避免了IO读取类名和反射获取类的开销. 方案2:遍历Dex(不推荐) 问题分解 1. 获取所有的类Android App所有Java类都是封装到Dex文件中, 让虚拟机执行, 所以我们可以通过DexFile.entries();来获取指定DexFile中所封装的所有完整类名, 然后通过反射就可以获取类了. 如何获取DexFileA. 直接创建DexFile对象 DexFile df = new DexFile(context.getPackageCodePath());但这种方法不适用于多个dex的情况, 而且其构造方法将在API26被弃用 B. 通过类加载器获取DexFile 查看BaseDexClassLoader的源码 可知, 其私有对象pathList是DexFile的容器, 所以我们可以通过反射来获取这个容器中所有的DexFile. 同时, 也可以找到多个Dex文件. 注: 由于DexFile的API在26版本对外弃用了, 但在DexFile源码 可知,其内部的核心方法还是可用的. 在高于26版本继续通过反射进行调用. 2. 筛选出实现指定接口的类在通过反射利用类名得到Class对象A后, 我们需要判断其是否实现了指定接口B,通过B.isAssignableFrom(A)可以分辨, 当其返回true,则说明B是A的实现类或子接口. 工具类 public class ClassUtils { private static BaseDexClassLoader mClassLoader = (BaseDexClassLoader) Thread.currentThread().getContextClassLoader(); private static SoftReference mAllClassNamesBuffer; /** * 默认情况下有可能ClassLoader获取失败 * 调用该函数确保ClassLoader能获取到 */ public static void setClassLoader(Context context) { if (mClassLoader == null) { mClassLoader = (BaseDexClassLoader) context.getClassLoader(); } } public static void setClassLoader(BaseDexClassLoader classLoader) { if (classLoader != null) { mClassLoader = classLoader; } } /** * @return 返回与接口同包名的所有实现类 */ public static List getAllClassByInterface(Class interfaceClass) { Package pkg = interfaceClass.getPackage(); String pkgName = pkg != null ? pkg.getName() : ""; return getAllClassByInterface(interfaceClass, pkgName); } /** * @param packageName 指定返回的类的包名前缀,设为空则不限制 * @return 返回这个interfaceClass的所有实现类及子接口, 不包括interfaceClass本身 */ public static List getAllClassByInterface(Class interfaceClass, String packageName) { if (!interfaceClass.isInterface()) { throw new IllegalArgumentException("interfaceClass must be a Interface!"); } List returnClassList = new ArrayList(); List> getClasses(String packageName) { ArrayList c_DexFile = getClass("dalvik.system.DexFile"); Field f_mCookie = getField("mCookie", c_DexFile); Method m_getClassNameList = getMethod("getClassNameList", c_DexFile, Object.class); try { if (m_getClassNameList == null) { return classNames; } for (Object o : list) { Object o_DexFile = getObjectFromField(f_dexFile, o); Object o_mCookie = getObjectFromField(f_mCookie, o_DexFile); if (o_mCookie == null) { continue; } String[] classList = (String[]) m_getClassNameList.invoke(o_DexFile, o_mCookie); if (classList != null) { Collections.addAll(classNames, classList); } } } catch (IllegalAccessException | InvocationTargetException e) { e.printStackTrace(); } } } catch (ClassNotFoundException e) { e.printStackTrace(); } mAllClassNamesBuffer = new SoftReference(classNames); return classNames; } public static Field getField(String field, Class Class) { try { return Class.getDeclaredField(field); } catch (Throwable e) { e.printStackTrace(); } return null; } public static Method getMethod(String method, Class Class, Class... parameterTypes) { try { Method res = Class.getDeclaredMethod(method, parameterTypes); res.setAccessible(true); return res; } catch (Throwable e) { e.printStackTrace(); } return null; } public static Class getClass(String className) throws ClassNotFoundException { return mClassLoader.loadClass(className); } public static Object getObjectFromField(Field field, Object arg) { try { field.setAccessible(true); return field.get(arg); } catch (Throwable e) { e.printStackTrace(); } return null; } } 方案比较比较代码: int time = 1; long start = System.currentTimeMillis(); for (int i = 0; i < time; i++) { Iterator it = new ImplClassFactory(Animal.class); while (it.hasNext()) { it.next().name(); } } Log.e("Main", "1耗时" + (System.currentTimeMillis() - start) + "ms"); start = System.currentTimeMillis(); for (int i = 0; i < time; i++) { for (Class c : ClassUtils.getAllClassByInterface(Animal.class)) { try { c.newInstance().name(); } catch (IllegalAccessException | InstantiationException e) { e.printStackTrace(); } } } Log.e("Main", "2耗时" + (System.currentTimeMillis() - start) + "ms");测试结果: 次数110100方案1耗时(ms)428264方案2 耗时(ms)2136963330可见方案2耗时比方案1高十几倍甚至几十倍, 所以优先使用方案1. |

【本文地址】
今日新闻 |
推荐新闻 |