VIM插件离线安装与配置(taglist,airliner,gutentags,LeaderF,gtags,AutoComplPop,omnicppcomplete,fzf,Rg) |
您所在的位置:网站首页 › iweboa插件安装 › VIM插件离线安装与配置(taglist,airliner,gutentags,LeaderF,gtags,AutoComplPop,omnicppcomplete,fzf,Rg) |
VIM插件离线安装与配置(taglist,airliner,gutentags,LeaderF,gtags,AutoComplPop,omnicppcomplete,fzf,Rg)
|
VIM插件离线安装与配置
1.VIM 插件离线安装与配置1.1 离线包
2.vim8安装2.1.查看vim版本2.2.vim下载2.3 vim安装步骤
3. vimrc通用配置4.插件管理([vim-plug](https://github.com/junegunn/vim-plug.git))4.1.插件下载4.2.插件安装步骤4.2.1 解压vim-plug-master.zip4.2.2 将下载好的plug.vim放到autoload4.2.3 在.vimrc中添加配置4.2.4 打开vim在命令行模式下输入:PluginInstall(离线的同学可以忽略,不需要管)
5.标签列表插件([taglist](https://github.com/vim-scripts/taglist.vim))5.1.效果预览5.2.安装步骤5.2.1 下载5.2.2 解压安装包5.2.3 部署5.2.3 添加vimrc配置
6.快速注释插件([nerdcommenter](https://github.com/preservim/nerdcommenter))6.1 效果预览6.2 安装步骤6.2.1 下载6.2.2 解压安装包6.2.3 部署6.2.4 添加vimrc配置
7. 状态栏([airline](https://github.com/vim-airline/vim-airline))7.1 效果预览7.2 安装步骤7.2.1 下载7.2.2 解压安装包7.2.4 添加环境变量7.2.3 部署7.2.4 添加vimrc配置
8. 自动异步生成tags插件([gutentags](https://github.com/ludovicchabant/vim-gutentags))8.1 效果预览8.2 安装步骤8.2.1 下载8.2.2 解压安装包8.2.3 部署8.2.4 添加vimrc配置
9. 异步模糊查找([LeaderF](https://github.com/Yggdroot/LeaderF))9.1 效果预览9.2 安装步骤9.2.1 下载9.2.2 解压安装包9.2.3 部署9.2.4 添加vimrc配置
10. 索引跳转插件([gtags](https://www.gnu.org/software/global/))10.1 效果预览10.2 安装步骤10.2.1 下载10.2.2 解压global-6.6.4.tar.gz安装包10.2.3 编译安装10.2.4 添加环境变量10.2.5 global-6.6.4部署10.2.6 添加global-6.6.4,vimrc配置10.2.7 global跳过目录或文件不扫描&跟踪10.2.8 解压gutentags_plus安装包10.2.9 gutentags_plus部署10.2.10 添加gutentags_plus,vimrc配置10.2.11 生成GPATH,GRTAGS,GTAGS三个文件过程中意外退出出现如下报错
11. c/c++ 语法高亮([cpp-enhanced-highlight](https://github.com/octol/vim-cpp-enhanced-highlight))11.1 效果预览11.2 安装步骤11.2.1 下载11.2.2 解压安装包11.2.3 部署11.2.4 添加vimrc配置
12. 自动补全([AutoComplPop](https://github.com/vim-scripts/AutoComplPop))12.1 效果预览12.2 安装步骤12.2.1 下载12.2.2 解压安装包12.2.3 部署
13. 结构体补全([omnicppcomplete](http://www.vim.org/scripts/script.php?script_id=1520))13.1 效果预览13.2 安装步骤13.2.1 下载13.2.2 解压安装包13.2.3 部署
13.3 添加vimrc配置
14 字符串/文件模糊查找([ripgrep](https://github.com/BurntSushi/ripgrep),[fzf.vim](https://github.com/junegunn/fzf.vim))14.1 效果预览14.1.1 模糊查找文件14.1.2 模糊查找字符串
14.2 安装步骤14.2.1 fzf下载14.2.2 fzf解压安装包14.2.3 fzf安装与部署14.2.4 fzf离线安装卡在`Running fzf installer ...`的问题14.2.5 ripgrep下载14.2.6 ripgrep.deb包安装与部署14.2.7 ripgrep使用
14.3 添加vimrc配置
15. 括号匹配插件([auto-pairs](https://github.com/jiangmiao/auto-pairs))15.1 效果预览15.2 安装步骤15.2.1 auto-pairs下载15.2.2 auto-pairs解压15.2.3 安装与部署
15.3 添加vimrc配置
16. 自动保存([auto-save](https://github.com/907th/vim-auto-save))16.1 效果预览16.2 安装步骤16.2.1 auto-save下载16.2.2 auto-save解压安装包16.2.3 部署
16.3 添加vimrc配置
1.VIM 插件离线安装与配置
看了很多vim的安装贴(这里特别感谢知乎韦易笑大部分文献都参考于他),基本都是基于github或者网络才能安装。对于一些离线安装的同学非常不友好,小白就更别说了。本贴将提供安装包和安装步骤,以及配置尽量手把手的教大家安装vim插件。本帖提供git(白嫖方式)和安装包(投币方式)安装方式
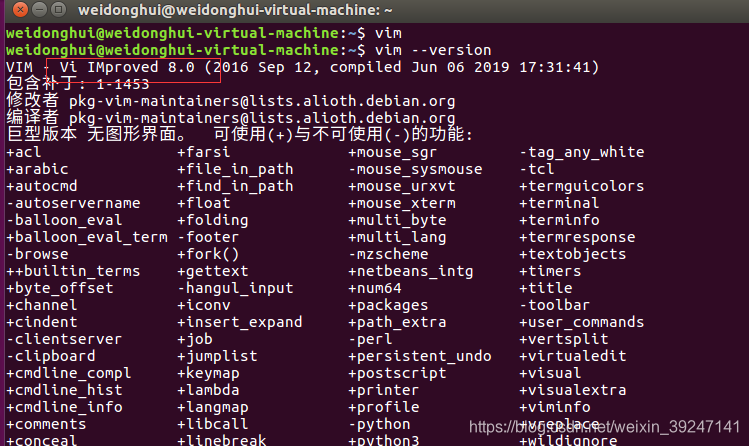
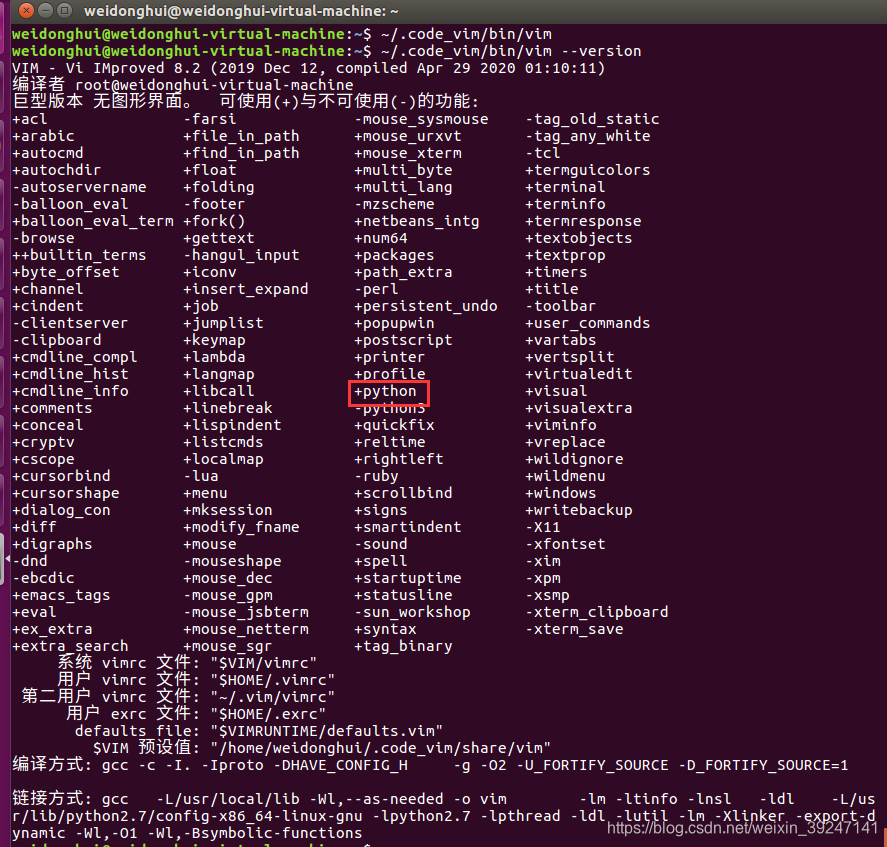
环境:Ubuntu 16.04 VIM:vim 8.x 1.1 离线包 更新于20200510:离线全安装包1.0 包含: vim82.zipvim-plug-master.zip,异步插件管理taglist.vim.zip,标签列表插件nerdcommenter-master.zip,快速注释插件vim-airline-master.zip,状态栏插件vim-gutentags-master.zip,异步生成tags插件LeaderF-master_4991.zip,异步模糊查找插件global-6.6.4.tar.gz,gutentags_plus-master.zip,索引跳转插件vim-cpp-enhanced-highlight-master.zip,语法高亮插件AutoComplPop-master.zip,自动补全插件 更新于20200922:离线全安装包2.0 新增: omnicppcomplete-0.41.zip,结构体补全插件ripgrep_11.0.2_amd64.deb,fzf.vim-master.zip,fzf-master.zip异步模糊查找文件,字符串插件 更新于20201219:离线全安装包3.0 新增: vim-auto-save-master.zip, 自动保存插件auto-pairs-master.zip,括号匹配插件新增vimrc通用配置: 自动去除尾行空格和tab。搜索时默认不区分大小写,只有搜索关键字中出现一个大字母时才区分大小写。在vim中打开终端。 更新于20230320: 新增: 开QuickFix窗口选择后自动关闭的方法(详情查看,3.vimrc通用配置或添加gutentags_plus,vimrc配置)。解决global(gtags)不跟踪某些目录和文件的方法(详情查看,global跳过目录或文件不扫描&跟踪)。解决异步生成GTAGS时,退出在进入报gutentags: gutentags: gtags-cscope job failed, returned: 1,导致gtags无法使用。(详情查看,生成GPATH,GRTAGS,GTAGS三个文件过程中意外退出出现如下报错)。 2.vim8安装VIM:vim 8.x 2.1.查看vim版本 :~# vim --version
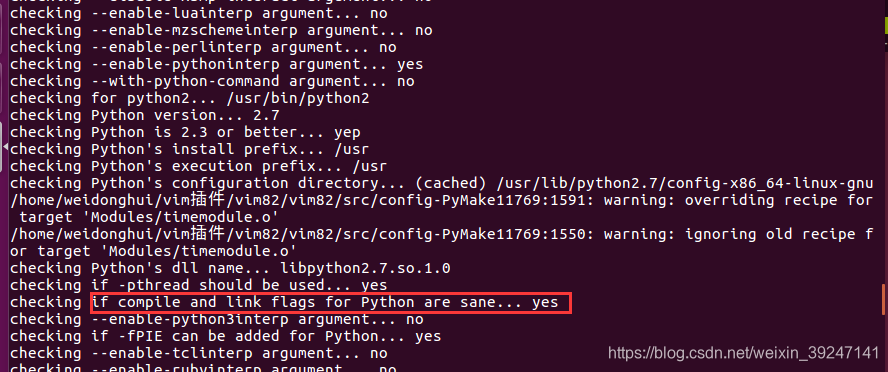
configure 其他配置可以参看:INSTALL 如果出现以下报错说明缺少ncurses库请,sudo apt-get install libncurses5-dev安装。 checking for tgetent()... configure: error: NOT FOUND! You need to install a terminal library; for example ncurses. Or specify the name of the library with --with-tlib.这个安装包已经把决大多数依赖包对放在里面了。但是不同的环境可能依赖会不一样,请认真的查看报错,百度解决。 Python安装配置情况 if compile and link flags for Python are sane... yes 出现这句话证明支持python,没有这句话,则安装出来的vim不支持python。 编译与安装 make sudo make install这个时候其实已经可以用了可以通过~/.code_vim82/bin/vim验证 配置环境变量,我们直接vim --version发现还是自己原来的vim,这是没有配置环境变量导致的。这里给出一种解决办法。适用于非root用户和root用户。在~/.bashrc中添加vim的环境路径,注意必须添加到$PATH的前面,这样打开vim就优先找自己安装的版本。注意:关闭窗口在打开才有效。 vim ~/.bashrc export PATH="/home/weidonghui/.code_vim82/bin/:$PATH" 这个时候你会发现vi和vim打开的版本可能不一样我们可以利用软连接将vi和vim开的版本变成一致的。注意:关闭窗口在打开才有效。 cd ~/.code_vim82/bin ln -s vim vi 3. vimrc通用配置 "通用配置 syntax on " 开启语法高亮 colorscheme peachpuff "vim配置方案 set number " 显示行号 set hls "搜索时高亮显示被找到的文本 set scrolloff=3 " 上下可视行数 set incsearch " 搜索时高亮显示被找到的文本 set ignorecase smartcase "搜索时默认不区分大小写,只有搜索关键字中出现一个大字母时才区分大小写 set enc=utf-8 "编码设置 set fileencodings=ucs-bom,utf-8,cp936,gb18030,big5,euc-jp,euc-kr,latin1 "编码自动识别 set mouse=n "鼠标普通模式 " set cursorline "选中行出现下划线 set autowriteall "可使切换文件时,修改的文件被自动保存 set autoread "打开文件监视。如果在编辑过程中文件发生外部改变(比如被别的编辑器编辑了),就会发出提示。 set hidden " 允许在有未保存的修改时切换缓冲区,此时的修改由 vim 负责保存 map qq :qa! "多窗口不保存关闭 map ww :wqa! "多窗口保存关闭 "vim自动打开跳到上次的光标位置 if has("autocmd") au BufReadPost * if line("'\"") > 1 && line("'\"") — 而行尾多余的空白字符显示成 - map :ter "在vim内终端 set listchars=tab:>-,trail:- map :set list " 显示空格和tab map :set list! " 取消显示空格和tab map cq " 手动关闭QuickFix窗口 autocmd FileType qf nnoremap :cclose "打开QuickFix窗口选择后自动关闭 4.插件管理(vim-plug) 4.1.插件下载 git下载方式 git clone https://github.com/junegunn/vim-plug.git ~/.vim/autoload 离线的同学点这里vim-plug安装包 4.2.插件安装步骤 4.2.1 解压vim-plug-master.zip cd ~ && unzip ~/vim_plugin.zip unzip ~/vim_plugin/vim-plug-master.zip 4.2.2 将下载好的plug.vim放到autoload mkdir -p ~/.vim/autoload cp -rf vim-plug-master/plug.vim ~/.vim/autoload/ 4.2.3 在.vimrc中添加配置 call plug#begin('~/.vim/plugged') "plug插件管理,全异步安装,不仅支持在线安装,更支持下载好的离线包直接安装。 "且安装完后,可以注释掉相关指令很方便的关闭对应插件。下面基本都是离线安装的例子 "Plug 'vim-scripts/vim-gutentags' call plug#end() 4.2.4 打开vim在命令行模式下输入:PluginInstall(离线的同学可以忽略,不需要管)
taglist 依赖ctags。离线的同学搜一下自行安装。 sudo apt-get install ctags 5.1.效果预览 优点可以在列表中看到函数定义,函数声明,全局变量,宏定义。可以通过鼠标或者ctrl +ww跳转到Tlist列表选择函数跳转到该函数定义。 5.2.安装步骤
5.2.1 下载
git下载方式
git clone https://github.com/vim-scripts/taglist.vim
安装包方式(taglist安装包)
5.2.2 解压安装包
cd ~ && unzip ~/vim_plugin.zip
cd ~/.vim/plugged
unzip ~/vim_plugin/taglist.vim.zip
5.2.3 部署
打开.vimrc添加以下指令
call plug#begin('~/.vim/plugged')
Plug 'vim-scripts/taglist.vim' "Tlist标签列表插件
call plug#end()
5.2.3 添加vimrc配置
"Tlist插件配置
let Tlist_Show_One_File = 1 " 只显示当前文件的tags
"let Tlist_Auto_Open = 1 " 打开vim自动打开Tlist
"let Tlist_GainFocus_On_ToggleOpen = 1 " 打开Tlist窗口时,光标跳到list窗口
let Tlist_Exit_OnlyWindow = 1 " 如果Tlist窗口是最后一个窗口则退出Vim
let Tlist_Use_Left_Window = 1 " 在左侧窗口中显示
let Tlist_File_Fold_Auto_Close = 1 " 自动折叠
let Tlist_Auto_Update = 1 " 自动更新
" 打开 Tlist 窗口,在左侧栏显示
map :TlistToggle
6.快速注释插件(nerdcommenter)
.c,Makefile,vimrc等都有效
6.1 效果预览
5.2.安装步骤
5.2.1 下载
git下载方式
git clone https://github.com/vim-scripts/taglist.vim
安装包方式(taglist安装包)
5.2.2 解压安装包
cd ~ && unzip ~/vim_plugin.zip
cd ~/.vim/plugged
unzip ~/vim_plugin/taglist.vim.zip
5.2.3 部署
打开.vimrc添加以下指令
call plug#begin('~/.vim/plugged')
Plug 'vim-scripts/taglist.vim' "Tlist标签列表插件
call plug#end()
5.2.3 添加vimrc配置
"Tlist插件配置
let Tlist_Show_One_File = 1 " 只显示当前文件的tags
"let Tlist_Auto_Open = 1 " 打开vim自动打开Tlist
"let Tlist_GainFocus_On_ToggleOpen = 1 " 打开Tlist窗口时,光标跳到list窗口
let Tlist_Exit_OnlyWindow = 1 " 如果Tlist窗口是最后一个窗口则退出Vim
let Tlist_Use_Left_Window = 1 " 在左侧窗口中显示
let Tlist_File_Fold_Auto_Close = 1 " 自动折叠
let Tlist_Auto_Update = 1 " 自动更新
" 打开 Tlist 窗口,在左侧栏显示
map :TlistToggle
6.快速注释插件(nerdcommenter)
.c,Makefile,vimrc等都有效
6.1 效果预览
 7.2 安装步骤
7.2.1 下载
git下载方式
git clone https://github.com/vim-airline/vim-airline.git
(airline)安装包下载
7.2.2 解压安装包
cd ~ && unzip ~/vim_plugin.zip
cd ~/.vim/plugged
unzip ~/vim_plugin/vim-airline-master.zip
7.2.4 添加环境变量
export TERM=xterm-256color
7.2.3 部署
打开.vimrc添加以下指令
call plug#begin('~/.vim/plugged')
Plug 'vim-scripts/vim-airline-master' "airline状态栏
call plug#end()
7.2.4 添加vimrc配置
"airline状态栏配置
"这个是安装字体后 必须设置此项"
let g:airline_powerline_fonts = 1
"打开tabline功能,方便查看Buffer和切换,省去了minibufexpl插件
let g:airline#extensions#tabline#enabled = 1
let g:airline#extensions#tabline#buffer_nr_show = 1
let g:airline#extensions#tabline#formatter = 'unique_tail'
" " 关闭状态显示空白符号计数
let g:airline#extensions#whitespace#enabled = 0
let g:airline#extensions#whitespace#symbol = '!'
" " 设置consolas字体"前面已经设置过
" " set guifont=Consolas\ for\ Powerline\ FixedD:h11
if !exists('g:airline_symbols')
let g:airline_symbols = {}
endif
"
" " unicode symbols
let g:airline_left_sep = '▶'
let g:airline_right_sep = '◀'
let g:airline_symbols.crypt = '🔒'
let g:airline_symbols.linenr = '¶'
let g:airline_symbols.maxlinenr = '☰'
let g:airline_symbols.branch = '⎇'
let g:airline_symbols.paste = '∥'
let g:airline_symbols.spell = 'Ꞩ'
let g:airline_symbols.notexists = '∄'
let g:airline_symbols.whitespace = 'Ξ'
"设置切换Buffer快捷键"
map :bp " 切换到上一个
map :bn " 切换到下一个
map :bd " 关闭当前窗口
map 11 :b1 " 切换到编号1
map 22 :b2 " 切换到编号2
map 33 :b3 " 切换到编号3
map 44 :b4 " 切换到编号4
map 55 :b5 " 切换到编号5
map 66 :b6 " 切换到编号6
map 77 :b7 " 切换到编号7
map 88 :b8 " 切换到编号8
map 99 :b9 " 切换到编号9
map 00 :b10 " 切换到编号10
8. 自动异步生成tags插件(gutentags)
gutentags自动异步生成tags,并管理在~/.cache目录下不污染当前目录依赖vim8和ctags
8.1 效果预览
进行tags跳转时不需要手动生成tags,在阅读linux源码时有很大帮助。可以看到当前目录下没有tags,而是异步生成在~/.cache目录下
7.2 安装步骤
7.2.1 下载
git下载方式
git clone https://github.com/vim-airline/vim-airline.git
(airline)安装包下载
7.2.2 解压安装包
cd ~ && unzip ~/vim_plugin.zip
cd ~/.vim/plugged
unzip ~/vim_plugin/vim-airline-master.zip
7.2.4 添加环境变量
export TERM=xterm-256color
7.2.3 部署
打开.vimrc添加以下指令
call plug#begin('~/.vim/plugged')
Plug 'vim-scripts/vim-airline-master' "airline状态栏
call plug#end()
7.2.4 添加vimrc配置
"airline状态栏配置
"这个是安装字体后 必须设置此项"
let g:airline_powerline_fonts = 1
"打开tabline功能,方便查看Buffer和切换,省去了minibufexpl插件
let g:airline#extensions#tabline#enabled = 1
let g:airline#extensions#tabline#buffer_nr_show = 1
let g:airline#extensions#tabline#formatter = 'unique_tail'
" " 关闭状态显示空白符号计数
let g:airline#extensions#whitespace#enabled = 0
let g:airline#extensions#whitespace#symbol = '!'
" " 设置consolas字体"前面已经设置过
" " set guifont=Consolas\ for\ Powerline\ FixedD:h11
if !exists('g:airline_symbols')
let g:airline_symbols = {}
endif
"
" " unicode symbols
let g:airline_left_sep = '▶'
let g:airline_right_sep = '◀'
let g:airline_symbols.crypt = '🔒'
let g:airline_symbols.linenr = '¶'
let g:airline_symbols.maxlinenr = '☰'
let g:airline_symbols.branch = '⎇'
let g:airline_symbols.paste = '∥'
let g:airline_symbols.spell = 'Ꞩ'
let g:airline_symbols.notexists = '∄'
let g:airline_symbols.whitespace = 'Ξ'
"设置切换Buffer快捷键"
map :bp " 切换到上一个
map :bn " 切换到下一个
map :bd " 关闭当前窗口
map 11 :b1 " 切换到编号1
map 22 :b2 " 切换到编号2
map 33 :b3 " 切换到编号3
map 44 :b4 " 切换到编号4
map 55 :b5 " 切换到编号5
map 66 :b6 " 切换到编号6
map 77 :b7 " 切换到编号7
map 88 :b8 " 切换到编号8
map 99 :b9 " 切换到编号9
map 00 :b10 " 切换到编号10
8. 自动异步生成tags插件(gutentags)
gutentags自动异步生成tags,并管理在~/.cache目录下不污染当前目录依赖vim8和ctags
8.1 效果预览
进行tags跳转时不需要手动生成tags,在阅读linux源码时有很大帮助。可以看到当前目录下没有tags,而是异步生成在~/.cache目录下  8.2 安装步骤
8.2.1 下载
git下载方式
git clone https://github.com/ludovicchabant/vim-gutentags.git
gutentags安装包下载
8.2.2 解压安装包
cd ~ && unzip ~/vim_plugin.zip
cd ~/.vim/plugged
unzip ~/vim_plugin/vim-gutentags-master.zip
8.2.3 部署
打开.vimrc添加以下指令
call plug#begin('~/.vim/plugged')
Plug 'vim-scripts/vim-gutentags-master' "gutentags异步tags插件
call plug#end()
8.2.4 添加vimrc配置
ctags --vesrion查看自己的ctags版本
" " 配置 ctags 的参数 "
map g "ctags跳转不自动选择
" gutentags 搜索工程目录的标志,当前文件路径向上递归直到碰到这些文件/目录名
let g:gutentags_project_root = ['.root', '.svn', '.git', '.hg', '.project']
" 所生成的数据文件的名称
let g:gutentags_ctags_tagfile = '.tags'
" 同时开启 ctags 和 gtags 支持:
let g:gutentags_modules = []
if executable('ctags')
let g:gutentags_modules += ['ctags']
endif
if executable('gtags-cscope') && executable('gtags')
let g:gutentags_modules += ['gtags_cscope']
endif
" 将自动生成的 ctags/gtags 文件全部放入 ~/.cache/tags目录中,避免污染工程目录
let g:gutentags_cache_dir = expand('~/.cache/tags')
" 配置 ctags 的参数,老的 Exuberant-ctags 不能有--extra=+q,注意
let g:gutentags_ctags_extra_args = ['--fields=+niazS']
let g:gutentags_ctags_extra_args += ['--c++-kinds=+px']
let g:gutentags_ctags_extra_args += ['--c-kinds=+px']
" 如果使用 universal ctags 需要增加下面一行,老的Exuberant-ctags 不能加下一行
"let g:gutentags_ctags_extra_args += ['--output-format=e-ctags']
" 禁用 gutentags 自动加载 gtags 数据库的行为
let g:gutentags_auto_add_gtags_cscope = 0
9. 异步模糊查找(LeaderF)
本人已弃用,使用fzf(第14章)代替,坚持用leaderF可以继续部署。LeaderF参考链接
9.1 效果预览
异步快速搜索文件
8.2 安装步骤
8.2.1 下载
git下载方式
git clone https://github.com/ludovicchabant/vim-gutentags.git
gutentags安装包下载
8.2.2 解压安装包
cd ~ && unzip ~/vim_plugin.zip
cd ~/.vim/plugged
unzip ~/vim_plugin/vim-gutentags-master.zip
8.2.3 部署
打开.vimrc添加以下指令
call plug#begin('~/.vim/plugged')
Plug 'vim-scripts/vim-gutentags-master' "gutentags异步tags插件
call plug#end()
8.2.4 添加vimrc配置
ctags --vesrion查看自己的ctags版本
" " 配置 ctags 的参数 "
map g "ctags跳转不自动选择
" gutentags 搜索工程目录的标志,当前文件路径向上递归直到碰到这些文件/目录名
let g:gutentags_project_root = ['.root', '.svn', '.git', '.hg', '.project']
" 所生成的数据文件的名称
let g:gutentags_ctags_tagfile = '.tags'
" 同时开启 ctags 和 gtags 支持:
let g:gutentags_modules = []
if executable('ctags')
let g:gutentags_modules += ['ctags']
endif
if executable('gtags-cscope') && executable('gtags')
let g:gutentags_modules += ['gtags_cscope']
endif
" 将自动生成的 ctags/gtags 文件全部放入 ~/.cache/tags目录中,避免污染工程目录
let g:gutentags_cache_dir = expand('~/.cache/tags')
" 配置 ctags 的参数,老的 Exuberant-ctags 不能有--extra=+q,注意
let g:gutentags_ctags_extra_args = ['--fields=+niazS']
let g:gutentags_ctags_extra_args += ['--c++-kinds=+px']
let g:gutentags_ctags_extra_args += ['--c-kinds=+px']
" 如果使用 universal ctags 需要增加下面一行,老的Exuberant-ctags 不能加下一行
"let g:gutentags_ctags_extra_args += ['--output-format=e-ctags']
" 禁用 gutentags 自动加载 gtags 数据库的行为
let g:gutentags_auto_add_gtags_cscope = 0
9. 异步模糊查找(LeaderF)
本人已弃用,使用fzf(第14章)代替,坚持用leaderF可以继续部署。LeaderF参考链接
9.1 效果预览
异步快速搜索文件  异步快速搜索函数,变量,宏(内存要够不然会卡) 异步快速搜索函数,变量,宏(内存要够不然会卡)  9.2 安装步骤
9.2.1 下载
git下载方式
git clone https://github.com/Yggdroot/LeaderF.git
(LeaderF)安装包下载
9.2.2 解压安装包
cd ~ && unzip ~/vim_plugin.zip
cd ~/.vim/plugged
unzip ~/vim_plugin/LeaderF-master_4991.zip
9.2.3 部署
打开.vimrc添加以下指令
call plug#begin('~/.vim/plugged')
Plug 'vim-scripts/LeaderF-master' "LeaderF模糊查找插件
call plug#end()
9.2.4 添加vimrc配置
"LeaderF 模糊文件查找配置
let g:Lf_ShortcutF = '' " 文件快速搜索
" 函数,宏,变量快速搜索
noremap :LeaderfTag
let g:Lf_StlSeparator = { 'left': '', 'right': '', 'font': '' }
let g:Lf_RootMarkers = ['.project', '.root', '.svn', '.git']
let g:Lf_WorkingDirectoryMode = 'Ac'
let g:Lf_WindowHeight = 0.30
let g:Lf_CacheDirectory = expand('~/.vim/cache')
let g:Lf_ShowRelativePath = 0
let g:Lf_HideHelp = 1
let g:Lf_StlColorscheme = 'powerline'
let g:Lf_PreviewResult = {'Function':0, 'BufTag':0}
命令描述退出LeaderF在完整路径搜索模式和仅名称搜索模式之间切换在结果窗口中向下移动光标在结果窗口中向上移动光标/从历史回忆起上一个/下一个输入模式在水平分割窗口打开在垂直分割窗口打开在新标签页中打开
10. 索引跳转插件(gtags)
gtags参数链接配合vim-gutentags,vim-gutentags_plus插件,LeaderF插件
10.1 效果预览
9.2 安装步骤
9.2.1 下载
git下载方式
git clone https://github.com/Yggdroot/LeaderF.git
(LeaderF)安装包下载
9.2.2 解压安装包
cd ~ && unzip ~/vim_plugin.zip
cd ~/.vim/plugged
unzip ~/vim_plugin/LeaderF-master_4991.zip
9.2.3 部署
打开.vimrc添加以下指令
call plug#begin('~/.vim/plugged')
Plug 'vim-scripts/LeaderF-master' "LeaderF模糊查找插件
call plug#end()
9.2.4 添加vimrc配置
"LeaderF 模糊文件查找配置
let g:Lf_ShortcutF = '' " 文件快速搜索
" 函数,宏,变量快速搜索
noremap :LeaderfTag
let g:Lf_StlSeparator = { 'left': '', 'right': '', 'font': '' }
let g:Lf_RootMarkers = ['.project', '.root', '.svn', '.git']
let g:Lf_WorkingDirectoryMode = 'Ac'
let g:Lf_WindowHeight = 0.30
let g:Lf_CacheDirectory = expand('~/.vim/cache')
let g:Lf_ShowRelativePath = 0
let g:Lf_HideHelp = 1
let g:Lf_StlColorscheme = 'powerline'
let g:Lf_PreviewResult = {'Function':0, 'BufTag':0}
命令描述退出LeaderF在完整路径搜索模式和仅名称搜索模式之间切换在结果窗口中向下移动光标在结果窗口中向上移动光标/从历史回忆起上一个/下一个输入模式在水平分割窗口打开在垂直分割窗口打开在新标签页中打开
10. 索引跳转插件(gtags)
gtags参数链接配合vim-gutentags,vim-gutentags_plus插件,LeaderF插件
10.1 效果预览
 weidh@xxx:~/.vim/plugged/vim-gutentags-master$ git diff
diff --git a/autoload/gutentags/gtags_cscope.vim b/autoload/gutentags/gtags_cscope.vim
index 1131066..f4864f6 100644
--- a/autoload/gutentags/gtags_cscope.vim
+++ b/autoload/gutentags/gtags_cscope.vim
@@ -88,7 +88,7 @@ function! gutentags#gtags_cscope#generate(proj_dir, tags_file, gen_opts) abort
let l:proj_options = readfile(l:proj_options_file)
let l:cmd += l:proj_options
endif
- let l:cmd += ['--incremental', '"'.l:db_path.'"']
+ let l:cmd += ['--skip-unreadable', '-q', '--incremental', '"'.l:db_path.'"']
let l:cmd = gutentags#make_args(l:cmd)
call gutentags#trace("Running:gtags_cscope.vim: " . string(l:cmd))
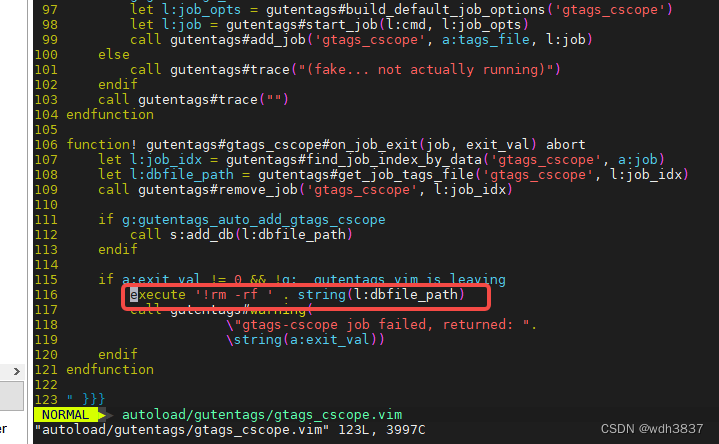
@@ -113,6 +113,7 @@ function! gutentags#gtags_cscope#on_job_exit(job, exit_val) abort
endif
if a:exit_val != 0 && !g:__gutentags_vim_is_leaving
+ execute '!rm -rf ' . string(l:dbfile_path)
call gutentags#warning(
\"gtags-cscope job failed, returned: ".
\string(a:exit_val))
weidh@xxx:~/.vim/plugged/vim-gutentags-master$
'--skip-unreadable', '-q'为gtags参数,用户可以根据需要添加,详情可参看gtags --help。
11. c/c++ 语法高亮(cpp-enhanced-highlight)
11.1 效果预览
weidh@xxx:~/.vim/plugged/vim-gutentags-master$ git diff
diff --git a/autoload/gutentags/gtags_cscope.vim b/autoload/gutentags/gtags_cscope.vim
index 1131066..f4864f6 100644
--- a/autoload/gutentags/gtags_cscope.vim
+++ b/autoload/gutentags/gtags_cscope.vim
@@ -88,7 +88,7 @@ function! gutentags#gtags_cscope#generate(proj_dir, tags_file, gen_opts) abort
let l:proj_options = readfile(l:proj_options_file)
let l:cmd += l:proj_options
endif
- let l:cmd += ['--incremental', '"'.l:db_path.'"']
+ let l:cmd += ['--skip-unreadable', '-q', '--incremental', '"'.l:db_path.'"']
let l:cmd = gutentags#make_args(l:cmd)
call gutentags#trace("Running:gtags_cscope.vim: " . string(l:cmd))
@@ -113,6 +113,7 @@ function! gutentags#gtags_cscope#on_job_exit(job, exit_val) abort
endif
if a:exit_val != 0 && !g:__gutentags_vim_is_leaving
+ execute '!rm -rf ' . string(l:dbfile_path)
call gutentags#warning(
\"gtags-cscope job failed, returned: ".
\string(a:exit_val))
weidh@xxx:~/.vim/plugged/vim-gutentags-master$
'--skip-unreadable', '-q'为gtags参数,用户可以根据需要添加,详情可参看gtags --help。
11. c/c++ 语法高亮(cpp-enhanced-highlight)
11.1 效果预览
vim的自动补全有很多种强大入YouCompleteMe不过在离线状态下比较难安装目前还在研究目前找到一个替代品AutoComplPop效果也不错,安装方便效果也不错。 12.1 效果预览
这个需要依赖ctags 13.1 效果预览omnicppcomplete可以配合AutoComplPop,AutoComplPop不能再输入“::”,“->”,“.”进行补全,而omnicppcomplete可以达到这个目的。  然而依然不能使用。搞了一天决定放弃,有哪位大神安装成功了,请指教。我先转战fzf.vim
14.1 效果预览
14.1.1 模糊查找文件
左下框为待选框,右下框为预览框,在字符串搜索的时候将更明显。 然而依然不能使用。搞了一天决定放弃,有哪位大神安装成功了,请指教。我先转战fzf.vim
14.1 效果预览
14.1.1 模糊查找文件
左下框为待选框,右下框为预览框,在字符串搜索的时候将更明显。  14.1.2 模糊查找字符串

此时联网的同学会很快的过去,但是离线的同学就会发现一直卡在这Running fzf installer ...,当然使用的我的离线包的同学是不会卡在这的。这里主要针对的是那些白嫖加离线同学,顺便也是为了记录当时怎么解决这个问题的。原因是fzf需要下载一个二进制包,这个二进制包是根据系统来选择的比如的我的电脑是Ubuntu64位就会去下载对应的二进制包。 首先我们要明确既然是下载文件Ubuntu在线下载命令常用的几个要知道wget,url。我们进入fzf的源码找到install打开,搜索一下wget或url就可以看以下代码。 在尝试去找一下try_wget()调用的地方 这里我们很容易的发现其实$url就是需要下载的文件。我们可以根据try_wget()可以看出将要下载的文件包可能是tgz 或zip格式的。预期自己将要下哪种格式的文件包我们可以看180~202的代码。对于Ubuntu64位系统下的是187行的文件包。这里不考虑zip格式的情况。 此时我们要知道的就是两点,1.知道下载的路径,2.下载下来的文件包要放哪。我们需要在代码里加两句打印确认以上两点。 运行install就得到以下信息。 我们只需要将https://github.com/junegunn/fzf-bin/releases/download/0.22.0/fzf-0.22.0-linux_amd64.tgz复制出来贴到浏览器上即可下载(由于是外网,下不了的同学请自行解决),然后将文件包放到/home/wdh/.vim/plugged/fzf-master/bin 搞定完上一步之后再次运行install还是会进入下载。这个时候就需要对install进行一些改写了。  进入vim在输入一次:Files 进入vim在输入一次:Files   打开~/.fzf.bash添加如下配置
export FZF_CTRL_T_OPTS="--preview '(highlight -O ansi -l {} 2> /dev/null || cat {} || tree -C {}) 2> /dev/null | head -200'"
就可以使用Ctrl + t时打开预览框 打开~/.fzf.bash添加如下配置
export FZF_CTRL_T_OPTS="--preview '(highlight -O ansi -l {} 2> /dev/null || cat {} || tree -C {}) 2> /dev/null | head -200'"
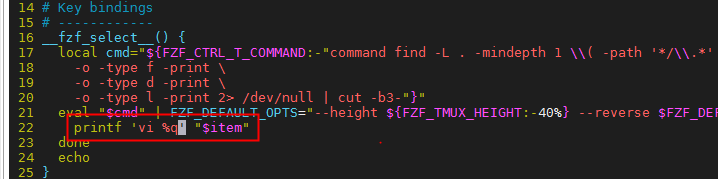
就可以使用Ctrl + t时打开预览框 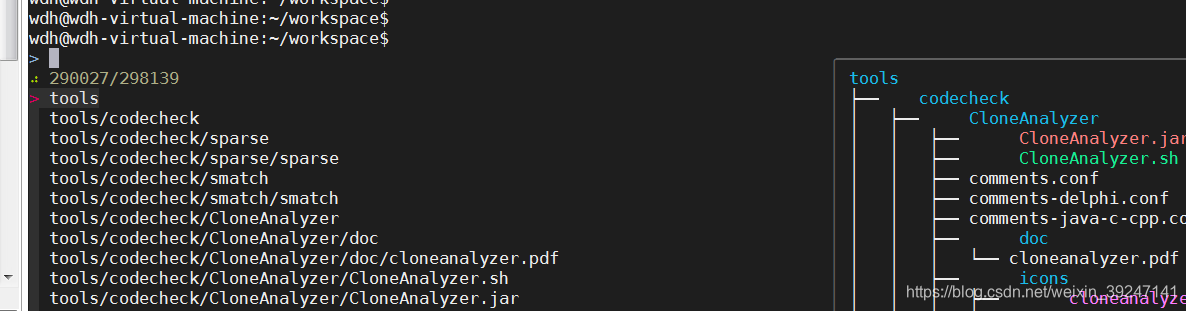 如果想输入Ctrl + t选中需要的文件后用vi打开可以修改~/.vim/plugged/fzf-master/shell/key-bindings.bash配置实现:
将:
printf '%q' "$item"
修改成:
printf 'vi %q' "$item" 如果想输入Ctrl + t选中需要的文件后用vi打开可以修改~/.vim/plugged/fzf-master/shell/key-bindings.bash配置实现:
将:
printf '%q' "$item"
修改成:
printf 'vi %q' "$item"
此时已经可以使用模糊查找文件但是模糊查找字符串还需要依赖ripgrep才可以使用,也可以使用其他的如Ag,ack等搜索引擎(其实Ubuntu自带的grep也可以用,就是大工程的搜索时比较卡)。这里放出这些搜索引擎的速度对比。 不装ripgrep的可以直接跳到vimrc配置那里把Ubuntu自带的grep配置用起来,也可以使用。 sudo apt-get install ripgrep 14.2.6 ripgrep.deb包安装与部署 sudo dpkg -i ripgrep_11.0.2_amd64.deb 14.2.7 ripgrep使用 ripgrep是vim字符串查找中速度最快的。可以配合.gitignore略过不需要查找的文件详细使用请看看README。使用rg查找字符串试试。 14.3 添加vimrc配置
fzf支持多种grep,下面是rg的配置
"调用Rg进行搜索,包含隐藏文件
command! -bang -nargs=* Rg
\ call fzf#vim#grep(
\ 'rg --column --line-number --no-heading --color=always --smart-case --hidden '.shellescape(), 1,
\ 0 ? fzf#vim#with_preview('up:60%')
\ : fzf#vim#with_preview('right:50%'),
\ 0)
"模糊查找文件
map :Files
"模糊查找字符串
map :Rg
使用git的同学可以试试git grep
command! -bang -nargs=* GGrep
\ call fzf#vim#grep(
\ 'git grep --line-number '.shellescape(), 0,
\ 0 ? fzf#vim#with_preview('up:60%')
\ : fzf#vim#with_preview('right:50%'),
\ 0)
"模糊查找文件
map :GFiles
" 模糊查找字符串
map :GGrep
用ubuntu自带的grep
command! -bang -nargs=* Grg
\ call fzf#vim#grep(
\ 'grep -nri --exclude=tags '.shellescape(), 1,
\ 0 ? fzf#vim#with_preview('up:60%')
\ : fzf#vim#with_preview('right:50%'),
\ 0)
"模糊查找文件
map :Files
"模糊查找字符串
map :Grg
15. 括号匹配插件(auto-pairs)
该插件在输入/删除左括号时,能自动补上/删除右括号。
15.1 效果预览
功能支持原文本按键新文本成对插入{},[],(),”“,”,“[[|]成对删除{},[],(),”“,”,“foo[|]BACKSPACEfoo|换行并自动缩进{},[],()node{|}ENTERnode { | }在括号内两侧各插入空格{},[],()foo{|}SPACEfoo{ | }词后单引号不成对插入’foo|’foo’ |跳过右括号{},[],()[ foo| ]][ foo ]|在转义符\后禁用插件{},[],(),”“,”,“foo|{foo\{ |对字符串加小括号C风格字符串|’foo’ALT+e(‘foo’)|删除重复成对符号{},[],(),”,”“,“foo”’|”’BACKSPACEfoo|飞行模式,跳出括号对而不插入{},[],()if(a[3|]))if(a[3])|撤销飞行模式,插入而不是跳出括号对{},[],()if(a[3])|ALT+bif(a[3])|
15.2 安装步骤
15.2.1 auto-pairs下载
https://github.com/jiangmiao/auto-pairs
15.2.2 auto-pairs解压
cd ~ && unzip ~/vim_plugin.zip
cd ~/.vim/plugged
unzip ~/vim_plugin/auto-pairs-master.zip
15.2.3 安装与部署
call plug#begin('~/.vim/plugged')
"括号匹配插件
Plug 'vim-scripts/auto-pairs-master'
call plug#end()
15.3 添加vimrc配置
根据自己的情况选择,我的配置一个都不开用默认的就好。
" 设置要自动配对的符号
" let g:AutoPairs = {'(':')', '[':']', '{':'}',"'":"'",'"':'"'}
" 添加要自动配对的符号
" let g:AutoPairs[''
" 设置要自动配对的符号,默认为g:AutoPairs,可以通过自动命令来对不同文件类型设置不同自动匹配对符号。
" let b:AutoPairs = g:AutoParis
" 设置插件打开/关闭的快捷键,默认为ALT+p。
" let g:AutoPairsShortcutToggle = ''
" 设置自动为文本添加圆括号的快捷键,默认为ALT+e。
" let g:AutoPairsShortcutFastWrap = ''
" 设置调到下一层括号对的快捷键,默认为ALT+n。
" let g:AutoPairsShortcutJump = ''
" 设置撤销飞行模式的快捷键,默认为ALT+b。
" let g:AutoPairsShortcutBackInsert = ''
" 把BACKSPACE键映射为删除括号对和引号,默认为1。
" let g:AutoPairsMapBS = 1
" 把ctrl+h键映射为删除括号对和引号,默认为1。
" let g:AutoPairsMapCh = 1
" 把ENTER键映射为换行并缩进,默认为1。
" let g:AutoPairsMapCR = 1
" 当g:AutoPairsMapCR为1时,且文本位于窗口底部时,自动移到窗口中间。
" let g:AutoPairsCenterLine = 1
" 把SPACE键映射为在括号两侧添加空格,默认为1。
" let g:AutoPairsMapSpace = 1
" 启用飞行模式,默认为0。
" let g:AutoPairsFlyMode = 0
" 启用跳出多行括号对,默认为1,为0则只能跳出同一行的括号。
let g:AutoPairsMultilineClose = 1
16. 自动保存(auto-save)
我是个比较懒的人。不喜欢按:w但又喜欢没事保存的人,切来切去真的很烦。在用vscode的时候发现vscode可以设置没有操作的后的一段时间自动保存。于是我发现了auto-save。
16.1 效果预览
下图可以看出在插入状态下,在输入停止了一段时间后(这里我设置为5秒)左上框的蓝色变成了黄色,+号也消失了。
14.3 添加vimrc配置
fzf支持多种grep,下面是rg的配置
"调用Rg进行搜索,包含隐藏文件
command! -bang -nargs=* Rg
\ call fzf#vim#grep(
\ 'rg --column --line-number --no-heading --color=always --smart-case --hidden '.shellescape(), 1,
\ 0 ? fzf#vim#with_preview('up:60%')
\ : fzf#vim#with_preview('right:50%'),
\ 0)
"模糊查找文件
map :Files
"模糊查找字符串
map :Rg
使用git的同学可以试试git grep
command! -bang -nargs=* GGrep
\ call fzf#vim#grep(
\ 'git grep --line-number '.shellescape(), 0,
\ 0 ? fzf#vim#with_preview('up:60%')
\ : fzf#vim#with_preview('right:50%'),
\ 0)
"模糊查找文件
map :GFiles
" 模糊查找字符串
map :GGrep
用ubuntu自带的grep
command! -bang -nargs=* Grg
\ call fzf#vim#grep(
\ 'grep -nri --exclude=tags '.shellescape(), 1,
\ 0 ? fzf#vim#with_preview('up:60%')
\ : fzf#vim#with_preview('right:50%'),
\ 0)
"模糊查找文件
map :Files
"模糊查找字符串
map :Grg
15. 括号匹配插件(auto-pairs)
该插件在输入/删除左括号时,能自动补上/删除右括号。
15.1 效果预览
功能支持原文本按键新文本成对插入{},[],(),”“,”,“[[|]成对删除{},[],(),”“,”,“foo[|]BACKSPACEfoo|换行并自动缩进{},[],()node{|}ENTERnode { | }在括号内两侧各插入空格{},[],()foo{|}SPACEfoo{ | }词后单引号不成对插入’foo|’foo’ |跳过右括号{},[],()[ foo| ]][ foo ]|在转义符\后禁用插件{},[],(),”“,”,“foo|{foo\{ |对字符串加小括号C风格字符串|’foo’ALT+e(‘foo’)|删除重复成对符号{},[],(),”,”“,“foo”’|”’BACKSPACEfoo|飞行模式,跳出括号对而不插入{},[],()if(a[3|]))if(a[3])|撤销飞行模式,插入而不是跳出括号对{},[],()if(a[3])|ALT+bif(a[3])|
15.2 安装步骤
15.2.1 auto-pairs下载
https://github.com/jiangmiao/auto-pairs
15.2.2 auto-pairs解压
cd ~ && unzip ~/vim_plugin.zip
cd ~/.vim/plugged
unzip ~/vim_plugin/auto-pairs-master.zip
15.2.3 安装与部署
call plug#begin('~/.vim/plugged')
"括号匹配插件
Plug 'vim-scripts/auto-pairs-master'
call plug#end()
15.3 添加vimrc配置
根据自己的情况选择,我的配置一个都不开用默认的就好。
" 设置要自动配对的符号
" let g:AutoPairs = {'(':')', '[':']', '{':'}',"'":"'",'"':'"'}
" 添加要自动配对的符号
" let g:AutoPairs[''
" 设置要自动配对的符号,默认为g:AutoPairs,可以通过自动命令来对不同文件类型设置不同自动匹配对符号。
" let b:AutoPairs = g:AutoParis
" 设置插件打开/关闭的快捷键,默认为ALT+p。
" let g:AutoPairsShortcutToggle = ''
" 设置自动为文本添加圆括号的快捷键,默认为ALT+e。
" let g:AutoPairsShortcutFastWrap = ''
" 设置调到下一层括号对的快捷键,默认为ALT+n。
" let g:AutoPairsShortcutJump = ''
" 设置撤销飞行模式的快捷键,默认为ALT+b。
" let g:AutoPairsShortcutBackInsert = ''
" 把BACKSPACE键映射为删除括号对和引号,默认为1。
" let g:AutoPairsMapBS = 1
" 把ctrl+h键映射为删除括号对和引号,默认为1。
" let g:AutoPairsMapCh = 1
" 把ENTER键映射为换行并缩进,默认为1。
" let g:AutoPairsMapCR = 1
" 当g:AutoPairsMapCR为1时,且文本位于窗口底部时,自动移到窗口中间。
" let g:AutoPairsCenterLine = 1
" 把SPACE键映射为在括号两侧添加空格,默认为1。
" let g:AutoPairsMapSpace = 1
" 启用飞行模式,默认为0。
" let g:AutoPairsFlyMode = 0
" 启用跳出多行括号对,默认为1,为0则只能跳出同一行的括号。
let g:AutoPairsMultilineClose = 1
16. 自动保存(auto-save)
我是个比较懒的人。不喜欢按:w但又喜欢没事保存的人,切来切去真的很烦。在用vscode的时候发现vscode可以设置没有操作的后的一段时间自动保存。于是我发现了auto-save。
16.1 效果预览
下图可以看出在插入状态下,在输入停止了一段时间后(这里我设置为5秒)左上框的蓝色变成了黄色,+号也消失了。  16.2 安装步骤
16.2.1 auto-save下载
https://github.com/907th/vim-auto-save.git
16.2.2 auto-save解压安装包
cd ~ && unzip ~/vim_plugin.zip
cd ~/.vim/plugged
unzip ~/vim_plugin/vim-auto-save-master.zip
16.2.3 部署
打开.vimrc添加以下指令
call plug#begin('~/.vim/plugged')
Plug 'vim-scripts/vim-auto-save-master' "自动保存插件
call plug#end()
16.3 添加vimrc配置
" auto-save配置
" TextChangedI:在插入模式下对当前缓冲区中的文本进行更改后,TextChangedI将保存。
" CursorHold:在正常模式下,CursorHold将保存updatetime选项中定义的每毫秒量。
" CursorHoldI:CursorHoldI将在插入模式下执行相同的操作。
" CompleteDone:在每个完成事件之后,CompleteDone也将触发保存。
let g:auto_save = 1 " 开启自动保存
let g:auto_save_silent = 1 " 不显示命令
let g:auto_save_events = ["CursorHold", "CursorHoldI"] " 添加自动保存触发的事件
set updatetime=5000 " 配合CursorHold, CursorHoldI。5000ms后自动保存
16.2 安装步骤
16.2.1 auto-save下载
https://github.com/907th/vim-auto-save.git
16.2.2 auto-save解压安装包
cd ~ && unzip ~/vim_plugin.zip
cd ~/.vim/plugged
unzip ~/vim_plugin/vim-auto-save-master.zip
16.2.3 部署
打开.vimrc添加以下指令
call plug#begin('~/.vim/plugged')
Plug 'vim-scripts/vim-auto-save-master' "自动保存插件
call plug#end()
16.3 添加vimrc配置
" auto-save配置
" TextChangedI:在插入模式下对当前缓冲区中的文本进行更改后,TextChangedI将保存。
" CursorHold:在正常模式下,CursorHold将保存updatetime选项中定义的每毫秒量。
" CursorHoldI:CursorHoldI将在插入模式下执行相同的操作。
" CompleteDone:在每个完成事件之后,CompleteDone也将触发保存。
let g:auto_save = 1 " 开启自动保存
let g:auto_save_silent = 1 " 不显示命令
let g:auto_save_events = ["CursorHold", "CursorHoldI"] " 添加自动保存触发的事件
set updatetime=5000 " 配合CursorHold, CursorHoldI。5000ms后自动保存
|


【本文地址】
今日新闻 |
推荐新闻 |