HRNet代码及原理分析(一) |
您所在的位置:网站首页 › hrnetone怎么样 › HRNet代码及原理分析(一) |
HRNet代码及原理分析(一)
|
HRNet代码及原理分析(一)-- 网络结构
通常来说,目前市场上主流物体关键点的方法一般分两类:基于坐标回归,热力图。而后者主要是由高到低分辨率网络然后由低分辨率网络再转到高分辨率网络中(high-to-low resolution—>low-to-high resolution)。但是微软提出的一种新型的网络结构–HRNet。
leaky_Relu(激活函数,HRNet中最常用的,这里没什么可说的): def leaky_Relu(input, name=''): return tf.nn.leaky_relu(input, alpha=0.1, name=name + '_relu')conv_2d(卷积+BN+激活,注意这里没有用池化,因为HRNet中的主网络shape是保持不变的,不需要进行池化来改变其shape): def conv_2d(inputs, channels, kernel_size=3, strides=1, batch_normalization=True, activation=None, name='', padding='same', kernel_initializer=tf.random_normal_initializer(stddev=0.01), is_training=True): output = tf.layers.conv2d(inputs=inputs, filters=channels, kernel_size=kernel_size, strides=strides, padding=padding, name=name + '_conv', kernel_initializer=kernel_initializer) name = name + '_conv' if batch_normalization: output = tf.layers.batch_normalization(output, axis=-1, momentum=0.9, name=name+'_bn', training=is_training) name = name + '_bn' if activation: output = activation(output, name=name) return outputps: 1.默认进行BN,但是不进行激活,同时默认的kernel_size等于3,步长等于1。由于在后续网络中,有需要改变其输入shape的也有不改变其输入的shape的,所以视情况而定。 down_sampling(下采样(卷积)) def down_sampling(input, method='strided_convolution', rate=2, name='', activation=leaky_Relu, is_training=True): assert method == 'max_pooling' or method == 'strided_convolution', \ 'Unknown type of down_sample method! "strided_convolution" and "' \ 'max_pooling" are expected, but "' + method + '" is provided!' output = input if method == 'strided_convolution': _, _, _, channels = input.get_shape() channels = channels.value output = input loop_index = 1 new_rate = rate while new_rate > 1: assert new_rate % 2 == 0, 'The rate of down_sampling (using "strided_convolution") must be the power of ' \ '2, but "{}" is provided!'.format(rate) output = conv_2d(output, channels=channels * (2 ** loop_index), strides=2, activation=activation, name=name + 'down_sampling' + '_x' + str(loop_index * 2), is_training=is_training) loop_index += 1 new_rate = int(new_rate / 2) elif method == 'max_pooling': output = tf.layers.max_pooling2d(input, pool_size=rate, strides=rate, name=name+'_max_pooling') return outputps: 1.该函数的作用就是进行下采样,但是方式分两种:下卷积和下池化,默认为下卷积(即我们最常见的从conv2d),同时默认的下采样的rate为2,即shape缩小一半。 2.如果为下卷积,这里rate代表下卷积的比例(第一次卷积就缩小一半,第二次卷积就缩小四分之一…),为了不让因为卷积所导致过多的信息丢失,所以随着卷积次数的增加,其输入的channels就相对应的提高倍数。举个栗子,输入的feature map的shape为(1,64,64,3),如果做第一次下卷积,那么wh的大小缩小一倍,即64->32,同时,channels由3->3*(2 ** 1)=6,所以最终输出的feature map大小为(1,32,32,6),如果第二次下卷积,那么wh缩小两倍,即64->16,同时channels由3->3*(2**2)=12,所以最终输出的feature map大小为(1,16,16,12)。 3.如果为下池化,那么就没啥好说的了,这里采用的是最大池化。 up_sampling(上采样) def up_sampling(input, channels, method='nearest_neighbor', rate=2, name='', activation=leaky_Relu, is_training=True): assert method == 'nearest_neighbor', 'Only "nearest_neighbor" method is supported now! ' \ 'However, "' + method + '" is provided.' output = input if method == 'nearest_neighbor': _, x, y, _= input.get_shape() x = x.value y = y.value output = tf.image.resize_nearest_neighbor(input, size=(x*rate, y*rate), name=name + '_upsampling') name += '_upsampling' output = conv_2d(output, channels=channels, kernel_size=1, activation=activation, name=name + '_align_channels', is_training=is_training) return outputps: 这里上采样采用的是nearest_neighbor策略,没有采用simple baseline中上卷积的方法。这里先进行邻值插入,然后对其进行一次卷积。 residual_unit_bottleneck(resnet基础模块) def residual_unit_bottleneck(input, name='RU_bottleneck', channels=64, is_training=True): """ Residual unit with bottleneck design, default width is 64. :param input: :param name: :return: """ _, _, _, c = input.get_shape() conv_1x1_1 = conv_2d(input, channels=channels, kernel_size=1, activation=leaky_Relu, name=name + '_conv1x1_1', is_training = is_training) conv_3x3 = conv_2d(conv_1x1_1, channels=channels, activation=leaky_Relu, name=name + '_conv3x3', is_training=is_training) conv_1x1_2 = conv_2d(conv_3x3, channels=c, kernel_size=1, name=name + '_conv1x1_2', is_training=is_training) _output = tf.add(input, conv_1x1_2, name=name + '_add') output = leaky_Relu(_output, name=name + '_out') return outputps: 1.该基础模块的kernal_size为1,要与后续residual_unit函数区别开。 2.假设输入的feature map的shape为(1,256,192,3),首先进行一次卷积(这里的卷积表示卷积+BN+激活(可有可无),后来不再赘述)将shape改变为(1,256,192,64),这里64是传入到该函数的超参数。然后再进行一次卷积,shape不变还是为(1,256,192,64),接着再接一次卷积,shape变回(1,256,192,3)。最后将输入的feature map和最后一次卷积得到的feature map进行融合,并做一次激活函数,最后得到的output的shape还是与输入保持一致,为(1,256,192,3)。 residual_unit(同上residual_unit_bottleneck,但是卷积核大小不同) def residual_unit(input, name='RU', is_training=True): """ Residual unit with two 3 x 3 convolution layers. :param input: :param name: :return: """ _, _, _, channels = input.get_shape() conv3x3_1 = conv_2d(inputs=input, channels=channels, activation=leaky_Relu, name=name + '_conv3x3_1', is_training=is_training) conv3x3_2 = conv_2d(inputs=conv3x3_1, channels=channels, name=name + '_conv3x3_2', is_training=is_training) _output = tf.add(input, conv3x3_2, name=name + '_add') output = leaky_Relu(_output, name=name + '_out') return outputps: 该函数与residual_unit_bottleneck函数的作用一致,但是唯一的区别就是卷积核大小不同,但是二者都不会对输入的feature map的大小发生改变。 STAGE1
input是包含stage1生成的feature map(16,256,192,32)的列表。 def exchange_within_stage(inputs, name='exchange_within_stage', is_training=True): with tf.variable_scope(name): subnetworks_number = len(inputs) outputs = [] # suppose i is the index of the input sub-network, o is the index of the output sub-network for o in range(subnetworks_number): one_subnetwork = 0 for i in range(subnetworks_number): if i == o: # if in the same resolution temp_subnetwork = inputs[i] elif i - o |

 上图是high-to-low resolution—>low-to-high resolution的一般的网络结构,下图就是HRNet的大概的网络结构。可以清楚的看到,HRNet在网络分辨率上是没有进行改变的,主网络的shape一直都是保持一样的,这种设计可以保护图片的局部信息,不会因为卷积而丢失过多的信息。 代码:HRNet (因为官方是使用pytorch实现的,所以我单独在github找了个tf版本的) 下面,就是进行代码拆解:
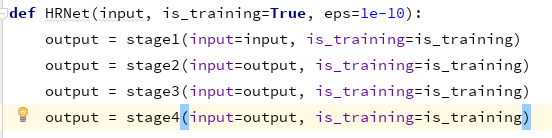 进入HRNet的函数中可以发现一共有四个步骤,挨个进行~ 在进行步骤解读之前,先搞清楚一下每个基本模块的作用~
 这里做连续五次的resnet基础模块操作,前四次的shape大小不会发生改变,但是最后一次卷积生成的最终的output大小为(16,256,192,32)。
【本文地址】