【Echarts】echarts在Vue的安装、配置、使用 |
您所在的位置:网站首页 › hbuilderx怎么安装echart › 【Echarts】echarts在Vue的安装、配置、使用 |
【Echarts】echarts在Vue的安装、配置、使用
|
先放上echarts教程的官方文档:https://echarts.apache.org/zh/tutorial.html#5%20%E5%88%86%E9%92%9F%E4%B8%8A%E6%89%8B%20ECharts
安装: npm安装echarts npm install echarts --save 配置:全局引入,在main.js文件中添加以下配置: import echarts from 'echarts' Vue.prototype.$echarts = echarts这样 就可以使用啦! 使用: HTML代码:为echarts准备一个有宽高的容器 JS代码: // 1 、基于准备好的容器初始化echarts实例对象 var myChart = echarts.init(document.getElementById('demo')); // 2 、指定图表的配置项和数据 var option = { title: { text: 'ECharts 示例' }, tooltip: {}, legend: { data:['销量'] }, xAxis: { data: ["衬衫","羊毛衫","雪纺衫","裤子","高跟鞋","袜子"] }, yAxis: {}, series: [{ name: '销量', type: 'bar', data: [5, 20, 36, 10, 10, 20] }] }; // 3、 将配置项指定给图表。 myChart.setOption(option);
子组件代码: export default { name: 'ChartDemo', //props接受父组件传来的数据 这块是关键!!! props: { demoNum: { type: Number, default: 66 }, …… }, data() { return { chartInstance: null, allData: null, titleFontSize: 0, } }, methods:{ initChart(){ this.chartInstance = this.$echarts.init(document.getElementById('leftDash')) var option={……} this.chartInstance.setOption(option) }, mounted() { this.initChart() } }在Props中添加要从父组件接受的属性,包括数据、颜色宽高等样式都可 option中用this.xxx进行调用即可 父组件引用: //先引入子组件所在的 import ChartDemo from '@views/ChartDemo' export default { name: "JdParameEngineList", mixins: [JeecgListMixin, mixinDevice], components: { ChartDemo, //注册子组件 }, data(){ return{ speed:88, …… } }, …… }在data中声明的动态数据 ,在使用echarts子组件时传给子组件就可以了
柱状图、折线图、饼图等都比较简单,文档也写得很清楚,下面是我做项目是搞得比较难的。 只放了option配置项部分 仪表盘: var speed=88 var electric = 66 const option = { //渐变的背景颜色 backgroundColor: { type: 'linear', x: 0, y: 1, x2: 1, y2: 0, colorStops: [{ offset: 0, color: '#031029' // 0% 处的颜色 }, { offset: 1, color: '#24375f'// 100% 处的颜色 }], globalCoord: false // 缺省为 false }, series: [ { name: '刻度', type: 'gauge', center: ['50%', '50%'], // 默认全局居中 radius: '88%', //半径 min:0,//最小刻度 max:140,//最大刻度 splitNumber: 7, //刻度盘分段数量 //角度 startAngle: 225, endAngle: -45, axisLine: { show: false, lineStyle: { width: 1, //颜色根据数值设置的 color: [ [speed/140, "#00ffff"], [1, '#fff'] ] } },//仪表盘轴线 axisLabel: { show: false, },//刻度标签。 axisTick: { show: true, lineStyle: { color: 'auto', width: 1, }, length: 10 },//刻度样式 splitLine: { show: true, length: 20, lineStyle: { color: 'auto' } },//分隔线样式 detail: { show: false }, pointer: { show: false } }, { name:'仪表上大圈', type: 'gauge', radius: '90%', center: ['50%', '50%'], splitNumber: 0, //刻度数量 startAngle: 225, endAngle: -45, axisLine: { show: true, lineStyle: { width:5, shadowColor: 'rgba(48, 131, 255, 1)', //阴影颜色 shadowBlur: 5, //阴影大小 color: [ [speed/140, "#00ffff"], [1, '#fff'] ] }, },//分隔线样式。 splitLine: { show: false, }, axisLabel: { show: false }, axisTick: { show: false }, pointer: { show: false }, title: { show: true, offsetCenter: [0, '20%'], //偏移位置 textStyle: { color: '#fff', fontSize: 20 } }, //仪表盘详情,用于显示数据。 detail: { show: true, offsetCenter: [0, '-20%'], color: '#fff', formatter: function(params) { return params }, textStyle: { fontSize: 60 } }, data: [{ name: "km/h", value: speed }] }, { name: '下小圈', type: 'gauge', center: ['50%', '50%'], // 默认全局居中 radius: '87%', min:40, max:0, startAngle:-60, endAngle:-120, splitNumber:2, axisLine: { // 坐标轴线 lineStyle: { // 属性lineStyle控制线条样式 width: 3, color: [ [(1-electric/40), '#fff'], [1, '#ff9900']] } }, axisLabel: { show: true, distance:-25, textStyle:{ color:'#fff', fontSize:15 }, }, axisTick: { // 坐标轴小标记 show:false }, splitLine: { // 分隔线 show:false }, pointer: { show:false, }, title: { show:false, }, detail: { show:false, }, data:[{value: electric, name: '电量'}] } ] };
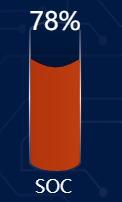
那个小电池是个html图片,绝对定位加上去的,不包含在option中 需要注意的是:下面的电量刻度表进度方向,是逆时针的顺序。要注意刻度、及颜色的处理 水球图/液体图需要额外安装 echarts-liquidfill npm install echarts-liquidfill --save安装完也需要在main.js中配置,引入即可 import 'echarts-liquidfill'配置完就可以使用了 const option = { title:{ text:'尿素罐液位', textStyle:{ fontSize:18, fontWeight: 400, color:'#fff', }, bottom:70, left:25, }, series: [ { type: 'liquidFill', //类型设置 data: [{ value: 0.6, itemStyle: { normal: { //液体的渐变颜色 color:{ type: 'linear', x: 0, y: 0, x2: 1, y2: 0, colorStops: [ { offset: 0, color: '#9e4a1e' // 0% 处的颜色 }, { offset: 1, color: '#f9e243' // 100% 处的颜色 } ], globalCoord: false // 缺省为 false } } } }], radius: '100%', outline: { borderDistance: 0, itemStyle: { borderWidth: 2, //设置了一个渐变的边框 borderColor: { type: 'linear', x: 0, y: 0, x2: 0, y2: 1, colorStops: [ { offset: 0, color: '#13264b' // 0% 处的颜色 }, { offset:0.5 ,color:'#eaeaea' }, { offset: 1, color: '#011a44' // 100% 处的颜色 } ], globalCoord: false // 缺省为 false }, }, }, backgroundStyle: { color: 'transparent', }, //shape 这里引入的是想要的容器的矢量数据 shape:'path://M28 0.5C4 0.5 0.5 7.83333 0 11V161C1.33333 164.167 9.5 171 29 171C48.5 171 56 164.167 57 160.5V11C56.1667 7.16667 52 0.5 28 0.5Z', //标签 label: { normal: { textStyle: { fontSize: 25, color:'#fff', fontWeight:400, }, position: ['50%', '0%'] } } }] };
其中液体为动画效果
暂时就用到这些了,再有新的示例也会添加上来的 最后贴一个echarts的实例,里面好多用户实例,大多数需要的类型都有!!建议收藏 https://www.makeapie.com/explore.html#sort=rank~timeframe=all~author=all |
【本文地址】
今日新闻 |
推荐新闻 |


