UE4/UE5 Runtime下的Mesh合并 |
您所在的位置:网站首页 › globalplug-insettings › UE4/UE5 Runtime下的Mesh合并 |
UE4/UE5 Runtime下的Mesh合并
|
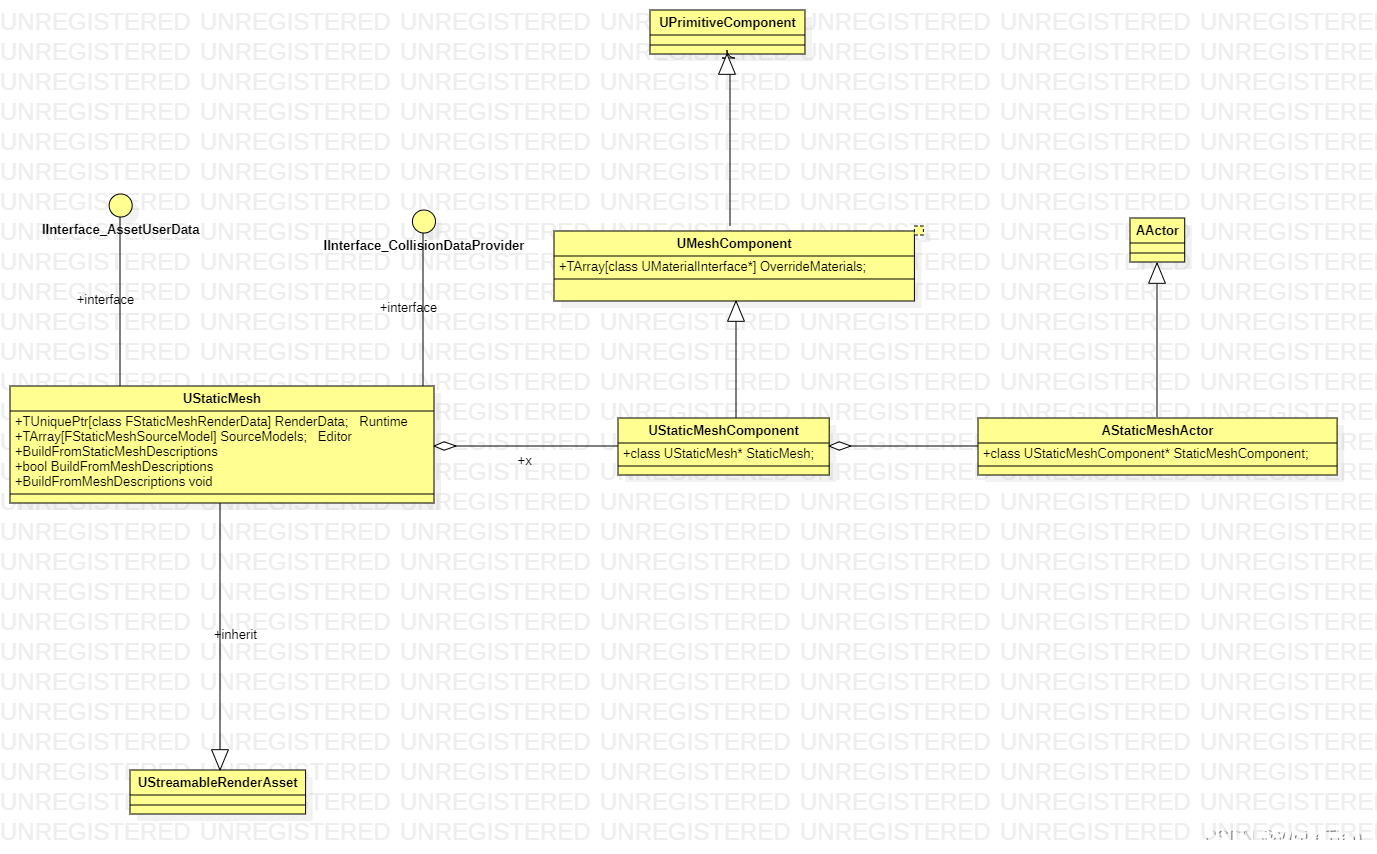
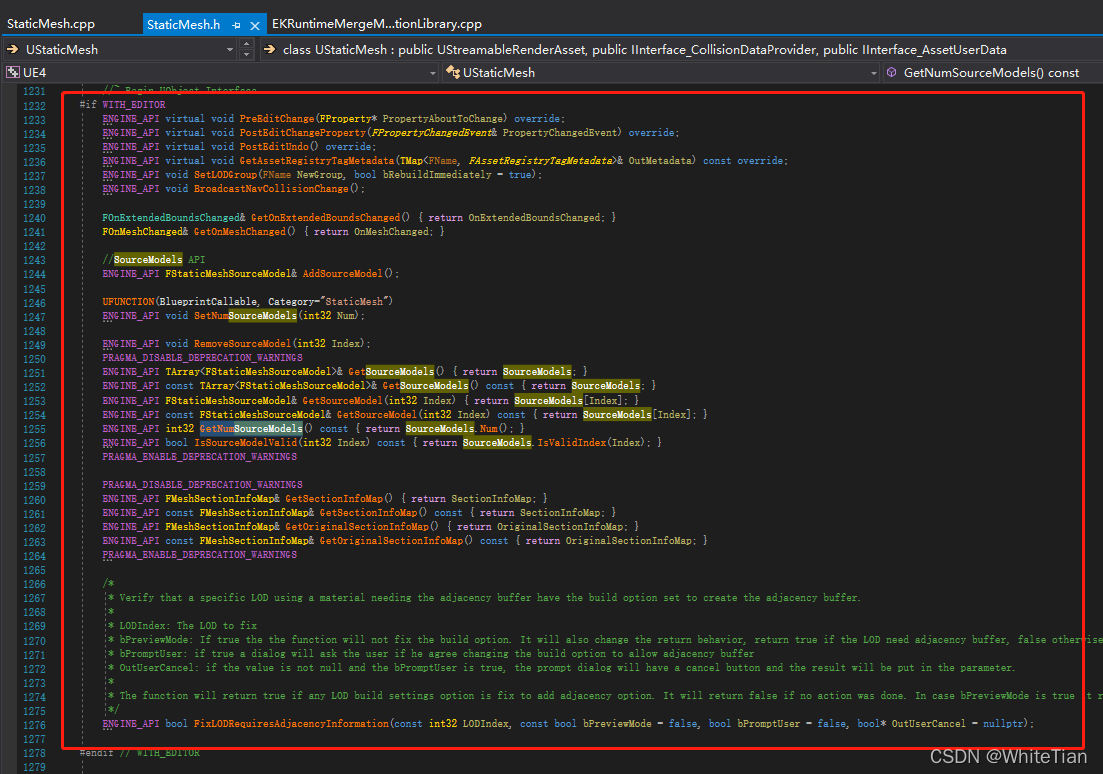
原创文章,转载请注明出处。 StaticMesh的合并 前言类图Editor下的实现Runtime下的实现难点1,StaticMesh的RenderData转FMeshDescription难点2,StaticMesh构建复杂碰撞难点3,多Section的StaticMesh合并之后材质出错 插件封装,现有功能介绍以及后续计划参考文章 前言引擎版本:4.27.2 合并的前提:在UE4.26.2之后,允许了在运行时构建UStaticmesh。之前的方式只支持编辑器下导入, 导入后转成UStaticMesh的RenderData进行渲染; 为什么要做合并: 需求的来源是软件我们想利用UE4.27.2的runtime下的udatasmith导入功能, 但是因为datasmith的设计初衷呢就是尽可能小的拆分模型,粒度很小。 所以有的udatasmith导入后会在关卡中有上万个,帧率极低。 所以才会有了该篇文章 在运行时来合并StaticMesh。 合批的优化方案如下 其实这里面是有很多可以做合批的。 所以,这里我就针对udatasmith导入这个功能,研究了一下合批的方案; 方案优点缺点1>修改datasmith导入部分插件的代码效率最高不易维护2>自己做一套效率低于方案1,易维护易维护3>修改datasmith的导出插件不确定不易维护使用哪一种方案? 方案1来讲的话,改DataSmith的源码,效率我认为是最好的。 为什么: 首先说方案1的做法:在一个个的actor还没有spawn,mesh还没有build,collsion,材质等这些信息还没有build之前, 我们提前过滤好哪些Mesh可以被合并,之后再spawn MeshActor,build StaticMesh的vertex,collision,material。 再说方案2的做法:所有的actor已经在世界中spawn出来了,StaticMesh的vertex,collision,material这些信息都已经build好了。再去过滤好哪些Mesh可以被合并,之后再spawn MeshActor,build StaticMesh的vertex,collision,material。 暂时实现了方案2 对比看的话,方案1是要比方案2效率高的。但方案1改起来比较麻烦,并且我认为不容易维护。看了一天之后,我先实现了方案2。 视频效果:Merge之后的帧率和DC明显提高跳转观看 UE4/UE5 Runtime下合并Mesh 类图
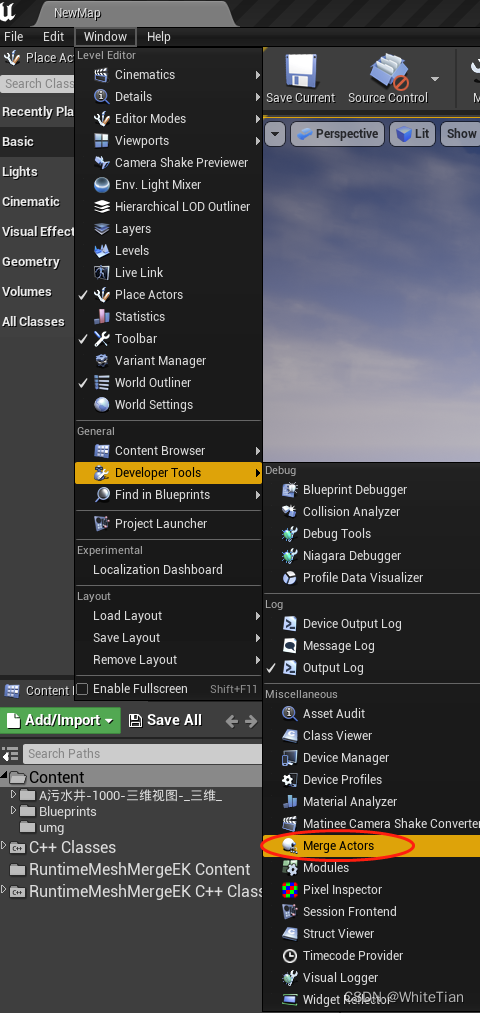
参考MergeActor Tool 利用编辑器下的MergeActorTool工具的功能,很快就能在编辑器下实现合并的逻辑。Standlone下也可以合并。 但是需要注意的是这个只能在编辑器下用,打包就歇菜。 编辑器下合并具体的代码如下,作为参考: //编辑器下的合并方法 void UMyBlueprintFunctionLibrary::MergeMy(const TArray& ComponentsToMerge, UWorld* World, const FMeshMergingSettings& InSettings, UMaterialInterface* InBaseMaterial, UPackage* InOuter, const FString& InBasePackageName, TArray& OutAssetsToSync, FVector& OutMergedActorLocation, const float ScreenSize, bool bSilent /*= false*/, FString AppendName) { const IMeshMergeUtilities& MeshUtilities = FModuleManager::Get(). LoadModuleChecked("MeshMergeUtilities").GetUtilities(); MeshUtilities.MergeComponentsToStaticMeshWithName(ComponentsToMerge, GWorld, InSettings, InBaseMaterial, InOuter, InBasePackageName, OutAssetsToSync, OutMergedActorLocation, ScreenSize, bSilent, AppendName); }//合并具体逻辑,将相同材质的Mesh传进去即可完成合并。 TArray OutAssetsToSync; FVector OutMergedActorLocation; const float ScreenAreaSize = TNumericLimits::Max(); FMeshMergingSettings setting; setting.bMergePhysicsData = 1; MergeMy(mergedata.Value, GWorld, setting, nullptr, GetTransientPackage(), FString(), OutAssetsToSync, OutMergedActorLocation, ScreenAreaSize, true, mergedata.Key); UStaticMesh* UtilitiesMergedMesh = nullptr; if (!OutAssetsToSync.FindItemByClass(&UtilitiesMergedMesh)) { // Error, TEXT("MergeStaticMeshActors failed. No mesh was created. continue; } for (auto obj : OutAssetsToSync) { auto umesh = Cast(obj); if (!umesh) continue; /*auto mat0 = umesh->GetMaterial(0); if (!UKismetSystemLibrary::IsValid(mat0)) continue;*/ OutMergedActorLocation+=FVector(0,0,500); auto MergedActor = GWorld->SpawnActor(AStaticMeshActor::StaticClass(), OutMergedActorLocation, FRotator(0, 0, 0)); if (MergedActor) { MergedActor->SetMobility(EComponentMobility::Movable); if (!MergedActor->GetStaticMeshComponent()) continue; MergedActor->GetStaticMeshComponent()->SetStaticMesh(umesh); if (mergedata.Value.Num() > 0) { UStaticMeshComponent* pSTM = Cast(mergedata.Value[0]); if (pSTM) { //umesh->SetStaticMaterials(pSTM->GetStaticMesh()->GetStaticMaterials()); } } GWorld->UpdateCullDistanceVolumes(MergedActor, MergedActor->GetStaticMeshComponent()); MergedActor->AttachToActor(RootActor, FAttachmentTransformRules::KeepWorldTransform); #if WITH_EDITOR MergedActor->SetActorLabel(UKismetSystemLibrary::GetDisplayName(umesh)); #endif // endif } //删除被替代的RootActor for (auto willremovecomp : mergedata.Value) { if(!IsValid(DeleteActorArray[willremovecomp])) continue; if(!DeleteActorArray[willremovecomp]->IsValidLowLevel()) continue; TArray OutComponent; OutComponent = DeleteActorArray[willremovecomp]->K2_GetComponentsByClass(UStaticMeshComponent::StaticClass()); if (OutComponent.Num() willremovecomp->DestroyComponent(); } } } Runtime下的实现 难点1,StaticMesh的RenderData转FMeshDescription其实这个如果看过StaticMesh的人应该了解,在编辑器下合并的代码都是用的编辑器下StaticMesh独有的数据来合并的,就是下面的图。用到的变量为 SourceModels 依次将每一个可以合并的Mesh的数据从RenderData转换成FMeshDescription,接着再将这些 FMeshDescription加到一次,再给到UStaticMesh的BuildFromStaticMeshDescriptions传进去就搞定了(此处需要注意数据的大小,UE的序列化不能超2G,但是好在这块都是我们自己写,再拼接FMeshDescription的时候我们把内存控制好就行了,这块也关系到合并的速度) 具体步骤概括一下其实就是: 1>RenderData转FMeshDescription 2>拼接所有的FMeshDescription:方法 static void AppendMeshDescription(const FMeshDescription& SourceMesh, FMeshDescription& TargetMesh, FAppendSettings& AppendSettings); 3>调用BuildFromStaticMeshDescriptions 难点2,StaticMesh构建复杂碰撞要构建复杂碰撞,那么就要调用 UBodySetup->CreatePhysicsMeshes(),如果仔细跟过的话,进去后会发现,在Runtime下,build碰撞会调用ProcessFormatData_PhysX或者ProcessFormatData_Chaos,但是前提条件必须满足IsRuntime的判断。 我发现这块的原因就是,合并好之后,我在创建UStaticMesh对象的时候写法就是普通的,NewObect(xxxxxxx),结果在IsRuntime的判断那里一直为false。 if (IsRuntime(this)) { #if WITH_PHYSX && PHYSICS_INTERFACE_PHYSX bClearMeshes = !RuntimeCookPhysics_PhysX(); #elif WITH_CHAOS bClearMeshes = !RuntimeCookPhysics_Chaos(); #endif } void UBodySetup::CreatePhysicsMeshes() { TRACE_CPUPROFILER_EVENT_SCOPE(UBodySetup::CreatePhysicsMeshes); SCOPE_CYCLE_COUNTER(STAT_CreatePhysicsMeshes); // Create meshes from cooked data if not already done if(bCreatedPhysicsMeshes) { return; } // If we don't have any convex/trimesh data we can skip this whole function if (bNeverNeedsCookedCollisionData) { return; } bool bClearMeshes = true; // Find or create cooked physics data static FName PhysicsFormatName(FPlatformProperties::GetPhysicsFormat()); FByteBulkData* FormatData = GetCookedData(PhysicsFormatName); // On dedicated servers we may be cooking generic data and sharing it if (FormatData == nullptr && IsRunningDedicatedServer()) { FormatData = GetCookedData(FGenericPlatformProperties::GetPhysicsFormat()); } if (FormatData) { #if WITH_PHYSX && PHYSICS_INTERFACE_PHYSX bClearMeshes = !ProcessFormatData_PhysX(FormatData); #elif WITH_CHAOS bClearMeshes = !ProcessFormatData_Chaos(FormatData); #endif } else { if (IsRuntime(this))//这个地方在Runtime下如果你用的是UStaticMesh的话,是无法通过的。 { #if WITH_PHYSX && PHYSICS_INTERFACE_PHYSX bClearMeshes = !RuntimeCookPhysics_PhysX(); #elif WITH_CHAOS bClearMeshes = !RuntimeCookPhysics_Chaos(); #endif } } // fix up invalid transform to use identity // this can be here because BodySetup isn't blueprintable if ( GetLinkerUE4Version() if ( AggGeom.ConvexElems[i].GetTransform().IsValid() == false ) { AggGeom.ConvexElems[i].SetTransform(FTransform::Identity); } } } #if WITH_CHAOS // For drawing of convex elements we require an index buffer, previously we could // get this from a PxConvexMesh but Chaos doesn't maintain that data. Instead now // it is a part of the element rather than the physics geometry, if we load in an // element without that data present, generate a convex hull from the convex vert // data and extract the index data from there. for(FKConvexElem& Convex : AggGeom.ConvexElems) { Convex.ComputeChaosConvexIndices(); } #endif if(bClearMeshes) { ClearPhysicsMeshes(); } bCreatedPhysicsMeshes = true; }费了半天劲,才找导解决方案。 1>首先需要从UStaticMesh派生一个类出来; 2>并且这个类的bAllowCPUAccess必须为true; 3>并且要重载一下GetWorld(); 然后自己在加一个SetWorld方法; 这个类的具体代码如下 : /* * 从UStaticMesh派生的类,允许在运行时烹饪碰撞网格 * 要做到这一点,bAllowCPUAccess必须为true,并且方法GetWorld()必须返回一个有效的world * 否则在Cook的时候有个IsRuntime()的判断是一直为假 */ UCLASS() class EASYKITRUNTIMEMERGEMESH_API UEKRMM_RuntimeMesh : public UStaticMesh { GENERATED_BODY() public: UEKRMM_RuntimeMesh() : World(nullptr) { // 设置bAllowCPUAccess为true,允许将渲染数据三角形复制到碰撞网格中 bAllowCPUAccess = true; } // UObject覆盖 //覆盖允许烹饪碰撞网格,简单和复杂,从静态网格在运行时 virtual UWorld* GetWorld() const override { return World ? World : UStaticMesh::GetWorld(); } // 结束UObject覆盖 //使用有效的世界,允许碰撞网格烹饪,简单和复杂,从静态网格在运行时 void SetWorld(UWorld* InWorld) { World = InWorld; } private: UWorld* World; };用法就比较简单了,如下,之后再去调用UBodySetup->CreatePhysicsMeshes()就OK了: UEKRMM_RuntimeMesh* StaticMesh = NewObject(GetTransientPackage(), MeshName, RF_Public | RF_Standalone); if(!StaticMesh) continue; StaticMesh->InitResources(); //必须设置世界 StaticMesh->SetWorld(RootActor->GetWorld()); 难点3,多Section的StaticMesh合并之后材质出错当一个UStaticMesh具有多材质的这种,其实RenderData里面是分了多个Section的。 每个Section的结构体为FSectionInfo 下面的代码是从StaticMesh的RenderData里面提取Section,OutSections数组是多个的,那么就证明你的StaticMesh是多材质的,依次对应的关系。为什么说 这个是个难点,请继续往下看。 void UEKRMM_BlueprintFunctionLibrary::EKRMM_ExtractSections(const UStaticMeshComponent* Component, int32 LODIndex, TArray& OutSections) { static UMaterialInterface* DefaultMaterial = UMaterial::GetDefaultMaterial(MD_Surface); const UStaticMesh* StaticMesh = Component->GetStaticMesh(); TArray MaterialSlotNames; for (const FStaticMaterial& StaticMaterial : StaticMesh->GetStaticMaterials()) { #if WITH_EDITOR MaterialSlotNames.Add(StaticMaterial.ImportedMaterialSlotName); #else MaterialSlotNames.Add(StaticMaterial.MaterialSlotName); #endif } for (const FStaticMeshSection& MeshSection : StaticMesh->GetRenderData()->LODResources[LODIndex].Sections) { // Skip empty sections if (MeshSection.NumTriangles == 0) { continue; } // Retrieve material for this section UMaterialInterface* StoredMaterial = Component->GetMaterial(MeshSection.MaterialIndex); // Make sure the resource actual exists, otherwise use default material StoredMaterial = (StoredMaterial != nullptr) && StoredMaterial->GetMaterialResource(GMaxRHIFeatureLevel) ? StoredMaterial : DefaultMaterial; // Populate section data FSectionInfo SectionInfo; SectionInfo.Material = StoredMaterial; SectionInfo.MaterialIndex = MeshSection.MaterialIndex; SectionInfo.MaterialSlotName = MaterialSlotNames.IsValidIndex(MeshSection.MaterialIndex) ? MaterialSlotNames[MeshSection.MaterialIndex] : NAME_None; SectionInfo.StartIndex = MeshSection.FirstIndex / 3; SectionInfo.EndIndex = SectionInfo.StartIndex + MeshSection.NumTriangles; if (MeshSection.bEnableCollision) { SectionInfo.EnabledProperties.Add(GET_MEMBER_NAME_CHECKED(FStaticMeshSection, bEnableCollision)); } if (MeshSection.bCastShadow && Component->CastShadow) { SectionInfo.EnabledProperties.Add(GET_MEMBER_NAME_CHECKED(FStaticMeshSection, bCastShadow)); } OutSections.Add(SectionInfo); } }上面难点一的提取数据中说道,从RenderData里面提取完每个Mesh的MeshDescription之后,调用static void AppendMeshDescription(const FMeshDescription& SourceMesh, FMeshDescription& TargetMesh, FAppendSettings& AppendSettings);这个静态方法才可以将数据拼接到一起。这里注意第三个参数,FAppendSettings这个结构体参数传入的时候如果传入不慎,会导致Section就有一个,原本多个section,合并完了变成1个了,那不就出错了。主要是AppendSettings里面的Lambda需要指定,这个藏的比较深。并且逻辑要正确,因为AppendMeshDescription里面需要用到那个lambda。这是第一个会导致材质section出错的问题。 如何验证是否正确呢? 合并完之后可以看 输出参数FMeshDescription& TargetMesh的PolygonGroups是几个,如果原先数组内有多个索引比如0和1,合并完了数组内的索引都变成0了,那就是错了,正确的应该保持不变。 如果发现最终效果你发现还不对 但是PolygonGroups通过AppendMeshDescription发现数据都是正确的。 我们断点看一下UStaticMesh最终渲染数据的Section的索引是否是正确的, StaticMesh->GetRenderData()->LODResources[LODIndex].Sections)我遇到的情况是Sections虽然是数组没错,但是索引都是0,那么效果肯定就不对了 原因是因为BuildFromMeshDescription下面代码里面的MaterialIndex 指定的位置都赋值了0,那么为什么是0呢,因为MaterialIndex的赋值是通过GetStaticMaterials().IndexOfByPredicate,里面看函数体是用的材质槽的名称,由于我的材质槽名称都是一样的,所以找到的下标都是0。 到这就知道怎么做了:在build之前,将staticmesh的材质槽首先要分配好,并且名称要具有唯一性,不能重复。和NewObject传入的名称一样,必须具有唯一性。 源码下面这个方法里面 void UStaticMesh::BuildFromMeshDescription(const FMeshDescription& MeshDescription, FStaticMeshLODResources& LODResources) { //省略好多代码 Section.NumTriangles = TriangleCount; Section.MinVertexIndex = MinVertexIndex; Section.MaxVertexIndex = MaxVertexIndex; const int32 MaterialIndex = GetStaticMaterials().IndexOfByPredicate( [&MaterialSlotName = MaterialSlotNames[PolygonGroupID]](const FStaticMaterial& StaticMaterial) { return StaticMaterial.MaterialSlotName == MaterialSlotName; } ); Section.MaterialIndex = MaterialIndex; 注意这里的MaterialIndex,是通过IndexOfByPredicate这个方法来算出来的,这个是啥意思?就是在我这个TArray里面,遍历它每一个元素,找到条件第一个符合函数体的内容,返回出去。 Section.bEnableCollision = true; Section.bCastShadow = true; if (MaxVertexIndex > TNumericLimits::Max()) { IndexBufferStride = EIndexBufferStride::Force32Bit; } SectionIndex++; //省略好多代码 } 插件封装,现有功能介绍以及后续计划目前支持的功能: 1>所有相同材质的mesh合并到一起:传入一个AActor对象作为RootActor,能够将RootActor下的所有材质相同的UStaticmeshComponent合并成单个UStaticMesh; 2>材质正确 3>保证有复杂碰撞 4>坐标正确 5>待添加:合并之前的大小计算,分块:主要目的是满足序列化以及兼顾合并效率 6>待添加:减面插件,合并时候可以动态减面,我准备同样弄一个插件出来,运行时的减面算法 7>待添加:USkeletalMesh的Merge 8>:序列化 参考文章Datasmith Runtime 官方的Blog Unreal Engine 4.27 Datasmith Runtime Import UE – StaticMesh 分析 谢谢,创作不易,大侠请留步… 动起可爱的双手,来个赞再走吧! |
 并且,编辑器下对StaticMesh的构建是最终会调用Build方法,但这些都在运行时无法使用。 我们需要使用引擎中新版本中的 BuildFromStaticMeshDescriptions来生成UStaticMesh。
 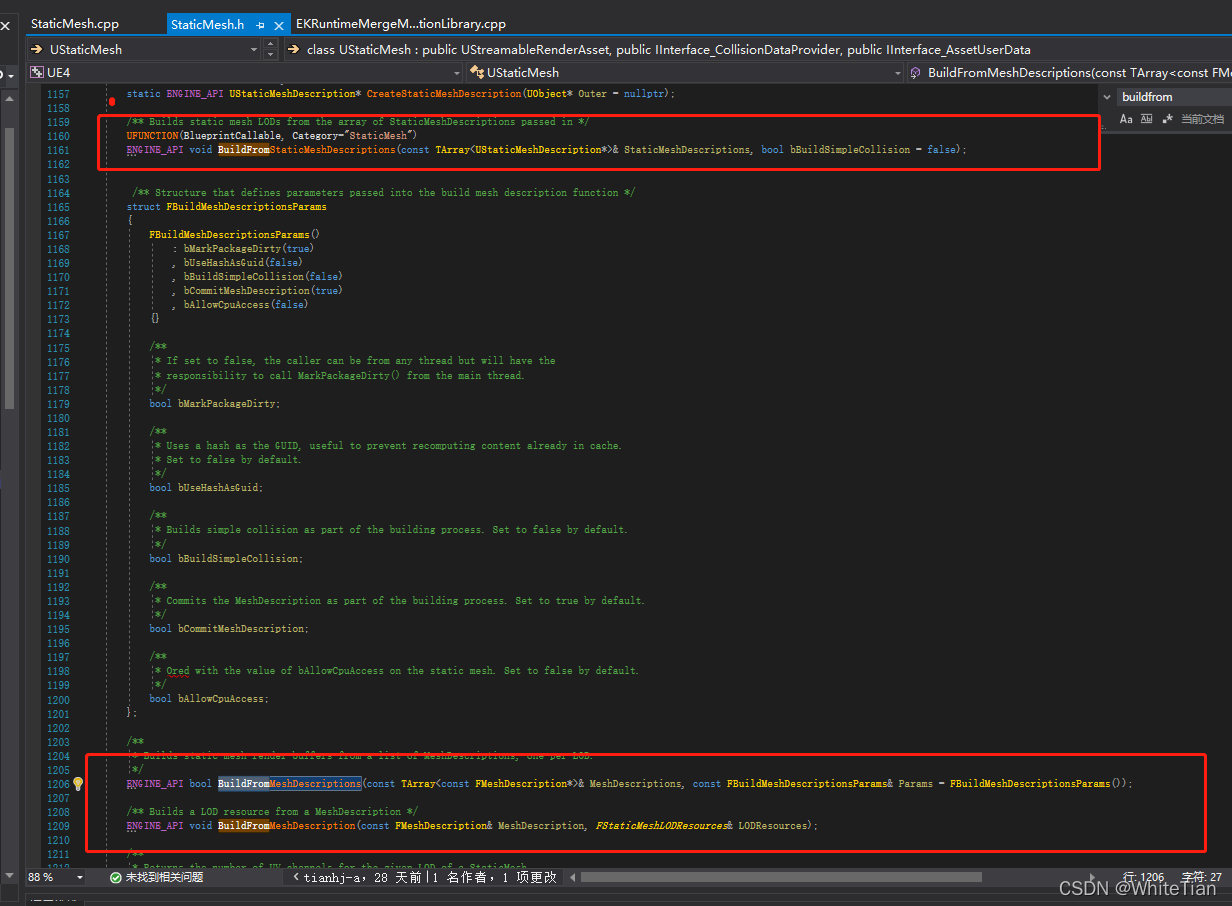 BuildFromStaticMeshDescriptions该方法需要的是FMeshDescription,FMeshDescription在编辑器下导入之后就有了,但是运行时UStaticMesh的SourceModels不存在了,怎么办? 我们需要反推,最终渲染的数据都存在UStaticMesh的RenderData中,所以我们就从RenderData里面把数据转成FMeshDescription数组就好了。
【本文地址】