|
python将excel数据提取到word
工作中可能需要将excel中的数据批量生成word,今天分享将excel数据提取,然后生成word数据的方法。 先看要求,将当前目录下(定值回执统计表.xlsx)表格中的每一行数据按照word模板生成word,并保存到当前目录,文件命名按照当天日期+定值回执单.docx。
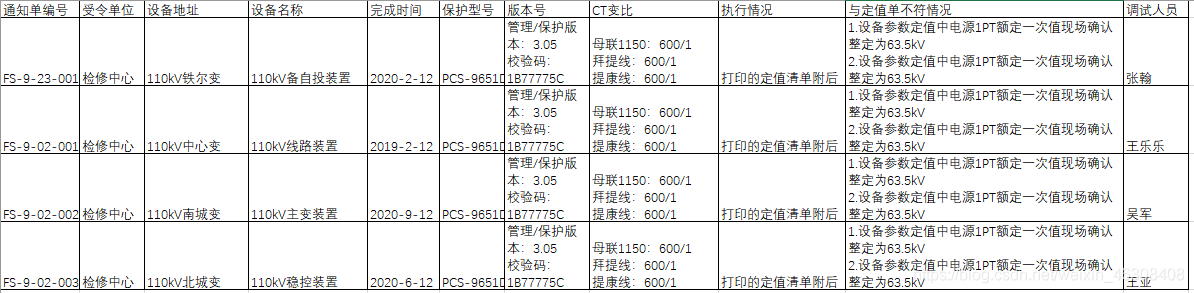 按照要求生成如下表格的word 按照要求生成如下表格的word 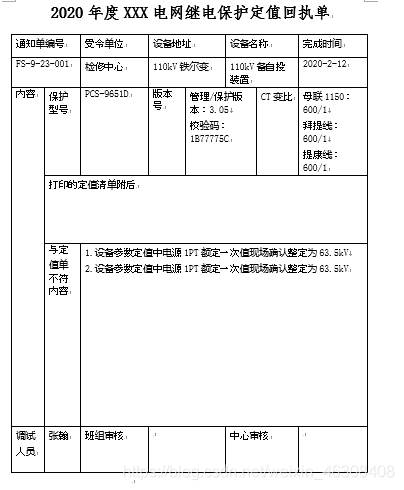 **python版本 3.8.6925.0 pycharm版本 193.6015.41 废话不多说,代码如下: **python版本 3.8.6925.0 pycharm版本 193.6015.41 废话不多说,代码如下:
from docx import Document #功能是打开文档
from docx.enum.text import WD_ALIGN_PARAGRAPH # 功能是对齐
from docx.shared import Pt #设置磅数
from docx.oxml.ns import qn #负责中文格式 以上是每次使用word要使用的库
from docx.shared import Cm #调整行高和列宽
import xlrd
#from docx.shared import Inches #设置图片格式
import time #需要导入时间
year = time.strftime("%Y")
today = time.strftime("%Y{y}%m{m}%d{d}",time.localtime()).format(y='年',m='月',d='日') #可以更具需求任意修改中间的内容,带式不能显示中文,通过formate可以实现显示中文
document = Document() #初始化文档
document.styles['Normal'].font.name = u'仿宋' #设置整个文档的字体
document.styles['Normal'].font.size = Pt(12) #设置文档磅号
document.styles['Normal'].element.rPr.rFonts.set(qn('w:esatAsia'),u'仿宋') #设置文档的基础中文字体,否则显示中文有问题
#document.add_picture('1.PNG',width=Inches(6)) #插入图片,设置图片尺寸
xlsx = xlrd.open_workbook('定值回执统计表.xlsx')
sheetname = xlsx.sheet_names()[0]
sheet_c = xlsx.sheet_by_index(0)
for i in range(1,sheet_c.nrows):
date0 = sheet_c.row_values(i)
P1 = document.add_paragraph() #增加一个自然段
P1.alignment = WD_ALIGN_PARAGRAPH.CENTER #对其方式为居中,不设置默认左对齐
run1 = P1.add_run('%s年度XXX电网继电保护定值回执单'%year) #增加自然段的内容
run1.font.name = '仿宋' #设置自然段的字体
run1.element.rPr.rFonts.set(qn('w:eastAsia'),u'仿宋') #为显示中文正确
run1.font.size =Pt(20) #设置中文字体磅数
run1.font.bold = True #设置加粗
P1.space_after = Pt(5) #段前的距离
P1.space_before = Pt(5) #段后的距离
table = document.add_table(rows=6,cols=8,style='Table Grid') #表示6行5列,style 使用word使用word自带格式
table.run1 = table.cell(0,0).paragraphs[0].add_run('定值单编号:') #对于合并后的单元格,table(0,0),使用当中的任何一个单元格都可以
table.run1.font.name = u'仿宋'
table.run1.element.rPr.rFonts.set(qn('w:eastAisa'),u'仿宋')
table.cell(0,0).paragraphs[0].aligment =WD_ALIGN_PARAGRAPH.CENTER #设置表格内容居中
table.cell(0,0).width = Cm(2) #设置单元格列宽
table.cell(0,1).width = Cm(2)
table.cell(0,2).width = Cm(4)
table.cell(0,3).width = Cm(1)
table.cell(0,4).width = Cm(3)
table.cell(0,5).width = Cm(3)
table.cell(0,6).width = Cm(1)
table.cell(0,7).width = Cm(4)
table.rows[0].height = Cm(1) #设置行高
table.rows[1].height = Cm(1)
table.rows[2].height = Cm(3)
table.rows[3].height = Cm(3)
table.rows[4].height = Cm(8)
table.rows[5].height = Cm(2)
table.cell(0,0).merge(table.cell(0,1)) #对第1行进行合并,第0行第0列合并到第0行第5列
table.cell(0,3).merge(table.cell(0,4))
table.cell(0,5).merge(table.cell(0,6))
table.cell(1,0).merge(table.cell(1,1)) #对第1行进行合并,第0行第0列合并到第0行第5列
table.cell(1,3).merge(table.cell(1,4))
table.cell(1,5).merge(table.cell(1,6))
table.cell(2,0).merge(table.cell(4,0))
table.cell(2,4).merge(table.cell(2,5))
table.cell(3,1).merge(table.cell(3,7))
table.cell(4,2).merge(table.cell(4,7))
table.cell(5,3).merge(table.cell(5,4))
table.cell(5,5).merge(table.cell(5,6))
table.cell(0,0).text = '通知单编号'
table.cell(0,2).text = '受令单位'
table.cell(0,3).text = '设备地址'
table.cell(0,5).text = '设备名称'
table.cell(0,7).text = '完成时间'
table.cell(2,0).text = '内容'
table.cell(2,1).text = '保护型号'
table.cell(2,3).text = '版本号'
table.cell(2,6).text = 'CT变比'
table.cell(4,1).text = '与定值单不符内容'
table.cell(5,0).text = '调试人员'
table.cell(5,2).text = '班组审核'
table.cell(5,5).text = '中心审核'
table.cell(1,0).text = date0[0] #开始打印cecel表格中的内容
table.cell(1,2).text = date0[1]
table.cell(1,3).text = date0[2]
table.cell(1,5).text = date0[3]
table.cell(1,7).text = date0[4]
table.cell(2,2).text = date0[5]
table.cell(2,4).text = date0[6]
table.cell(2,7).text = date0[7]
table.cell(3,1).text = date0[8]
table.cell(4,2).text = date0[9]
table.cell(5,1).text = date0[10]
document.add_page_break() #作用是插入分页符
document.save('%s定值回执单.docx'%today)
PS:刚接触python,看了几天视频,照猫画虎结果算是出来了结果,肯定还有更好的方法,后期继续研究。 存在的问题:字体设置感觉不太合适,表格的大小还需要进一步进行优化。2020年2月17日留作纪念。
|