硬盘媒体类型是硬盘驱动器 |
您所在的位置:网站首页 › c盘是驱动器吗 › 硬盘媒体类型是硬盘驱动器 |
硬盘媒体类型是硬盘驱动器
新ssd硬盘怎么安装efi 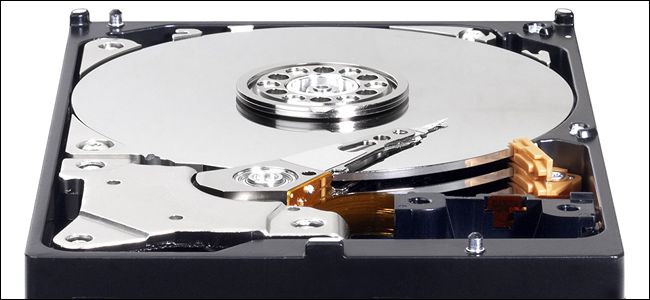
A hard drive upgrade is one of the easiest ways to improve your PC, whether you’re looking for more storage or the speed boost an SSD provides. Here’s how to choose and install your new drive. 硬盘升级是改善PC的最简单方法之一,无论您要寻找更多的存储空间还是SSD所提供的速度提升。 这是选择和安装新驱动器的方法。 第一步:选择新硬盘 (Step One: Choosing Your New Drive)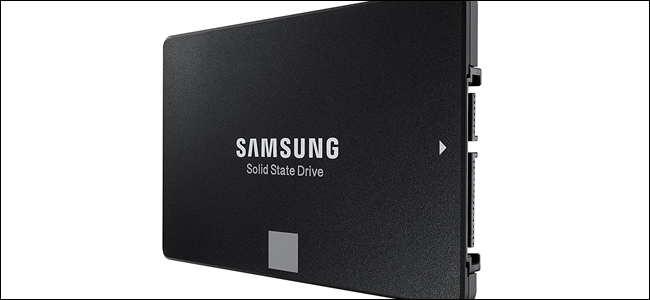
Choosing a drive that fits your budgets and does what you need is the first step. These days, your most important choice is between a traditional hard drive or a solid state drive (SSD). But there are few other things to think about, too. 第一步,选择适合您的预算并满足您需要的驱动器。 如今,您最重要的选择是在传统硬盘驱动器还是固态驱动器(SSD)之间。 但也没有其他要考虑的事情。 您应该使用常规驱动器,SSD还是同时使用两者? (Should You Get Regular Drive, an SSD, or Both?)Here’s the question to ask yourself: do you want more speed or more storage? 这是一个要问自己的问题:您想要更快的速度还是更多的存储空间? Modern SSDs are amazing, and are a worthy upgrade to just about any system. Moving from a regular drive to an SSD improves speed across your system. You PC will start faster, load apps and large files faster, and decrease load times in most games. The trouble is, once you get past a terabyte of storage space, SSDs start to get prohibitively expensive. 现代固态硬盘令人惊叹,几乎可以对任何系统进行升级。 从常规驱动器转移到SSD可以提高整个系统的速度。 您的PC可以更快地启动,更快地加载应用和大文件,并减少大多数游戏中的加载时间。 问题在于,一旦超过1 TB的存储空间,SSD的价格将变得过高。 Alternately, conventional hard drives are slower, but offer huge amounts of storage relatively cheaply. You can find desktop drives that hold four terabytes—enough to satisfy all but the most demanding of media hoarders—for under $100 USD. 或者,常规硬盘驱动器速度较慢,但相对便宜地提供大量存储。 您可以找到容量为4 TB的台式机驱动器,足以满足除最苛刻的媒体存储商之外的所有需求,价格不到100美元。 You can also combine the strengths of SSDs and hard drives. If your desktop can handle more than one drive (and most of them can), you can install your operating system on the main SSD for speedy access to programs and essential files, and use a large capacity traditional drive for storing files. This makes an SSD an especially attractive upgrade if you already have a hard drive, since you can move the operating system over and “demote” the hard drive to storage duties. 您还可以结合使用SSD和硬盘驱动器的优势。 如果您的台式机可以处理多个驱动器(大多数都可以),则可以在主SSD上安装操作系统以快速访问程序和基本文件,并使用大容量传统驱动器来存储文件。 如果您已经有硬盘驱动器,那么这将使SSD成为特别吸引人的升级,因为您可以将操作系统移至“硬盘驱动器”上并“降级”到存储状态。 
If money is no object—or if you’re limited to a single drive connection in your laptop—you can spend quite a lot to get a multi-terabyte SSD. But for most people, a smaller SSD combined with a larger hard drive is a great compromise. 如果钱不是问题,或者您的笔记本电脑仅限于单个驱动器连接,则可以花很多钱来获得数TB的SSD。 但是对于大多数人来说,较小的SSD与较大的硬盘驱动器是一个很大的折衷。 驱动器应为多少物理尺寸? (What Physical Size Should the Drive Be?)
Hard drives typically come in two sizes: 2.5″ and 3.5″. The 3.5″ drives are also known as “full size” or “desktop drives.” Pretty much every desktop PC out there has room for at least one (and sometimes many) 3.5″ drives. The possible exception to this are the super-small form factor PCs that can only handle a 2.5″ drive. 硬盘驱动器通常有两种尺寸:2.5英寸和3.5英寸。 3.5英寸驱动器也称为“全尺寸”或“台式驱动器”。 几乎每台台式电脑都可以容纳至少一个(有时很多)3.5英寸驱动器。 可能的例外是只能处理2.5英寸驱动器的超小型PC。 2.5″ drives are traditionally meant for laptops, but will also fit just fine in a desktop PC. Some desktop PCs have built in mounting points for 2.5″ drives. If yours doesn’t, you’ll need a mounting bracket like this one. Note that these are usually labelled as “SSD mounting brackets.” This is because all SSDs in the traditional hard drive form are 2.5″ drives. That’s what size you’ll use whether you’re mounting it in a desktop or laptop. 2.5英寸驱动器传统上是为笔记本电脑设计的,但也恰好适合台式机。 一些台式机内置了2.5英寸驱动器的安装点。 如果没有,则需要这样的安装支架。 请注意,这些通常被标记为“ SSD安装支架”。 这是因为所有传统硬盘形式的SSD都是2.5英寸驱动器。 无论是将其安装在台式机还是笔记本电脑上,都将使用该大小。 And speaking of SSDs, there is one more form factor to talk about: the M.2 standard. These drives actually look more like a stick of RAM than a hard drive. Instead of connecting to your motherboard via a SATA cable the way regular drives do, M.2 drives get plugged into a specialized slot. If you’re interested in the M.2 drives, you’ll have to determine whether your PC supports them. 谈到SSD,还有另外一个要讨论的形式因素: M.2标准。 这些驱动器实际上看起来更像是RAM而不是硬盘。 将M.2驱动器插入专用插槽中,而不是像常规驱动器那样通过SATA电缆连接到主板。 如果您对M.2驱动器感兴趣,则必须确定PC是否支持它们。 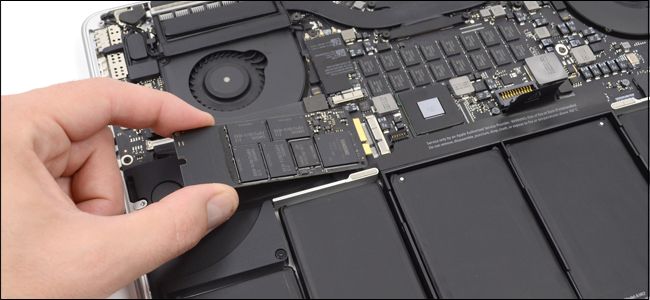 Some laptops, like Macbooks, use an M.2 storage drive that requires advanced, model-specific instructions for replacement. It often voids the warranty as well.
某些笔记本电脑,例如Macbooks,使用M.2存储驱动器,需要更换的特定于型号的高级说明。 它通常也使保修失效。
Some laptops, like Macbooks, use an M.2 storage drive that requires advanced, model-specific instructions for replacement. It often voids the warranty as well.
某些笔记本电脑,例如Macbooks,使用M.2存储驱动器,需要更换的特定于型号的高级说明。 它通常也使保修失效。
One other note about laptops. As they’ve gotten smaller and sleeker, laptops have also gotten harder to upgrade. Most laptops that aren’t super-tiny still use 2.5″ drives, but they may or may not have a user-accessible drive bay for upgrades. Cheaper, bulkier laptops, and few business-class designs like Lenovo’s ThinkPads or Dell’s Latitudes, still allow access fairly easily. Other models might need some extensive work to get to the drive bay, or may not have access at all, especially if they’ve moved to the expensive M.2 standard. Upgrading those drives will probably void your warranty, and you’ll need to look for a model-specific guide, like this one on iFixIt. 关于笔记本电脑的另一注。 随着笔记本电脑越来越小巧,时尚,笔记本电脑的升级也越来越难。 大多数不是超级微型的笔记本电脑仍然使用2.5英寸驱动器,但是它们可能具有或没有用户可访问的驱动器托架来进行升级。 更便宜,更笨重的笔记本电脑,以及联想(Lenovo)的ThinkPads或戴尔(Dell)的Latitudes等商业级设计,仍然允许访问相当容易。 其他型号可能需要大量工作才能进入驱动器托架,或者根本无法访问,特别是如果它们已转换为昂贵的M.2标准。 升级这些驱动器可能会使保修无效,并且您需要查找特定于型号的指南,例如iFixIt上的指南。 我需要什么连接? (What Connection Do I Need?)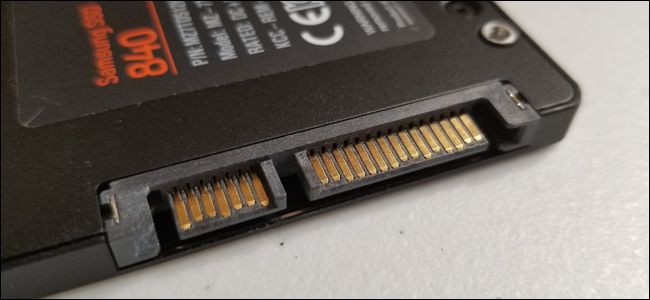
All modern 3.5″ and 2.5″ drives use a SATA connection for power and data. 所有现代的3.5英寸和2.5英寸驱动器都使用SATA连接来供电和传输数据。 If you’re installing the drive into a desktop PC, the SATA power cable is a 15-pin cable that runs from your PC’s power supply. If your PC only offers the older 4-pin Molex cables, you can buy adapters that work just fine. 如果要将驱动器安装到台式机,则SATA电源线是一根15针电缆,由PC电源供电。 如果您的PC仅提供较旧的4针Molex电缆,则可以购买工作正常的适配器。 The SATA data cable requires that your motherboard support a SATA connection (all modern PCs do). You’ll find them in slightly different configurations. Some (like the one pictured below) have a straight plug on one end and an L-shaped plug on the other end. The L-shaped plug makes it easier to fit into jacks that are closer to other components. Some SATA cables have straight plugs or L-shaped plugs on both ends. You should get SATA cables with your hard drive, but if you’re working in a particularly tight space, be aware that these other options exist. SATA数据电缆要求您的主板支持SATA连接(所有现代PC都支持)。 您会发现它们的配置略有不同。 有些(如下图所示)一端有一个笔直的插头,另一端有一个L形的插头。 L形插头使它更容易安装到更靠近其他组件的插Kong中。 某些SATA电缆的两端都有直插头或L形插头。 您应该在硬盘驱动器上使用SATA电缆,但是如果您在特别狭窄的空间中工作,请注意还有其他选择。 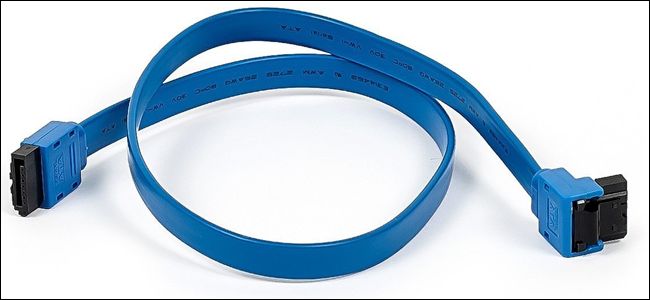
If you’re installing into a laptop that allows user access, things are easier. You’ll usually be able to plug the drive right into a slot that already has the power and data connections ready—no cables to connect. 如果要安装到允许用户访问的笔记本电脑中,则事情会更容易。 通常,您可以将驱动器直接插入已经准备好电源和数据连接的插槽中,而无需连接电缆。 One other word on SATA drives. The latest revision to the SATA standard is SATA 3.3, and drives and cables are backwards compatible with older versions. On desktops, you’ll want to make sure that the drive you’re buying is as fast or faster than the connection that your motherboard accepts—most motherboard SATA connections from the last five years have at least 3.0 support. The same goes for the SATA cable you buy. Laptops don’t use SATA cables, so just make sure that the drive you’re upgrading to uses the same SATA revision or newer than the drive it’s replacing. SATA驱动器上的另一个词。 SATA标准的最新版本是SATA 3.3,驱动器和电缆向后兼容较旧的版本。 在台式机上,您需要确保所购买的驱动器的速度与主板可接受的连接速度相同或更快-最近五年来的大多数主板SATA连接至少支持3.0 。 您购买的SATA电缆也是如此。 笔记本电脑不使用SATA电缆,因此只需确保要升级到的驱动器使用相同的SATA版本或比要更换的驱动器新的驱动器即可。 我需要多少存储空间? (How Much Storage Do I Need?)This one’s easy: whatever fits your budget. More storage costs more money, no matter what type of drive you’re looking at. 这很容易:只要适合您的预算。 无论您要使用哪种类型的驱动器,更多的存储空间都会花费更多的钱。 我的驱动器需要多快? (How Fast Does My Drive Need To Be?)The default answer here is “as fast as you can afford.” That said, if you’re upgrading from a hard drive to an SSD, you’re going to be blown away by the speed increase no matter what. So you might not want to splurge on the fastest SSD you can get. Getting more storage on an SSD will be more important to most people than getting more speed. 此处的默认答案是“尽快支付”。 就是说,如果您要从硬盘驱动器升级到SSD,那么无论如何,您都会对速度的提高感到震惊。 因此,您可能不想挥霍购买最快的SSD。 对于大多数人来说,在SSD上获得更多存储比提高速度更为重要。 If you’re buying a regular drive, speed is generally expressed in RPM—the revolutions per minute of the spinning data platters. 5400 RPM is a typical speed for inexpensive drives (especially in 2.5″ form factors), with 7200 RPM drives also being quite common. Some high-performance hard drives are offered at 10,000 RPM, but these have been mostly superseded by faster SSDs. 如果您要购买常规驱动器,则速度通常以RPM(旋转数据盘每分钟的转数)表示。 5400 RPM是廉价驱动器(尤其是2.5英寸外形尺寸)的典型速度,而7200 RPM驱动器也很常见。 某些高性能硬盘驱动器的转速为10,000 RPM,但大多数已被更快的SSD所取代。 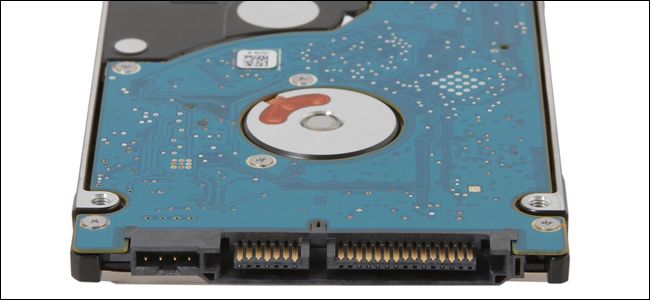 Hybrid hard drives combine standard hard drive storage with a small amount of speedy flash storage for caching files.
混合硬盘驱动器将标准硬盘驱动器存储与少量快速闪存存储结合在一起,用于缓存文件。
Hybrid hard drives combine standard hard drive storage with a small amount of speedy flash storage for caching files.
混合硬盘驱动器将标准硬盘驱动器存储与少量快速闪存存储结合在一起,用于缓存文件。
There’s another option here, if your choice is limited to a conventional hard drive. “Hybrid” drives combine a large, standard hard drive with a small cache of flash storage. This won’t magically make your hard drive as fast as an SSD, but the file caching can make a considerable improvement if you’re constantly accessing mostly the same programs and files. It might be worth the small price premium versus a standard hard drive. 如果您的选择仅限于常规硬盘驱动器,则这里还有另一种选择。 “混合”驱动器将大型标准硬盘驱动器与少量闪存存储结合在一起。 这不会神奇地使您的硬盘驱动器像SSD一样快,但是如果您经常访问大多数相同的程序和文件,则文件缓存可以显着改善。 与标准硬盘相比,这可能是值得的。 第二步:确定是转移操作系统还是执行全新安装 (Step Two: Decide Whether to Transfer Your Operating System or Perform a Clean Installation)You’ve purchased your new drive, and you’re ready to install it. Your next step is to decide whether you want to transfer your operating system to the new drive or just do a clean installation and start fresh. There are pros and cons for each. 您已经购买了新驱动器,并准备安装它。 下一步是确定是要将操作系统转移到新驱动器,还是只是进行全新安装并重新开始。 每个都有优点和缺点。 传输操作系统 (Transferring Your Operating System)
Transferring your operating system (and all your data and installed apps) means not having to worry about reinstalling Windows, setting it up the way you like it again, and then reinstalling each of your apps. The downside is that it’s a pretty slow and tedious process. 传输操作系统(以及所有数据和已安装的应用程序)意味着不必担心重新安装Windows,以您喜欢的方式设置Windows,然后重新安装每个应用程序。 缺点是,这是一个非常缓慢而乏味的过程。 If you’re upgrading from only one drive to another (as opposed to simply installing an additional drive in a desktop), you’ll probably want to transfer your operating system to the new drive instead of installing fresh. The bad news is that this is a slow and tedious process. The good news is that it isn’t too hard to do. Most new drives come with tools to make it happen. And if you didn’t get a free tool, there are other ways to upgrade to a larger hard drive without reinstalling Windows. 如果要从一个驱动器升级到另一个驱动器(而不是在桌面上简单地安装其他驱动器),则可能需要将操作系统转移到新驱动器上,而不是全新安装。 坏消息是,这是一个缓慢而乏味的过程。 好消息是,这并非难事。 大多数新驱动器都带有实现它的工具。 如果您没有免费的工具,还有其他方法可以升级到更大的硬盘,而无需重新安装Windows 。 If you use a laptop, you’ll need to use a USB-based SATA adapter or enclosure so that you can have both drives hooked up at once. You can go that way with a desktop, too, but it may be easier just to install the new drive, do the transfer, and then decide whether to leave the old drive in place for extra storage or uninstall it. 如果您使用笔记本电脑,则需要使用基于USB的SATA适配器或机箱,以便可以同时挂接两个驱动器。 您也可以在台式机上使用这种方式,但是仅安装新驱动器,进行传输,然后决定是保留旧驱动器以用于额外的存储还是卸载它可能会更容易。 执行全新安装 (Performing a Clean Installation)There are also advantages to just performing a clean installation of your operating system on your new drive. The big one is that you get to start fresh. No old program installations hanging around; it’s a fresh copy of your OS without the clutter. You get to set it the way you want, and only install what you want. 仅在新驱动器上执行操作系统的全新安装还有其他好处。 最重要的是您可以重新开始。 没有旧的程序安装挂了; 它是操作系统的全新副本,没有任何混乱。 您可以按照自己的方式进行设置,仅安装所需的内容。 The downside, of course, is that you have to do all that. While it typically goes faster than transferring your OS to the new drive, doing a clean installation does mean that you’ll have reinstall the apps and games you want, and restore your personal files from backup (or copy them from the new drive). You’ll also need make sure you have access to your applications for reinstallation. If you installed them from DVD or downloaded the installation files, you’ll need to find those—along with any necessary activation keys. 缺点当然是您必须做所有这些事情。 尽管通常比将操作系统转移到新驱动器要快,但执行全新安装确实意味着您将重新安装所需的应用和游戏,并从备份中还原个人文件(或从新驱动器复制它们)。 您还需要确保可以访问应用程序以进行重新安装。 如果从DVD安装它们或下载了安装文件,则需要找到这些文件以及所有必要的激活密钥。 第三步:安装新驱动器 (Step Three: Install Your New Drive)The steps for installing (or replacing) a drive differ a bit, depending on whether you’re installing the drive in a laptop or desktop PC. 安装(或更换)驱动器的步骤略有不同,具体取决于您是将驱动器安装在笔记本电脑还是台式机上。 在笔记本电脑中安装新驱动器 (Installing Your New Drive In a Laptop)Different laptops have different methods for accessing the storage drive compartment, if they allow easy access at all. Some business-class designs let you swap out a drive by removing a single screw, others might need you to completely remove the bottom of the machine or even take out the keyboard. You can usually find specific instructions by searching the web for your laptop manufacturer and model. 如果不同的笔记本电脑可以轻松访问,则使用不同的方法来访问存储驱动器仓。 一些企业级设计允许您通过卸下一个螺钉来换出驱动器,而其他一些则可能需要您完全卸下机器底部甚至取出键盘。 通常,您可以通过在网上搜索笔记本电脑制造商和型号来找到特定的说明。 For this example, we’re swapping the drive in a ThinkPad T450s. The design is a few years old now, but it’s small enough that it requires the entire bottom to be removed, which is fairly typical among designs that allow a hard drive upgrade. 对于此示例,我们要在ThinkPad T450中交换驱动器。 该设计已有数年的历史,但是它很小,需要移除整个底部,这在允许硬盘驱动器升级的设计中非常常见。 To access the drive, I have to remove the battery, and then take out eight different screws. 要访问驱动器,我必须卸下电池,然后取出八个不同的螺钉。 
That loosens the metal body plate enough to let me pull it off the computer. You can see the hard drive in the lower-left corner. 那使金属机身板松开到足以让我将其从计算机上拉下。 您可以在左下角看到硬盘驱动器。 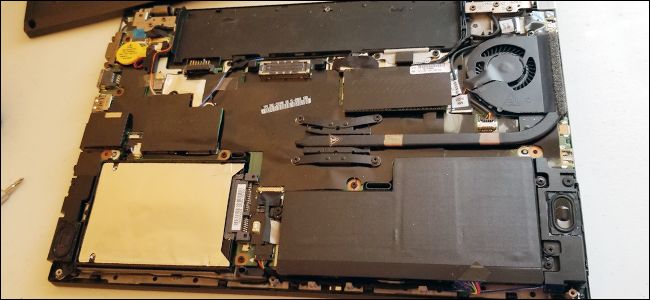
To pull the drive itself out, I need to remove another screw, pull the drive up a bit, and then slide it off of the integrated SATA connection. 要拉出驱动器本身,我需要卸下另一颗螺钉,将驱动器向上拉一点,然后将其滑出集成的SATA连接。 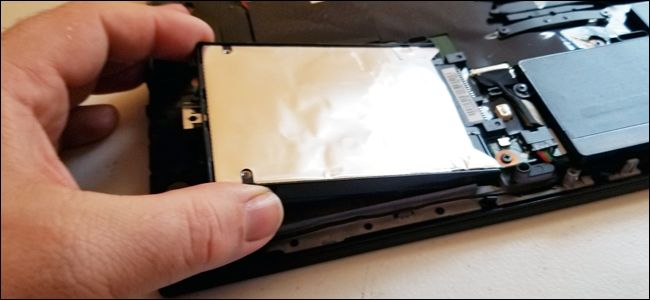
For this model, the drive caddy is just a thin piece of aluminum with a rubber bumper. I pulled it off, and then placed it on the new drive. 对于此型号,驱动器盒只是带有橡胶保险杠的薄铝片。 我将其拔出,然后将其放在新驱动器上。 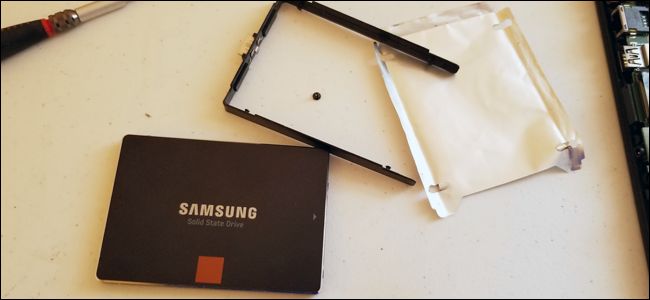
Then, I reverse the process, slipping the new drive onto the SATA connection in the laptop, screwing the caddy back down to the frame, and replacing the body panel. 然后,我反向进行此过程,将新驱动器滑入笔记本电脑的SATA连接中,将球童拧回框架,并装回车身面板。 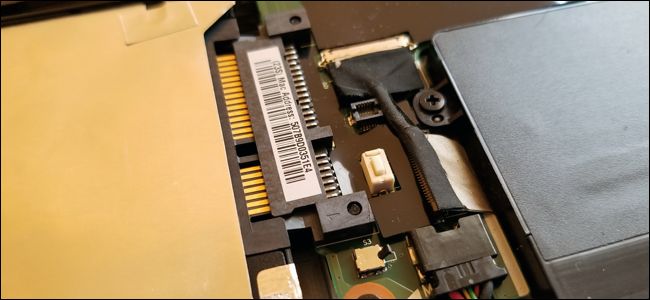

Again, this process is going to vary quite a lot depending upon which laptop you have. If you need a step-by-step breakdown for your model, Google is your friend—you’ll generally find at least a few users who want to do the same thing, and maybe an article or video if you’re lucky. 同样,此过程将根据您拥有的笔记本电脑而有很大不同。 如果您需要模型的分步细分,则Google是您的朋友-通常,您会发现至少有几个用户想要做同样的事情,如果幸运的话,还可以找到文章或视频。 在台式机上安装新驱动器 (Installing Your New Drive in a Desktop PC)This process is a bit more involved than on a laptop, but the good news is that getting the case off and accessing the drive is typically a lot easier than on most laptops. 与笔记本电脑相比,此过程要复杂得多,但好消息是,卸下机箱并访问驱动器通常比大多数笔记本电脑容易得多。 You’ll need a standard Philips-head screwdriver and a SATA cable. If you’re completely replacing a single drive, you can use the SATA cable that’s already in place. Your power supply probably has a free SATA power connection—multiple plugs are often available—but if not, you’ll need an adapter cable. If you’re working in an area that’s particularly prone to static electricity, you’ll want to use an anti-static bracelet as well. If you built your own PC, the screws needed to install your new drive should have come with the case—I hope you kept the box of accessories. If not, you’ll need to get some replacement screws. Finally, you’ll want a bowl or a cup to hold screws. 您需要标准的飞利浦螺丝起子和SATA电缆。 如果要完全更换单个驱动器,则可以使用已经安装的SATA电缆。 您的电源可能具有免费的SATA电源连接-通常可以使用多个插头-但是,如果没有,则需要适配器电缆。 如果您在特别容易产生静电的区域工作,则也要使用防静电手镯。 如果您构建了自己的PC,则机箱随附了安装新驱动器所需的螺钉-我希望您保留附件盒。 如果没有,您将需要一些替换螺钉。 最后,您需要一个碗或杯子来固定螺丝。 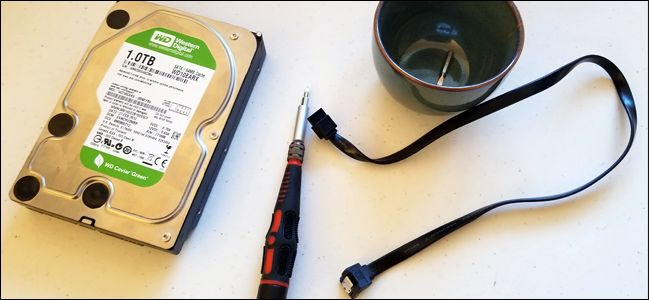
Power down your machine and remove all cables, then move it to your work area. This should be a cool, dry spot that’s easy to access, preferably without carpet below you. If you know the configuration of your computer’s internal parts, feel free to place it at the most accessible angle. If you don’t, just leave it upright—you may have to take multiple panels off for a full installation. 关闭机器电源并拔下所有电缆,然后将其移至工作区。 这应该是一个凉爽,干燥的地方,易于取用,最好不要在您下面放地毯。 如果您知道计算机内部部件的配置,请随时将其放在最容易接近的角度。 如果您不这样做,则将其直立放置-您可能需要卸下多个面板才能进行完整安装。 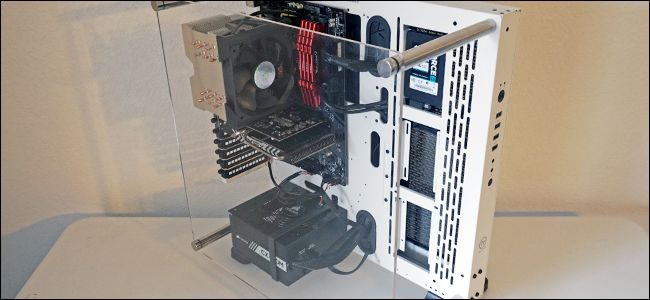
Remove the access panel from the primary side of the case—that’s the one on your left if you’re looking at your computer from the front. Most designs require you to remove two to three screws from the back side before it will slide or swing out. Set the access panel aside. Some desktops require that you take the whole case cover off rather than just an access panel. If you’re unsure, look up your desktop model or case on the web. Instructions should be easy to find. 从机箱的第一侧卸下检修面板-如果从正面看电脑,这就是左侧的检修面板。 大多数设计要求您从背面卸下两到三颗螺钉,以使其滑出或摆动出去。 将检修面板放在一旁。 某些台式机要求您将整个机箱盖取下,而不仅仅是检修面板。 如果不确定,请在网络上查找台式机型号或保护套。 说明应该很容易找到。 Take a moment to orient yourself. If you’re working on a conventional desktop you’re probably looking at the motherboard, with the boxy power supply either at the top or the bottom of the case. You should be able to see your computer’s storage drive or drives mounted towards the front of the case. A SATA data cable should be running from the motherboard to the drive. A SATA power cable should be running from the power supply to the drive. 花一点时间调整自己的方向。 如果您是在传统台式机上工作,则可能是在看主板,机箱顶部或底部的电源都在盒子里。 您应该能够看到计算机的存储驱动器或安装在机箱正面的驱动器。 SATA数据电缆应从主板连接到驱动器。 SATA电源线应从电源连接到驱动器。 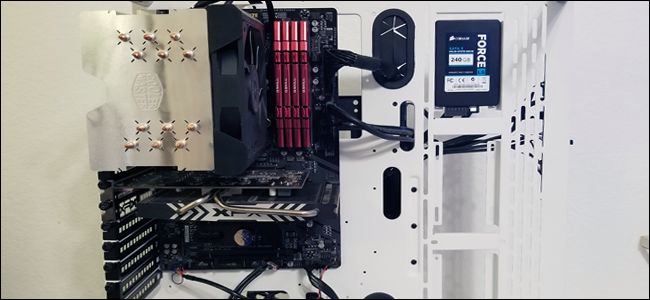
Note: If you can’t see either a larger 3.5-inch drive or a smaller 2.5-inch drive, it might be mounted in an alternate spot. In newer designs this is often behind the motherboard itself—remove the opposite access panel to check. 注意:如果看不到较大的3.5英寸驱动器或较小的2.5英寸驱动器,则可以将其安装在备用位置。 在较新的设计中,这通常位于主板本身的后面-卸下相对的检修面板进行检查。 If you’re not keeping your old drive in your system for extra storage, now’s the time to take it out. You can also leave the cables attached to the motherboard and power supply and then just connect them to the new drive after installing it. 如果您不打算将旧驱动器保留在系统中以用于额外的存储,那么现在就该将其取出。 您也可以将电缆留在主板和电源上,然后在安装新驱动器后将其连接到新驱动器。 First, unplug the data and power cables from the back of the old drive. There’s nothing too complex about this: just pull it out. Some cables have a little tab locking mechanism you’ll have to squeeze first. 首先,从旧驱动器的背面拔下数据电缆和电源线。 这没有什么太复杂的:只需将其拔出即可。 有些电缆带有一个小凸舌锁定机制,您必须首先挤压一下。 
If the drive is on a sliding caddy, remove it (and note that some sliding caddies are screwed into place). Now, just use your screwdriver to remove the screws from the drive, whether it’s in a caddy or affixed directly to the case. The screws come in many sizes and lengths—some including silicone spacers for sound damping—and might be mounted to the bottom of the drive or the side, depending on your case’s design. It doesn’t really matter: just remove them, set them aside in a spot where you won’t lose them. 如果驱动器位于滑轨上,请将其卸下(请注意,一些滑轨已拧紧到位)。 现在,只需使用螺丝刀从驱动器上卸下螺丝,无论是在盒中还是直接固定在外壳上。 这些螺钉有多种尺寸和长度(有些包括用于隔音的硅树脂垫片),并且可能根据机箱的设计安装在驱动器的底部或侧面。 其实并不重要:只需将它们删除,将它们放在不会丢失它们的位置即可。 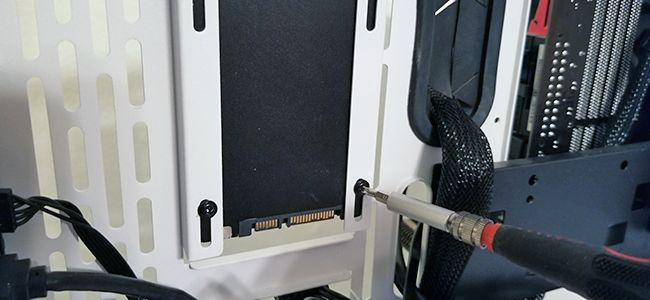
Your old drive is now free! Set it aside. Be careful with it, but don’t worry too much—they’re pretty sturdy. 您的旧驱动器现在免费! 放在一边。 请小心,但不要太担心-它们非常坚固。 To install the new drive in place of the old one, you’ll just reverse the process. Put the new drive into the caddie, and then slide it into place on the case (and secure it if necessary). 要安装新驱动器以代替旧驱动器,只需逆转该过程即可。 将新驱动器放入球童,然后将其滑入机箱上的位置(并在必要时将其固定)。 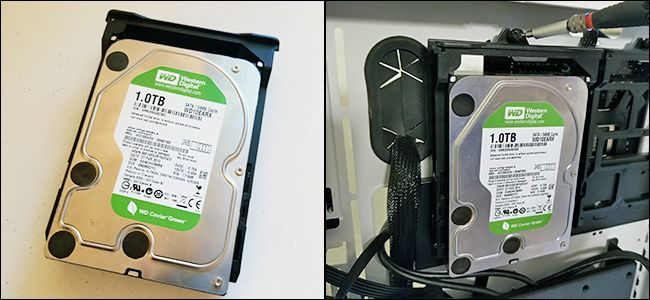
Now, plug the cables into the new drive. It’s easy to figure out—they only fit one way. 现在,将电缆插入新驱动器。 很容易弄清楚-它们只适合一种方式。 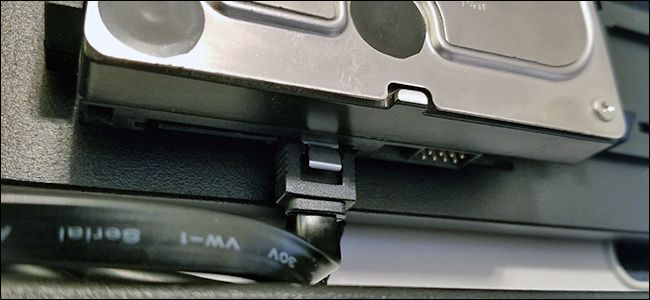
If you’re adding a new hard drive and leaving the old one in place, it’s a bit more complicated. You’ll need to mount the new drive to the case (sliding it into an extra caddy that should have come with your case, if necessary). And, you’ll need to plug in additional cables. 如果要添加新硬盘并将旧硬盘保留在原位,则要复杂一些。 您需要将新驱动器安装到机箱上(如有必要,将其滑入机箱随附的一个额外的小盒中)。 并且,您需要插入其他电缆。 Plug one end of the SATA data cable into the back of the new hard drive and the other end into your motherboard. The motherboard slots are generally on the side closest to the front of the PC, usually in a cluster of two to six. It doesn’t particularly matter which plug you use, though you might want to plug it into the top-left one (which is the “0” drive) or the closest one in sequence, just for the sake of organization. 将SATA数据电缆的一端插入新硬盘驱动器的背面,另一端插入主板。 主板插槽通常位于最靠近PC正面的一侧,通常为2至6个集群。 使用哪种插头并不重要,尽管出于组织上的考虑,您可能希望将其插入左上角的一个(即“ 0”驱动器)或最接近的一个。 
Now plug the SATA power connection from the power supply into the new drive. If you already had a drive installed, check the power cablecoming out of it, because they generally have more than one plug and can be used for multiple drives. If your power supply doesn’t have any free SATA power connections, you’ll need to use an adapter or a splitter. 现在,将SATA电源连接从电源插入新驱动器。 如果您已经安装了驱动器,请检查电源线是否从其中拔出,因为它们通常具有多个插头,并且可以用于多个驱动器。 如果您的电源没有免费的SATA电源连接,则需要使用适配器或分离器。 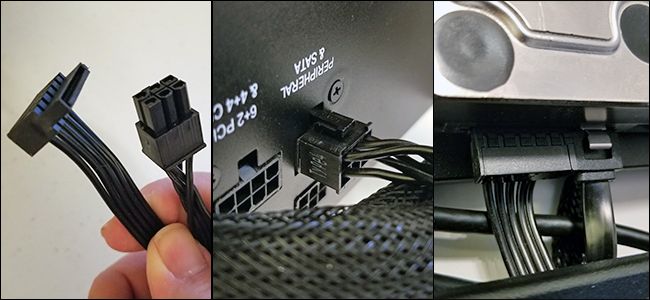
After that, your drive should be ready to go! Double check your connections, make sure the cables aren’t touching any heatsinks or bumping up against cooling fan blades, and then replace the access panel on the case. Move your PC back to its original position, reconnect all your accessories and power cables, and fire it up! 之后,您的驱动器应该可以使用了! 仔细检查您的连接,确保电缆没有碰到任何散热器或撞击冷却风扇叶片,然后装回机箱上的检修面板。 将PC移回其原始位置,重新连接所有附件和电源线,然后启动它! Image source: Amazon, Amazon, Amazon, Amazon, Newegg, iFixIt, Lenovo 图片来源:亚马逊,亚马逊,亚马逊,亚马逊, Newegg , iFixIt ,联想 翻译自: https://www.howtogeek.com/345988/how-to-upgrade-and-install-a-new-hard-drive-or-ssd-in-your-pc/ 新ssd硬盘怎么安装efi |
【本文地址】
今日新闻 |
推荐新闻 |