使用SecureCRT实现批量创建及导入session和批量SSH2登录 |
您所在的位置:网站首页 › crt软件怎么打开 › 使用SecureCRT实现批量创建及导入session和批量SSH2登录 |
使用SecureCRT实现批量创建及导入session和批量SSH2登录
|
好久没有写文章,最近在干一个新项目,大约有100台左右的设备需要SSH登录,习惯了SecureCRT,之前一直也没有搞过脚本快速添加session之类的,这么多设备一台一台的去添加,真的是给自己的运维增加了无趣又重复的工作。 前期准备:A.SecureCRT8.0+ 下载链接:https://www.vandyke.com/cgi-bin/releases.php?product=securecrt B.批量创建session脚本(机器需要具备VBS或Python环境) VBS脚本及Python脚本下载连接:https://forums.vandyke.com/showpost.php?p=37089&postcount=1 C.需要添加的主机列表;统一账号密码; D.在SecureCRT中填写自动登录账号密码。 实践过程:说明:SecureCRT下文简称为CRT 1.将CRT下一步下一步安装完毕,自行激活。
可添加的各个字符串含义: # ----------------------------------------------------------------------------- # session_name: The name that should be used for the session. If this field # does not exist, the hostname field is used as the session_name. # folder: Relative path for session as displayed in the Connect dialog. # hostname: The hostname or IP for the remote server. # protocol: The protocol (SSH2, SSH1, telnet, rlogin) # port: The port on which remote server is listening # username: The username for the account on the remote server # emulation: The emulation (vt100, xterm, etc.) # description: The comment/description. Multiple lines are separated with '\r' # logon_script: The full path to the Logon Script filename for the session. 4.打开CRT,“Script”->“Run”,选择VBS脚本。选择含有所添加主机信息的文件。
CRT提示:新添加的session是否选用default模板。接下来CRT就批量添加session。
添加完毕后生成的报告,假如添加未成功,根据报告仔细检查主机信息文件是否按照格式填写。
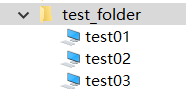
在我的连接里面可看到已创建test_folder文件夹,并创建了三个session。
Logon Actions中勾选Automate logon,并输入密码,密码可选*代替显示。 这里没有输入用户名的原因是在主机信息文件中已配置用户名。
以上步骤就是使用SecureCRT实现批量创建及导入session和批量SSH2登录方法。希望可以帮助到你。 可选配置,详情参考我的其他文章: SecureCRT常用快捷键 配置记录日志。SecureCRT配置操作日志及自动输出。 配置连接后session代码高亮显示。SecureCRT配色方案设置。 SecureCRT SSH Linux中不显示彩色 字体颜色、文件夹和文件显示的颜色区别开解决办法。 配置长连接
|


【本文地址】
今日新闻 |
推荐新闻 |