PRESENT: 密码学 Block Cipher |
您所在的位置:网站首页 › cipher和irreversible-cipher › PRESENT: 密码学 Block Cipher |
PRESENT: 密码学 Block Cipher
|
Present 硬件实现远比软件实现简单、高效.Introduction 之前介绍了最近 50 年的 现代密码学:对称加密,非对称加密,和加密协议。 对于嵌入式设备而言,例如 RFID 卡的芯片,并没有足够的资源运行 非对称加密 来生成密钥对,所以都是在出厂的时候将密钥固化到芯片里,接下来使用更加轻量级、高效的 对称加密 来进行数据加密、解密。 对称加密又分为 流加密 (Stream Cipher) 和 块加密 (Block Cipher)。前者一个 bit 一个 bit 地加密数据的,后者则把数据分块,一块一块地加密的。之后打算分别以轻量级的 Trivium (流加密) 和 Present (块加密) 为例,分别介绍 Stream Cipher 和 Block Cipher。 这篇文章以 PRESENT 为例介绍 Block Cipher。后面介绍的 Present 软硬件实现 (Verilog / C / Python) 都放在了这个 GitHub 仓库里: Block Cipher这里先介绍一下什么是 Block Cipher,其实它非常简单,不是那么严格地来说,就是想办法调换文本 (数据) 的位置 (permutation p-layer),或者按一张表改变文本 (数据) 的值 (S-Box),加密之后让你无法猜出来原文本是什么。 另一方面,前面提到 Block Cipher 是一块一块加密数据的,例如你要加密字符串 "hello-world" 一共有 11 个字节 (byte),或者加密字符串 "hi" 一共就 2 个字节 (byte),不论要加密的字符串有多长,Block Cipher 始终是按照固定长度一个个块加密的,例如这篇文章主要介绍的 Present 算法一个块是 8 个字节 (64 bit)。 比如前面两个例子 "hello-world" 那么就是先加密前 8 个字节 "hello-wo",再加密后 8 个字节,然而剩下的 "rld" 只有 3 个字节,那就给它补 5 个字节,凑满 8 个再一起加密。 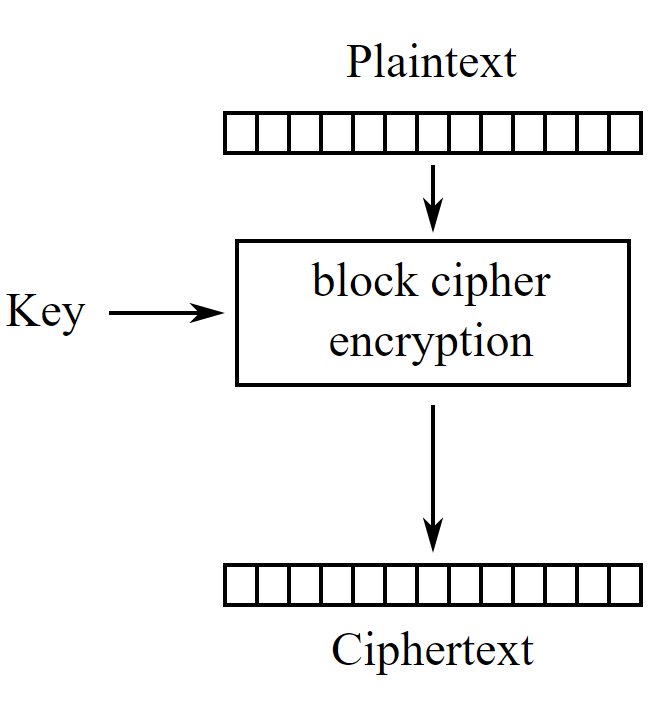 Single Block Encryption Single Block Encryption上面就是加密一个 Block 的示意图,每次加密 8 个字节,再加密后面 8 个字节,不足 8 个字节 0 或 1 补足 8 个字节。 这样如果我们有很长一串文本,最自然想到的就是,老老实实地加密 8 个字节、输出 8 个字节,再加密后面 8 个字节、输出 8 个字节。 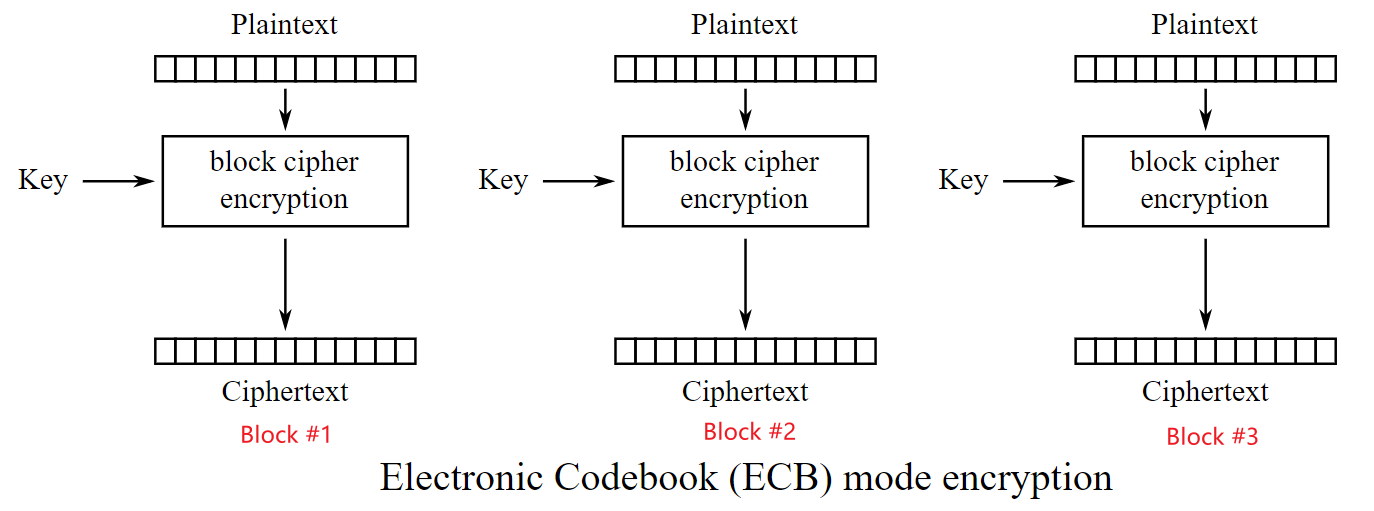 这种老实耿直的按顺序加密一块、输出一块的方式 (ECB 模式),在加密图片的时候就会发现问题了。下面这张图,左边是原来的图片,右边是加密后的图片。虽然加密之后图片面目全非,但是因为数据块的顺序没有改变,所以我们仍能猜出来右边加密后的图片是个 Linux 企鹅 Logo。  于是我们要想办法让前后的数据块产生关联,一个很直白的想法就是把前一个块加密后的输出,再作为后一个块的输入,把数据流像锁链一样串联在一起,又称之为 Blockchain,这样子加密后改变第一个数据块的内容,会导致后面数据块加密后的数据全部改变了,这也称之为 CBC 模式。 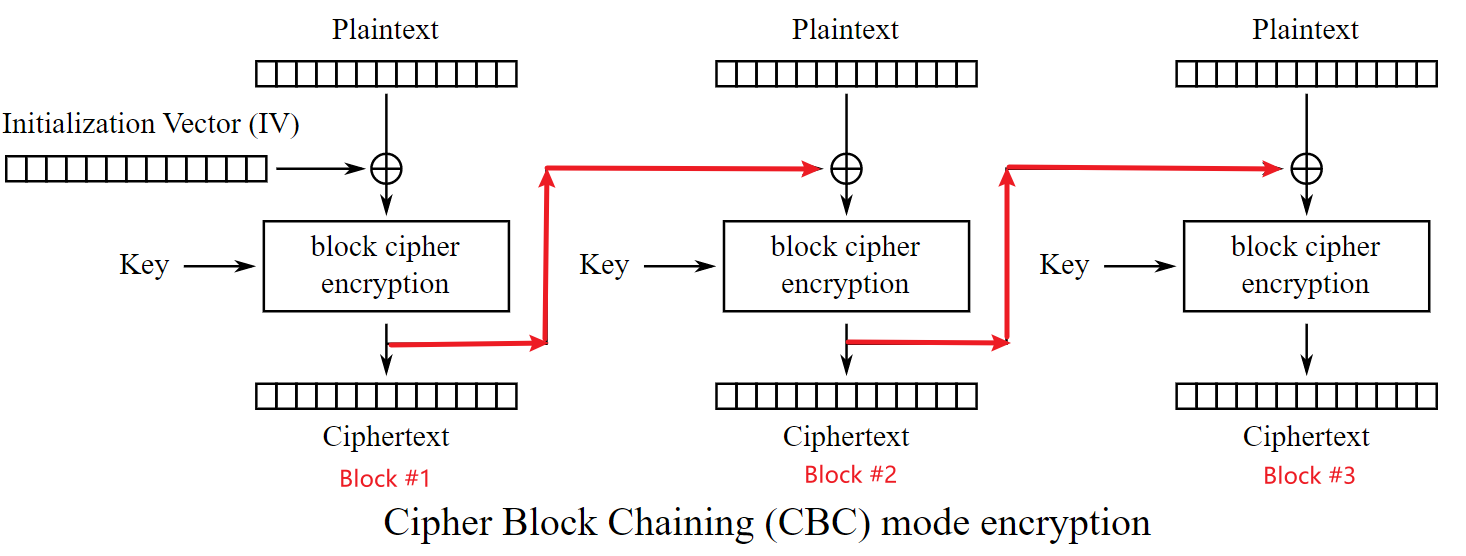 当然,还有很多其他模式,ECB,CBC,CFB,OFB 等等。不过这些都是如何连接不同 Block,这篇文章介绍的 Present 加密算法,先要解决一个单独的 Block 如何加密:给 8 个字节的输入,和 10 个字节的 Key,如何生成 8 个字节的密文。 Present Block Cipher于是我们专注于一个单独的 Block 是怎么加密的,其实 Present 的设计非常简单,下面这张图非常清晰地展示了 Present 加密流程,红色方框圈出来的部分就是 Present 的核心 3 个步骤 (addRoundKey,S-Box,p-Layer)。给一个输入数据,我们先生成 RoundKey,把这 3 个步骤重复 31 次,再来一步 addRoundKey,就完成了加密。 所以只要理解 addRoundKey,S-Box,p-Layer 这 3 步,就理解了 Present 加密流程。  Present 加密流程 Present 加密流程这里你可能会问,同样的操作为什么要来 31 次 (Round) 呢?一两次不行吗?如果看下面这张图,例如我们要加密 16 个字节 (64 bit) 的字符串 "0000 0000 0000 0000" (空格只是为了方便阅读),密钥长度是 20 字节 (80 bit) 的字符串 "0000 0000 0000 0000 0000",我们每增加一个回合,数据就会越混乱。这也就提高了加密的安全性。 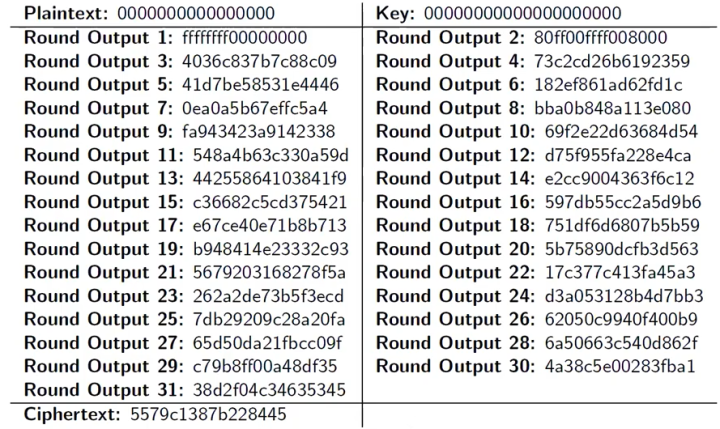 下面我们依次解释 Present 最核心的 3 个步骤,每一步都意外地简单。 Step 1: AddRoundKey第一步就是做加法,毕竟是 Add Round Key 嘛,就是把 Present 模块内部的 64 个状态 (最初是输入) 和当前的 Round Key 做加法,更新后的状态 (64-bit state) 传给后一步就结束了,仅此而已。  AddRoundKey 按位加法 (异或运算) AddRoundKey 按位加法 (异或运算)当然,二进制的按位加法运算,也就是异或电路 \oplus ,0+0=0,0+1=1,1+0=1,1+1=0。 那么问题来了,Round Key 是怎么生成的呢?其实很简单,Present 的密钥长度是 80 bit,而 Round Key 的长度是 64 bit,第一轮的 Round Key 就是取 80 位的前 64 位就可以了。后面每一轮的 RoundKey 就是:1. 循环右移 20 位;2. 高四位输入 S-Box;3. 第 19... 15 位和当前 Round 做加法。所以其实我们在一开始就可以一次性生成 31 个 RoundKey。  你会注意到,这些操作都是对硬件非常友好的,都是非常简单的硬件电路。另一方面,生成 RoundKey 的时候需要用到 S-Box,下面我们就介绍 S-Box。 Step 2: S-BoxS-Box 也很简单,其实就是每 4 bit 的数据进行一次替换,比如我们这一轮有 64 bit 的数据 (8个字节),01 23 45 67 89 AB CD EF (空格只是为了方便阅读),我们每 4 个 bit 按照下面的表替换一次。 比如下面这张表 0 替换为 C,1 替换为 5,2 替换为 6,就这么简单。 例如我们输入数据是 BAD0,那么替换后输出就是 B --> 8,A --> F,D --> 7,0 --> C,最后输出 8F7C。 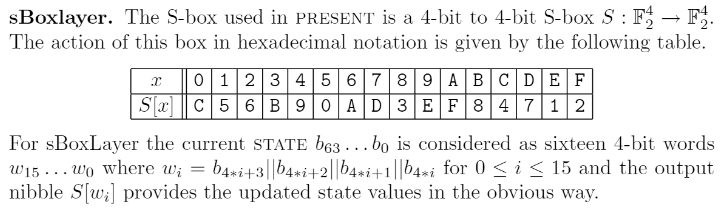 Step 3: p-Layer Step 3: p-Layer最后的一步 p-Layer 也相当简单,p 代表 permutation 就是换个顺序,像洗牌一样。比如我们有 64 bit 的输入数据,下面这张表把 第0位 移动到 第0位,第1位 移动到 第16位,第2位 移动到 第32位 ...... 就是这么简单,排列位置换个顺序而已,如果用硬件电路实现的话,就是更换一下导线的顺序。 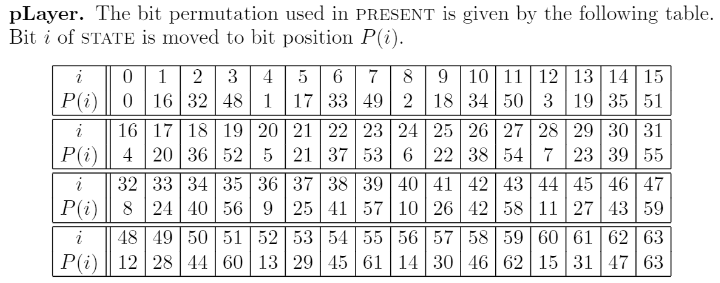 最后我们再完整地看一下 Present 的加密流程,也就是把上面三个步骤,重复 31 次。 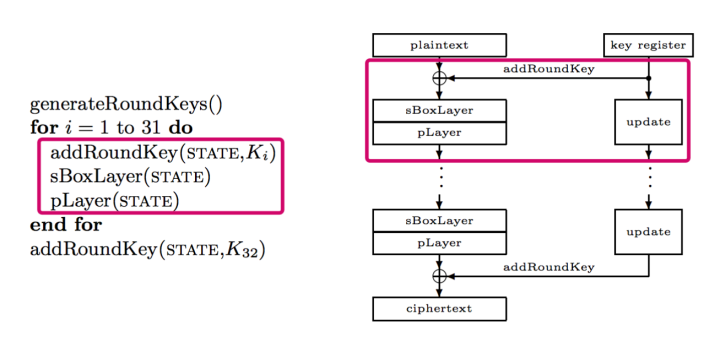 至于 S-Box 和 p-Layer 为什么顺序要这么设计,这个涉及到破解的密码分析学,之后有机会再以 线性密码分析 (Linear Cryptanalysis) 和 差分密码分析 (Differential Cryptanalysis) 详细解释。 硬件实现 (Verilog)前面提到 Present 硬件实现非常简单,例如 S-Box 一个 多路复用器(multiplexer) 就实现了。 module PRESENT_ENCRYPT_SBOX ( output reg [3:0] odat, input [3:0] idat ); always @(idat) case (idat) 4'h0 : odat = 4'hC; 4'h1 : odat = 4'h5; 4'h2 : odat = 4'h6; 4'h3 : odat = 4'hB; 4'h4 : odat = 4'h9; 4'h5 : odat = 4'h0; 4'h6 : odat = 4'hA; 4'h7 : odat = 4'hD; 4'h8 : odat = 4'h3; 4'h9 : odat = 4'hE; 4'hA : odat = 4'hF; 4'hB : odat = 4'h8; 4'hC : odat = 4'h4; 4'hD : odat = 4'h7; 4'hE : odat = 4'h1; 4'hF : odat = 4'h2; endcase endmodulep-Layer 则更简单,就是导线的顺序互换。 module PRESENT_ENCRYPT_PBOX( output [63:0] odat, input [63:0] idat ); assign odat[0 ] = idat[0 ]; assign odat[16] = idat[1 ]; assign odat[32] = idat[2 ]; assign odat[48] = idat[3 ]; assign odat[1 ] = idat[4 ]; assign odat[17] = idat[5 ]; assign odat[33] = idat[6 ]; assign odat[49] = idat[7 ]; assign odat[2 ] = idat[8 ]; assign odat[18] = idat[9 ]; assign odat[34] = idat[10]; assign odat[50] = idat[11]; assign odat[3 ] = idat[12]; assign odat[19] = idat[13]; assign odat[35] = idat[14]; assign odat[51] = idat[15]; assign odat[4 ] = idat[16]; assign odat[20] = idat[17]; assign odat[36] = idat[18]; assign odat[52] = idat[19]; assign odat[5 ] = idat[20]; assign odat[21] = idat[21]; assign odat[37] = idat[22]; assign odat[53] = idat[23]; assign odat[6 ] = idat[24]; assign odat[22] = idat[25]; assign odat[38] = idat[26]; assign odat[54] = idat[27]; assign odat[7 ] = idat[28]; assign odat[23] = idat[29]; assign odat[39] = idat[30]; assign odat[55] = idat[31]; assign odat[8 ] = idat[32]; assign odat[24] = idat[33]; assign odat[40] = idat[34]; assign odat[56] = idat[35]; assign odat[9 ] = idat[36]; assign odat[25] = idat[37]; assign odat[41] = idat[38]; assign odat[57] = idat[39]; assign odat[10] = idat[40]; assign odat[26] = idat[41]; assign odat[42] = idat[42]; assign odat[58] = idat[43]; assign odat[11] = idat[44]; assign odat[27] = idat[45]; assign odat[43] = idat[46]; assign odat[59] = idat[47]; assign odat[12] = idat[48]; assign odat[28] = idat[49]; assign odat[44] = idat[50]; assign odat[60] = idat[51]; assign odat[13] = idat[52]; assign odat[29] = idat[53]; assign odat[45] = idat[54]; assign odat[61] = idat[55]; assign odat[14] = idat[56]; assign odat[30] = idat[57]; assign odat[46] = idat[58]; assign odat[62] = idat[59]; assign odat[15] = idat[60]; assign odat[31] = idat[61]; assign odat[47] = idat[62]; assign odat[63] = idat[63]; endmodule当然还有每一轮的 RoundKKey 更新: assign dat1 = dreg ^ kreg[79:16]; // add round key assign odat = dat1; // output ciphertext // key update assign kdat1 = {kreg[18:0], kreg[79:19]}; // rotate key 61 bits to the left assign kdat2[14:0 ] = kdat1[14:0 ]; assign kdat2[19:15] = kdat1[19:15] ^ round; // xor key data and round counter assign kdat2[75:20] = kdat1[75:20];软件实现 (C / Python)如果使用软件实现 Present 的话,就是巧妙使用数组了。 例如 S-Box 可以把查找表放一个数组里,需要的时候直接查表。 // define the SBox uint8_t S[] = {0xC, 0x5, 0x6, 0xB, 0x9, 0x0, 0xA, 0xD, 0x3, 0xE, 0xF, 0x8, 0x4, 0x7, 0x1, 0x2}; // function for converting a nibble using the SBox uint8_t Sbox(uint8_t input) { return S[input]; }p-Layer 则稍微麻烦一点,需要一位位地计算,不如硬件实现的导线连接那么优雅。 // define the permutation table uint8_t P[] = {0, 16, 32, 48, 1, 17, 33, 49, 2, 18, 34, 50, 3, 19, 35, 51, 4, 20, 36, 52, 5, 21, 37, 53, 6, 22, 38, 54, 7, 23, 39, 55, 8, 24, 40, 56, 9, 25, 41, 57, 10, 26, 42, 58, 11, 27, 43, 59, 12, 28, 44, 60, 13, 29, 45, 61, 14, 30, 46, 62, 15, 31, 47, 63}; /* function that performs the permutation according to the permutation table P The permutation is done by adding one bit at a time from the source block to the appropriate location in the result. In each iteration the following is performed: 1) calculate the distance of the bit that is supposed to be added next from the least significant bit (at position 63) 2) shift the source block to the right so that the bit becomes the least significant bit 3) separate this bit by masking by performing bitwise and with 1 4) calculate the new location (from right to left) of the bit (distance between the least significant bit and P[i]) 5) shift the bit to the new location and add it to the permutation using bitwise OR */ uint64_t permute(uint64_t source) { uint64_t permutation = 0; int i; for (i=0; i> distance & 0x1) > (i*4)) & 0xF] > i) & 0x01) |
【本文地址】