hexo个人博客搭建(二)butterfly主题配置 |
您所在的位置:网站首页 › butterfly版权 › hexo个人博客搭建(二)butterfly主题配置 |
hexo个人博客搭建(二)butterfly主题配置
|
Butterfly主题安装文档(二)之主题配置
一、回顾安装butterfly主题
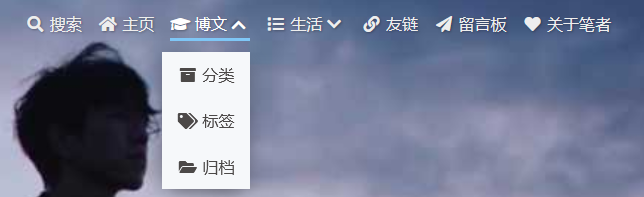
1、在hexo项目根目录下执行操作clone主题 git clone -b master https://github.com/jerryc127/hexo-theme-butterfly.git themes/butterfly2、如果沒有 pug 以及 stylus 的渲染器,还需要下载,否则在项目运行时会报错: npm install hexo-renderer-pug hexo-renderer-stylus --save3、修改项目根目录下的_config.yml文件(称为站点配置文件),开启主题 # Extensions ## Plugins: https://hexo.io/plugins/ ## Themes: https://hexo.io/themes/ #theme: landscape theme: butterfly4、升级建议 为了減少升级主题带来的不便,我们还需要做以下操作: 把主题文件夹中的 _config.yml 复制到 Hexo 根目录下,同重命名为 _config.butterfly.yml Hexo会自动合并主题中的_config.yml和 _config.butterfly.yml里的配置,如果存在同名配置,会使用_config.butterfly.yml的配置,其优先度较高。 二、设置网站个人资料修改根目录下的站点配置文件_config.yml 修改网站各种资料,例如标题、副标题和邮箱等个人资料 # Hexo Configuration ## Docs: https://hexo.io/docs/configuration.html ## Source: https://github.com/hexojs/hexo/ # Site title: 荒岛 #标题 subtitle: '' #副标题 description: 归途也还可爱 #个性签名 keywords: author: 寻 #作者 language: zh-CN #语言 timezone: Asia/Shanghai #中国的时区主题支持三种语言: default(en)zh-CN (简体中文)zh-TW (繁体中文) 三、导航菜单修改主题配置文件 _config.butterfly.yml menu: 主页: / || fas fa-home 博文 || fa fa-graduation-cap: 分类: /categories/ || fa fa-archive 标签: /tags/ || fa fa-tags 归档: /archives/ || fa fa-folder-open 生活 || fas fa-list: 分享: /shuoshuo/ || fa fa-comments-o 相册: /photos/ || fa fa-camera-retro 音乐: /music/ || fa fa-music 影视: /movies/ || fas fa-video 友链: /links/ || fa fa-link 留言板: /comment/ || fa fa-paper-plane #留言板: /messageboard/ || fa fa-paper-plane 关于笔者: /about/ || fas fa-heart效果图 开启代码复制功能, 修改主题配置文件_config.butterfly.yml: highlight_copy: true 2、highlight_shrink true 全部代码框不展开,需点击 > 打开false 代码狂展开,有 > 点击按钮none 不显示 > 按钮 修改主题配置文件_config.butterfly.yml: highlight_shrink: false #代码框展开 3、code_word_wrap在默认情况下,hexo-highlight 在编译的时候不会实现代码自动换行。如果你不希望在代码块的区域里有横向滚动条的话,可以_config.butterfly.yml开启代码换行: code_word_wrap: true 4、我的_config.butterfly.yml: # Code Blocks (代码块样式) # -------------------------------------- highlight_theme: mac # darker / pale night / light / ocean / mac / mac light / false highlight_copy: true # copy button 是否显示复制按钮 highlight_lang: true # show the code language 展示代码块语言 highlight_shrink: false # true: 打开文章默认折叠代码块内容 / false: 打开文章默认展开代码块内容 highlight_height_limit: false # unit: px code_word_wrap: true #是否关闭滚动条站点配置文件_config.yml:将line_number的值改为false highlight: enable: true line_number: false auto_detect: false tab_replace: '' 5、效果图:
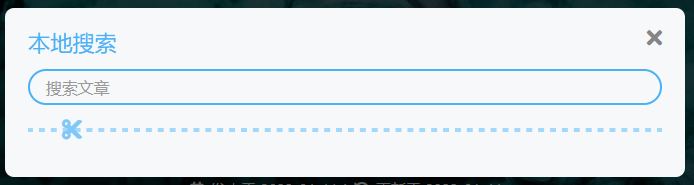
1、安装插件 npm install hexo-generator-search --save2、主题配置文件 _config.butterfly.yml: # Local search local_search: enable: true labels: input_placeholder: Search for Posts hits_empty: "We didn't find any results for the search: ${query}" # 如果没有查到内容相关内容显示3、效果图
1、分类 hexo new page categories会出现source/categories/index.md文件 2、标签 命令行输入: hexo new page tags会出现source/tags/index.md文件: …以此类推创建自己要的子页面 七、修改副标题 1、修改主题配置文件 _config.butterfly.yml: # the subtitle on homepage (主頁subtitle) subtitle: enable: true # Typewriter Effect (开启打字效果) effect: true # loop (循環打字) loop: true # source調用第三方服務 # source: false 關閉調用 # source: 1 調用搏天api的隨機語錄(簡體) # source: 2 調用一言網的一句話(簡體) # source: 3 調用一句網(簡體) # source: 4 調用今日詩詞(簡體) # subtitle 會先顯示 source , 再顯示 sub 的內容 source: false # 如果有英文逗号' , ',请使用转义字元 , # 如果有英文双引号' " ',请使用转义字元 ; # 开头不允許转义字元,如需要,请把整個句子用双引号包住 # 如果关闭打字效果,subtitle只会现示sub的第一行文字 sub: - 你在抱怨什么呢 - 为明天到来的事,说人生像是没有意义 - 没有选择会是唯一的路 - 这不是你自己的问题,人终归要好好去生活 2、副标题字体大小颜色在\themes\butterfly\source\css_layout中的head.styl: #site-subtitle color: var(--white) //此处修改为白色 font-size: 1.05em // 字体大小 +minWidth768() font-size: 1.40em // 字体大小效果图:sub句子轮流出现
图片可以用云图片链接或者放在本地文件夹位置:/themes/butterfly/source/img 1、网站图标 # Favicon(网站图标) favicon: /img/favicon.png 2、头像 avatar: img: /img/avatar.jpg #图片路径 effect: false #头像会一直转圈 3、主页封面图片 # The banner image of home page index_img: /img/background.jpg 4、文章详情页的顶部图片当没有在front-matter设置top_img和cover的情况下会显示该图 修改主题配置文件_config.butterfly.yml: # If the banner of page not setting, it will show the top_img default_top_img: /img/default_top_img.jpg #我设置的本地图片 5、归档页顶部图片 #归档子标签页图片 # The banner image of archive page archive_img: /img/archive.jpg 6、tag页顶部图 #tag页(标签页) # If the banner of tag page not setting, it will show the top_img # note: tag page, not tags page (子標籤頁面的 top_img) tag_img: /img/tag_img.jpg 7、category页顶部图 #category页 # If the banner of category page not setting, it will show the top_img # note: category page, not categories page (子分類頁面的 top_img) category_img: /img/category_img.jpg 8、文章封面每篇文章都可以设置一张封面,可以为每篇文章设置默认封面 也可以修改每个md文件的front-matter的cover属性,会覆盖上面的默认封面。修改主题配置文件_config.butterfly.yml: cover: index_enable: true # 是否展示文章封面 aside_enable: true archives_enable: true position: both # 封面展示的位置 left/right/both # 当没有设置cover时,默认展示的文章封面 default_cover: # 当配置多张图片时,会随机选择一张作为 cover. 此时写法为 - https: - http: - http: - http: - http: - http: 9、错误页面配置了该属性后会替换无法展示的图片 # Replace Broken Images (替換無法顯示的圖片) error_img: flink: /img/friend_404.gif post_page: /img/404.jpg效果图
1.新增hexo-lazyload-image模块 npm install hexo-lazyload-image --save2.在主目录配置文件_config.yml增加配置 lazyload: enable: true loadingImg: /img/loading.gif这个就是图片没加载出来的时候,出现一个动图转转转的文章页样式 十、图片大图查看修改主题配置文件_config.butterfly.yml # Lightbox (圖片大圖查看模式) # -------------------------------------- # You can only choose one, or neither (只能選擇一個 或者 兩個都不選) # medium-zoom # https://github.com/francoischalifour/medium-zoom medium_zoom: false # fancybox # http://fancyapps.com/fancybox/3/ fancybox: true 十一、文章页样式以下修改主题配置文件_config.butterfly.yml 1、复制的内容后面加上版权信息 # copy settings # copyright: Add the copyright information after copied content (複製的內容後面加上版權信息) copy: enable: true # 是否开启网站复制权限 copyright: # 复制的内容后面加上版权信息 enable: false # 是否开启复制版权信息添加 limit_count: 50 # 字数限制,当复制文字大于这个字数限制时 2、文章版权信息在底部会出现对应的作者、链接、声明 post_copyright: enable: true decode: true license: CC BY-NC-SA 4.0 license_url: https://creativecommons.org/licenses/by-nc-sa/4.0/效果图:
在文章最下面出现推送 # Related Articles related_post: enable: true limit: 6 # Number of posts displayed date_type: created # or created or updated 文章日期顯示創建日或者更新日 4、打赏给文章结尾设置打赏按钮,可以放上收款二维码 # Sponsor/reward reward: enable: true QR_code: - img: /img/wechat.jpg link: text: 微信 - img: /img/alipay.jpg link: text: 支付宝效果图:
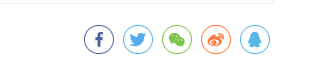
以下修改主题配置文件_config.butterfly.yml 1、调整侧边栏出现位置 aside: enable: true hide: false button: true mobile: true # display on mobile position: right # left or right 我的是右边 2、个人信息 ... card_author: enable: true description: button: enable: true icon: fab fa-github text: Follow Me #按钮文字 link: https://github.com/xxxxxx #可以放上自己的github地址 # social settings (社交圖標設置) # formal: # icon: link || the description #书写格式:图标名:url || 描述性文字` social: fab fa-github: https://githubfast.com/lyr233 || Github fa fa-book-open: https://blog.csdn.net/YR_112233 || CSDN fab fa-qq: tencent://AddContact/?fromId=45&fromSubId=1&subcmd=all&uin=728831102&website=www.oicqzone.com || QQ fas fa-envelope-open-text: mailto:[email protected] || Email效果图: 效果图: 以下均为修改主题配置文件 _config.butterfly.yml: 1、鼠标点击的效果有冒光特效、烟火特效、爱心特效、文字特效,选择其中一个将enable设置为true就可以 # Typewriter Effect (打字效果) # https://github.com/disjukr/activate-power-mode activate_power_mode: enable: false colorful: true # open particle animation (冒光特效) shake: true # open shake (抖動特效) mobile: false # Mouse click effects: fireworks (鼠標點擊效果: 煙火特效) fireworks: enable: false zIndex: 9999 # -1 or 9999 mobile: false # Mouse click effects: Heart symbol (鼠標點擊效果: 愛心) click_heart: enable: false mobile: false # Mouse click effects: words (鼠標點擊效果: 文字) ClickShowText: enable: true text: - 富强 - 民主 - 文明 - 和谐 - 平等 - 公正 - 法治 - 爱国 - 敬业 - 诚信 - 友善 fontSize: 15px random: true mobile: true 2、打字效果 # Typewriter Effect (打字效果) # https://github.com/disjukr/activate-power-mode activate_power_mode: enable: true colorful: true # open particle animation (冒光特效) shake: true # open shake (抖動特效) mobile: true 3、自定义主题色可以修改部分的UI颜色 # 我的没改 # theme_color: # enable: true # main: "#49B1F5" # paginator: "#00c4b6" # button_hover: "#FF7242" # text_selection: "#00c4b6" # link_color: "#99a9bf" # meta_color: "#858585" # hr_color: "#A4D8FA" # code_foreground: "#F47466" # code_background: "rgba(27, 31, 35, .05)" # toc_color: "#00c4b6" # blockquote_padding_color: "#49b1f5" # blockquote_background_color: "#49b1f5" 4、网站背景默认显示白色,可设置图片或者颜色 修改主题配置文件_config.butterfly.yml: background:我的修改为渐变色,步骤: (1)在\Butterfly\source\css\目录下创建css文件 backgound.css: 可以自己调色 //代码百度得来 #web_bg { background: -webkit-linear-gradient( 0deg, rgba(247, 149, 51, 0.1) 0, rgba(243, 112, 85, 0.1) 15%, rgba(239, 78, 123, 0.1) 30%, rgba(161, 102, 171, 0.1) 44%, rgba(80, 115, 184, 0.1) 58%, rgba(16, 152, 173, 0.1) 72%, rgba(7, 179, 155, 0.1) 86%, rgba(109, 186, 130, 0.1) 100% ); background: -moz-linear-gradient( 0deg, rgba(247, 149, 51, 0.1) 0, rgba(243, 112, 85, 0.1) 15%, rgba(239, 78, 123, 0.1) 30%, rgba(161, 102, 171, 0.1) 44%, rgba(80, 115, 184, 0.1) 58%, rgba(16, 152, 173, 0.1) 72%, rgba(7, 179, 155, 0.1) 86%, rgba(109, 186, 130, 0.1) 100% ); background: -o-linear-gradient( 0deg, rgba(247, 149, 51, 0.1) 0, rgba(243, 112, 85, 0.1) 15%, rgba(239, 78, 123, 0.1) 30%, rgba(161, 102, 171, 0.1) 44%, rgba(80, 115, 184, 0.1) 58%, rgba(16, 152, 173, 0.1) 72%, rgba(7, 179, 155, 0.1) 86%, rgba(109, 186, 130, 0.1) 100% ); background: -ms-linear-gradient( 0deg, rgba(247, 149, 51, 0.1) 0, rgba(243, 112, 85, 0.1) 15%, rgba(239, 78, 123, 0.1) 30%, rgba(161, 102, 171, 0.1) 44%, rgba(80, 115, 184, 0.1) 58%, rgba(16, 152, 173, 0.1) 72%, rgba(7, 179, 155, 0.1) 86%, rgba(109, 186, 130, 0.1) 100% ); background: linear-gradient( 90deg, rgba(247, 149, 51, 0.1) 0, rgba(243, 112, 85, 0.1) 15%, rgba(239, 78, 123, 0.1) 30%, rgba(161, 102, 171, 0.1) 44%, rgba(80, 115, 184, 0.1) 58%, rgba(16, 152, 173, 0.1) 72%, rgba(7, 179, 155, 0.1) 86%, rgba(109, 186, 130, 0.1) 100% ); }(2)修改配置文件_config.butterfly.yml的引入方式 # Inject # Insert the code to head (before '' tag) and the bottom (before '' tag) # 插入代码到头部 之前 和 底部 之前 inject: head: - bottom: # -(3)如果背景色不生效,设置_config.butterfly.yml # Website Background (設置網站背景) # can set it to color or image (可設置圖片 或者 顔色) # The formal of image: url(http://xxxxxx.com/xxx.jpg) background: '#efefef'效果图: footer 的背景,当设置 false 时,将与主题色一致。 修改主题配置文件_config.butterfly.yml: # footer是否显示图片背景(与top_img一致) footer_bg: true 6、背景特效有三种,自己选择开启,将enable设置为true就可以 修改主题配置文件_config.butterfly.yml: # Background effects (背景特效) # -------------------------------------- # canvas_ribbon (静止彩带) # See: https://github.com/hustcc/ribbon.js canvas_ribbon: enable: false size: 150 alpha: 0.6 zIndex: -1 click_to_change: false mobile: false # Fluttering Ribbon (动态彩带) canvas_fluttering_ribbon: enable: false mobile: false #星空特效 # canvas_nest # https://github.com/hustcc/canvas-nest.js canvas_nest: enable: true color: '0,0,255' #color of lines, default: '0,0,0'; RGB values: (R,G,B).(note: use ',' to separate.) opacity: 0.7 # the opacity of line (0~1), default: 0.5. zIndex: -1 # z-index property of the background, default: -1. count: 99 # the number of lines, default: 99. mobile: false 十四、字数统计1、项目目录右键打开 Git Bash Here, 2、npm install hexo-wordcount --save or yarn add hexo-wordcount 3、修改主题配置文件_config.butterfly.yml # wordcount (字數統計) wordcount: enable: true post_wordcount: true min2read: true total_wordcount: true效果图: addThis、sharejs、addtoany三个选一个开启 addThis官网:https://www.addthis.com/ # Share System (分享功能) # -------------------------------------- # AddThis # https://www.addthis.com/ addThis: enable: false pubid: #访问 AddThis 官网, 找到你的 pub-id # Share.js # https://github.com/overtrue/share.js sharejs: enable: true #我开启的 sites: facebook,twitter,wechat,weibo,qq #想要显示的内容 # AddToAny # https://www.addtoany.com/ addtoany: enable: false item: facebook,twitter,wechat,sina_weibo,facebook_messenger,email,copy_linksharejs效果图: |


【本文地址】
今日新闻 |
推荐新闻 |