Easy Blender 3D Tutorial: Understanding Spline Modeling In Blender |
您所在的位置:网站首页 › builtwithspline › Easy Blender 3D Tutorial: Understanding Spline Modeling In Blender |
Easy Blender 3D Tutorial: Understanding Spline Modeling In Blender
|
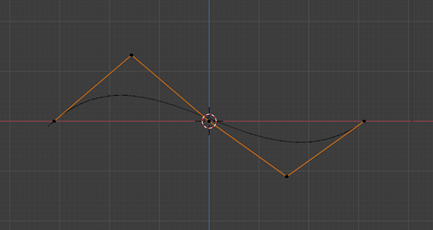
Chapter 4: Spline Modeling What is Spline Modelling?Spline modeling is, in short, modeling against curves. You may have heard of spline modeling involving Nurbs, Beziers, etc. Since this tutorial series is nontechnical in nature, I’ll simplify the basics of spline modeling as much as possible. To summarize, these splines/curves can be used to generate specific types of objects that utilize curves in their structure. Think of objects like a Raging Waters slide, a magical scroll, an archway, etc. Splines can also be used to determine which direction a particular object will move by constraining that object to the curve. For this, imagine the object is a car and you want to constrain it to the path of a race track during an animation sequence. A spline can be used to force the car to move on a certain curved path without having to animate each frame of the car. Check out Other Chapters:Chapter 1: Getting Started with Blender: IntroductionChapter 2: Things to Avoid When Starting OutChapter 3: 3D Blender Step-By-Step Tutorial: How to Create a Simple Vase in Blender? How do you make a Spline in the blender?Making a simple curve using Paths Let’s use “Path”, which is one of the 5 types of splines/curves you can generate. Use Shift + A to bring up the dropdown menu for generating models and click “Curve >> Path”. This will generate the below object, which looks like arrows connected along the line (Green Box). Note: If you don’t see the arrows, click the Overlays icon (Red Box) and check the box at the bottom under “Curves”. This will generate the arrows for your eyes to see better. This line contains multiple vertices which will affect the direction of the spline. Assuming you’ve selected the object, click the ~ key (tilde) and change the view to Front. After that, click tab to switch to “Edit” mode. You should be able to see 5 vertices. Select any and start moving them up and down using the move tool on the left (AKA hotkey G on the keyboard). Congratulations, you’ve created used a Path to create a curve. See below for an example. The orange line represents the edited adjustments you’ve made to the curve, but the line itself is that represents the spline is represented by the black line.
Now here are some things you can do with this curve. Select an endpoint and press “E” on the keyboard. This is the extrude tool, which in this case, adds another vertex for you to use in your curve, allowing you to fine-tune the curve by adding more vertices/points into the spline. Refer to section 1. on the first page and you will see a yellow box in the right context menu. Assuming you have the spline object selected in “Object Mode”, this yellow box menu item titled “Object Data Properties” will be what you will use for spline object properties. In it, you will be able to better modify your spline to fit your modeling needs. Here are some of the things you can do with this menu: I. Object Data Properties >> Geometry >> Extrude. This allows you to extrude the spline itself, creating the image you see below. It basically expands the entire spline, essentially fattening it to an actual usable object. 
II. Object Data Properties >> Bevel >> Depth/Resolution. These tools allow you to expand the level of the spline, which adds and expands non-perpendicular surfaces out from the spline like an expanding, curved cylinder, as seen below. This is great for creating tunnels, whips, water slides, or other such objects. 
III. Object Data Properties >> Active Spline >> Order U/Resolution U. Just by messing around with these tools, you can adjust the segmentation of the spline itself, creating sharper segments than the smooth curves we have been working with so far. See below for an example.  What is a spline in blender?
Splines are relatively simple. However, they have a lot of potential for creating unique objects that utilize curves in their structure. I know I haven’t gone through the use of constraints to lock objects onto a curved path yet, but that’s something we can discuss in future chapters. For now, just know that splines/curves are a tool in your arsenal that can help make modeling certain types of objects easier for you. Experiment around with the other types of curves in the Shift + A menu (like Beziers) to see whether those fit your modeling needs better. All of these curves can get the same result, but some may find using Beziers easier than using a Path for a particular purpose. In the end, experimentation is key and you’ll be able to fall back on splines whenever you need a curved war horn, whip animation, curved table leg, etc. in your future scenes. |
【本文地址】