Archipack |
您所在的位置:网站首页 › archipack › Archipack |
Archipack
|
New Blender 2.79 comes with free Archipack add-on. This plugin greatly automates the process of creating architecture elements and speeds up the modeling process. It generates fully parametric meshes, which can be editable as long as you want.
All notes were made after testing Archipack v. 1.2.8. Future versions may (and will) vary.
Procedural modeling is a part of almost each 3d package. Most of them allow you to create primitive meshes or simple architectural elements but rarely we can see such complex and well-thought solution that is developed by Stephen Leger for Blender. You not only get procedural meshes - Archipack tracks their dependencies, allowing to automatically aligning, scaling and cutting holes. It also shows all dimensions in realtime and allows for creating 3d walls from 2d planes. Let's take a look.
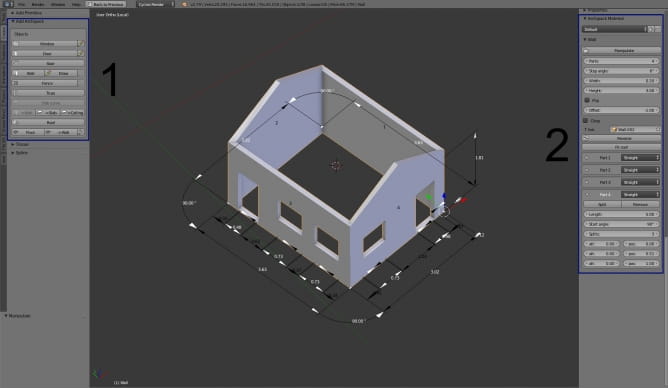
Create walls
Without Archipack we would start in one of following ways: either we would create floor mesh and cut it and then extrude walls from it or we would create a box then scale it to the taste, cut it and extrude all walls that we want to have in our final building. It's fast and convenient, but can it be better? Yes, with procedural modeling and parametric workflow you can work faster and the more complicated your building becomes, the advantages of using solution like Archipack are bigger.
With Archipack, when you create a wall, you enter its' height and parts count in properties panel (shortcut: N). If you need to change the length or angle of any wall part, you don't loose your walls continuity, mesh will follow your changes. You can also create curved walls with precise radius and change width and height of all walls at once tweaking a single parameter. Last but not least – you have great dimensions and angles grid that you can use to control dimensions of all your elements.
Archipack gives you two methods of creating walls – you can just insert the first segment, add more in properties panel and enter all dimensions of your walls or you can draw the wall on the grid plane (tip: press CTRL to snap to incremental values, vertices or other objects). But there is more!
Create doors and windows
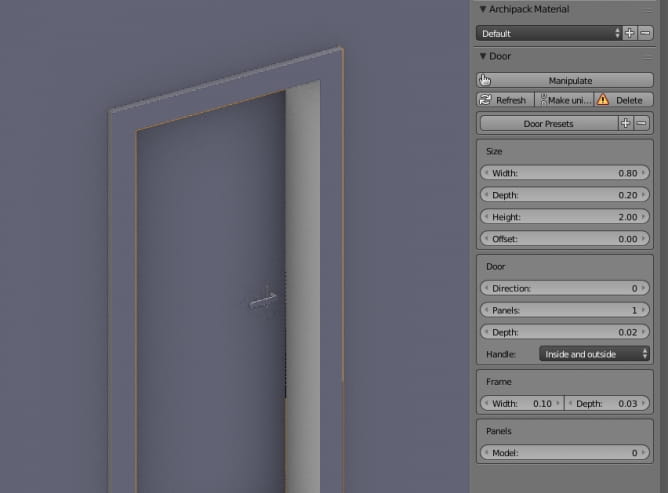
You can create several types of doors – complete with frame and handles. Currently you have 3 presets, developer promises more in the future.
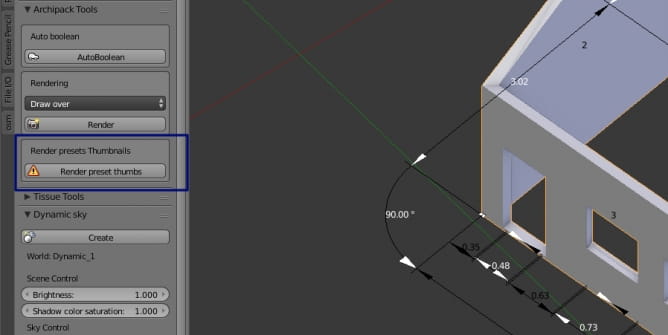
Tip: Blender does not allow to include thumbnails in official distribution, so you will see "No image" placeholders on presets list at first. In order to create/refresh presets thumbnails, use "Render preset thumbs" in Tool panel. This tool does render every preset thumbnail and may take a few minits to do so. Blender must be run with admin privilege in order to be able to save default thumbs. You can see progress of this process on the top of Blender window.
All objects have materials assigned. Currently these are "dummy" materials - they are properly assigned for walls elements (inside, outside, cuts, variations) but they do not have textures. Stephen Leger is currently working with chocofur.com on a dedicated material library to provide a „ready to render” solution.
You can create doors in two ways – by clicking on a preset or by drawing them directly on wall.
Door options on the right
Tip: if you want to draw doors, make sure that you selected „wall” element. If you select, for example, roof cutter rectangle, Blender will immediately crash.
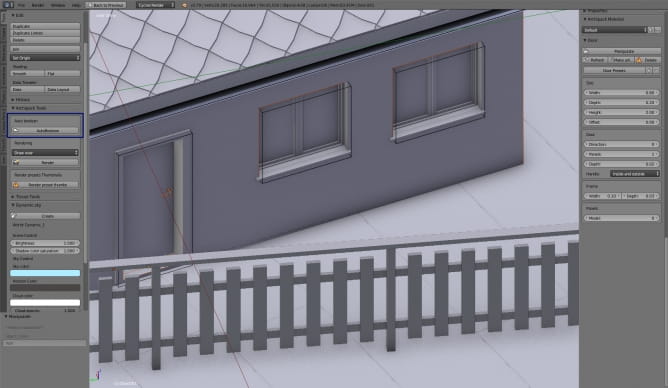
After you place door, go to the „Tools” panel and press „Autoboolean” button. And that’s where magic happens! Your wall will be automatically cut to fit the door frame. You can move the doors and the hole will be updated in realtime. How cool is that? :) You can change the position of your doors and windows at any time and Archipack will move the holes for you, no need to worry about the walls. It’s a great time saver.
Tip: if you duplicate a window or door only frame is updated in realtime. In order to recreate missing parts use the "refresh" button of object on the right panel.
Create slab, floor and ceiling
When you select your walls and press „Slab” or „Ceiling” buttons, a new slab/ceiling mesh appears that fits your walls placement (even if it's not closed room). You can even create a balcony on one of the sides (small warning though: due to the early stage of development, removing it can make your mesh go nuts!).
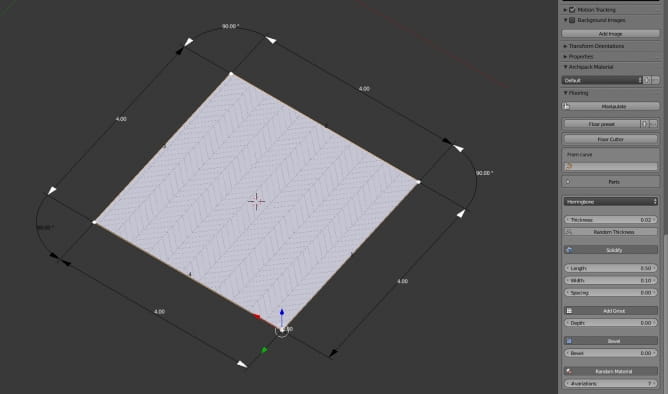
You can also choose from one of 9 types of floor – it’s a floor generator on steroids! You can have regular tiles, planks, herringbone, hexagons, stepping stone and more – really easy solution for creating good looking floor mesh. You can also control the bevel and all floor parameters (grout, pattern density) from here. Floor meshes have automatic UVs so it's another time-saving gem.
Roofs and other meshes
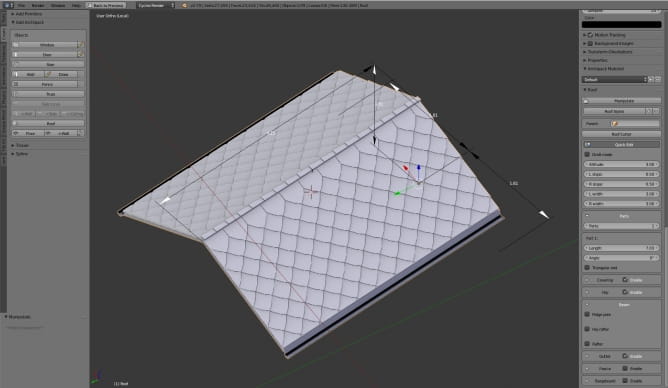
In the same procedural way you can add fences (five types), stairs (four types) and truss and they all work flawlessly. You can also create roofs – with different types of coverings, slope angles, gutters, etc. Roofs can include multiple parts that connect seamlessly – this feature alone will save you many hours of work, it’s pure awesomeness.
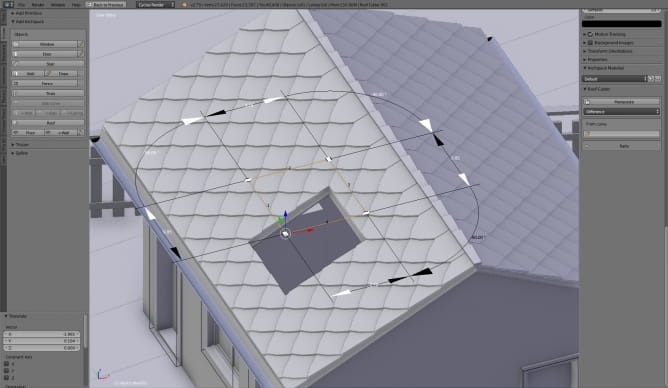
Cutters
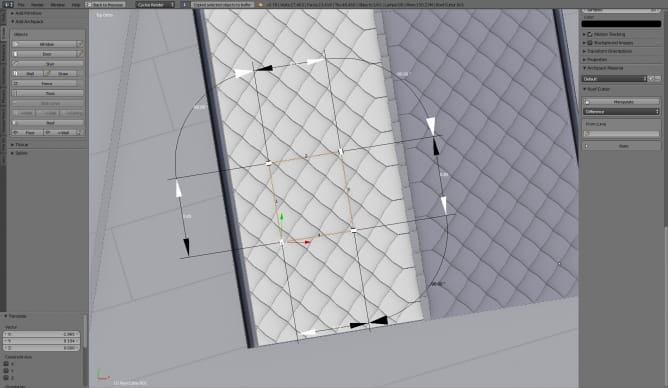
One of the latest additions to Archipack are cutters. These are 2d shapes that can cut a hole in your roof, ceiling or floor – perfect solution if you want to insert roof window or make multi-floor building. You can manipulate cutters and choose between two boolean modes: "intersect" trims the floor to the cutter dimensions, "difference" makes a hole in the floor that has a size of cutter.
Tip: if the hole isn’t updated after you move the cutter, try changing mode from „difference” to „intersect” and back. Cutter doesn’t have to be on mesh, it can be over it or under it – it is projected on the mesh from the top view.
Archipack grows rapidly, so there are many more features that we didn’t cover in this article, like making walls from 2d planes, boolean modes, etc. You will find detailed documentation on Github.
Tip: If you want to export your model to fbx or obj format, remember that boolean holes are exported too as separate meshes. To solve this issue, use "Apply holes" in the "Reference point" N panel. This tool apply all boolean modifiers and delete holes. To revert and get interactive holes back, select your wall and use "AutoBoolean" in the T panel (under Tools->Archipack Tools)
Conclusion: great, but not perfect yet Although Archipack is a great tool, it’s still a work in progress. That means that sometimes it crashes blender, sometimes some semi-transparent window appears in Blender viewport and you need to restart the application. Sometimes fitting walls to roof action gives strange results and you need to tweak elements position to get it right. Undo actions currently do not work when dragging - if you make a mistake that cannot be fixed by hand, you need to start over.
If you want to try Archipack and get familiar with this add-on go ahead. I cannot currently (we hope it will change very soon) recommend it for some important paid works, though due to instability of some functions. But I strongly believe that soon it will be a tool that can be used on all kind of architectural projects – it speeds many things and many other makes easier.
So, the verdict is: Archipack is still young add-on but yet it is extremely useful for creating buildings fast and control development process in a parametric way (it’s really comfortable to have all these numbers at hand). Go and check it out, play with it, it’s worth it! And it’s unbelievable that such feature-wise add-on is free and part of Blender.
Top image by Michal Franczak. Blender + Archipack, Cycles. |
【本文地址】
今日新闻 |
推荐新闻 |