RK3568笔记九: DRM显示摄像头 |
您所在的位置:网站首页 › 3568-3339 › RK3568笔记九: DRM显示摄像头 |
RK3568笔记九: DRM显示摄像头
|
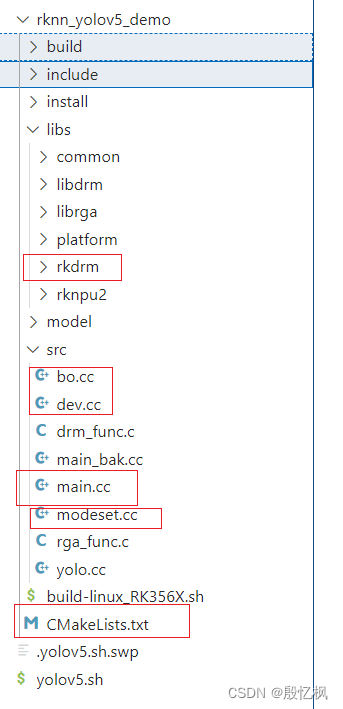
若该文为原创文章,转载请注明原文出处。 一、介绍学习DRM的目的是想做类似NVR显示多路实时流,通过勇哥(Marc)的指导,大概流程是通过Zlmedia拉流,RK3568的MPP解码,DRM显示,可以使用HDMI或DIS屏幕,所以为了后面的实现,先测试摄像头采集DRM显示。 二、移植过程测试过程在笔记八里,如有不懂的,请看笔迹八。 移植过程参考GitHub - MontaukLaw/cvv_test 里面有DRM显示两个屏的例子。 程序是以正点原子里的rknn_yolov5_demo例程修改。主要修改几个地方。
大概流程: 1、初始化屏幕 drm_dis_init(); 2、opencv打开摄像头cv::VideoCapture cap(0); 3、循环读数据并显示 cap.read(orig_img); draw_lcd_screen_rgb_960((uint8_t *)img.data, 720 * 1280 * 3); 代码: main.cc // Copyright (c) 2021 by Rockchip Electronics Co., Ltd. All Rights Reserved. // // Licensed under the Apache License, Version 2.0 (the "License"); // you may not use this file except in compliance with the License. // You may obtain a copy of the License at // // http://www.apache.org/licenses/LICENSE-2.0 // // Unless required by applicable law or agreed to in writing, software // distributed under the License is distributed on an "AS IS" BASIS, // WITHOUT WARRANTIES OR CONDITIONS OF ANY KIND, either express or implied. // See the License for the specific language governing permissions and // limitations under the License. /*------------------------------------------- Includes -------------------------------------------*/ #include #include #include #include #include #include #include #include "drm_func.h" #include "rga_func.h" #include "rknn_api.h" #include "yolo.h" #include "RgaUtils.h" #include "im2d.h" #include "opencv2/core/core.hpp" #include "opencv2/imgcodecs.hpp" #include "opencv2/imgproc.hpp" #include #include "rga.h" #include #include #include "dev.h" #include "bo.h" static sp_dev *mDev; #define OUTPUT_DEVICE_LCD 1 static drmModeConnectorPtr lcdConnectorPtr = nullptr; static struct sp_crtc *lcdCRPtr; static drmModeEncoderPtr lcdEncoderPtr = nullptr; static uint32_t lcdCrtcId = 0; static drmModeModeInfoPtr lcdModInfoPtr; static void get_connector(uint8_t outpuDevice) { int i, j = 0; int ret = 0; printf("mDev->num_connectors = %d\n", mDev->num_connectors); for (j = 0; j < mDev->num_connectors; j++) { // name 是分辨率信息 printf("connector name:%d\n", j); printf("connector_type:%d\n", j); printf("connector_type_id:%d\n", j); printf("connector status:%d\n", j); // 对应不同的输出设备, 指定不同的connector跟encoder if (outpuDevice == OUTPUT_DEVICE_LCD) { if (mDev->connectors[j]->connector_type == DRM_MODE_CONNECTOR_DSI && mDev->connectors[j]->connection == DRM_MODE_CONNECTED) { lcdConnectorPtr = mDev->connectors[j]; } } } } static void get_encoder(uint8_t outpuDevice) { int i; for (i = 0; i < mDev->num_encoders; i++) { if (outpuDevice == OUTPUT_DEVICE_LCD) { if (mDev->encoders[i]->encoder_type == DRM_MODE_ENCODER_DSI) { lcdEncoderPtr = mDev->encoders[i]; lcdCrtcId = lcdEncoderPtr->crtc_id; } } } } static void get_crtc() { int j; printf("lcd crtc id:%d\n", lcdCrtcId); for (j = 0; j < mDev->num_crtcs; j++) { printf("encoderPtr->crtc_id:%d\n", mDev->crtcs[j].crtc->crtc_id); printf("mode_valid:%d\n", mDev->crtcs[j].crtc->mode_valid); printf("mode_name:%s\n", mDev->crtcs[j].crtc->mode.name); if (mDev->crtcs[j].crtc->crtc_id == lcdCrtcId && mDev->crtcs[j].crtc->mode_valid) { lcdCRPtr = &mDev->crtcs[j]; } } } static int init_screens() { int ret = 0; // 获取lcd connector get_connector(OUTPUT_DEVICE_LCD); if (!lcdConnectorPtr) { printf("failed to get hdmi connector or encoder.\n"); return -1; } printf("lcd connector id:%d\n", lcdConnectorPtr->connector_id); // 获取lcd encoder get_encoder(OUTPUT_DEVICE_LCD); if (!lcdEncoderPtr) { printf("failed to get encoder.\n"); return -2; } printf("lcd encoder id:%d\n", lcdEncoderPtr->encoder_id); // 获取一下显示分辨率之类 lcdModInfoPtr = &lcdConnectorPtr->modes[0]; // 把connector的encoder id赋值为encoder的id lcdConnectorPtr->encoder_id = lcdEncoderPtr->encoder_id; // 获取lcd crtc get_crtc(); if (!lcdCRPtr) { printf("failed to get crtc.\n"); return -3; } if (lcdCRPtr->scanout) { printf("crtc already in use\n"); return -4; } printf("lcd crtc id:%d\n", lcdCRPtr->crtc->crtc_id); // allset // 获取bo, 只需要输入分辨率即可. lcdCRPtr->scanout = create_sp_bo(mDev, lcdModInfoPtr->hdisplay, lcdModInfoPtr->vdisplay, 24, 32, DRM_FORMAT_XRGB8888, 0); if (!lcdCRPtr->scanout) { printf("failed to create new scanout bo\n"); return -5; } printf("fill test color\n"); fill_bo(lcdCRPtr->scanout, 0xff, 0xff, 0x0, 0x0); ret = drmModeSetCrtc(mDev->fd, lcdEncoderPtr->crtc_id, lcdCRPtr->scanout->fb_id, 0, 0, &lcdConnectorPtr->connector_id, 1, lcdModInfoPtr); if (ret) { printf("failed to set crtc mode ret=%d\n", ret); return -6; } lcdCRPtr->crtc = drmModeGetCrtc(mDev->fd, lcdCRPtr->crtc->crtc_id); memcpy(&lcdCRPtr->crtc->mode, lcdModInfoPtr, sizeof(*lcdModInfoPtr)); return 0; } int drm_dis_init(void) { int ret = 0; int i = 0; printf("create sp dev\n"); // 创建显示设备 mDev = create_sp_dev(); if (!mDev) { printf("failed to exec create_sp_dev.\n"); return -10; } printf("init_screen\n"); // 初始化屏幕 ret = init_screens(); if (ret != 0) { printf("failed to exec initialize_screens.\n"); return -11; } return 0; } void draw_lcd_screen_rgb_960(uint8_t *data, uint32_t dataSize) { uint32_t colIdx = 0; uint32_t rowIdx = 0; uint8_t *dataPtr = data; for (rowIdx = 0; rowIdx < 1280; rowIdx++) { uint8_t *rowPtr = (uint8_t *)lcdCRPtr->scanout->map_addr + rowIdx * lcdCRPtr->scanout->pitch; for (colIdx = 0; colIdx < 720; colIdx++) { uint8_t *pixel = rowPtr + colIdx * 4; pixel[0] = *dataPtr; dataPtr++; pixel[1] = *dataPtr; dataPtr++; pixel[2] = *dataPtr; dataPtr++; pixel[3] = 0xff; } } } int main(int argc, char **argv) { int i,j; drm_dis_init(); cv::VideoCapture cap(0); if (!cap.isOpened()) { std::cout |
【本文地址】
