Vue 移动端实现调用相机扫描二维码或条形码 |
您所在的位置:网站首页 › 手机扫一扫识别金子 › Vue 移动端实现调用相机扫描二维码或条形码 |
Vue 移动端实现调用相机扫描二维码或条形码
|
一、开发前的准备
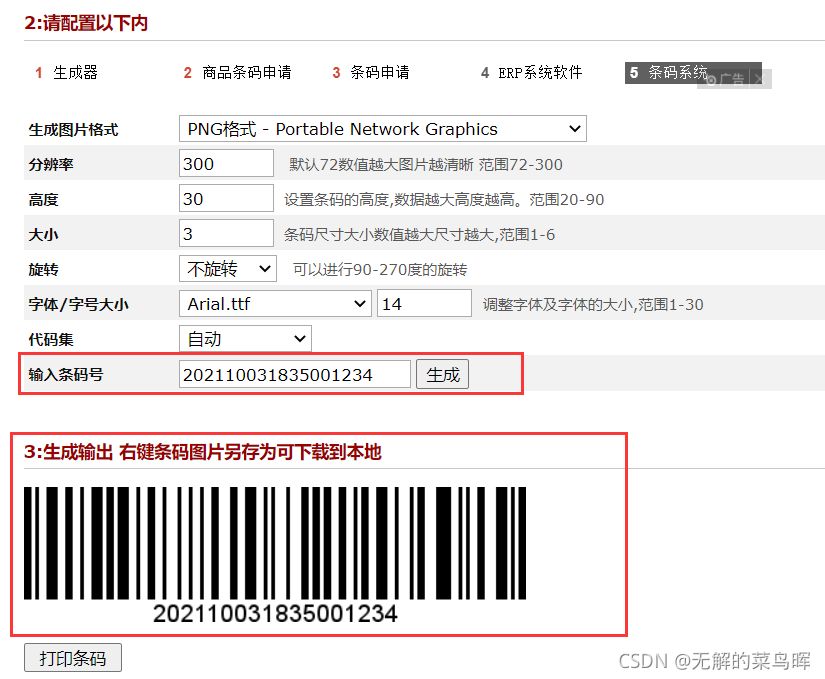
实现二维码或条形码的扫描识别比较普遍的做法是去调用微信 JS-SDK 的扫一扫功能(详见 概述 | 微信开放文档),或者支付宝 H5 开放的API(详见 支付宝H5开放文档)。 但是这两者都会比较麻烦且有一定的局限性,微信的扫一扫只能在微信里用,而且还需要公众号认证等配置操作。支付宝在内置 App 内可以同时识别二维码和条形码,但外部调用的 API 无法一次性同时识别,只能分开识别。 我这里就提供一个直接使用的开源库:https://github.com/zxing-js/library,本人移动端前端开发的框架是 Vue,组件库用的是 Vant,本文方案只要开发时用的电脑具有摄像头就可以实现效果预览。 二、实现效果图这里分享两个在线工具 1、免费在线条形码生成器-条码生成制作工具 2、草料二维码生成器
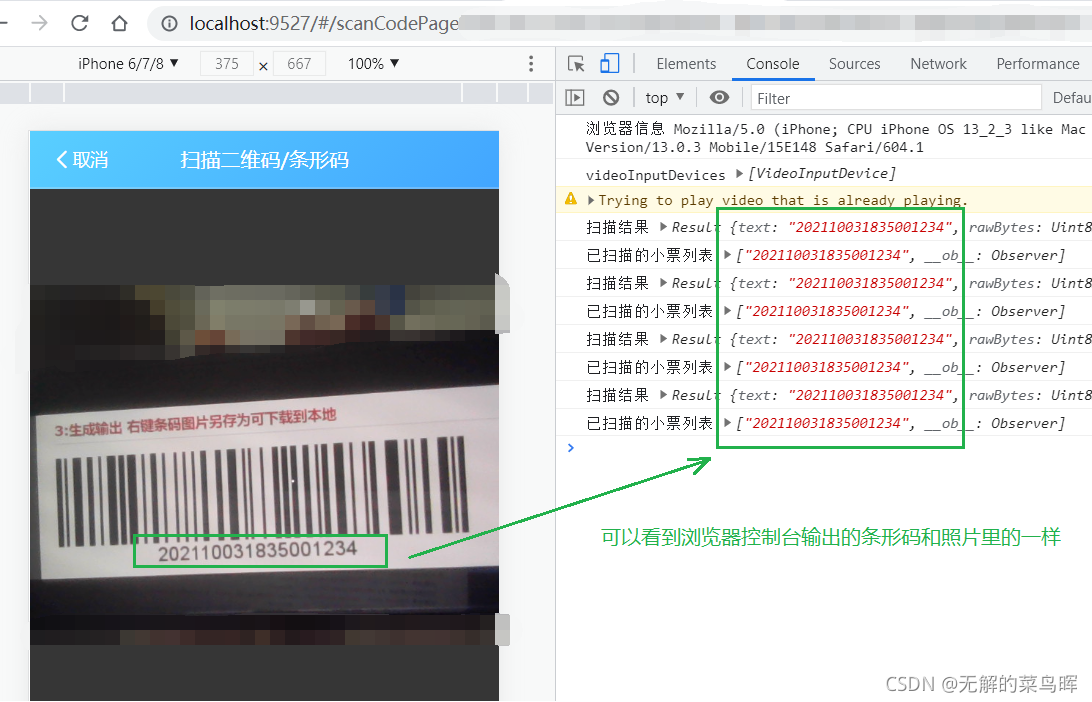
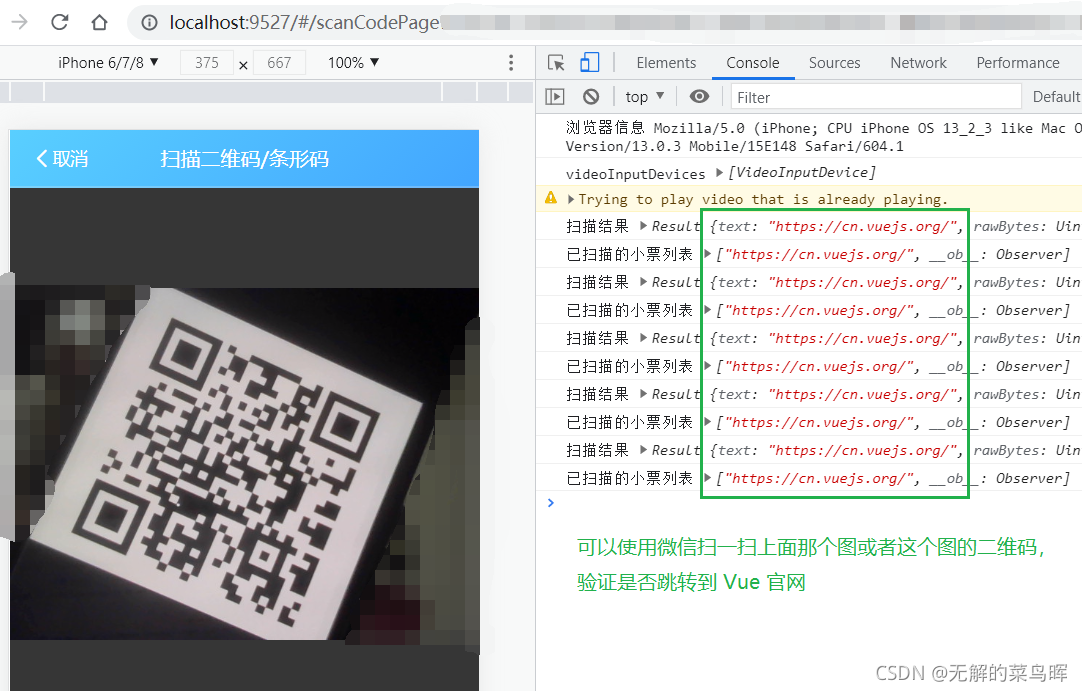
可以看到这样操作不用经过任何打包(有的需要打包成 app 才行)、部署(有的需要部署到 https 的服务器才行)、配置(前面说的诸如微信开发的配置等...)。 三、具体操作实现1、安装。 npm install @zxing/library --save2、假设场景:页面上有个按钮,点击触发扫码功能 @click='scanCode()',在 methods 写入该方法。 scanCode() { console.log('浏览器信息', navigator.userAgent); this.$router.push({ path: '/ScanCodePage' }); }同时在 vue-router 写入对应页面的路由。 { title: '扫码页面', name: 'ScanCodePage', path: '/ScanCodePage', component: () => import('@/views/ScanCodePage.vue') }3、扫码页面代码,通过与 video 标签结合使用,把以下代码直接全部拷贝到新建的一个 ScanCodePage.vue 文件里使用,读者在注释的地方自行根据需求,编写后续的业务代码即可。 {{ tipMsg }} import { BrowserMultiFormatReader } from '@zxing/library'; import { Toast, Dialog, Notify } from 'vant'; export default { name: 'ScanCodePage', // 扫码页面 data() { return { codeReader: null, tipShow: false, // 是否展示提示 tipMsg: '', // 提示文本内容 scanText: '', // 扫码结果文本内容 } }, created() { this.openScan(); }, watch: { '$route'(to, from) { if(to.path == '/ScanCodePage'){ // 当处于该页面时 this.openScan(); } } }, destroyed(){ this.codeReader.reset(); this.codeReader = null; }, methods: { async openScan() { // 初始化摄像头 this.codeReader = await new BrowserMultiFormatReader(); this.codeReader.getVideoInputDevices().then(videoDevices => { this.tipMsg = '正在调用摄像头...'; this.tipShow = true; console.log('get-videoDevices', videoDevices); // 默认获取摄像头列表里的最后一个设备id,通过几部测试机发现一般前置摄像头位于列表里的前面几位,所以一般获取最后一个的是后置摄像头 let firstDeviceId = videoDevices[videoDevices.length - 1].deviceId; // 一般获取了手机的摄像头列表里不止一个,有的手机摄像头高级多层,会有变焦摄像头等情况,需要做处理 if (videoDevices.length > 1) { // 一般通过判断摄像头列表项里的 label 字段,'camera2 0, facing back' 字符串含有 'back' 和 '0',大部分机型是这样,如果有些机型没有,那就还是默认获取最后一个 firstDeviceId = videoDevices.find(el => { return el.label.indexOf('back') > -1 && el.label.indexOf('0') > -1 }) ? videoDevices.find(el => { return el.label.indexOf('back') > -1 && el.label.indexOf('0') > -1 }).deviceId : videoDevices[videoDevices.length - 1].deviceId; } console.log('get-firstDeviceId', firstDeviceId); this.decodeFromInputVideoFunc(firstDeviceId); }).catch(err => { this.tipShow = false; console.error(err); }); }, decodeFromInputVideoFunc(firstDeviceId) { // 使用摄像头扫描 this.codeReader.reset(); // 重置 this.codeReader.decodeFromInputVideoDeviceContinuously(firstDeviceId, 'video', (result, err) => { this.tipMsg = '正在尝试识别...'; if (result) { console.log('扫码结果', result); this.scanText = result.text; if (this.scanText) { this.tipShow = false; Dialog.confirm({ // 获取到扫码结果进行弹窗提示,这部分接下去的代码根据需要,读者自行编写了 title: '扫码结果', message: this.scanText, }).then(() => { // 点击确认 }).catch(() => { // 点击取消 }); } } }); }, clickIndexLeft(){ // 返回上一页 this.$destroy(); this.$router.go(-1); // window.location.href = document.referrer; } } } .scan-index-bar{ background-image: linear-gradient( -45deg, #42a5ff ,#59cfff); .van-nav-bar__title, .van-nav-bar__arrow, .van-nav-bar__text{ color: #fff !important; } } .scan-page{ min-height: 100vh; background-color: #363636; overflow-y: hidden; .scan-video{ height: 85vh; } .scan-tip{ width: 100vw; text-align: center; color: white; font-size: 5vw; } }这是我本人在工作学习中做的一些总结,同时也分享出来给需要的小伙伴哈 ~ 供参考学习,有什么建议也欢迎评论留言,转载请注明出处哈,感谢支持! |

【本文地址】
今日新闻 |
推荐新闻 |