转 使用SwingBench 对Oracle RAC DB性能 压力测试 以及 MySQL基准测试工具 |
您所在的位置:网站首页 › 高达老虎和扎古 › 转 使用SwingBench 对Oracle RAC DB性能 压力测试 以及 MySQL基准测试工具 |
转 使用SwingBench 对Oracle RAC DB性能 压力测试 以及 MySQL基准测试工具
|
###########说明1:
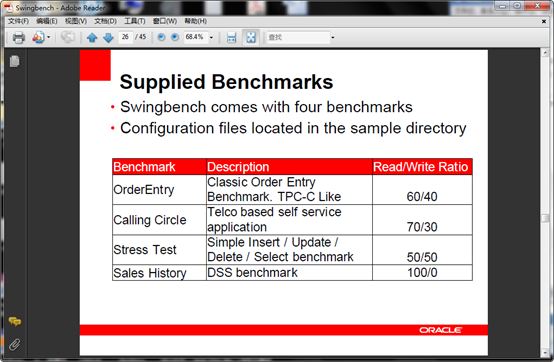
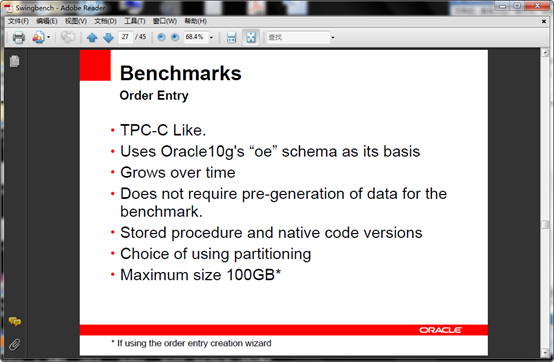
1 Swingbench 简述 1.1 概述 这是Oracle UK的一个员工在一个被抛弃的项目的基础上开发的。目前稳定版本2.2,最新版本2.3,基于JDK1.5。该工具是免费的,可以在作者的网站上自由下载,并且拥有详细的使用文档。除了Swingbench,作者还开发了两个相关工具:测试数据生成工具DataGenerator和跟踪文件分析工具Trace Analyzer。 Swingbench可 以执行4种不同的标准测试(benchmark),拥有三种前端展示方式Swingbench/Charbench/Minibench,其中 Charbench是字符模式的,另外两种是GUI模式的。另外还可以通过ClusterOverview可以聚合显示所有的结果。Swingbench的开发目的主要是用来展示RAC的负载和测试,但也可用于单实例环境。最新的2.3版本开始支持TimesTen内存数据库。 下载地址:http://www.dominicgiles.com/downloads.html 作者博客:http://www.dominicgiles.com/blog/blog.html 目前网络上开源的oracle压力测试工具主要是orabm和swingbench,由于orabm不支持oracle 11g版本,因此本次测试使用了swingben进行了压力测试。另外,swingbench还能对rac进行测试。swingbench是UK based oracle Database Solutions group开发的一个oracle压力测试工具,好像是官方废弃的一个项目,官方页面http://dominicgiles.com/swingbench.html上可以下载最新的软件版本。swingbench可以运行在windows和linux平台,本次以windows为例。
2. 环境配置 测试客户端需要安装JDK,无需安装oracle client端 swingbench的版本为2.4 ,直接解压软件压缩包,解压后路劲如下,因是windows下做测试 所以使用 winbin目录下的批处理文件
主要使用到的是如下四个bat文件
主要的bat文件作用如下: 1、 bmcompare 用来对比测试结果 2、 ccwizard 是以CC种子为模板创建的运行测试数据 3、 clusteroverview 用来启动集群的压力测试,并查看测试结果 4、 coordinator 用来启动协调服务器 5、 minibench 用来注册节点到协调服务器 6、 oewizard 是以OE种子为模板创建运行测试数据 7、 shwizard 是以SH种子为模板创建运行测试数据 8、 swingbench 执行基准测试
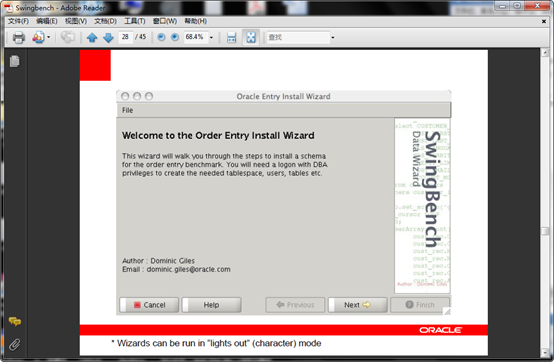
3.测试 3.1 创建测试数据 swingbench不使用客户数据,而是按自己的规则创建测试数据,(生成的测试数据只能使用一次,测试过后 需要再次测试的话,需要重新创建测试数据,这点做的不好) 到目标目录下 运行oewizard.bat批处理文件,也可以在目录下双机oewizard.bat批处理文件运行
会看到如下界面
下一步
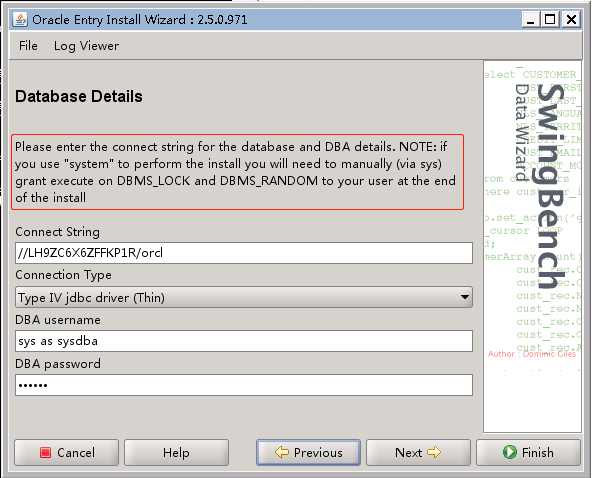
下一步,输入你需要测试的数据库的 //ip/sid 以及sys用户的密码
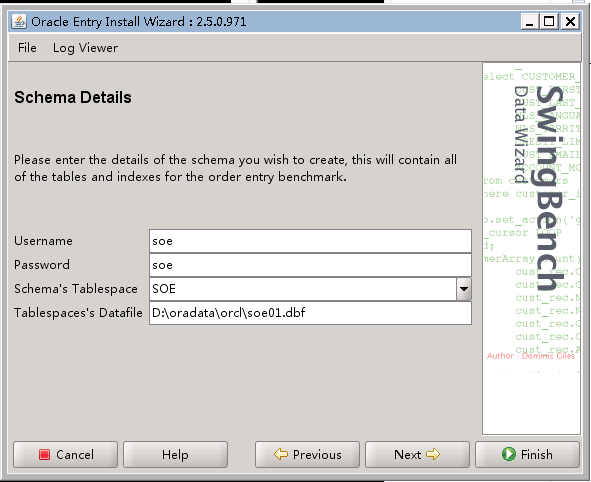
下一步,前三项不需要修改,为swingbench自动创建的schema,只需要修改datafile的存放路径即可。
下一步,选择创建数据的数据量 最小100M 最大1TB, 我选择为100GB 一般需要4-7小时,(和你硬件io性能有关) PS:做测试时要确定对生产库没有影响,用swingbench测试,会占用大量的IO,我使用的是新核心系统的新存储,和旧的环境完全独立,所以swingbench测试对旧生产环境没有任何影响。
下一步,
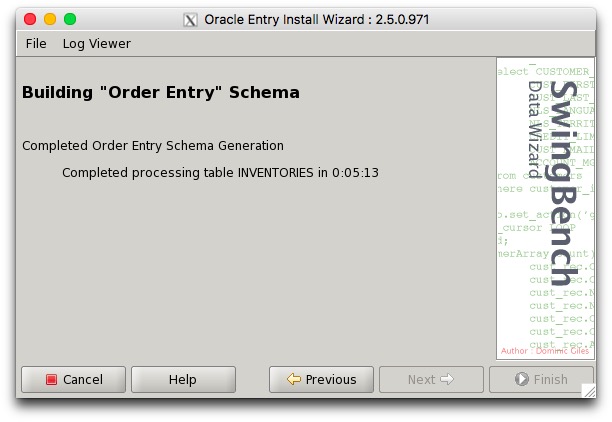
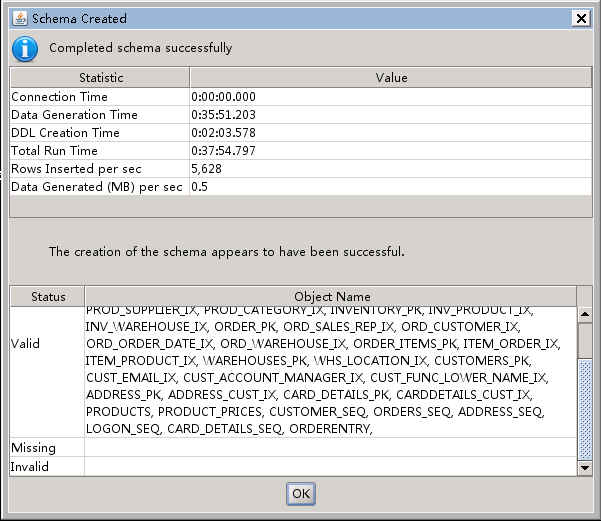
下一步,数据开始插入,100G的数据大概要7个小时左右完成。
4、启动swingbench配置 4.1、Winbin目录下运行coordinator–g 启动协调服务器,如下
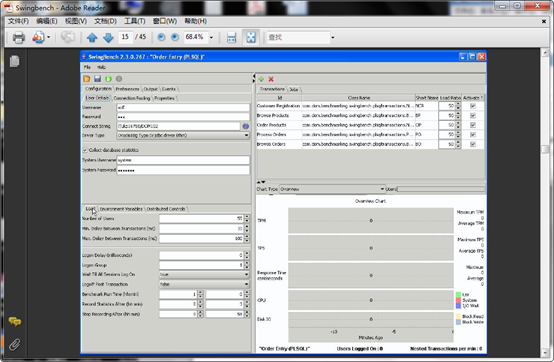
4.2、启动swingbench配置相关压力测试参数
出现如此主界面 主要参数设置 好对应的connect string,其他的参数建附录A
设置图上vhfs1节点圈圈内的参数,节点2同样操作。
将数据库OS 的ssh打开 则可以统计主机的cpu disk IO 信息
也可以拉出AWR报表
设置 insert,update ,select的比例
4.3 注册节点到注册服务器(这一步很重要,如果不填写协调服务器主机名,则无法使用cluster view集群进程)
完成后点击保存(两个节点都要填写协调服务器主机名),退出。
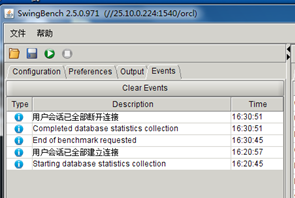
5、测试 5.1、打开集群的两个节点,命令如下, swingbench.bat -c C:\swingbench\configs\oeconfig.xml -cs 192.192.5.106:1521:vhfs1 -g vhfs1 -dt thin swingbench.bat -c C:\swingbench\configs\oeconfig.xml -cs 192.192.5.107:1521:vhfs2 -g vhfs2 -dt thin 保持集群下两节点的swingbench 图形进程处于打开状态。 5.2、运行./clusteroverview进行测试,依次启动oracleRAC的两个节点数据库连接,如下,可以在运行选项栏里选择自动负载均衡。
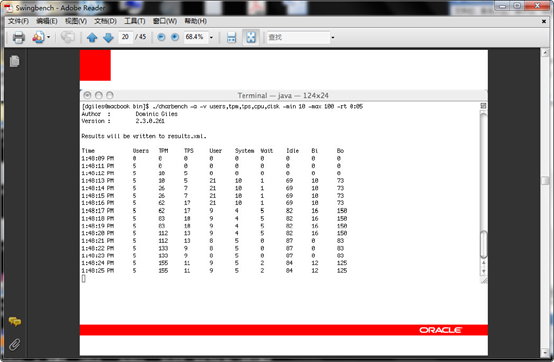
压力测试结果如下,
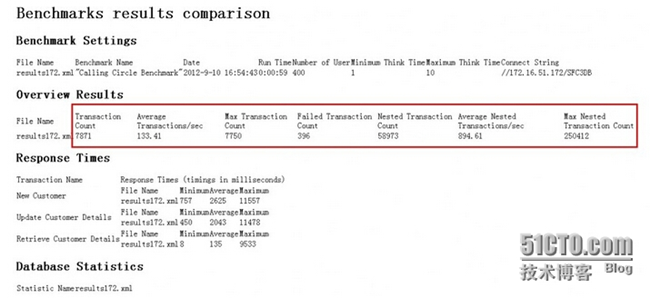
6、测试结果统计对比 结果为XML文档
############## sample 1: #######section 4: java虚拟机内存不足,“Could not create the Java Virtual Machine”问题解决方案
在运行java程序时,遇到问题"Could not create the Java Virtual Machine."如下截图:
大概原因,就是java堆内存不足以运行JVM,需要增加内存。 网上搜索此问题,大部分都是针对某个程序进行修改JVM内存的解决方法,比如eclipse,等。试问,若是其他程序出现问题了呢? 现在给出一个全局的java虚拟机修改内存的方法。在WIN XP,WIN 7,WIN8都可以。 解决方案:增加一个系统环境变量 变量名:_JAVA_OPTIONS 变量值:-Xmx512M 保存后,就OK!! 下面给出关于java堆内存的一个介绍,这是一个英文网页的翻译过来的。 关于java堆内存:
可以利用bmcompare.bat 对比两个测试结果,语法如图,结果会生产在本地。 c:\swingbench\winbin>bmcompare.bat -r results00003 results00013
https://www.cnblogs.com/jyzhao/p/6185463.html?utm_source=itdadao&utm_medium=referral
我们可以使用swingbench这个工具对数据库性能进行压力测试,得到一些性能指标作为参考。SwingBench下载:http://www.dominicgiles.com/downloads.html 参考相关文章:http://www.linuxidc.com/Linux/2016-04/130297.htmhttp://blog.csdn.net/xiaofan23z/article/details/7978998 实验环境:RHEL 6.5 + Oracle 11.2.0.4 RAC + SwingBench 2.5.0.971
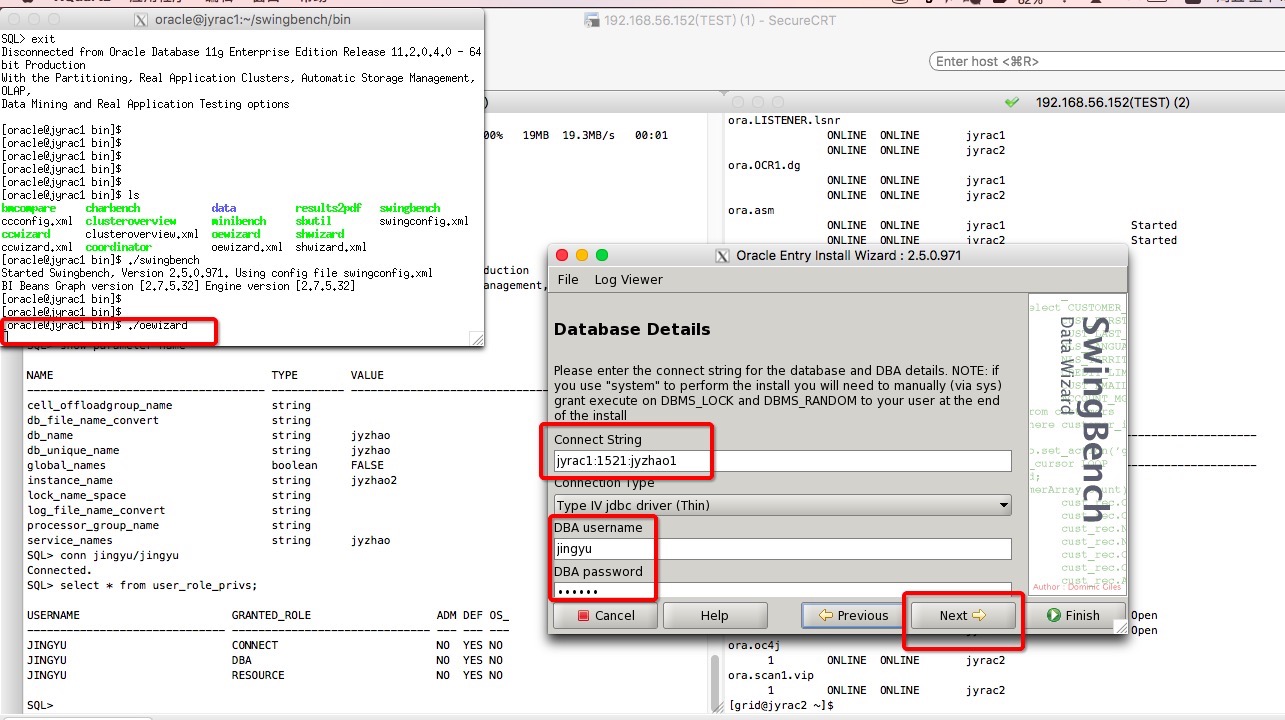
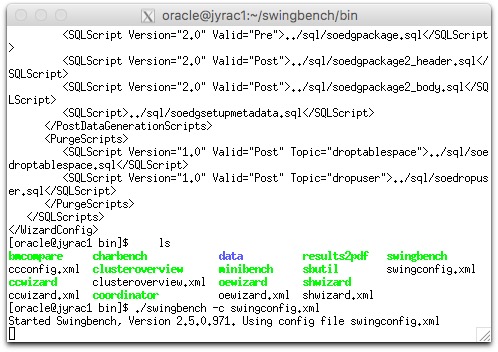
第一步 创建配置表和信息 1. 生成swingbench配置文件swingbench解压即可使用,第一次需要配置,本次只是简单熟悉swingbench的使用,配置基本按照默认。 [oracle@jyrac1 bin]$ pwd /home/oracle/swingbench/bin [oracle@jyrac1 bin]$ ./oewizard
--如果压测只连接实例2jyrac2:1521:jyzhao2 --如果压测连接RAC集群,LB到各个实例//jyrac1/jyzhao
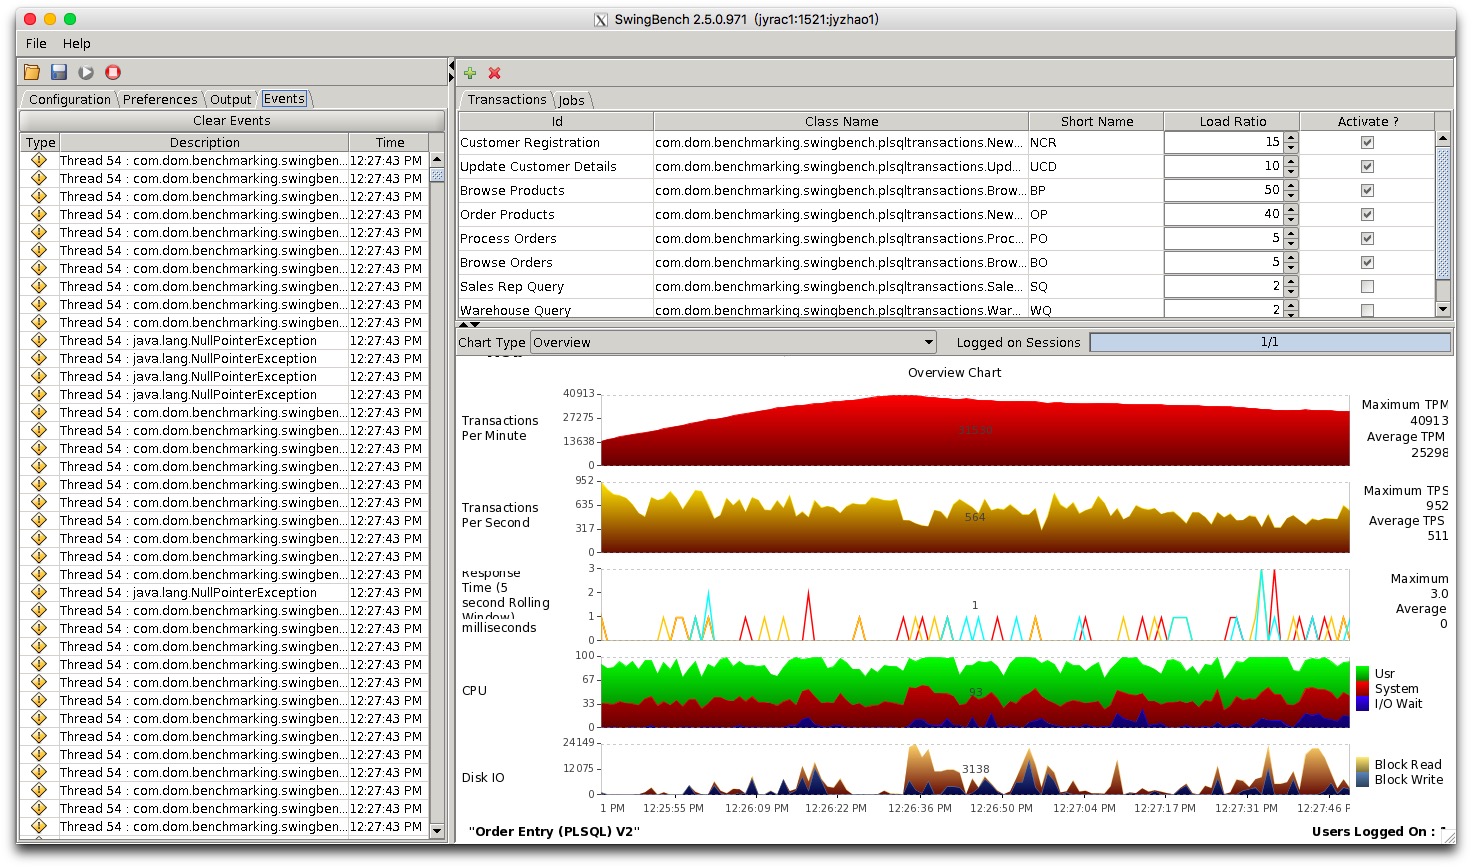
第二步: 进行压力测试 2. 运行swingbench压力测试
可以大致看到压力测试中,数据库可以达到的TPM,TPS等性能指标,作为今后系统正式上线后的一个参考依据 补充:最好使用sys用户直接连接,确认没有无效对象,避免后续再次赋权:下面附几张单实例压测配置的截图: --linux 测试环境 8G 数据实际完成时间为 3小时50分 -AIX 1G ,1G 数据库实际完成时间20分钟 -如果使用非system的dba 用户创建,需要执行grant execute on dbms_lock to soe; 数据导完之后在该目录下运行swingbench执行测试,修改数据库连接名,用户连接数设置为350,测试时间设置为10分钟
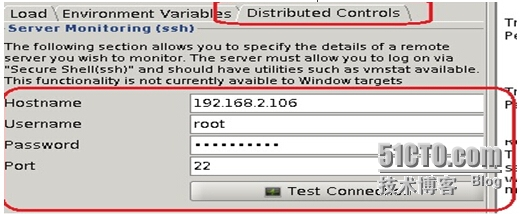
修改Distributed Controls用于测试过程中搜集测试监控信息,修改完之后测试连接是否正常,并可以统计主机的cpu disk IO 信息
还可以拉出AWR报表
设置 insert,update ,select的比例
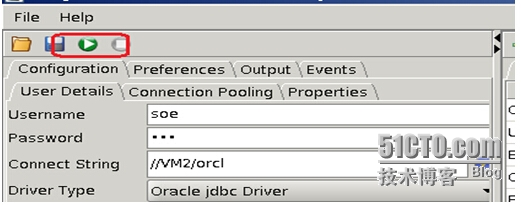
设置完成之后,点击左上角绿色按钮执行测试
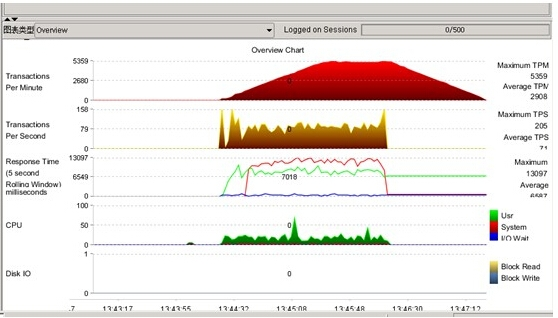
试结果可保持为XML文档,最后查看显示如下, 我的测试发现第一次运行压力测试正常,后面跑几次总是hang 在3分钟,左右,不知道什么原因 原因如下: 这是正常的测试 ,没有黄色的告警
这是有问题 ,
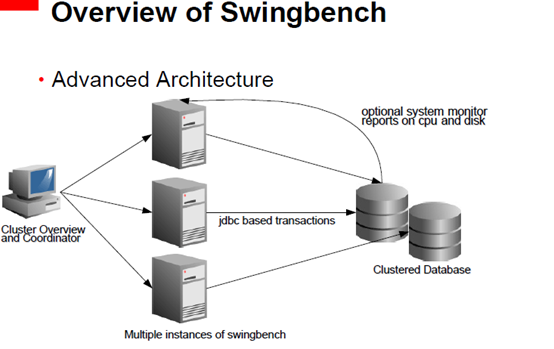
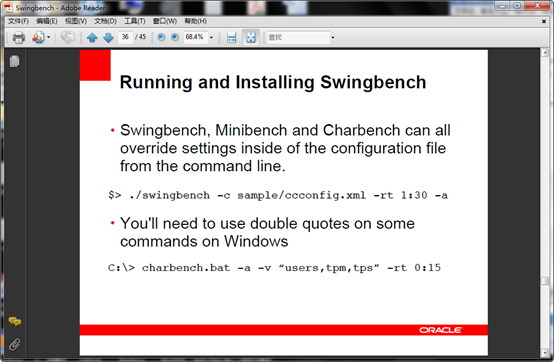
###官方文档 http://www.dominicgiles.com/Swingbench.pdf 1. Overview of Swingbench • Typically used as a standalone load generator • However a Coordinator process allows multiple load generators to work together. • ClusterOverview aggregates all of the results together. • Its free....
2.
For windows
1. Overview of Swingbench • Typically used as a standalone load generator • However a Coordinator process allows multiple load generators to work together. • ClusterOverview aggregates all of the results together. • Its free....
For windows
---恢复内容结束--- ############## sample 1:
整体来说,swingbench 使用起来比较只能,全部操作只需要在图形化界面窗口操作,就可以了,。 一共分为2步,第一步创建测试对象。 winbin/oewizard 进行创建 第二步使用测试对象的数据进行压力测试。
winbin/swingbench执行测试,
安装部署的主要问题
######### 注意事项 可以再创建时候,指定只创建metadatajava程序创建用户失败不会报错,注意比如19C 对用户密码有复杂度要求 需要单独拿出sql 在19c 环境测试才能出现报错19C 密码有复杂度要求, ORA-20001: Password length less than 8所以设置19c 密码可以设置的相对复杂点。 观察操作系统,可以看到如下进程正在跑 /usr/lib/systemd/systemd --switched-root --system --deserialize 22
实验用户如下: 11G 可以设置用户名和密码为 schemas=SOE/SOE 19C 可以设置用户名和密码为 schemas=SOE/Twer1234密码是跟测试机保持一致
另外: \swingbench 11g 连接用户system/manager实验用户 schemas=SOE/SOE
#######section 4: java虚拟机内存不足,“Could not create the Java Virtual Machine”问题解决方案
在运行java程序时,遇到问题"Could not create the Java Virtual Machine."如下截图:
大概原因,就是java堆内存不足以运行JVM,需要增加内存。 网上搜索此问题,大部分都是针对某个程序进行修改JVM内存的解决方法,比如eclipse,等。试问,若是其他程序出现问题了呢? 现在给出一个全局的java虚拟机修改内存的方法。在WIN XP,WIN 7,WIN8都可以。 解决方案:增加一个系统环境变量 变量名:_JAVA_OPTIONS 变量值:-Xmx512M 保存后,就OK!! 下面给出关于java堆内存的一个介绍,这是一个英文网页的翻译过来的。 关于java堆内存:
###解压软件,进入winbin/目录,执行oewizard.bat ###推荐使用sys 用户连接,如果需要使用system连接,需要授权alter user system identified by manager; grant execute on dbms_lock to system;grant execute on dbms_random to system; ###系统会默认创建一个soe 用户/密码也是SOE,并指定表空间
3、进入swingbench/bin目录执行oewizard导入1G测试数据,并修改数据库连接名和DBA密码
注意,上面的connect string,根据需求填写,比如: --如果压测只连接实例1 jyrac1:1521:jyzhao1 --如果压测只连接实例2 jyrac2:1521:jyzhao2 --如果压测连接RAC集群,LB到各个实例 //jyrac1/jyzhao
输入导入数据文件存放位置:
选择导入1G数据:
--linux 测试环境 8G 数据实际完成时间为 3小时50分
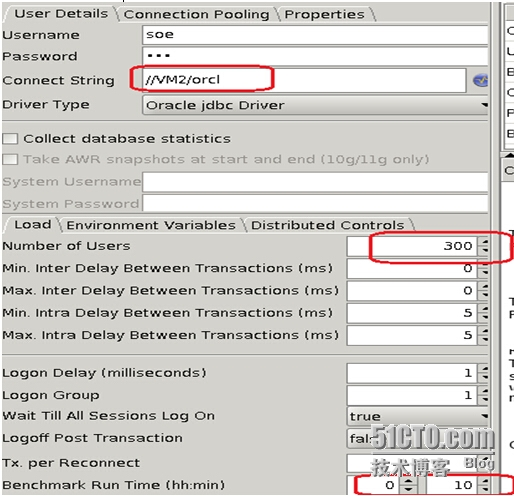
数据导完之后在该目录下运行swingbench执行测试,修改数据库连接名,用户连接数设置为300,测试时间设置为10分钟
修改Distributed Controls用于测试过程中搜集测试监控信息,修改完之后测试连接是否正常,并可以统计主机的cpu disk IO 信息
还可以拉出AWR报表
设置 insert,update ,select的比例
设置完成之后,点击左上角绿色按钮执行测试
测试过程截图
测试结果可保持为XML文档,最后查看显示如下
------------ 我们可以使用swingbench这个工具对数据库性能进行压力测试,得到一些性能指标作为参考。 SwingBench下载: http://www.dominicgiles.com/downloads.html 参考相关文章: http://www.linuxidc.com/Linux/2016-04/130297.htm http://blog.csdn.net/xiaofan23z/article/details/7978998
###########说明1:
1 Swingbench 简述 1.1 概述 这是Oracle UK的一个员工在一个被抛弃的项目的基础上开发的。目前稳定版本2.2,最新版本2.3,基于JDK1.5。该工具是免费的,可以在作者的网站上自由下载,并且拥有详细的使用文档。除了Swingbench,作者还开发了两个相关工具:测试数据生成工具DataGenerator和跟踪文件分析工具Trace Analyzer。 Swingbench可 以执行4种不同的标准测试(benchmark),拥有三种前端展示方式Swingbench/Charbench/Minibench,其中 Charbench是字符模式的,另外两种是GUI模式的。另外还可以通过ClusterOverview可以聚合显示所有的结果。Swingbench的开发目的主要是用来展示RAC的负载和测试,但也可用于单实例环境。最新的2.3版本开始支持TimesTen内存数据库。 下载地址:http://www.dominicgiles.com/downloads.html 作者博客:http://www.dominicgiles.com/blog/blog.html 目前网络上开源的oracle压力测试工具主要是orabm和swingbench,由于orabm不支持oracle 11g版本,因此本次测试使用了swingben进行了压力测试。另外,swingbench还能对rac进行测试。swingbench是UK based oracle Database Solutions group开发的一个oracle压力测试工具,好像是官方废弃的一个项目,官方页面http://dominicgiles.com/swingbench.html上可以下载最新的软件版本。swingbench可以运行在windows和linux平台,本次以windows为例。
2. 环境配置 测试客户端需要安装JDK,无需安装oracle client端 swingbench的版本为2.4 ,直接解压软件压缩包,解压后路劲如下,因是windows下做测试 所以使用 winbin目录下的批处理文件
主要使用到的是如下四个bat文件
主要的bat文件作用如下: 1、 bmcompare 用来对比测试结果 2、 ccwizard 是以CC种子为模板创建的运行测试数据 3、 clusteroverview 用来启动集群的压力测试,并查看测试结果 4、 coordinator 用来启动协调服务器 5、 minibench 用来注册节点到协调服务器 6、 oewizard 是以OE种子为模板创建运行测试数据 7、 shwizard 是以SH种子为模板创建运行测试数据 8、 swingbench 执行基准测试
3.测试 3.1 创建测试数据 swingbench不使用客户数据,而是按自己的规则创建测试数据,(生成的测试数据只能使用一次,测试过后 需要再次测试的话,需要重新创建测试数据,这点做的不好) 到目标目录下 运行oewizard.bat批处理文件,也可以在目录下双机oewizard.bat批处理文件运行
会看到如下界面
下一步
下一步,输入你需要测试的数据库的 //ip/sid 以及sys用户的密码
下一步,前三项不需要修改,为swingbench自动创建的schema,只需要修改datafile的存放路径即可。
下一步,选择创建数据的数据量 最小100M 最大1TB, 我选择为100GB 一般需要4-7小时,(和你硬件io性能有关) PS:做测试时要确定对生产库没有影响,用swingbench测试,会占用大量的IO,我使用的是新核心系统的新存储,和旧的环境完全独立,所以swingbench测试对旧生产环境没有任何影响。
下一步,
下一步,数据开始插入,100G的数据大概要7个小时左右完成。
4、启动swingbench配置 4.1、Winbin目录下运行coordinator–g 启动协调服务器,如下
4.2、启动swingbench配置相关压力测试参数
出现如此主界面 主要参数设置 好对应的connect string,其他的参数建附录A
设置图上vhfs1节点圈圈内的参数,节点2同样操作。
将数据库OS 的ssh打开 则可以统计主机的cpu disk IO 信息
也可以拉出AWR报表
设置 insert,update ,select的比例
4.3 注册节点到注册服务器(这一步很重要,如果不填写协调服务器主机名,则无法使用cluster view集群进程)
完成后点击保存(两个节点都要填写协调服务器主机名),退出。
5、测试 5.1、打开集群的两个节点,命令如下, swingbench.bat -c C:\swingbench\configs\oeconfig.xml -cs 192.192.5.106:1521:vhfs1 -g vhfs1 -dt thin swingbench.bat -c C:\swingbench\configs\oeconfig.xml -cs 192.192.5.107:1521:vhfs2 -g vhfs2 -dt thin 保持集群下两节点的swingbench 图形进程处于打开状态。 5.2、运行./clusteroverview进行测试,依次启动oracleRAC的两个节点数据库连接,如下,可以在运行选项栏里选择自动负载均衡。
压力测试结果如下,
6、测试结果统计对比 结果为XML文档
#######################
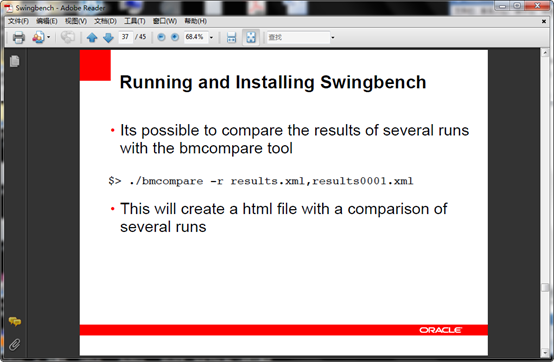
可以利用bmcompare.bat 对比两个测试结果,语法如图,结果会生产在本地。 c:\swingbench\winbin>bmcompare.bat -r results00003 results00013
https://www.cnblogs.com/jyzhao/p/6185463.html?utm_source=itdadao&utm_medium=referral
我们可以使用swingbench这个工具对数据库性能进行压力测试,得到一些性能指标作为参考。SwingBench下载:http://www.dominicgiles.com/downloads.html 参考相关文章:http://www.linuxidc.com/Linux/2016-04/130297.htmhttp://blog.csdn.net/xiaofan23z/article/details/7978998 实验环境:RHEL 6.5 + Oracle 11.2.0.4 RAC + SwingBench 2.5.0.971 1. 生成swingbench配置文件swingbench解压即可使用,第一次需要配置,本次只是简单熟悉swingbench的使用,配置基本按照默认。 [oracle@jyrac1 bin]$ pwd /home/oracle/swingbench/bin [oracle@jyrac1 bin]$ ./oewizard
--如果压测只连接实例2jyrac2:1521:jyzhao2 --如果压测连接RAC集群,LB到各个实例//jyrac1/jyzhao
2. 运行swingbench压力测试
可以大致看到压力测试中,数据库可以达到的TPM,TPS等性能指标,作为今后系统正式上线后的一个参考依据 补充:最好使用sys用户直接连接,确认没有无效对象,避免后续再次赋权:下面附几张单实例压测配置的截图:
###sample 2
https://www.cnblogs.com/wxzhe/p/10026569.html MySQL基准测试工具--sysbench我们需要知道的是sysbench并不是一个压力测试工具,是一个基准测试工具。linux自带的版本比较低,我们需要自己安装sysbench。 [root@test2 ~]# sysbench --version sysbench 0.4.12安装sysbench,sysbench的源码托管在GitHub上,下载源码:  unzip sysbench-master.zip #解压源码
yum -y install make automake libtool pkgconfig libaio-devel #下载依赖包
cd sysbench-master
sh autogen.sh
编译:
./configure --with-mysql-includes=/usr/local/mysql/include --with-mysql-libs=/usr/local/mysql/lib #根据安装的MySQL的位置,设置目录位置
make
make install
这样安装之后使用sysbench命令时会报错。
[root@test3 sysbench-master]# sysbench --version
sysbench: error while loading shared libraries: libmysqlclient.so.20: cannot open shared object file: No such file or directory
解决办法:
在/etc/profile文件中加入一行:
export LD_LIBRARY_PATH=/usr/local/mysql/lib
source /etc/profile
命令可以正常使用
[root@test3 sysbench-master]# sysbench --version
sysbench 1.1.0
unzip sysbench-master.zip #解压源码
yum -y install make automake libtool pkgconfig libaio-devel #下载依赖包
cd sysbench-master
sh autogen.sh
编译:
./configure --with-mysql-includes=/usr/local/mysql/include --with-mysql-libs=/usr/local/mysql/lib #根据安装的MySQL的位置,设置目录位置
make
make install
这样安装之后使用sysbench命令时会报错。
[root@test3 sysbench-master]# sysbench --version
sysbench: error while loading shared libraries: libmysqlclient.so.20: cannot open shared object file: No such file or directory
解决办法:
在/etc/profile文件中加入一行:
export LD_LIBRARY_PATH=/usr/local/mysql/lib
source /etc/profile
命令可以正常使用
[root@test3 sysbench-master]# sysbench --version
sysbench 1.1.0
查看sysbench的一些帮助信息:
[root@test3 ~]# sysbench --help
Usage:
sysbench [options]... [testname] [command]
Commands implemented by most tests: prepare run cleanup help
General options:
--threads=N number of threads to use [1] #线程的数量,默认是1
--events=N limit for total number of events [0] #限制的最大事件数量,默认是0,不限制
--time=N limit for total execution time in seconds [10] #整个测试执行的时间
--warmup-time=N #在进行基准测试多少秒之后启用统计信息--forced-shutdown=STRING #超过--time时间限制后,强制中断,默认是【off】
--thread-stack-size=SIZE size of stack per thread [64K]
--thread-init-timeout=N wait time in seconds for worker threads to initialize [30]
--rate=N average transactions rate. 0 for unlimited rate [0]
--report-interval=N #打印出中间的信念,N表示每隔N秒打印一次,0表示禁用--report-checkpoints=[LIST,...] #转储完全统计信息并在指定时间点复位所有计数器,参数是逗号分隔值的列表,表示从必须执行报告检查点的测试开始所经过的时间(以秒为单位)。 默认情况下,报告检查点处于关闭状态[off]。--debug[=on|off] print more debugging info [off]
--validate[=on|off] #在可能情况下执行验证检查,默认是[off]
--help[=on|off] print help and exit [off]
--version[=on|off] print version and exit [off]
--config-file=FILENAME File containing command line options
--luajit-cmd=STRING perform LuaJIT control command. This option is equivalent to 'luajit -j'. See LuaJIT documentation for more information#上面是一些通用的配置信息,在具体测试某个测试时,会再详细说明参数设置
首先来进行IO测试
[root@test3 ~]# sysbench fileio help #查看IO测试的文档
sysbench 1.1.0 (using bundled LuaJIT 2.1.0-beta3)
fileio options:
--file-num=N number of files to create [128] #文件的数量
--file-block-size=N block size to use in all IO operations [16384] #文件块的大小,如果要是针对INNODB的测试,可以设置为innodb_page_size的大小
--file-total-size=SIZE total size of files to create [2G] #文件的总大小
--file-test-mode=STRING test mode {seqwr【顺序写】, seqrewr【顺序读写】, seqrd【顺序读】, rndrd【随机读】, rndwr【随机写】, rndrw【随机读写】} #文件测试模式
--file-io-mode=STRING file operations mode {sync【同步】,async【异步】,mmap【map映射】} [默认为:sync] #文件的io模式
--file-async-backlog=N number of asynchronous operatons to queue per thread [128] #打开文件时的选项,这是与API相关的参数。
--file-extra-flags=[LIST,...] #打开文件时的选项,这是与API相关的参数。可选有sync,dsync,direct。--file-fsync-freq=N #执行fsync函数的频率,fsync主要是同步磁盘文件,因为可能有系统和磁盘缓冲的关系。默认为100,如果为0表示不使用fsync。
--file-fsync-all[=on|off] #每执行完一次写操作,就执行一次fsync,默认未off。--file-fsync-end[=on|off] #在测试结束时,执行fsync,默认为on。--file-fsync-mode=STRING #文件同步函数的选择,同样是和API相关的参数,由于多个操作对fdatasync支持的不同,因此不建议使用fdatasync。默认为fsync。--file-merged-requests=N #尽可能合并此数量的io请求(0-不合并),默认为[0]。
--file-rw-ratio=N #测试时的读写比例,默认是2:1。
在使用sysbench进行测试的时候,通常分为三个步骤prepare,run,cleanup阶段。 第一步准备数据(prepare阶段):
[root@test3 systext]# sysbench fileio --file-num=10 --file-total-size=50G prepare
sysbench 1.1.0 (using bundled LuaJIT 2.1.0-beta3)
10 files, 5242880Kb each, 51200Mb total
Creating files for the test...
Extra file open flags: (none)
Creating file test_file.0
Creating file test_file.1
Creating file test_file.2
Creating file test_file.3
Creating file test_file.4
Creating file test_file.5
Creating file test_file.6
Creating file test_file.7
Creating file test_file.8
Creating file test_file.9
53687091200 bytes written in 489.55 seconds (104.59 MiB/sec).#这里给出一个每秒写入的数据量104.59MB/s, 这里的写入是顺序写入的,表示磁盘的吞吐量为104.59MB/s。【一般对顺序的读写称为吞吐量,对随机的IO使用IOPS来表示】[root@test3 systext]# ll -h #文件大小为5个G total 50G-rw------- 1 root root 5.0G Nov 27 09:30 test_file.0-rw------- 1 root root 5.0G Nov 27 09:31 test_file.1-rw------- 1 root root 5.0G Nov 27 09:32 test_file.2-rw------- 1 root root 5.0G Nov 27 09:32 test_file.3-rw------- 1 root root 5.0G Nov 27 09:33 test_file.4-rw------- 1 root root 5.0G Nov 27 09:34 test_file.5-rw------- 1 root root 5.0G Nov 27 09:35 test_file.6-rw------- 1 root root 5.0G Nov 27 09:36 test_file.7-rw------- 1 root root 5.0G Nov 27 09:36 test_file.8-rw------- 1 root root 5.0G Nov 27 09:37 test_file.9
数据准备好之后,进行测试:
#这里进行随机读写测试[root@test3 systext]# sysbench fileio --file-num=10 --file-total-size=50G --file-block-size=16384 --file-test-mode=rndrw --file-io-mode=sync --file-extra-flags=direct --time=100 --threads=16 --report-interval=10 run
sysbench 1.1.0 (using bundled LuaJIT 2.1.0-beta3)
Running the test with following options: #设定的一些参数数值
Number of threads: 16
Report intermediate results every 10 second(s)
Initializing random number generator from current time
Extra file open flags: directio
10 files, 5GiB each
50GiB total file size
Block size 16KiB
Number of IO requests: 0
Read/Write ratio for combined random IO test: 1.50
Periodic FSYNC enabled, calling fsync() each 100 requests.
Calling fsync() at the end of test, Enabled.
Using synchronous I/O mode
Doing random r/w test
Initializing worker threads...
Threads started!
[ 10s ] reads: 3.24 MiB/s writes: 2.16 MiB/s fsyncs: 34.08/s latency (ms,95%): 80.025 #每隔10s输出一次报告
[ 20s ] reads: 3.49 MiB/s writes: 2.32 MiB/s fsyncs: 36.70/s latency (ms,95%): 73.135
[ 30s ] reads: 3.45 MiB/s writes: 2.29 MiB/s fsyncs: 37.00/s latency (ms,95%): 75.817
[ 40s ] reads: 3.43 MiB/s writes: 2.29 MiB/s fsyncs: 36.00/s latency (ms,95%): 75.817
[ 50s ] reads: 3.57 MiB/s writes: 2.38 MiB/s fsyncs: 37.40/s latency (ms,95%): 73.135
[ 60s ] reads: 3.08 MiB/s writes: 2.06 MiB/s fsyncs: 32.30/s latency (ms,95%): 86.002
[ 70s ] reads: 3.41 MiB/s writes: 2.27 MiB/s fsyncs: 36.40/s latency (ms,95%): 75.817
[ 80s ] reads: 3.47 MiB/s writes: 2.31 MiB/s fsyncs: 36.20/s latency (ms,95%): 73.135
[ 90s ] reads: 3.46 MiB/s writes: 2.31 MiB/s fsyncs: 36.20/s latency (ms,95%): 77.194
[ 100s ] reads: 3.10 MiB/s writes: 2.07 MiB/s fsyncs: 33.50/s latency (ms,95%): 75.817
Throughput:
read: IOPS=215.57 3.37 MiB/s (3.53 MB/s) #通常的机械磁盘随机IOPS也就是200多一点。
write: IOPS=143.72 2.25 MiB/s (2.35 MB/s) #随机写入的速度明显要低很多。
fsync: IOPS=37.13
Latency (ms):
min: 0.08
avg: 40.51
max: 1000.31
95th percentile: 77.19
sum: 1601329.71#随机读大概是2.10M/s,文件块的大小为16KB,可以大概估计磁盘转速: 2.10*1024KB*60s/16KB=7560n/m, 大概就是7500转每分
 顺序读的测试 顺序读的测试
可以更改--file-test-mode的模式,改变测试的模式。 测试阶段完成之后,需要进行最后的cleanup阶段,
[root@test3 systext]# sysbench fileio --file-num=10 --file-total-size=50 cleanup
sysbench 1.1.0 (using bundled LuaJIT 2.1.0-beta3)
Removing test files...
[root@test3 systext]# ls
[root@test3 systext]# df -h
Filesystem Size Used Avail Use% Mounted on
/dev/vda3 29G 8.4G 20G 31% /
tmpfs 3.9G 44K 3.9G 1% /dev/shm
/dev/vda1 190M 30M 151M 17% /boot
/dev/vdb 100G 25G 76G 25% /data
cgroup_root 3.9G 0 3.9G 0% /cgroup
#看到磁盘空间已经释放
测试MySQL的OLTP sysbench新版的用法和之前的旧版本有所不同,先来看测试数据库时的一些参数:
General database options:
--db-driver=STRING specifies database driver to use ('help' to get list of available drivers) [mysql] #指定数据库驱动,默认是mysql
--db-ps-mode=STRING prepared statements usage mode {auto, disable} [auto] #
--db-debug[=on|off] print database-specific debug information [off] #dubug模式
Compiled-in database drivers:
mysql - MySQL driver
mysql options:
--mysql-host=[LIST,...] MySQL server host [localhost]
--mysql-port=[LIST,...] MySQL server port [3306]
--mysql-socket=[LIST,...] MySQL socket
--mysql-user=STRING MySQL user [sbtest]
--mysql-password=STRING MySQL password []
--mysql-db=STRING MySQL database name [sbtest] #数据库名字,默认是sbtest
--mysql-ssl[=on|off] use SSL connections, if available in the client library [off] #以下是ssl的连接测试
--mysql-ssl-key=STRING path name of the client private key file
--mysql-ssl-ca=STRING path name of the CA file
--mysql-ssl-cert=STRING path name of the client public key certificate file
--mysql-ssl-cipher=STRING use specific cipher for SSL connections []
--mysql-compression[=on|off] use compression, if available in the client library [off] #压缩测试
--mysql-debug[=on|off] trace all client library calls [off]
--mysql-ignore-errors=[LIST,...] list of errors to ignore, or "all" [1213,1020,1205] #忽略的错误
--mysql-dry-run[=on|off] Dry run, pretend that all MySQL client API calls are successful without executing them [off]
MySQL测试的lua脚本:
#因为是源码安装,索引目录在这里
[root@test3 lua]# pwd
/data/sysbench-master/src/lua
[root@test3 lua]# ls
bulk_insert.lua Makefile oltp_common.lua oltp_point_select.lua oltp_update_index.lua prime-test.lua
empty-test.lua Makefile.am oltp_delete.lua oltp_read_only.lua oltp_update_non_index.lua select_random_points.lua
internal Makefile.in oltp_insert.lua oltp_read_write.lua oltp_write_only.lua select_random_ranges.lua
#根据脚本的名字可以选择对应的基本#查看某个lua脚本的用法[root@test3 lua]# sysbench oltp_common.lua help sysbench 1.1.0 (using bundled LuaJIT 2.1.0-beta3)oltp_common.lua options: --auto_inc[=on|off] Use AUTO_INCREMENT column as Primary Key (for MySQL), or its alternatives in other DBMS. When disabled, use client-generated IDs [on] --create_secondary[=on|off] Create a secondary index in addition to the PRIMARY KEY [on] --create_table_options=STRING Extra CREATE TABLE options [] --delete_inserts=N Number of DELETE/INSERT combinations per transaction [1] --distinct_ranges=N Number of SELECT DISTINCT queries per transaction [1] --index_updates=N Number of UPDATE index queries per transaction [1] --mysql_storage_engine=STRING Storage engine, if MySQL is used [innodb] --non_index_updates=N Number of UPDATE non-index queries per transaction [1] --order_ranges=N Number of SELECT ORDER BY queries per transaction [1] --pgsql_variant=STRING Use this PostgreSQL variant when running with the PostgreSQL driver. The only currently supported variant is 'redshift'. When enabled, create_secondary is automatically disabled, and delete_inserts is set to 0 --point_selects=N Number of point SELECT queries per transaction [10] --range_selects[=on|off] Enable/disable all range SELECT queries [on] --range_size=N Range size for range SELECT queries [100] --secondary[=on|off] Use a secondary index in place of the PRIMARY KEY [off] --simple_ranges=N Number of simple range SELECT queries per transaction [1] --skip_trx[=on|off] Don't start explicit transactions and execute all queries in the AUTOCOMMIT mode [off] --sum_ranges=N Number of SELECT SUM() queries per transaction [1] --table_size=N Number of rows per table [10000] --tables=N Number of tables [1]
prepare阶段: 创建默认的测试库:
mysql> create database sbtest; #创建数据库
Query OK, 1 row affected (0.11 sec)
#准备数据,时间比较长,可以把table_size设置的小一点
[root@test3 lua]# sysbench /data/sysbench-master/src/lua/oltp_read_write.lua --tables=3 --table_size=10000000 --mysql-user=root --mysql-password=123456 --mysql-host=10.0.102.214 --mysql-port=3306 --mysql-db=sbtest prepare
sysbench 1.1.0 (using bundled LuaJIT 2.1.0-beta3)
Creating table 'sbtest1'...
Inserting 10000000 records into 'sbtest1'
Creating a secondary index on 'sbtest1'...
Creating table 'sbtest2'...
Inserting 10000000 records into 'sbtest2'
Creating a secondary index on 'sbtest2'...
Creating table 'sbtest3'...
Inserting 10000000 records into 'sbtest3'
Creating a secondary index on 'sbtest3'...#在MySQL shel1中查看数据mysql> select count(*) from sbtest1;+----------+| count(*) |+----------+| 10000000 |+----------+1 row in set (1.89 sec) mysql> show tables;+------------------+| Tables_in_sbtest |+------------------+| sbtest1 || sbtest2 || sbtest3 |+------------------+3 rows in set (0.00 sec)
run阶段 选择一个合适的lua脚本进行测试:
[root@test3 lua]# sysbench /data/sysbench-master/src/lua/oltp_point_select.lua --tables=3 --table_size=10000000 --mysql-user=root --mysql-password=123456 --mysql-host=10.0.102.214 --mysql-port=3306 --mysql-db=sbtest --threads=128 --time=100 --report-interval=5 run
sysbench 1.1.0 (using bundled LuaJIT 2.1.0-beta3)
Running the test with following options:
Number of threads: 128
Report intermediate results every 5 second(s)
Initializing random number generator from current time
Initializing worker threads...
Threads started!
[ 5s ] thds: 128 tps: 15037.47 qps: 15037.47 (r/w/o: 15037.47/0.00/0.00) lat (ms,95%): 41.10 err/s: 0.00 reconn/s: 0.00
[ 10s ] thds: 128 tps: 18767.43 qps: 18767.43 (r/w/o: 18767.43/0.00/0.00) lat (ms,95%): 46.63 err/s: 0.00 reconn/s: 0.00
[ 15s ] thds: 128 tps: 22463.68 qps: 22463.68 (r/w/o: 22463.68/0.00/0.00) lat (ms,95%): 40.37 err/s: 0.00 reconn/s: 0.00
[ 20s ] thds: 128 tps: 26848.42 qps: 26848.42 (r/w/o: 26848.42/0.00/0.00) lat (ms,95%): 28.67 err/s: 0.00 reconn/s: 0.00
[ 25s ] thds: 128 tps: 27005.57 qps: 27005.57 (r/w/o: 27005.57/0.00/0.00) lat (ms,95%): 15.00 err/s: 0.00 reconn/s: 0.00
[ 30s ] thds: 128 tps: 26965.62 qps: 26965.62 (r/w/o: 26965.62/0.00/0.00) lat (ms,95%): 1.82 err/s: 0.00 reconn/s: 0.00
[ 35s ] thds: 128 tps: 27626.74 qps: 27626.74 (r/w/o: 27626.74/0.00/0.00) lat (ms,95%): 0.42 err/s: 0.00 reconn/s: 0.00
[ 40s ] thds: 128 tps: 27244.27 qps: 27244.27 (r/w/o: 27244.27/0.00/0.00) lat (ms,95%): 0.33 err/s: 0.00 reconn/s: 0.00
[ 45s ] thds: 128 tps: 26522.56 qps: 26522.56 (r/w/o: 26522.56/0.00/0.00) lat (ms,95%): 1.42 err/s: 0.00 reconn/s: 0.00
[ 50s ] thds: 128 tps: 26791.43 qps: 26791.43 (r/w/o: 26791.43/0.00/0.00) lat (ms,95%): 5.57 err/s: 0.00 reconn/s: 0.00
[ 55s ] thds: 128 tps: 27088.42 qps: 27088.42 (r/w/o: 27088.42/0.00/0.00) lat (ms,95%): 1.42 err/s: 0.00 reconn/s: 0.00
[ 60s ] thds: 128 tps: 28056.06 qps: 28056.06 (r/w/o: 28056.06/0.00/0.00) lat (ms,95%): 0.22 err/s: 0.00 reconn/s: 0.00
[ 65s ] thds: 128 tps: 27296.11 qps: 27296.11 (r/w/o: 27296.11/0.00/0.00) lat (ms,95%): 0.73 err/s: 0.00 reconn/s: 0.00
[ 70s ] thds: 128 tps: 28621.60 qps: 28621.60 (r/w/o: 28621.60/0.00/0.00) lat (ms,95%): 0.19 err/s: 0.00 reconn/s: 0.00
[ 75s ] thds: 128 tps: 28992.29 qps: 28992.29 (r/w/o: 28992.29/0.00/0.00) lat (ms,95%): 0.19 err/s: 0.00 reconn/s: 0.00
[ 80s ] thds: 128 tps: 28279.88 qps: 28279.88 (r/w/o: 28279.88/0.00/0.00) lat (ms,95%): 0.20 err/s: 0.00 reconn/s: 0.00
[ 85s ] thds: 128 tps: 28612.84 qps: 28612.84 (r/w/o: 28612.84/0.00/0.00) lat (ms,95%): 0.20 err/s: 0.00 reconn/s: 0.00
[ 90s ] thds: 128 tps: 28031.47 qps: 28031.47 (r/w/o: 28031.47/0.00/0.00) lat (ms,95%): 0.20 err/s: 0.00 reconn/s: 0.00
[ 95s ] thds: 128 tps: 28734.66 qps: 28734.66 (r/w/o: 28734.66/0.00/0.00) lat (ms,95%): 0.20 err/s: 0.00 reconn/s: 0.00
[ 100s ] thds: 128 tps: 28767.20 qps: 28767.20 (r/w/o: 28767.20/0.00/0.00) lat (ms,95%): 2.39 err/s: 0.00 reconn/s: 0.00
SQL statistics:
queries performed:
read: 2638920 #总的select数量
write: 0
other: 0
total: 2638920
transactions: 2638920 (26382.71 per sec.) #TPS
queries: 2638920 (26382.71 per sec.) #QPS
ignored errors: 0 (0.00 per sec.) #忽略的错误
reconnects: 0 (0.00 per sec.) #重新连接
Throughput:
events/s (eps): 26382.7081 #每秒的事件数,一般和TPS一样
time elapsed: 100.0246s #测试的总时间
total number of events: 2638920 #总的事件数,一般和TPS一样
Latency (ms):
min: 0.11 #最小响应时间
avg: 4.85 #平均响应时间
max: 649.29 #最大响应时间
95th percentile: 25.74 #95%的响应时间是这个数据
sum: 12796148.28
Threads fairness:
events (avg/stddev): 20616.5625/196.08
execution time (avg/stddev): 99.9699/0.00#在这个测试中,可以看到TPS与QPS的大小基本一致,说明这个lua脚本中的一个查询一般就是一个事务!
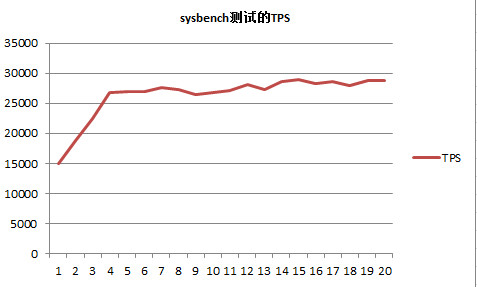
我们一般关注的指标主要有: response time avg:平均响应时间(后面的95%的大小可以通过–percentile=98的方式去更改)。 transactions:精确的说是这一项后面的TPS,但如果使用了–skip-trx=on,这项事务数为0,需要用total number of events去除以总时间,得到tps(其实还可以分为读tps和写tps)。 queries:用它除以总时间,得到吞吐量QPS。因为上面的TPS与QPS是一样的,因此只绘了TPS的图,如下:
刚开始的时候有一个明显的上升,这时候是因为在bp中没有缓存数据,需要从磁盘中读数据,也就是预热阶段! 清理数据
[root@test3 lua]# sysbench /data/sysbench-master/src/lua/oltp_read_write.lua --tables=3 --table_size=10000000 --mysql-user=root --mysql-password=123456 --mysql-host=10.0.102.214 --mysql-port=3306 --mysql-db=sbtest cleanup
sysbench 1.1.0 (using bundled LuaJIT 2.1.0-beta3)
Dropping table 'sbtest1'...
Dropping table 'sbtest2'...
Dropping table 'sbtest3'...
[root@test3 lua]#
sysbench除了以上的测试之外,还可以测试:
Compiled-in tests:
fileio - File I/O test
cpu - CPU performance test
memory - Memory functions speed test
threads - Threads subsystem performance test
mutex - Mutex performance test
See 'sysbench help' for a list of options for each test
sample mysql 压力测试 task 8: sysbech 压力测试 源码安装:https://github.com/akopytov/sysbench RHEL/CentOS yum -y install make automake libtool pkgconfig libaio-devel # For MySQL support, replace with mysql-devel on RHEL/CentOS 5 yum -y install mariadb-devel openssl-devel # For PostgreSQL support yum -y install postgresql-devel unzip sysbench-master.zipcd sysbench-master ./autogen.sh # Add --with-pgsql to build with PostgreSQL support ./configure make -j make install sysbench --help 调试:cd /tmp/dba/sysbench-master/src/lua sysbench oltp_common.lua help mysql -uroot -p -h10.241.21.113 -P 3306 mysql> create database sbtest; #创建数据库 prepare阶段:#准备数据,时间比较长,可以把table_size设置的小一点sysbench /tmp/dba/sysbench-master/src/lua/oltp_read_write.lua --tables=3 --table_size=10000000 --mysql-user=dba --mysql-password=db1234DBA --mysql-host=10.241.21.113 --mysql-port=3306 --mysql-db=sbtest prepare use sbtest;select count(*) from sbtest1; run阶段:##--threads=N number of threads to use [1] #线程的数量,默认是1##--time=N limit for total execution time in seconds [10] #整个测试执行的时间## --report-interval=N #打印出中间的信念,N表示每隔N秒打印一次,sysbench /tmp/dba/sysbench-master/src/lua/oltp_read_write.lua --tables=3 --table_size=10000000 --mysql-user=dba --mysql-password=db1234DBA --mysql-host=10.241.21.113 --mysql-port=3306 --mysql-db=sbtest --threads=128 --time=100 --report-interval=5 run
清理数据:sysbench /tmp/dba/sysbench-master/src/lua/oltp_read_write.lua --tables=3 --table_size=10000000 --mysql-user=dba --mysql-password=db1234DBA --mysql-host=10.241.21.113 --mysql-port=3306 --mysql-db=sbtest cleanup SQL statistics: queries performed: read: 2638920 #总的select数量 write: 0 other: 0 total: 2638920 transactions: 2638920 (26382.71 per sec.) #TPS queries: 2638920 (26382.71 per sec.) #QPS ignored errors: 0 (0.00 per sec.) #忽略的错误 reconnects: 0 (0.00 per sec.) #重新连接 Throughput: events/s (eps): 26382.7081 #每秒的事件数,一般和TPS一样 time elapsed: 100.0246s #测试的总时间 total number of events: 2638920 #总的事件数,一般和TPS一样 Latency (ms): min: 0.11 #最小响应时间 avg: 4.85 #平均响应时间 max: 649.29 #最大响应时间 95th percentile: 25.74 #95%的响应时间是这个数据 sum: 12796148.28 Threads fairness: events (avg/stddev): 20616.5625/196.08 execution time (avg/stddev): 99.9699/0.00 #在这个测试中,可以看到TPS与QPS的大小基本一致,说明这个lua脚本中的一个查询一般就是一个事务! 我们一般关注的指标主要有: response time avg:平均响应时间(后面的95%的大小可以通过–percentile=98的方式去更改)。 transactions:精确的说是这一项后面的TPS,但如果使用了–skip-trx=on,这项事务数为0,需要用total number of events去除以总时间,得到tps(其实还可以分为读tps和写tps)。 queries:用它除以总时间,得到吞吐量QPS。因为上面的TPS与QPS是一样的,因此只绘了TPS的图,如下:
####更多解释: https://www.cnblogs.com/zhoujinyi/archive/2013/04/19/3029134.html ③:使用说明
初始化数据:prepare。在本地数据库的dba_test库中,初始化三张表(sbtest1、sbtest2、sbtest3),存储引擎是innodb,每张表50万数据。 sysbench --test=/usr/share/doc/sysbench/tests/db/oltp.lua --mysql-table-engine=innodb --mysql-host=127.0.0.1 --mysql-db=dba_test --oltp-table-size=500000 --oltp_tables_count=3 --rand-init=on --mysql-user=zjy --mysql-password=zjy prepare
因为是本机测试,所以也可以用也可以使用--mysql-socket指定socket文件来连接。
测试:run。模拟对3个表并发OLTP测试,每个表50万行记录,持续压测时间为5分钟。 sysbench --test=/usr/share/doc/sysbench/tests/db/oltp.lua --mysql-table-engine=innodb --mysql-host=127.0.0.1 --mysql-db=dba_test --num-threads=8 --oltp-table-size=500000 --oltp_tables_count=3 --oltp-read-only=off --report-interval=10 --rand-type=uniform --max-time=600 --max-requests=0 --percentile=99 --mysql-user=zjy --mysql-password=zjy run
上面跑完会出一个结果:
#每10秒钟报告一次测试结果,tps、每秒读、每秒写、95%以上的响应时长统计
[ 10s] threads: 8, tps: 66.60, reads: 943.67, writes: 269.62, response time: 431.72ms (95%), errors: 0.00, reconnects: 0.00
[ 20s] threads: 8, tps: 34.30, reads: 480.20, writes: 137.20, response time: 598.28ms (95%), errors: 0.00, reconnects: 0.00
[ 30s] threads: 8, tps: 36.60, reads: 512.40, writes: 146.40, response time: 494.87ms (95%), errors: 0.00, reconnects: 0.00
OLTP test statistics:
queries performed:
read: 941248 #读总数
write: 268928 #写总数
other: 134464 #其他操作总数(SELECT、INSERT、UPDATE、DELETE之外的操作,例如COMMIT等)
total: 1344640 #全部总数
transactions: 67232 (112.04 per sec.) #总事务数(每秒事务数)
read/write requests: 1210176 (2016.73 per sec.) #读写总数(每秒读写次数)
other operations: 134464 (224.08 per sec.) #其他操作总数(每秒其他操作次数)
ignored errors: 0 (0.00 per sec.)
reconnects: 0 (0.00 per sec.)
General statistics:
total time: 600.0698s #总耗时
total number of events: 67232 #共发生多少事务数
total time taken by event execution: 4799.8569s # 所有事务耗时相加(不考虑并行因素)
response time:
min: 2.09ms #最小耗时
avg: 71.39ms #平均耗时
max: 839.32ms #最大耗时
approx. 95 percentile: 309.40ms 超过95%平均耗时
Threads fairness:
events (avg/stddev): 8404.0000/17.56
execution time (avg/stddev): 599.9821/0.02
##############sample 5 oracle oracle如何快速创建一个 大表 How to Quickly Create Large Tables for Testing (Doc ID 810826.1)使用应用用户登陆,这样可以在模拟生成测试数据。 #create or replacePROCEDURE TESTPROC( val1 IN NUMBER DEFAULT 1, val2 IN NUMBER DEFAULT 1, val3 IN NUMBER DEFAULT 1)as col1_val varchar2(20);col2_val varchar2(20);col3_val varchar2(20);col4_val number(4,0);table_exists number(1,0);BEGIN -- Check whether the table exists or not-- If yes, then the table is truncated select count(*) into table_exists from user_objects where object_name = 'test_table' and object_type='TABLE';if table_exists=1 then execute immediate 'truncate table test_table';else execute immediate 'CREATE TABLE test_table(COL1 VARCHAR2(20), COL2 VARCHAR2(20),COL3 VARCHAR2(20),DATA NUMBER)';end if; for i in 1..val1 loop col1_val := 'A'||i; for j in 1..val2 loop col2_val := 'B'||j; for k in 1..val3 loop col3_val := 'C'||k; select dbms_random.value(1,1000) num into col4_val from dual; execute immediate 'insert into test_table values(:col1_val,:col2_val,:col3_val,:col4_val)' using col1_val,col2_val,col3_val,col4_val; end loop; commit; end loop; end loop; commit;END TESTPROC;/ This will create a procedure that fills a table test_table with 3 key columns (COL1, COL2 and COL3) and a random fact column (DATA). The function is called like this: ##### 创建表test_table,并且随机插入1000行记录call TESTPROC(10,10,10);The resulting table is filled with 1000 rows (10 times 10 times 10). You can adjust this according to your needs. If you need to create an index, you can create a composite index as each row is unique: alter table test_table add constraint pk_test_table primary key(col1,col2,col3);You can add more columns or fact tables by just adding more loops or you can change the datatype or contents of each column as needed. The definitions are very easy to locate and can be modified as needed.
|
 注意,上面的connect string,根据需求填写,比如:--如果压测只连接实例1jyrac1:1521:jyzhao1
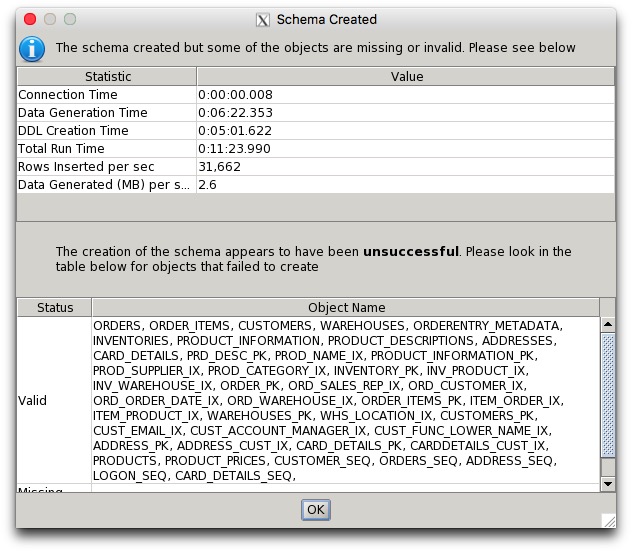


【本文地址】