【Linux】第一个驱动程序,hello world!开启驱动之旅 |
您所在的位置:网站首页 › 驱动怎么编译文件 › 【Linux】第一个驱动程序,hello world!开启驱动之旅 |
【Linux】第一个驱动程序,hello world!开启驱动之旅
|
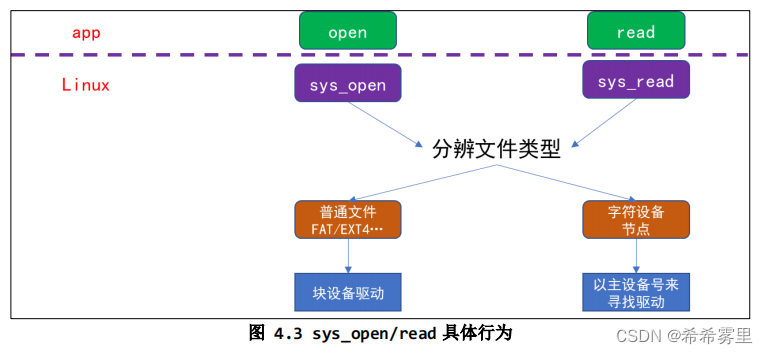
目录 前言: 一、背景 二、驱动程序编写流程 1.APP打开的文件在内核中如何表示? 2.编写驱动程序的流程 三、hello驱动程序实战 1.hello_drive.c 2.hello_drive_test.c 3.最终测试: a.首先编译内核(如果没有编译过) b.设置交叉编译工具链 c.编写makefile d.上机测试 e.最终结果: 前言:经典环节:带着问题进行思考和实践。 (1)最简单的驱动程序是怎么样的? (2)怎么编写驱动程序? APP打开的文件在内核中如何表示?理解编写程序的流程 怎么调用到自写的open/read/write函数?怎么告知内核有一个新的驱动程序?内核通过什么找到驱动程序?驱动程序的安装和卸载是怎么实现的?(3)Hello驱动程序实战 如果有所帮助,多多支持,这个会给与我更多的创作动力! 一、背景回顾前文,当我们APP调用glibc中open/read/write函数,会从用户态到内核态,调用相应的sys_open、sys_read等函数访问内核中的文件,打开相应的设备节点,寻找到并启动相应的驱动程序。其中,如何从用户态转到内核态等一些相关知识,参阅文章: https://blog.csdn.net/weixin_42373086/article/details/129913881?spm=1001.2014.3001.5501
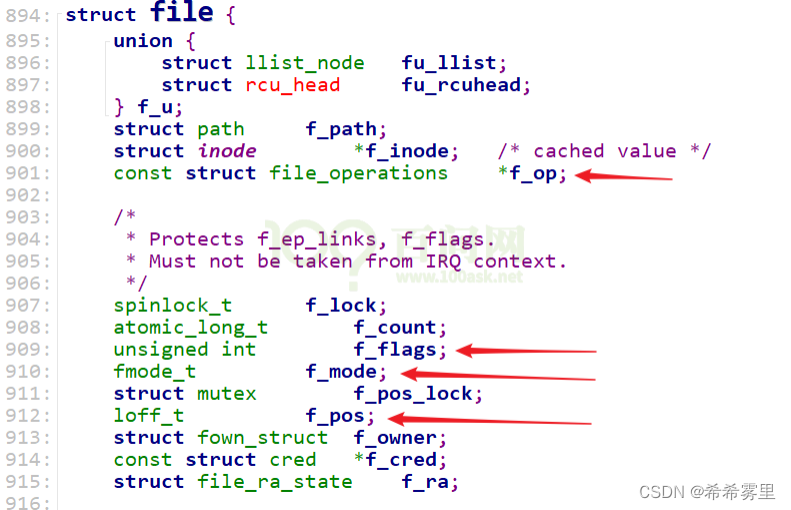
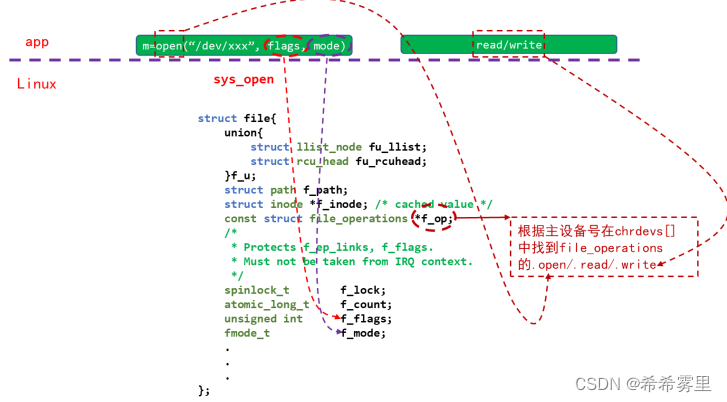
最简单的驱动程序是怎么样的? 这里最简单的驱动程序调用方式,驱动程序也提供自己的drv_open、drv_read等函数,一个驱动程序对应一个设备。 二、驱动程序编写流程基于上述,完成一个简单基本的驱动程序,我们需要去自己实现open/read/write函数,但完整实现一个驱动程序还会有一些具体问题。 具体问题: APP打开的文件在内核中如何表示?理解编写程序的流程: 怎么调用到自写的open/read/write函数?怎么告知内核有一个新的驱动程序?内核通过什么找到驱动程序?驱动程序的安装和卸载是怎么实现的? 1.APP打开的文件在内核中如何表示?APP打开文件时,可以得到一个整数(文件句柄),对于APP的每一个文件句柄,在内核里面都会有一个“struct file”与之对应。打开字符设备节点时,内核中也有对应的struct file。
使用open打开文件时,传入的flags、mode等参数会被记录在内核中对应的struct file结构体里(f_flags,f_mode): 去读写文件时,文件的当前偏移地址也会保存在struct file结构体的f_pos成员里。
打开字符设备节点时,内核中也有相对应的struct file。注:成员里的结构体struct file_operations *f_op,这是由驱动程序提供的。
这里初步编写一个驱动程序,这里主体写hello_drive.c驱动程序以及测试程序hello_drive_test.c。 注:驱动程序和应用程序之间数据要使用copy_from_user/copy_to_user函数。 1.hello_drive.c /* hello_drive.c */ #include #include #include #include #include #include #include #include #include #include #include #include #include #include #include /*第一步:确定主设备号,也可以让内核分配*/ static int major = 0; //用于保存应用程序下发的数据,定义一个buffer static char kernel_buffer[1024]; static struct class* hello_class; #define MIN(a, b) (a < b ? a : b) /*第三步:实现对应的 drv_open/drv_read/drv_write 等函数,填入 file_operations 结构体*/ static ssize_t hello_drv_read (struct file * file, char __user *buf, size_t size, loff_t *offset) { int err; printk("%s %s line %d\n", __FILE__, __FUNCTION__, __LINE__); err = copy_to_user(buf, kernel_buffer, MIN(1024, size)); return MIN(1024, size); } static ssize_t hello_drv_write (struct file * file,const char __user *buf, size_t size, loff_t *offset) { int err; printk("%s %s line %d\n", __FILE__, __FUNCTION__, __LINE__); err = copy_from_user(kernel_buffer, buf, MIN(1024, size)); return MIN(1024, size); } static int hello_drv_open (struct inode *node, struct file *file) { printk("%s %s line %d\n", __FILE__, __FUNCTION__, __LINE__); return 0; } static int hello_drv_close (struct inode *node, struct file *file) { printk("%s %s line %d\n", __FILE__, __FUNCTION__, __LINE__); return 0; } /*第二步:定义自己的 file_operations 结构体---注:里面存有驱动的open/read/write函数*/ static struct file_operations hello_drv = { .owner = THIS_MODULE, .open = hello_drv_open, .read = hello_drv_read, .write = hello_drv_write, .release = hello_drv_close, }; /*第四步:把 file_operations 结构体告诉内核:register_chrdev*/ /*第五步:定义一个入口函数, 调用register_chrdev*/ static int __init hello_init(void) { int err; printk("%s %s line %d\n", __FILE__, __FUNCTION__, __LINE__); major = register_chrdev(0, "hello", &hello_drv); //创建一个类,提供设备信息 hello_class = class_create(THIS_MODULE, "hello_class"); err = PTR_ERR(hello_class); if (IS_ERR(hello_class)){ unregister_chrdev(major, "hello"); return -1; } device_create(hello_class, NULL, MKDEV(major, 0), NULL, "hello"); return 0; } /*第六步:定义一个出口函数,出口函数调用unregister_chrdev*/ static void __exit hello_exit(void) { device_destroy(hello_class, MKDEV(major, 0)); class_destroy(hello_class); major = unregister_chrdev(0, "hello"); } /*第七步:其他完善:提供设备信息,自动创建设备节点:class_create、device_create*/ //把函数修饰成入口函数和出口函数 module_init(hello_init); module_exit(hello_exit); //内核遵循GPL协议,所以我们也要遵循GPL协议,才能够使用内核里的一些函数 MODULE_LICENSE("GPL"); 2.hello_drive_test.c #include #include #include #include #include #include /* * ./hello_drv_test -w abc * ./hello_drv_test -r */ int main(int argc, char **argv) { int fd; char buf[1024]; int len; /* 1. 判断参数 */ if (argc < 2) { printf("Usage: %s -w \n", argv[0]); printf(" %s -r\n", argv[0]); return -1; } /* 2. 打开文件 */ fd = open("/dev/hello", O_RDWR); if (fd == -1) { printf("can not open file /dev/hello\n"); return -1; } /* 3. 写文件或读文件 */ if ((0 == strcmp(argv[1], "-w")) && (argc == 3)) { len = strlen(argv[2]) + 1; len = len < 1024 ? len : 1024; write(fd, argv[2], len); } else { len = read(fd, buf, 1024); buf[1023] = '\0'; printf("APP read : %s\n", buf); } close(fd); return 0; } 3.最终测试: a.首先编译内核(如果没有编译过)参照这篇文章https://blog.csdn.net/weixin_42373086/article/details/129796348?spm=1001.2014.3001.5501 b.设置交叉编译工具链 export ARCH=arm export CROSS_COMPILE=arm-buildroot-linux-gnueabihf- export PATH=$PATH:/home/book/100ask_imx6ull-sdk/ToolChain/arm-buildroot-linux-gnueabihf_sdk-buildroot/bin c.编写makefile注意:KERN_DIR是要对应开发板上的内核。 KERN_DIR = /home/book/100ask_imx6ull-sdk/Linux-4.9.88 all: make -C $(KERN_DIR) M=`pwd` modules $(CROSS_COMPILE)gcc -o hello_drv_test hello_drv_test.c clean: make -C $(KERN_DIR) M=`pwd` modules clean rm -rf modules.order rm -f hello_drv_test obj-m += hello_drv.o 之后make编译并将.ko文件和hello_drive_test复制到nfs挂载的文件夹下。
|
【本文地址】
今日新闻 |
推荐新闻 |


