Three.js |
您所在的位置:网站首页 › 飞机简易模型 › Three.js |
Three.js
|
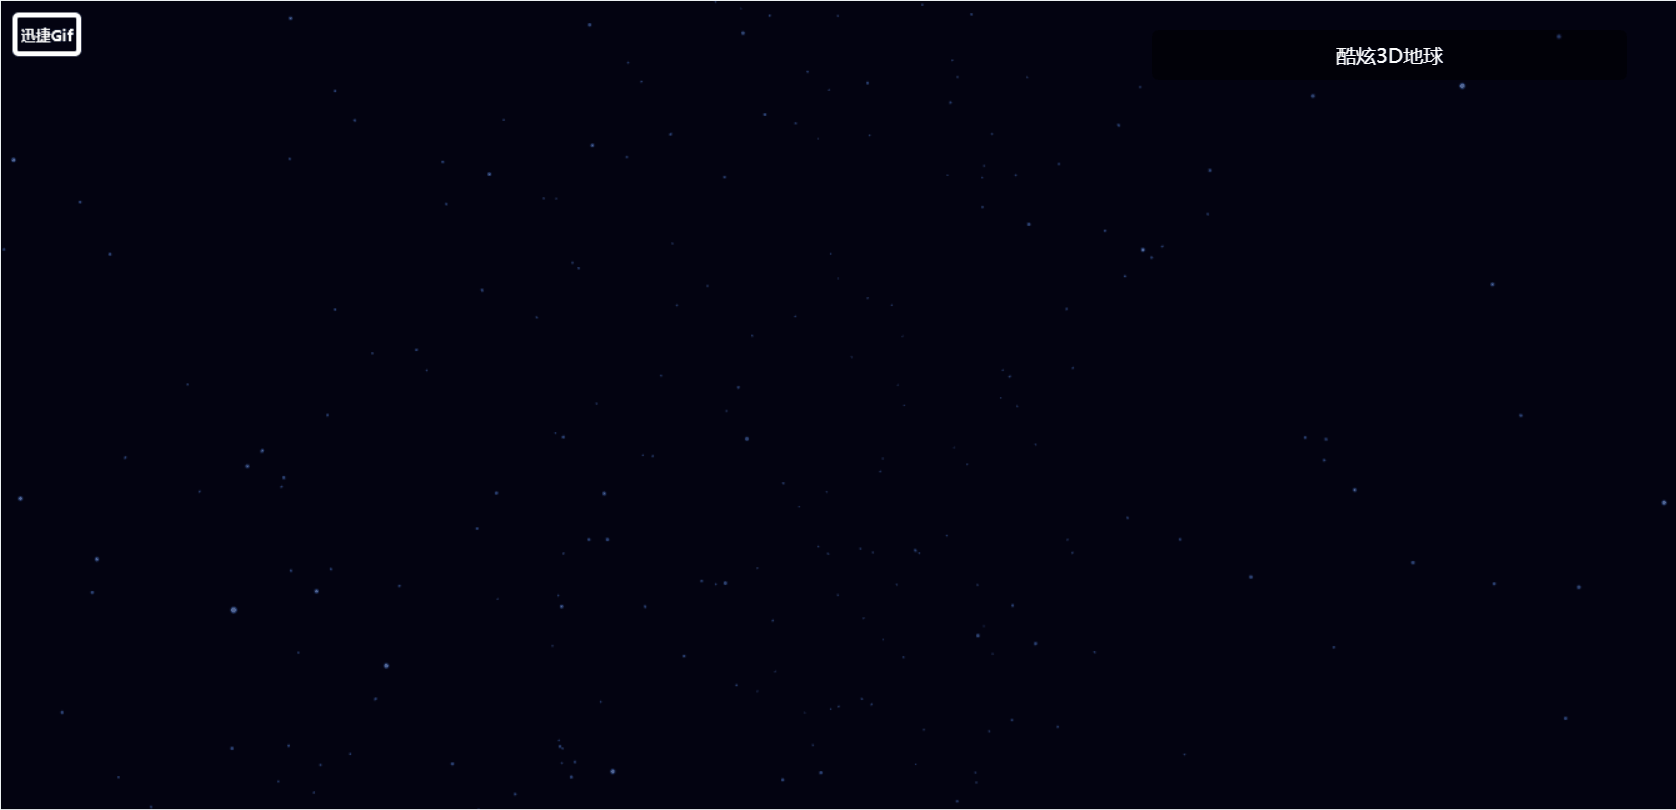
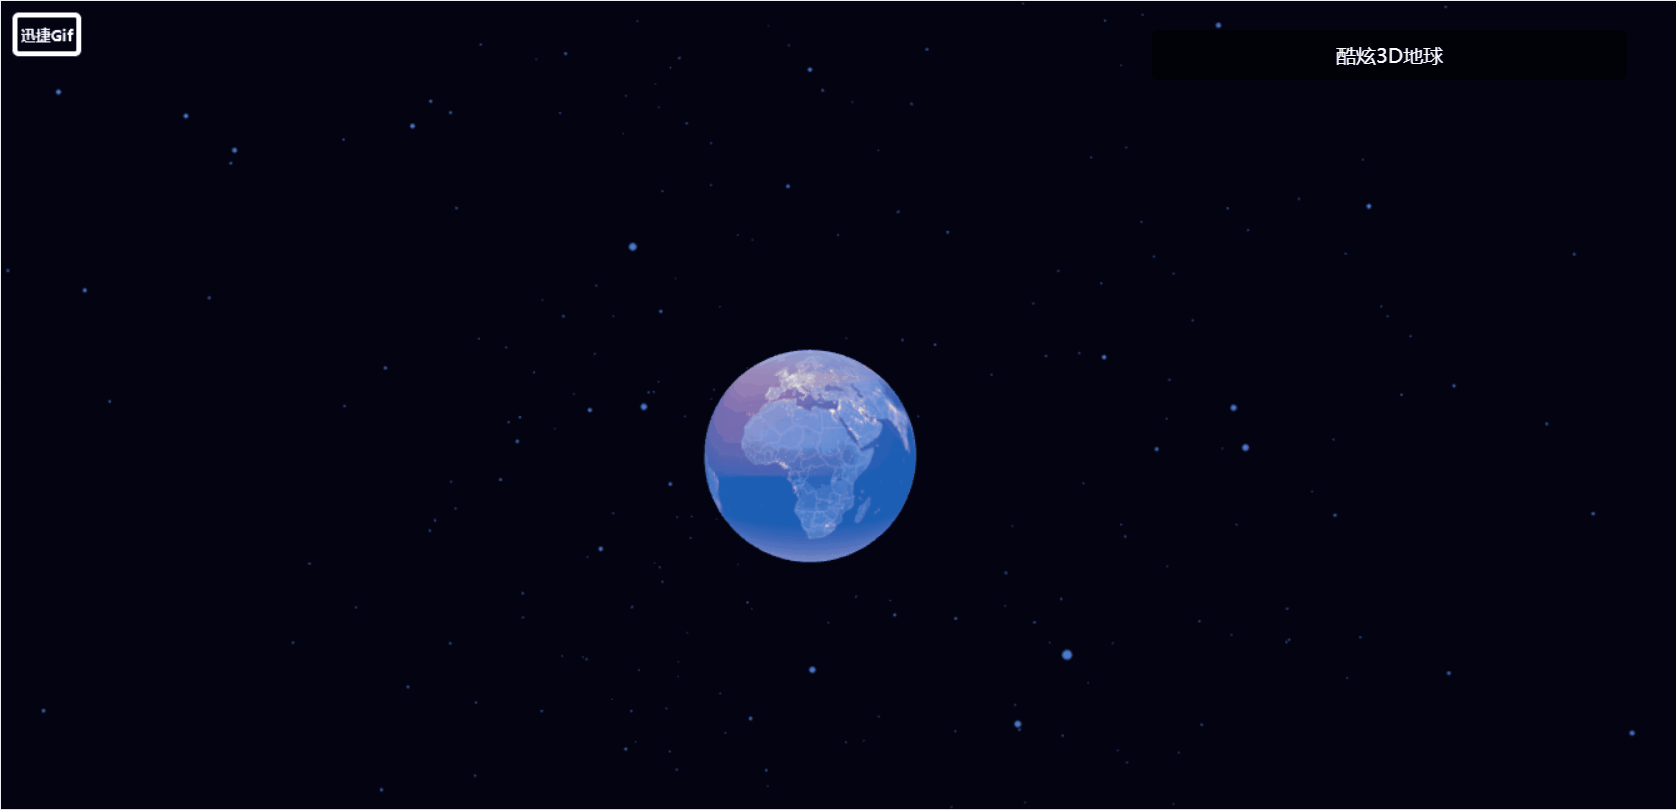
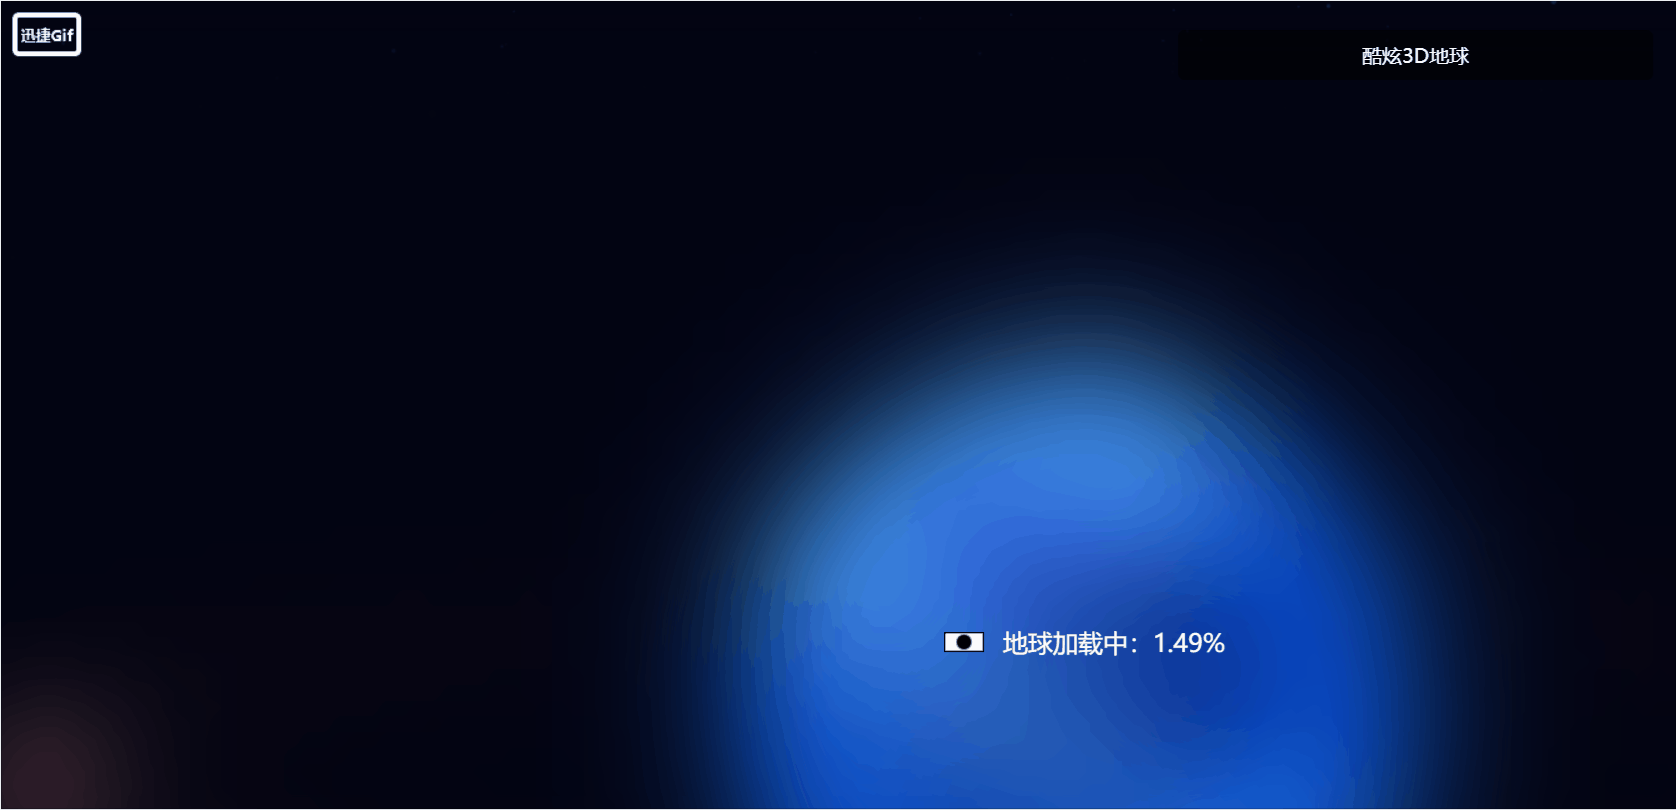
目录 项目搭建 实现网页简单布局 初始化three.js基础代码 创建环境背景 加载地球模型 实现光柱效果 添加月球模型 今天简单实现一个three.js的小Demo,加强自己对three知识的掌握与学习,只有在项目中才能灵活将所学知识运用起来,话不多说直接开始。 项目搭建本案例还是借助框架书写three项目,借用vite构建工具搭建vue项目,vite这个构建工具如果有不了解的朋友,可以参考我之前对其讲解的文章:vite脚手架的搭建与使用 。搭建完成之后,用编辑器打开该项目,在终端执行 npm i 安装一下依赖,安装完成之后终端在安装 npm i three 即可。 因为我搭建的是vue3项目,为了便于代码的可读性,所以我将three.js代码单独抽离放在一个组件当中,在App根组件中进入引入该组件。具体如下: import CoolEarth from './components/CoolEarth.vue'; *{ margin: 0; padding: 0; } 实现网页简单布局在HTML布局处进行设置一个loading效果,并通过一个loading.glf动态图使loading效果更加具体,相关代码样式如下:  地球加载中:{{ progress }}%
酷炫3D地球
body {
background-color: #000;
}
.canvas-container {
width: 100vw;
height: 100vh;
}
.home {
width: 100vw;
height: 100vh;
transform-origin: 0 0;
}
.loading {
position: fixed;
top: 0;
left: 0;
width: 1920px;
height: 1080px;
background-image: url(../assets/loading.jpg);
background-size: cover;
filter: blur(50px);
z-index: 100;
}
.progress {
position: fixed;
top: 0;
left: 0;
width: 1920px;
height: 1080px;
z-index: 101;
display: flex;
justify-content: center;
align-items: center;
font-size: 20px;
color: #fff;
}
.progress > img {
padding: 0 15px;
}
.title {
width: 380px;
height: 40px;
position: fixed;
right: 100px;
top: 50px;
background-color: rgba(0, 0, 0, 0.5);
line-height: 40px;
text-align: center;
color: #fff;
border-radius: 5px;
z-index: 110;
}
初始化three.js基础代码
地球加载中:{{ progress }}%
酷炫3D地球
body {
background-color: #000;
}
.canvas-container {
width: 100vw;
height: 100vh;
}
.home {
width: 100vw;
height: 100vh;
transform-origin: 0 0;
}
.loading {
position: fixed;
top: 0;
left: 0;
width: 1920px;
height: 1080px;
background-image: url(../assets/loading.jpg);
background-size: cover;
filter: blur(50px);
z-index: 100;
}
.progress {
position: fixed;
top: 0;
left: 0;
width: 1920px;
height: 1080px;
z-index: 101;
display: flex;
justify-content: center;
align-items: center;
font-size: 20px;
color: #fff;
}
.progress > img {
padding: 0 15px;
}
.title {
width: 380px;
height: 40px;
position: fixed;
right: 100px;
top: 50px;
background-color: rgba(0, 0, 0, 0.5);
line-height: 40px;
text-align: center;
color: #fff;
border-radius: 5px;
z-index: 110;
}
初始化three.js基础代码
three.js开启必须用到的基础代码如下: 导入three库: import * as THREE from 'three'初始化场景: const scene = new THREE.Scene()初始化相机: const camera = new THREE.PerspectiveCamera(75,window.innerWidth/window.innerHeight,0.1,1000) camera.position.set(0,50,300)初始化渲染器: const renderer = new THREE.WebGLRenderer({ antialias: true }) renderer.setSize(window.innerWidth,window.innerHeight)监听屏幕大小的改变,修改渲染器的宽高和相机的比例: window.addEventListener("resize",()=>{ renderer.setSize(window.innerWidth,window.innerHeight) camera.aspect = window.innerWidth/window.innerHeight camera.updateProjectionMatrix() })设置渲染函数: const render = () =>{ controls.update(); requestAnimationFrame(render); renderer.render(scene, camera); }进行挂载: onMounted(()=>{ // 设置进度 THREE.DefaultLoadingManager.onProgress = function (item, loaded, total) { progress.value = new Number((loaded / total) * 100).toFixed(2); }; // 将画布添加到页面中 screenDom.value.appendChild(renderer.domElement) render() })ok,写完基础代码之后,接下来开始具体的Demo实操。 创建环境背景这里通过TextureLoader加载各种类型的纹理图像,包括JPEG、PNG、GIF等。通过TextureLoader,开发人员可以轻松地将纹理加载到自己的Three.js场景中,从而为场景增加更多的细节和视觉效果。 // 创建星空的背景颜色 scene.background = new THREE.Color(0x030311); // 加载点材质纹理 const starsTexture = new THREE.TextureLoader().load("./images/stars.png"); const starsMaterial = new THREE.PointsMaterial({ size: 2, sizeAttenuation: true, // 尺寸衰减 color: 0x4d76cf, transparent: true, opacity: 1, map: starsTexture, });接下来通过点材质创建星空效果,setAttribute方法可以用于向这些BufferAttribute对象中设置顶点属性数据,BufferAttribute是在Three.js等WebGL引擎中用于描述几何体或粒子的渲染数据结构,也是WebGL中顶点缓存对象(VBO)中存储顶点数据的方式之一: // 使用点材质创建星空效果 const vertices = []; for (let i = 0; i < 500; i++) { const vertex = new THREE.Vector3(); vertex.x = 800 * Math.random() - 400; vertex.y = 800 * Math.random() - 400; vertex.z = 800 * Math.random() - 400; vertices.push(vertex.x, vertex.y, vertex.z); } // 星空效果 let starsGeometry = new THREE.BufferGeometry(); starsGeometry.setAttribute( "position", new THREE.BufferAttribute(new Float32Array(vertices), 3) ); let stars = new THREE.Points(starsGeometry, starsMaterial); scene.add(stars);
接下来依然通过TextureLoader加载各种类型的纹理图像: // 创建地球 let earthGeometry = new THREE.SphereGeometry(50, 32, 32); let earthTexture = new THREE.TextureLoader().load("./images/map.jpg"); let earthMaterial = new THREE.MeshBasicMaterial({ map: earthTexture, }); let earth = new THREE.Mesh(earthGeometry, earthMaterial); scene.add(earth);
接下来在原有地球的基础上再加一层发光球体的壳,使地球更具有美感: // 发光地球 let lightTexture = new THREE.TextureLoader().load("./images/earth.jpg"); let lightEarthGeometry = new THREE.SphereGeometry(53, 32, 32); let lightEarthMaterial = new THREE.MeshBasicMaterial({ map: lightTexture, alphaMap: lightTexture, blending: THREE.AdditiveBlending, transparent: true, }); let lightEarth = new THREE.Mesh(lightEarthGeometry, lightEarthMaterial); scene.add(lightEarth);
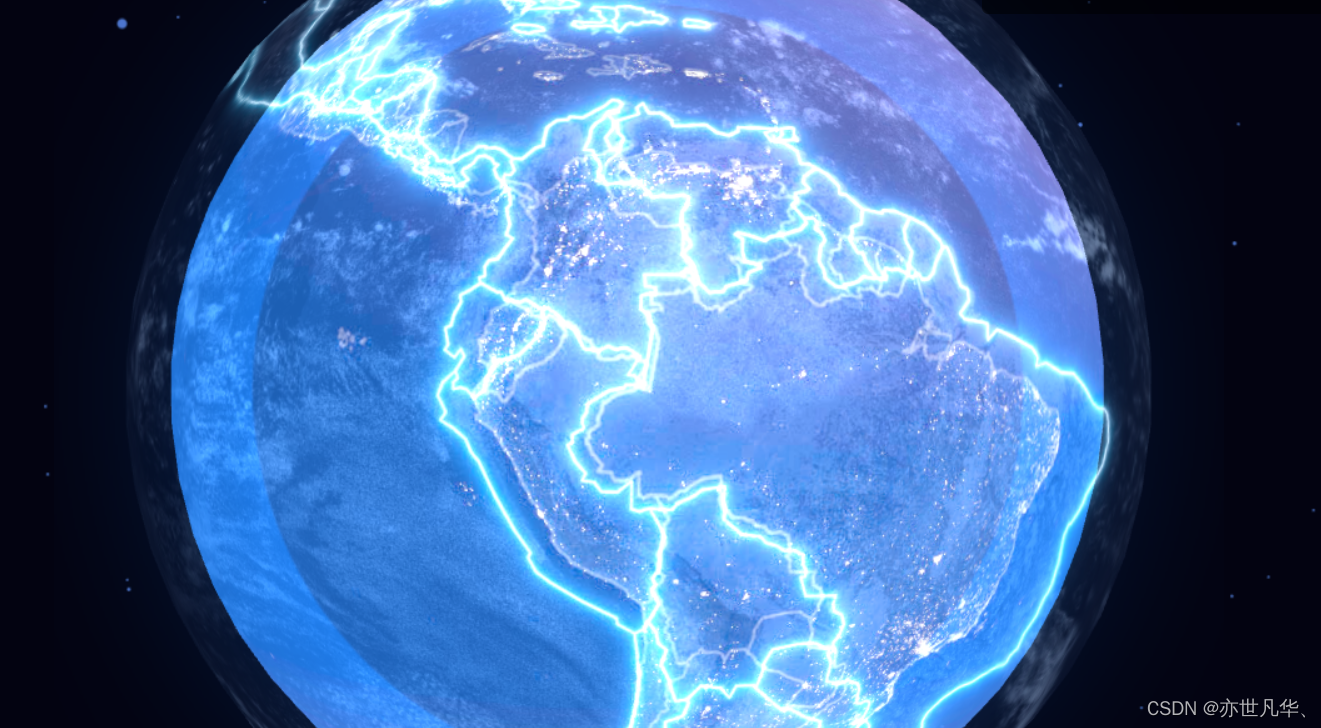
接下来通过 Sprite 将Sprite 对象图像资源打包在一张贴图上,然后在需要渲染Sprite 的时候使用不同的纹理坐标选取对应的图像片段进行绘制。 // 添加地球内外发光精灵 let spriteTexture = new THREE.TextureLoader().load("./images/glow.png"); let spriteMaterial = new THREE.SpriteMaterial({ map: spriteTexture, color: 0x4d76cf, transparent: true, depthWrite: false, depthTest: false, blending: THREE.AdditiveBlending, }); let sprite = new THREE.Sprite(spriteMaterial); sprite.scale.set(155, 155, 0); scene.add(sprite);
接下来接着使用该函数使其内发光: // 内发光 let spriteTexture1 = new THREE.TextureLoader().load("./images/innerGlow.png"); let spriteMaterial1 = new THREE.SpriteMaterial({ map: spriteTexture1, color: 0x4d76cf, transparent: true, depthWrite: false, depthTest: false, blending: THREE.AdditiveBlending, }); let sprite1 = new THREE.Sprite(spriteMaterial1); sprite1.scale.set(128, 128, 0); scene.add(sprite1); let scale = new THREE.Vector3(1, 1, 1);
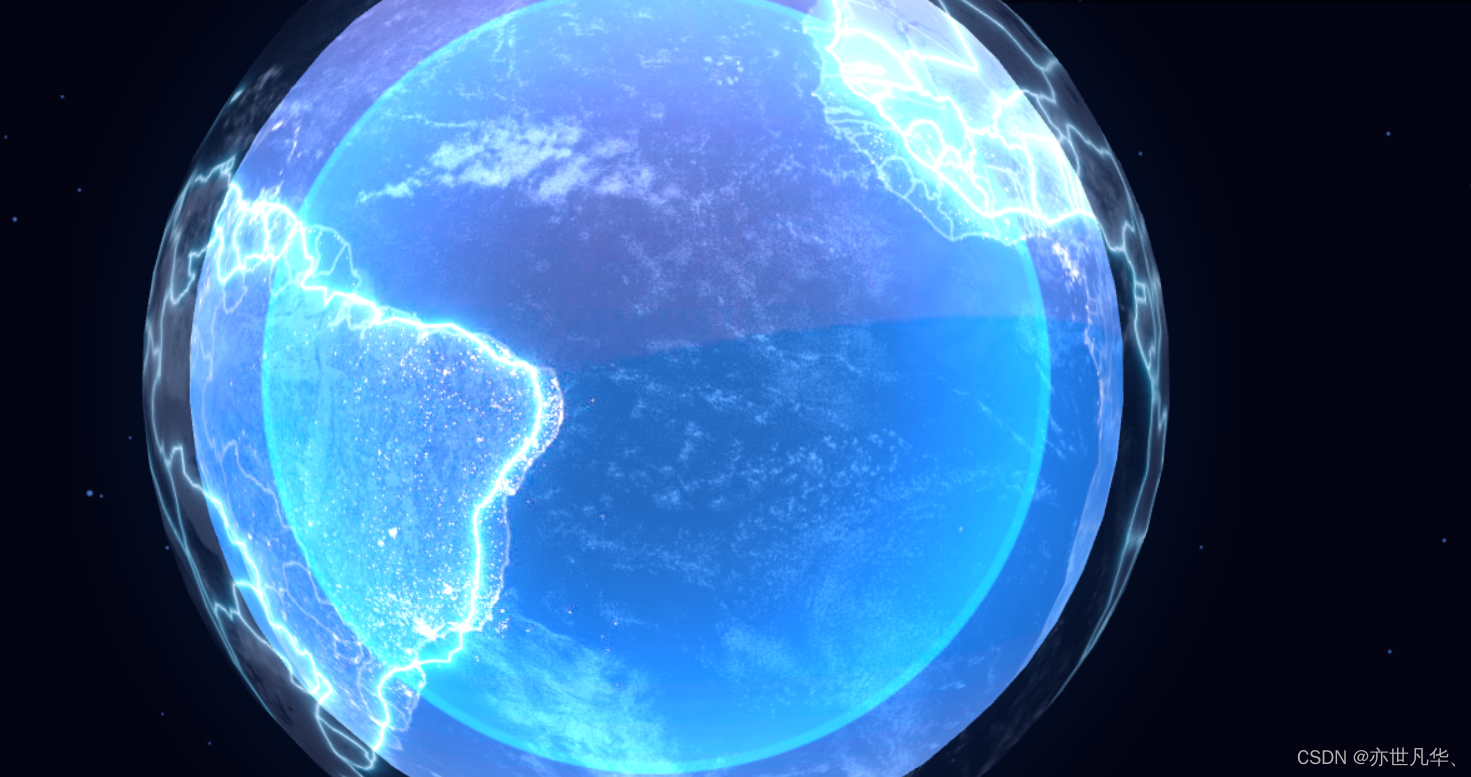
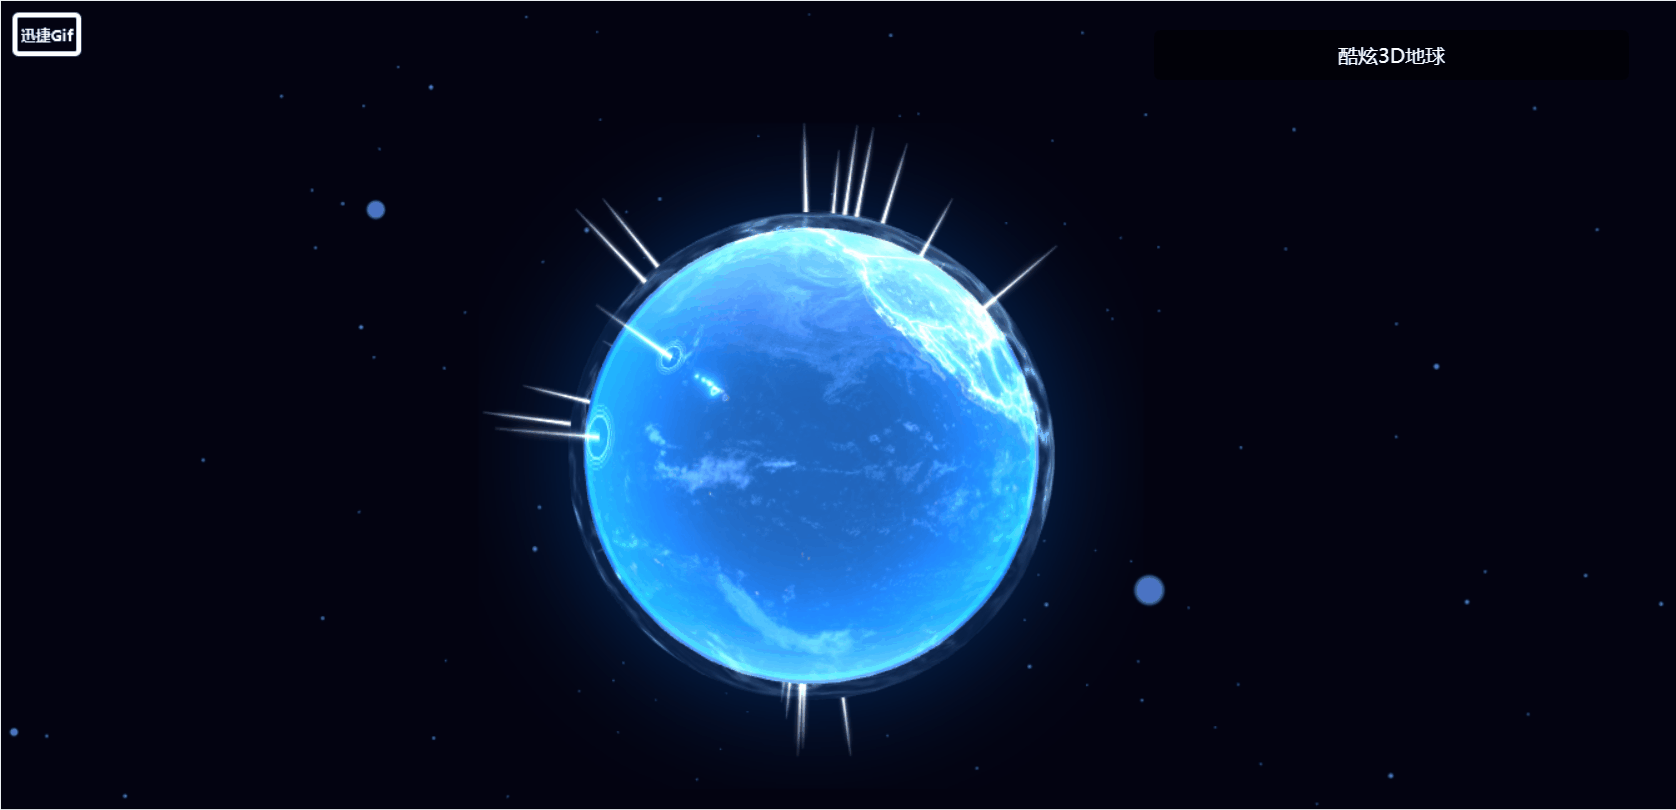
通过for循环实现30个光柱效果的展示,这里依然通过TextureLoader加载各种类型的纹理图像: for (let i = 0; i < 30; i++) { // 实现光柱 let lightPillarTexture = new THREE.TextureLoader().load( "./images/light_column.png" ); let lightPillarGeometry = new THREE.PlaneGeometry(3, 20); let lightPillarMaterial = new THREE.MeshBasicMaterial({ color: 0xffffff, map: lightPillarTexture, alphaMap: lightPillarTexture, transparent: true, blending: THREE.AdditiveBlending, side: THREE.DoubleSide, depthWrite: false, }); let lightPillar = new THREE.Mesh(lightPillarGeometry, lightPillarMaterial); lightPillar.add(lightPillar.clone().rotateY(Math.PI / 2)); // 设置光柱的位置 let lat = Math.random() * 180 - 90; let lon = Math.random() * 360 - 180; let position = lon2xyz(60, lon, lat); lightPillar.position.set(position.x, position.y, position.z); lightPillar.quaternion.setFromUnitVectors( new THREE.Vector3(0, 1, 0), position.clone().normalize() ); scene.add(lightPillar); }
接下来利用贴图给地球的每个光柱添加光圈效果,这里利用gsap动画库实现: // 创建波纹扩散效果 let circlePlane = new THREE.PlaneGeometry(6, 6); let circleTexture = new THREE.TextureLoader().load("./images/label.png"); let circleMaterial = new THREE.MeshBasicMaterial({ color: 0xffffff, map: circleTexture, transparent: true, blending: THREE.AdditiveBlending, depthWrite: false, side: THREE.DoubleSide, }); let circleMesh = new THREE.Mesh(circlePlane, circleMaterial); circleMesh.rotation.x = -Math.PI / 2; circleMesh.position.set(0, -7, 0); lightPillar.add(circleMesh); gsap.to(circleMesh.scale, { duration: 1 + Math.random() * 0.5, x: 2, y: 2, z: 2, repeat: -1, delay: Math.random() * 0.5, yoyo: true, ease: "power2.inOut", });
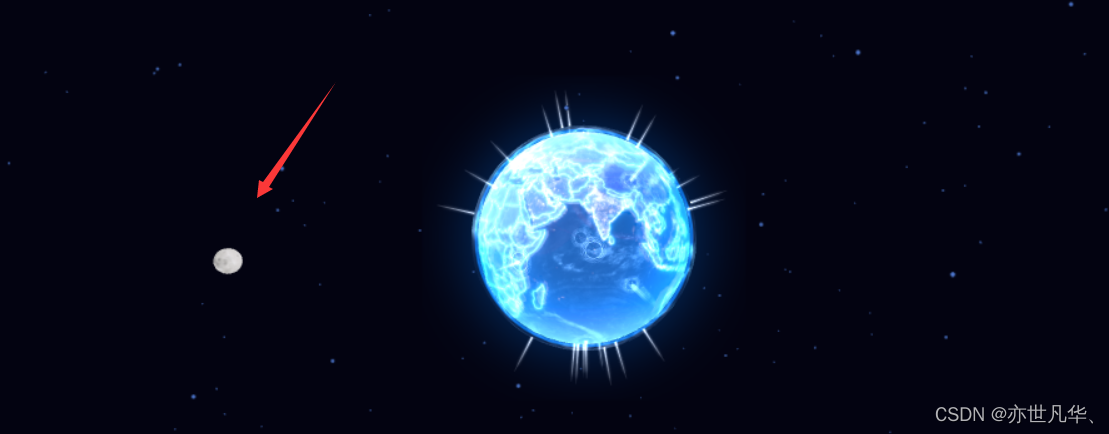
接下来依然通过TextureLoader加载各种类型的纹理图像: // 绕地球运行的月球 let moonTexture = new THREE.TextureLoader().load("./images/moon.jpg"); let moonMaterial = new THREE.MeshStandardMaterial({ map: moonTexture, emissive: 0xffffff, emissiveMap: moonTexture, }); let moonGeometry = new THREE.SphereGeometry(5, 32, 32); let moon = new THREE.Mesh(moonGeometry, moonMaterial); moon.position.set(150, 0, 0); scene.add(moon);
接下来实现月球环模型: // 创建月球环 let moonRingTexture = new THREE.TextureLoader().load("./images/moon_ring.png"); let moonRingMaterial = new THREE.MeshBasicMaterial({ map: moonRingTexture, transparent: true, blending: THREE.AdditiveBlending, side: THREE.DoubleSide, depthWrite: false, opacity: 0.5, }); let moonRingGeometry = new THREE.RingGeometry(145, 155, 64); let moonRing = new THREE.Mesh(moonRingGeometry, moonRingMaterial); moonRing.rotation.x = -Math.PI / 2; scene.add(moonRing);
接下来通过gsap动画库当月球顺时针绕地球无限匀速旋转运动下去: let time = { value: 0, }; gsap.to(time, { value: 1, duration: 10, repeat: -1, ease: "linear", onUpdate: () => { moon.position.x = 150 * Math.cos(time.value * Math.PI * 2); moon.position.z = 150 * Math.sin(time.value * Math.PI * 2); moon.rotation.y = time.value * Math.PI * 8; }, });
效果完成之后,我们在一开始设置的挂载时显示进度也就有效果了,如下:
demo做完,给出本案例的完整代码:(获取素材也可以私信博主)
地球加载中:{{ progress }}%
酷炫3D地球
import * as THREE from 'three'
import { ref,onMounted } from 'vue'
import { gsap } from 'gsap'
import { OrbitControls } from 'three/examples/jsm/controls/OrbitControls'
let screenDom = ref(null)
let progress = ref(0);
// 经纬度转换函数
const lon2xyz = (R,longitude,latitude) =>{
let lon = ( longitude * Math.PI ) / 180 // 转弧度值
const lat = (latitude * Math.PI) / 180 // 转弧度值
lon = -lon // js坐标系z坐标轴对应经度-90度,而不是90度
// 经纬度坐标转球面坐标计算公式
const x = R * Math.cos(lat) * Math.cos(lon)
const y = R * Math.sin(lat)
const z = R * Math.cos(lat) * Math.sin(lon)
// 返回球面坐标
return new THREE.Vector3(x,y,z)
}
// 创建场景
const scene = new THREE.Scene()
// 创建相机
const camera = new THREE.PerspectiveCamera(75,window.innerWidth/window.innerHeight,0.1,1000)
camera.position.set(0,50,300)
// 创建渲染器
const renderer = new THREE.WebGLRenderer({ antialias: true })
renderer.setSize(window.innerWidth,window.innerHeight)
// 创建控制器
const controls = new OrbitControls(camera,renderer.domElement)
controls.autoRotate = true
window.addEventListener("resize",()=>{
renderer.setSize(window.innerWidth,window.innerHeight)
camera.aspect = window.innerWidth/window.innerHeight
camera.updateProjectionMatrix()
})
// 创建渲染函数
const render = () =>{
controls.update();
requestAnimationFrame(render);
renderer.render(scene, camera);
}
onMounted(()=>{
// 设置进度
THREE.DefaultLoadingManager.onProgress = function (item, loaded, total) {
progress.value = new Number((loaded / total) * 100).toFixed(2);
};
// 将画布添加到页面中
screenDom.value.appendChild(renderer.domElement)
render()
})
// 创建星空的背景颜色
scene.background = new THREE.Color(0x030311);
// 加载点材质纹理
const starsTexture = new THREE.TextureLoader().load("./images/stars.png");
const starsMaterial = new THREE.PointsMaterial({
size: 2,
sizeAttenuation: true, // 尺寸衰减
color: 0x4d76cf,
transparent: true,
opacity: 1,
map: starsTexture,
});
// 使用点材质创建星空效果
const vertices = [];
for (let i = 0; i < 500; i++) {
const vertex = new THREE.Vector3();
vertex.x = 800 * Math.random() - 400;
vertex.y = 800 * Math.random() - 400;
vertex.z = 800 * Math.random() - 400;
vertices.push(vertex.x, vertex.y, vertex.z);
}
// 星空效果
let starsGeometry = new THREE.BufferGeometry();
starsGeometry.setAttribute(
"position",
new THREE.BufferAttribute(new Float32Array(vertices), 3)
);
let stars = new THREE.Points(starsGeometry, starsMaterial);
scene.add(stars);
// 创建地球
let earthGeometry = new THREE.SphereGeometry(50, 32, 32);
let earthTexture = new THREE.TextureLoader().load("./images/map.jpg");
let earthMaterial = new THREE.MeshBasicMaterial({
map: earthTexture,
});
let earth = new THREE.Mesh(earthGeometry, earthMaterial);
scene.add(earth);
// 发光地球
let lightTexture = new THREE.TextureLoader().load("./images/earth.jpg");
let lightEarthGeometry = new THREE.SphereGeometry(53, 32, 32);
let lightEarthMaterial = new THREE.MeshBasicMaterial({
map: lightTexture,
alphaMap: lightTexture,
blending: THREE.AdditiveBlending,
transparent: true,
});
let lightEarth = new THREE.Mesh(lightEarthGeometry, lightEarthMaterial);
scene.add(lightEarth);
// 添加地球内外发光精灵
let spriteTexture = new THREE.TextureLoader().load("./images/glow.png");
let spriteMaterial = new THREE.SpriteMaterial({
map: spriteTexture,
color: 0x4d76cf,
transparent: true,
depthWrite: false,
depthTest: false,
blending: THREE.AdditiveBlending,
});
let sprite = new THREE.Sprite(spriteMaterial);
sprite.scale.set(155, 155, 0);
scene.add(sprite);
// 内发光
let spriteTexture1 = new THREE.TextureLoader().load("./images/innerGlow.png");
let spriteMaterial1 = new THREE.SpriteMaterial({
map: spriteTexture1,
color: 0x4d76cf,
transparent: true,
depthWrite: false,
depthTest: false,
blending: THREE.AdditiveBlending,
});
let sprite1 = new THREE.Sprite(spriteMaterial1);
sprite1.scale.set(128, 128, 0);
scene.add(sprite1);
let scale = new THREE.Vector3(1, 1, 1);
for (let i = 0; i < 30; i++) {
// 实现光柱
let lightPillarTexture = new THREE.TextureLoader().load(
"./images/light_column.png"
);
let lightPillarGeometry = new THREE.PlaneGeometry(3, 20);
let lightPillarMaterial = new THREE.MeshBasicMaterial({
color: 0xffffff,
map: lightPillarTexture,
alphaMap: lightPillarTexture,
transparent: true,
blending: THREE.AdditiveBlending,
side: THREE.DoubleSide,
depthWrite: false,
});
let lightPillar = new THREE.Mesh(lightPillarGeometry, lightPillarMaterial);
lightPillar.add(lightPillar.clone().rotateY(Math.PI / 2));
// 设置光柱的位置
let lat = Math.random() * 180 - 90;
let lon = Math.random() * 360 - 180;
let position = lon2xyz(60, lon, lat);
lightPillar.position.set(position.x, position.y, position.z);
lightPillar.quaternion.setFromUnitVectors(
new THREE.Vector3(0, 1, 0),
position.clone().normalize()
);
scene.add(lightPillar);
// 创建波纹扩散效果
let circlePlane = new THREE.PlaneGeometry(6, 6);
let circleTexture = new THREE.TextureLoader().load("./images/label.png");
let circleMaterial = new THREE.MeshBasicMaterial({
color: 0xffffff,
map: circleTexture,
transparent: true,
blending: THREE.AdditiveBlending,
depthWrite: false,
side: THREE.DoubleSide,
});
let circleMesh = new THREE.Mesh(circlePlane, circleMaterial);
circleMesh.rotation.x = -Math.PI / 2;
circleMesh.position.set(0, -7, 0);
lightPillar.add(circleMesh);
gsap.to(circleMesh.scale, {
duration: 1 + Math.random() * 0.5,
x: 2,
y: 2,
z: 2,
repeat: -1,
delay: Math.random() * 0.5,
yoyo: true,
ease: "power2.inOut",
});
}
// 绕地球运行的月球
let moonTexture = new THREE.TextureLoader().load("./images/moon.jpg");
let moonMaterial = new THREE.MeshStandardMaterial({
map: moonTexture,
emissive: 0xffffff,
emissiveMap: moonTexture,
});
let moonGeometry = new THREE.SphereGeometry(5, 32, 32);
let moon = new THREE.Mesh(moonGeometry, moonMaterial);
moon.position.set(150, 0, 0);
scene.add(moon);
// 创建月球环
let moonRingTexture = new THREE.TextureLoader().load("./images/moon_ring.png");
let moonRingMaterial = new THREE.MeshBasicMaterial({
map: moonRingTexture,
transparent: true,
blending: THREE.AdditiveBlending,
side: THREE.DoubleSide,
depthWrite: false,
opacity: 0.5,
});
let moonRingGeometry = new THREE.RingGeometry(145, 155, 64);
let moonRing = new THREE.Mesh(moonRingGeometry, moonRingMaterial);
moonRing.rotation.x = -Math.PI / 2;
scene.add(moonRing);
let time = {
value: 0,
};
gsap.to(time, {
value: 1,
duration: 10,
repeat: -1,
ease: "linear",
onUpdate: () => {
moon.position.x = 150 * Math.cos(time.value * Math.PI * 2);
moon.position.z = 150 * Math.sin(time.value * Math.PI * 2);
moon.rotation.y = time.value * Math.PI * 8;
},
});
body {
background-color: #000;
}
.canvas-container {
width: 100vw;
height: 100vh;
}
.home {
width: 100vw;
height: 100vh;
transform-origin: 0 0;
}
.loading {
position: fixed;
top: 0;
left: 0;
width: 1920px;
height: 1080px;
background-image: url(../assets/loading.jpg);
background-size: cover;
filter: blur(50px);
z-index: 100;
}
.progress {
position: fixed;
top: 0;
left: 0;
width: 1920px;
height: 1080px;
z-index: 101;
display: flex;
justify-content: center;
align-items: center;
font-size: 20px;
color: #fff;
}
.progress > img {
padding: 0 15px;
}
.title {
width: 380px;
height: 40px;
position: fixed;
right: 100px;
top: 50px;
background-color: rgba(0, 0, 0, 0.5);
line-height: 40px;
text-align: center;
color: #fff;
border-radius: 5px;
z-index: 110;
}
|


【本文地址】
今日新闻 |
推荐新闻 |