银河麒麟服务器操作系统V10 SP2 X86源码编译安装LNMP |
您所在的位置:网站首页 › 银河麒麟安装要求 › 银河麒麟服务器操作系统V10 SP2 X86源码编译安装LNMP |
银河麒麟服务器操作系统V10 SP2 X86源码编译安装LNMP
|
前言
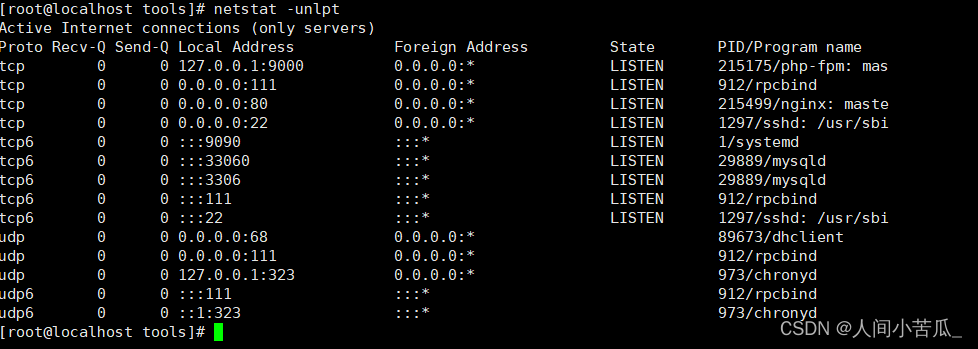
LNMP是一个基于CentOS/Debian编写的Nginx、PHP、MySQL、PHPMyAdmin、eAccelerator一键安装包。可以在VPS、独立主机上轻松的安装LNMP生产环境。 LNMP代表的就是:Linux系统下Nginx+MySQL+PHP这种网站服务器架构。 Nginx较为稳定、功能丰富、安装配置简单、低系统资源 Nginx既可以在内部直接支持Rails和PHP,也可以支持作为HTTP代理服务器对外进行服务。Nginx用C编写,不论是系统资源开销还是CPU使用效率都比Perlbal好得多 目录 前言 1.安装nginx 2.安装Mysql8.0.29 3.安装PHP 3.1装依赖环境 3.2安装oniguruma-6.9.4 3.3下载安装libmcrypt 3.4编译安装php 4.修改配置 5.修改Nginx 6.检查服务是否启动 7.测试 总结 1.安装nginx注意关闭防火墙以及Selinux,依赖环境的安装等。 #关闭防火墙,Selinux systemctl status firewalld.service systemctl stop firewalld.service systemctl disable firewalld.service # 关闭Selinux 重启生效 sed -i "s/SELINUX=enforcing/SELINUX=disabled/" /etc/selinux/config reboot #创建软件包存放目录 mkdir -p /opt/tools && cd /opt/tools #创建不能登录的用户 useradd -M -s /sbin/nologin nginx wget http://nginx.org/download/nginx-1.18.0.tar.gz tar -xvf nginx-1.18.0.tar.gz cd nginx-1.18.0 #配置 ./configure \ --prefix=/usr/local/nginx \ --user=nginx --group=nginx \ --with-debug \ --with-pcre-jit \ --with-http_ssl_module \ --with-http_stub_status_module \ --with-http_realip_module \ --with-http_auth_request_module \ --with-http_v2_module \ --with-http_dav_module \ --with-http_slice_module \ --with-threads \ --with-http_addition_module \ --with-http_gunzip_module \ --with-http_gzip_static_module \ --with-http_image_filter_module=dynamic \ --with-http_flv_module \ --with-http_mp4_module \ --with-http_sub_module \ --with-http_xslt_module=dynamic \ --with-stream=dynamic \ --with-stream_ssl_module \ --with-mail=dynamic \ --with-mail_ssl_module \ --with-stream_realip_module \ --with-stream #编译安装 make -j4 && make install ln -s /usr/local/nginx/sbin/nginx /usr/bin/nginx #制作service cat >>/usr/lib/systemd/system/nginx.service> /etc/profile source /etc/profile #准备配置文件 cp php.ini-production /usr/local/php/etc/php.ini cp /usr/local/php/etc/php-fpm.conf.default /usr/local/php/etc/php-fpm.conf cp /usr/local/php/etc/php-fpm.d/www.conf.default /usr/local/php/etc/php-fpm.d/www.conf ln -s /usr/local/php/etc/ /etc/php #修改 /usr/local/php/etc/php-fpm.conf 运行用户和组改为nginx chown nginx.nginx /usr/local/php/etc/php-fpm.conf chown -R nginx.nginx /etc/php #禁用PHP功能 sed -i "s#disable_functions =#disable_functions =\"passthru,exec,system,chroot,scandir,chgrp,chown,shell_exec,proc_open,proc_get_status,ini_alter,ini_alter,ini_restore,dl,openlog,syslog,readlink,symlink,popepassthru,stream_socket_server,escapeshellcmd,dll,popen,disk_free_space,checkdnsrr,checkdnsrr,getservbyname,getservbyport,disk_total_space,posix_ctermid,posix_get_last_error,posix_getcwd,wnam,posix_getpwuid, posix_getrlimit,posix_getsid,posix_getuid,posix_isatty,posix_kill,posix_mkfifo,posix_setegid,posix_seteuid,posix_setgid,posix_setpgid,posix_setsid,posix_setuid,posix_strerror,posix_times,posix_ttyname,posix_uname\"#" /etc/php/php.ini #支持mysql sed -i "s#pdo_mysql.default_socket=#pdo_mysql.default_socket=/var/lib/mysql/mysql.sock #" /etc/php/php.ini sed -i "s#mysqli.default_socket =#mysqli.default_socket =/var/lib/mysql/mysql.sock #" /etc/php/php.ini #设置开机自启,并启动 cp /opt/tools/php-7.4.16/sapi/fpm/init.d.php-fpm /etc/init.d/php-fpm chmod 755 /etc/init.d/php-fpm chkconfig php-fpm on systemctl start php-fpm 5.修改Nginx #修改nginx cp /usr/local/nginx/conf/nginx.conf{,.bak} vim /usr/local/nginx/conf/nginx.conf ... location / { root html; index index.html index.htm index.php; #添加 index.php } ... location ~ \.php$ { root html; fastcgi_pass 127.0.0.1:9000; fastcgi_index index.php; #将/scripts$fastcgi_script_name修改为$document_root$fastcgi_script_name。 fastcgi_param SCRIPT_FILENAME $document_root$fastcgi_script_name; include fastcgi_params; } ... #检查配置 nginx -t systemctl start nginx #启动nginx 6.检查服务是否启动
|
【本文地址】