计算机视觉中Canny算子详解 |
您所在的位置:网站首页 › 边缘检测有哪些算子 › 计算机视觉中Canny算子详解 |
计算机视觉中Canny算子详解
|
文章目录
前言一、Canny的实现步骤二、具体实现1.高斯平滑滤波2.计算梯度大小和方向3.非极大抑制4.双阈值(Double Thresholding)和滞后边界跟踪
总结
前言
Canny边缘检测是一种非常流行的边缘检测算法,是John Canny在1986年提出的。它是一个多阶段的算法,即由多个步骤构成。本文主要讲解了Canny算子的原理及实现过程。
一、Canny的实现步骤
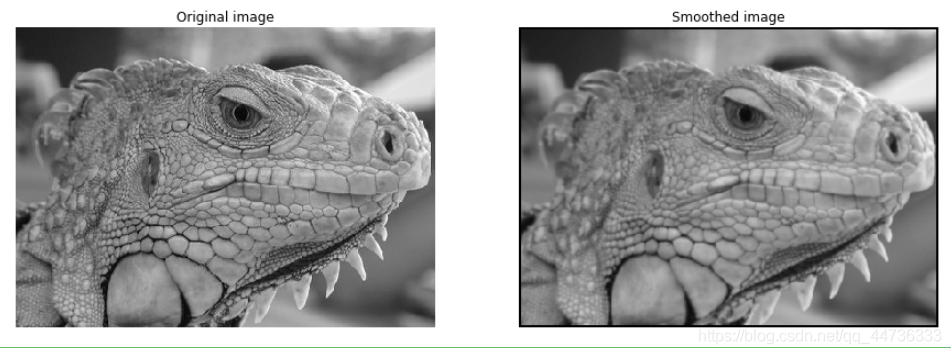
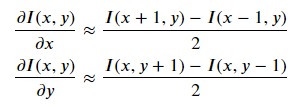
通常情况下边缘检测的目的是在保留原有图像属性的情况下,显著减少图像的数据规模。有多种算法可以进行边缘检测,虽然Canny算法年代久远,但可以说它是边缘检测的一种标准算法,而且仍在研究中广泛使用。 应用高斯滤波来平滑图像,目的是去除噪声找寻图像的强度梯度(intensity gradients)应用非最大抑制(non-maximum suppression)技术来消除边误检(本来不是但检测出来是)应用双阈值的方法来决定可能的(潜在的)边界利用滞后技术来跟踪边界 二、具体实现 1.高斯平滑滤波滤波是为了去除噪声,选用高斯滤波也是因为在众多噪声滤波器中,高斯表现最好(表现怎么定义的?最好好到什么程度?),你也可以试试其他滤波器如均值滤波、中值滤波等等。一个大小为(2k+1)x(2k+1)的高斯滤波器核(核一般都是奇数尺寸的)的生成方程式由下式给出: 下面是手动创建一个高斯滤波核的函数: def gaussian_kernel(size, sigma): """ Implementation of Gaussian Kernel. This function follows the gaussian kernel formula, and creates a kernel matrix. Hints: - Use np.pi and np.exp to compute pi and exp. Args: size: int of the size of output matrix. sigma: float of sigma to calculate kernel. Returns: kernel: numpy array of shape (size, size). """ kernel = np.zeros((size, size)) ### YOUR CODE HERE for x in range(size): for y in range(size): kernel[x, y] = 1 / (2*np.pi*sigma*sigma) * np.exp(-(x*x+y*y)/(2*sigma*sigma)) ### END YOUR CODE return kernel这是定义卷积计算过程的函数: def conv(image, kernel): """ An implementation of convolution filter. This function uses element-wise multiplication and np.sum() to efficiently compute weighted sum of neighborhood at each pixel. Args: image: numpy array of shape (Hi, Wi). kernel: numpy array of shape (Hk, Wk). Returns: out: numpy array of shape (Hi, Wi). """ Hi, Wi = image.shape Hk, Wk = kernel.shape out = np.zeros((Hi, Wi)) # For this assignment, we will use edge values to pad the images. # Zero padding will make derivatives at the image boundary very big, # whereas we want to ignore the edges at the boundary. pad_width0 = Hk // 2 pad_width1 = Wk // 2 pad_width = ((pad_width0,pad_width0),(pad_width1,pad_width1)) padded = np.pad(image, pad_width, mode='edge') ### YOUR CODE HERE x = Hk // 2 y = Wk // 2 # 横向遍历卷积后的图像 for i in range(pad_width0, Hi-pad_width0): # 纵向遍历卷积后的图像 for j in range(pad_width1, Wi-pad_width1): split_img = image[i-pad_width0:i+pad_width0+1, j-pad_width1:j+pad_width1+1] # 对应元素相乘 out[i, j] = np.sum(np.multiply(split_img, kernel)) # out = (out-out.min()) * (1/(out.max()-out.min()) * 255).astype('uint8') ### END YOUR CODE return out接下来就是用自己写的高斯滤波卷积核去卷原来的图片: # Test with different kernel_size and sigma kernel_size = 5 sigma = 1.4 # Load image img = io.imread('iguana.png', as_gray=True) # Define 5x5 Gaussian kernel with std = sigma kernel = gaussian_kernel(kernel_size, sigma) # Convolve image with kernel to achieve smoothed effect smoothed = conv(img, kernel) plt.subplot(1,2,1) plt.imshow(img) plt.title('Original image') plt.axis('off') plt.subplot(1,2,2) plt.imshow(smoothed) plt.title('Smoothed image') plt.axis('off') plt.show()结果是下面两张图片,可以看到图像的边缘被明显地模糊了,图像的抗噪能力变强了。 总结一下这一步:高斯滤波其实就是将所指像素用周围的像素的某种均值代替(即卷积核),卷积核尺寸越大,去噪能力越强,因此噪声越少,但图片越模糊,canny检测算法抗噪声能力越强,但模糊的副作用也会导致定位精度不高。 高斯的卷积核大小推荐:一般情况下,尺寸5 * 5,3 * 3也行。 2.计算梯度大小和方向对于一张图片来说,梯度能很好地反映其像素的变化情况,而梯度变化越大,说明相邻像素之间存在着较大差异,放大到整张图片来说,就是在某一块区域存在边缘,从视觉上来说就是用黑到白(灰度图片读入)。 梯度的计算分为大小和方向,首先需要求出各个方向上的梯度,然后求平方根和切线。 以下是x、y方向上梯度的计算方式: 代码实现: def partial_x(img): """ Computes partial x-derivative of input img. Hints: - You may use the conv function in defined in this file. Args: img: numpy array of shape (H, W). Returns: out: x-derivative image. """ out = None ### YOUR CODE HERE # 对x求偏导 kernel = np.array(([-1, 0, 1], [-1, 0, 1], [-1, 0, 1]))# np.random.randint(10, size=(3, 3)) out = conv(img, kernel) / 2 ### END YOUR CODE return out def partial_y(img): """ Computes partial y-derivative of input img. Hints: - You may use the conv function in defined in this file. Args: img: numpy array of shape (H, W). Returns: out: y-derivative image. """ out = None ### YOUR CODE HERE # 对y求偏导 kernel = np.array(([1, 1, 1], [0, 0, 0], [-1, -1, -1]))# np.random.randint(10, size=(3, 3)) out = conv(img, kernel) / 2 ### END YOUR CODE return out def gradient(img): """ Returns gradient magnitude and direction of input img. Args: img: Grayscale image. Numpy array of shape (H, W). Returns: G: Magnitude of gradient at each pixel in img. Numpy array of shape (H, W). theta: Direction(in degrees, 0 = 0 and i < H 2. j >= 0 and j < W 3. (i, j) != (y, x) Args: y, x: location of the pixel. H, W: size of the image. Returns: neighbors: list of indices of neighboring pixels [(i, j)]. """ neighbors = [] for i in (y-1, y, y+1): for j in (x-1, x, x+1): if i >= 0 and i = 0 and j |

【本文地址】
今日新闻 |
推荐新闻 |