基于Arduino的音乐动感节奏灯 |
您所在的位置:网站首页 › 跟着音乐闪烁的叫什么灯 › 基于Arduino的音乐动感节奏灯 |
基于Arduino的音乐动感节奏灯
|
1、音乐动感节奏灯是个什么东西?
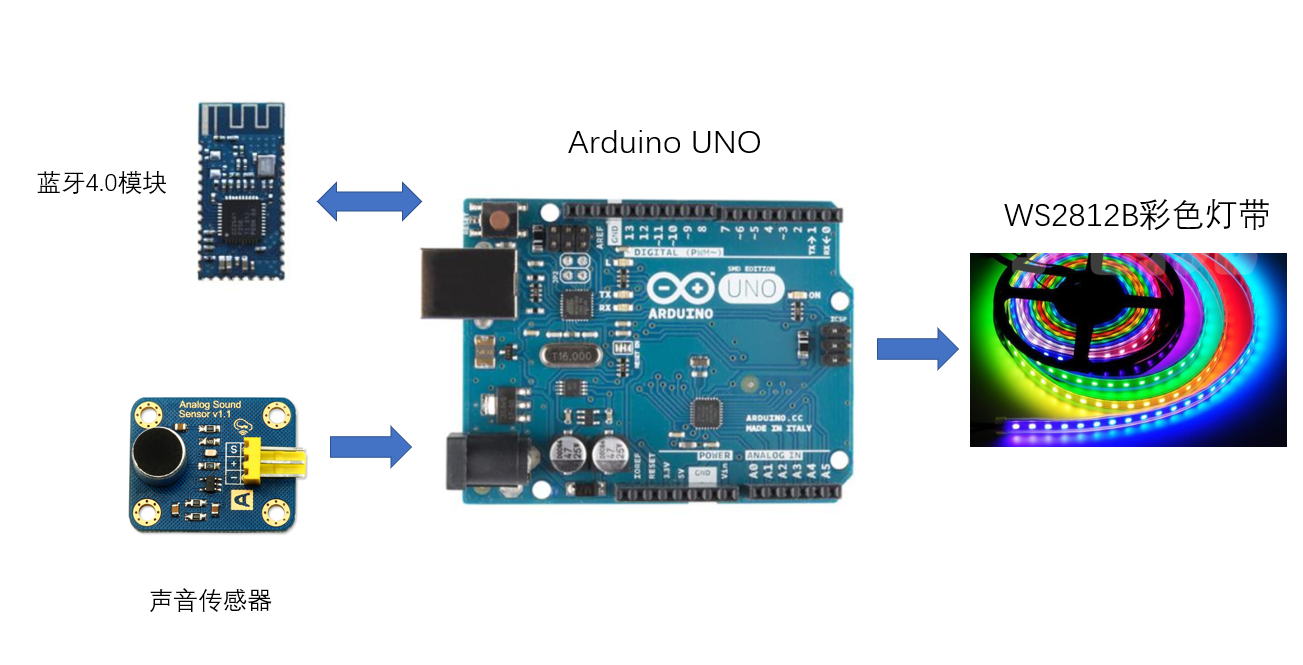
前段时间听音乐觉得无聊,便想着音乐光听也没意思啊,能不能 “看见” 音乐呢?于是谷歌了一番,发现还真有人做了将音乐可视化的东西,那就是音乐节奏灯。说的简单点就是LED灯光颜色亮度等随着音乐的节奏而发生变化,看了下他们的实现方法有很多,不过大都比较复杂,而且灯只能够做节奏灯也比较浪费,于是我便动手做了一个既可以当作普通台灯使用,又可以随着音乐而闪烁的动感节奏灯,一举两得。 2、做这个东西需要准备哪些材料?工欲善其事,必先利其器。那么做这样一个音乐动感节奏等需要准备哪些材料呢? Arduino UNO 开发板 声音传感器(最好买Arduino专用的) BLE蓝牙4.0模块 WS2812B彩色灯带 灯罩 3D打印底座 电源线和杜邦线若干以上材料可以在淘宝买到,灯罩和3D打印的底座可以按照自己的实际需求来进行自己选择,为了防止打广告的嫌疑我就不放购买链接了,可以自行设计打印~ 3、做这个东西需该怎么做?准备好上述的材料之后,我们就可以开始进行灯的制作啦~,节奏灯的主要结构如下图:
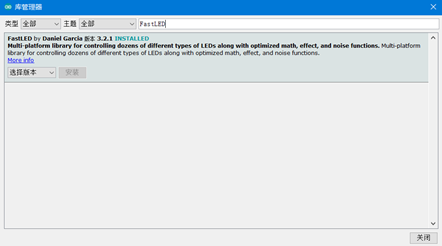
我们使用Arduino UNO作为主要的计算和处理模块,蓝牙4.0模块和手机进行通信,利用手机APP来选择模式(后续会讲),在节奏灯的模式下,通过声音传感器来采集声音,通过得到的声音来控制灯带的颜色和闪烁,在彩色灯的模式下,利用手机来控制灯的颜色,理论上的有160万可调颜色。接下来介绍下详细的步骤。 3.1 安装开发环境Arduino UNO 开发的环境为Arduino IDE,软件下载地址为 https://www.arduino.cn/thread-5838-1-1.html ,默认安装为最新版即可。安装完IDE之后还需要安装第三方的库。 1) WS2812B的库 FastLED, 选择 项目->加载库->管理库,然后在输入栏输入FastLED,选择最新的版本安装,FastLED库的更多使用方法可以参考 http://www.taichi-maker.com/homepage/reference-index/arduino-library-index/fastled-library/ 2) 物联网开发平台库 Blinker, 在Blinker 官网https://doc.blinker.app 页面下载最新的Blinker库,然后: Window:将下载好的blinker库解压到 我的电脑>文档>Arduino>libraries 文件夹中 Mac OS:将下载好的blinker库解压到 文稿>Arduino>libraries 文件夹中 可以在文件->示例 查看库是否安装成功。 3.2 连接线路具体的线路图由于时间原因没有画,所以直接按照后续的代码可以找到每个模块的连接方式,当然这些连接方式都可以自定义,然后在代码内做简单修改即可。需要注意的是蓝牙模块采用软串口连接,即RX,TX连接在ARDUINO UNO的2 和 3 号脚,而不是0和1 号脚,这个在BLINKER的网站上会说明,如果你代码烧录不了,查查是不是这个原因。 3.3 代码编写 1 #define BLINKER_PRINT Serial 2 #define BLINKER_BLE 3 4 #include 5 #include 6 7 /** BASIC CONFIGURATION **/ 8 9 //The amount of LEDs in the setup 10 #define NUM_LEDS 100 11 //The pin that controls the LEDs 12 #define LED_PIN 6 13 //The pin that we read sensor values form 14 #define ANALOG_READ 0 15 16 //Confirmed microphone low value, and max value 17 #define MIC_LOW 0.0 18 #define MIC_HIGH 300.0 19 /** Other macros */ 20 //How many previous sensor values effects the operating average? 21 #define AVGLEN 5 22 //How many previous sensor values decides if we are on a peak/HIGH (e.g. in a song) 23 #define LONG_SECTOR 20 24 25 //Mneumonics 26 #define HIGH 3 27 #define NORMAL 2 28 29 //How long do we keep the "current average" sound, before restarting the measuring 30 #define CYCLES 30 * 1000 31 32 33 float fscale( float originalMin, float originalMax, float newBegin, float newEnd, float inputValue, float curve); 34 void insert(int val, int *avgs, int len); 35 int compute_average(int *avgs, int len); 36 void visualize_music(); 37 38 //How many LEDs to we display 39 int curshow = NUM_LEDS; 40 41 /*Not really used yet. Thought to be able to switch between sound reactive 42 mode, and general gradient pulsing/static color*/ 43 int mode = 0; 44 45 //Showing different colors based on the mode. 46 int songmode = NORMAL; 47 48 //Average sound measurement the last CYCLES 49 unsigned long song_avg; 50 51 //The amount of iterations since the song_avg was reset 52 int iter = 0; 53 54 //The speed the LEDs fade to black if not relit 55 float fade_scale = 1.2; 56 57 //Led array 58 CRGB leds[NUM_LEDS]; 59 60 /*Short sound avg used to "normalize" the input values. 61 We use the short average instead of using the sensor input directly */ |
【本文地址】
今日新闻 |
推荐新闻 |