mybatis |
您所在的位置:网站首页 › 超物理基斗为什么进不去 › mybatis |
mybatis
|
mybatis-plus
(懒人的必备神器) 本文笔记都是观看狂神老师视频手敲的,敲完的时候发现一件挺奔溃的事,视频地址:https://www.bilibili.com/video/BV17E411N7KN视频地址这个老师讲课真的很好,学java后端的都可以去看一下,从基础到架构很详细,推荐给大家https://space.bilibili.com/95256449/狂神说最近做项目听到老师讲到使用mybatis-plus,刚好狂神更新了mybatis-plus视频,简直天助我也,学完不要太震惊,真的牛逼,从此CURD告别写sql。本人也还是小白一名,下面文章大部分是手敲和官网复制,没有运行过,可能会有一些错误,字母符号什么的,如果要复制注意一下。看这篇文章需要掌握点mysql,mybatis,springboot,狂神老师那都有对应的视频,可以去看看,我也要去看看sql的基础知识了,上学期的SQL差点挂了,看完我会把笔记再发到博客,关注我哦!!!地址:https://mp.baomidou.com/ 简介MyBatis-Plus(简称 MP)是一个 MyBatis 的增强工具,在 MyBatis 的基础上只做增强不做改变,为简化开发、提高效率而生。 愿景 我们的愿景是成为 MyBatis 最好的搭档,就像 魂斗罗 中的 1P、2P,基友搭配,效率翻倍。
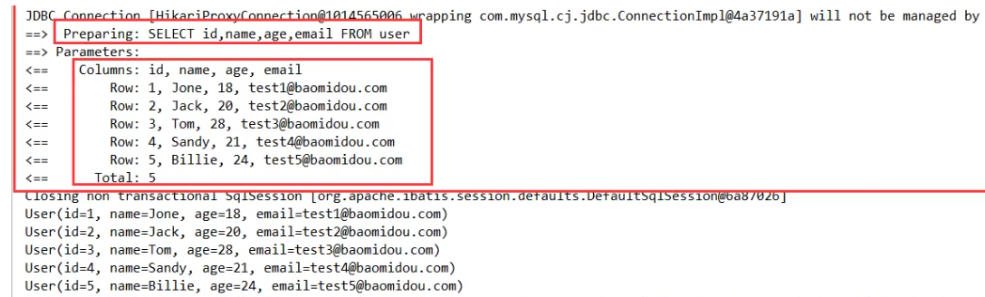
我们将通过一个简单的 Demo 来阐述 MyBatis-Plus 的强大功能,在此之前,我们假设您已经: 拥有 Java 开发环境以及相应 IDE熟悉 Spring Boot熟悉 Maven使用第三方组件: 1、导入对应的依赖 2、研究依赖如何配置 3、代码如何编写 4、提高扩展技术的能力 步骤 1、创建数据库 mybatis_plus现有一张 User 表,其表结构如下: [email protected]@[email protected]@[email protected]其对应的数据库 Schema 脚本如下: DROP TABLE IF EXISTS user; CREATE TABLE user ( id BIGINT(20) NOT NULL COMMENT '主键ID', name VARCHAR(30) NULL DEFAULT NULL COMMENT '姓名', age INT(11) NULL DEFAULT NULL COMMENT '年龄', email VARCHAR(50) NULL DEFAULT NULL COMMENT '邮箱', PRIMARY KEY (id) ); -- 真实开发中,version(乐观锁),deleted(逻辑删除)、gmt_create、gem_mo其对应的数据库 Data 脚本如下: DELETE FROM user; INSERT INTO user (id, name, age, email) VALUES (1, 'Jone', 18, '[email protected]'), (2, 'Jack', 20, '[email protected]'), (3, 'Tom', 28, '[email protected]'), (4, 'Sandy', 21, '[email protected]'), (5, 'Billie', 24, '[email protected]'); 2、导入相应的依赖 mysql mysql-connector-java runtime com.baomidou mybatis-plus-boot-starter 3.3.1.tmp org.projectlombok lombok 1.18.10 provided说明:我们使用mybatis-plus可以节省我们大量的代码,尽量不要同时导入mybatis和mybatis-plus! 版本的差异! 3、连接数据库 # mysql 5 驱动不同 com.mysql.jsbc.Driver # mysql 8 驱动不同 com.mysql.cj.jsbc.Driver、需要增加时区的配置 spring.datasource.username=root spring.datasource.password=123 spring.datasource.url=jdbc:mysql://localhost:3306/mybatis_plus?useSSL=false&useUnicode=true&characterEncoding=utf-8&serverTimezone=GMT%2B8 spring.datasource.driver-class-name=com.mysql.cj.jdbc.Driver 4、编写代码 pojo–>dao–>(连接mybatis,配置mapper.xml文件)–>service-controller (传统方式 ) 使用mybatis-plus之后 * pojo * dao接口(不用写mapper.xml文件) * 使用编写实体类 User.java(此处使用了 Lombok 简化代码) @Data public class User { private Long id; private String name; private Integer age; private String email; }编写Mapper类 UserMapper.java //在对应的Mapper上继承基本的类baseMapper public interface UserMapper extends BaseMapper { //所有的CRUD已经编写完成 //不需要像以前的配置一些xml }在 Spring Boot 启动类中添加 @MapperScan 注解,扫描 Mapper 文件夹: @SpringBootApplication @MapperScan("com.baomidou.mybatisplus.mapper")//扫描mapper文件夹 public class Application { public static void main(String[] args) { SpringApplication.run(QuickStartApplication.class, args); } }添加测试类,进行功能测试: @RunWith(SpringRunner.class) @SpringBootTest public class SampleTest { @Autowired private UserMapper userMapper; @Test public void testSelect() { System.out.println(("----- selectAll method test ------")); //参数是一个Wrapper,条件结构器,这里先不用 填null //查询所有的用户 List userList = userMapper.selectList(null); Assert.assertEquals(5, userList.size()); userList.forEach(System.out::println); } }UserMapper 中的 selectList() 方法的参数为 MP 内置的条件封装器 Wrapper,所以不填写就是无任何条件 控制台输出: User(id=1, name=Jone, age=18, [email protected]) User(id=2, name=Jack, age=20, [email protected]) User(id=3, name=Tom, age=28, [email protected]) User(id=4, name=Sandy, age=21, [email protected]) User(id=5, name=Billie, age=24, [email protected])完整的代码示例请移步:Spring Boot 快速启动示例 [Spring MVC 快速启动示例] 5、小结通过以上几个简单的步骤,我们就实现了 User 表的 CRUD 功能,甚至连 XML 文件都不用编写! 从以上步骤中,我们可以看到集成MyBatis-Plus非常的简单,只需要引入 starter 工程,并配置 mapper 扫描路径即可。 但 MyBatis-Plus 的强大远不止这些功能,想要详细了解 MyBatis-Plus 的强大功能?那就继续往下看吧! 配置日志我们所用的sql现在是不可见的,我们希望知道他是怎么执行的,所以我们必须要查看日志! #配置日志 mybatis-plus.configuration.log-impl=org.apache.ibatis.logging.stdout.StdOutImpl
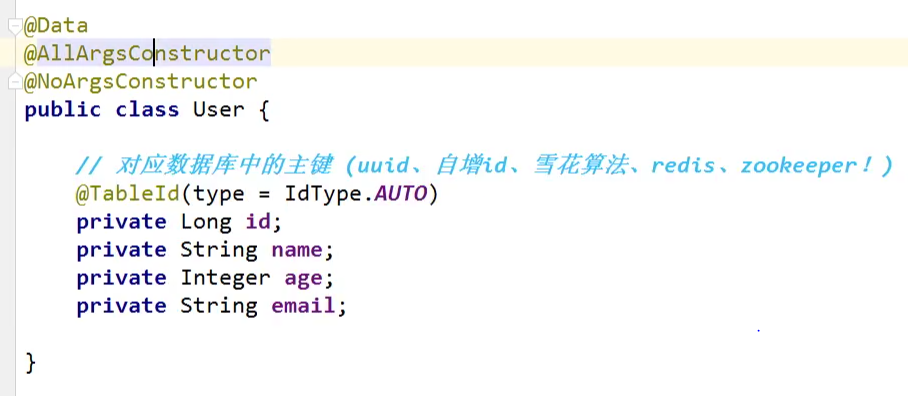
@TableName("表名") 当表名与实体类名不一致时,可以在实体类上加入@TableName()声明 @TableId声明属性为表中的主键(若属性名称不为默认id) @TableFieId("字段") 当实体类属性与表字段不一致时,可以用来声明 @TableName("表名") public class User{ @TableId private Long userId; @TableFieId("name") private String realName } CRUD扩展 Insert 插入 // 插入一条记录 int insert(T entity);参数说明 类型参数名描述Tentity实体对象举例测试 @Test public void testInsert() { System.out.println(("----- selectAll method test ------")); User user = new User(); user.setName=("shuishui"); user.setAge(3); user.setEmail("[email protected]"); userMapper.insert(user); }数据库插入的id为全局默认的id(ID_WORKER) 主键生成策略分布式系统唯一id生成 雪花算法 SnowFlake 算法,是 Twitter 开源的分布式 id 生成算法。其核心思想就是:使用一个 64 bit 的 long 型的数字作为全局唯一 id。在分布式系统中的应用十分广泛,且ID 引入了时间戳,基本上保持自增的。 这 64 个 bit 中,其中 1 个 bit 是不用的,然后用其中的 41 bit 作为毫秒数,用 10 bit 作为工作机器 id,12 bit 作为序列号。 https://blog.csdn.net/lq18050010830/article/details/89845790 主键自增 我们需要配置主键自增 1、实体类字段上 @TableId(type =IdType.AUTO)
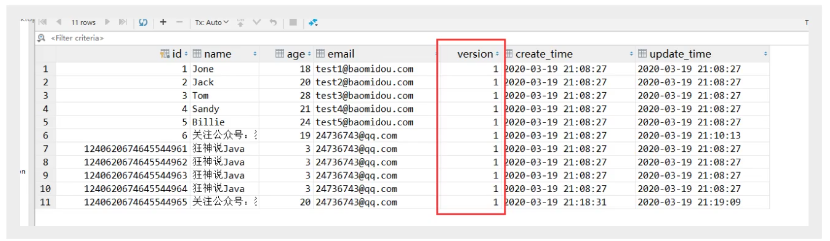
2、数据库字段一定要是自增的 其他的码源详解 public enum IdType { AUTO(0), //数据可id自增 NONE(1), //未设置主键 INPUT(2), //手动输入 ID_WORKER(3), //默认的全局唯一id UUID(4), //全局唯一id uuid ID_WORKER_STR(5); // ID_WORKEK 字符串表示法 private int key; private IdType(int key) { this.key = key; } public int getKey() { return this.key; } } 更新操作 // 根据 whereEntity 条件,更新记录 int update(@Param(Constants.ENTITY) T entity, @Param(Constants.WRAPPER) Wrapper updateWrapper); // 根据 ID 修改 int updateById(@Param(Constants.ENTITY) T entity); #参数说明 类型参数名描述Tentity实体对象 (set 条件值,可为 null)WrapperupdateWrapper实体对象封装操作类(可以为 null,里面的 entity 用于生成 where 语句)举例测试 @Test public void testUpdate() { //sql自动动态配置 User user = new User(); user.setName=("shui"); user.setId(3L); user.setAge("18"); //注意:updateById的参数是一个对象 userMapper.updateById(user); }自动填充 创建时间、修改时间!这些个操作一遍都是自动化完成,我们不希望手动更新! 阿里巴巴开发手册:所有的数据库表:gmt_create\gmt_modified几乎所有的表都要配置上!而且需要自动化 方式一:数据库级别 在表中新增字段 create_time 、update_time(默认CURRENT_TIMESIAMP) 方式二:代码级别 实体类上的属性需要增加注解==@TableField== //创建时间 @TableField(fill = FieldFill.INSERT) private Date createTime; //更新时间 @TableField(fill = FieldFill.INSERT_UPDATE) private Date updateTime; 编写处理器来处理这个注释即可! @Slf4j @Component public class MyMetaObjectHandler implements MetaObjectHandler { //插入时候的填充策略 @Override @Componcent //一定不要忘记吧处理器加到IOC容器中 public void insertFill(MetaObject metaObject) { log.info("start insert fill ...."); //日志 //设置字段的值(String fieldName字段名,Object fieldVal要传递的值,MetaObject metaObject) this.setFieldVaLByName("createTime",new Date(),metaObject); this.setFieldVaLByName("createTime",new Date(),metaObject); //this.strictInsertFill(metaObject, "createTime", LocalDateTime.class, LocalDateTime.now()); // 起始版本 3.3.0(推荐使用) // this.fillStrategy(metaObject, "createTime", LocalDateTime.now()); // 也可以使用(3.3.0 该方法有bug请升级到之后的版本如`3.3.1.8-SNAPSHOT`) /* 上面选其一使用,下面的已过时(注意 strictInsertFill 有多个方法,详细查看源码) */ //this.setFieldValByName("operator", "Jerry", metaObject); //this.setInsertFieldValByName("operator", "Jerry", metaObject); } //更新时间的填充策略 @Override public void updateFill(MetaObject metaObject) { log.info("start update fill ...."); this.setFieldVaLByName("createTime",new Date(),metaObject); //this.strictUpdateFill(metaObject, "updateTime", LocalDateTime.class, LocalDateTime.now()); // 起始版本 3.3.0(推荐使用) // this.fillStrategy(metaObject, "updateTime", LocalDateTime.now()); // 也可以使用(3.3.0 该方法有bug请升级到之后的版本如`3.3.1.8-SNAPSHOT`) /* 上面选其一使用,下面的已过时(注意 strictUpdateFill 有多个方法,详细查看源码) */ //this.setFieldValByName("operator", "Tom", metaObject); //this.setUpdateFieldValByName("operator", "Tom", metaObject); } }吐槽:这么麻烦,难道用数据库不香吗? 乐观锁 面试中经常会问到乐观锁,悲观锁 乐观锁:顾名思义十分乐观,它总是被认为不会出现问题,无论干什么都不去上锁!如果出现了问题,再次更新测试 悲观锁:顾名思义十分悲观,它总是出现问题,无论干什么都会上锁!再去操作! 乐观锁实现方式 取出记录是,获取当前version更新事,带上这个version执行更新事,set version=newVersion where version =oldVersion如果version不对,就更新失败 乐观锁: 1、先查询,获得版本号 version=1 --A update user set name ="shuishui" ,version =version+1 where id =2 and version=1 --B 如果线程抢先完成,这个时候version=2,会导致A修改失败 update user set name ="shuishui" ,version =version+1 where id =2 and version=1测试乐观锁 1、表中创建乐观锁字段version 默认值为1
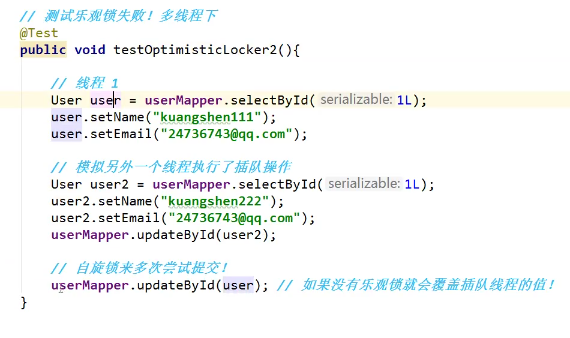
2、同步实体类 @Version //乐观锁Version注解 private Integer version;3、注册组件 (config包下) springboot: @EnableTransactionManagement @MapperScan("com.baomidou.cloud.service.*.mapper*") @Configuration//配置类 public class MyBatisPlusConfig{ //注册乐观锁插件 @Bean public OptimisticLockerInterceptor optimisticLockerInterceptor() { return new OptimisticLockerInterceptor(); } }spring xml: 特别说明: 支持的数据类型只有:int,Integer,long,Long,Date,Timestamp,LocalDateTime整数类型下 newVersion = oldVersion + 1newVersion 会回写到 entity 中仅支持 updateById(id) 与 update(entity, wrapper) 方法在 update(entity, wrapper) 方法下, wrapper 不能复用!!!测试一下:
|

【本文地址】
今日新闻 |
推荐新闻 |