python+paddleocr 进行图像识别、找到文字在屏幕中的位置 |
您所在的位置:网站首页 › 识别截图文字的软件叫什么 › python+paddleocr 进行图像识别、找到文字在屏幕中的位置 |
python+paddleocr 进行图像识别、找到文字在屏幕中的位置
|
目录 前言 1、安装paddleocr 2、安装PIL 3、安装numpy 4、 安装pyautogui 5、进行文本识别 6、识别结果 7、获取文字在图片/屏幕中的位置 8、pyautogui+paddleocr鼠标操作 9、完整代码 前言最近在做自动化测试,因为是处理过的界面,所以使用pywinauto,LDTP获取控件进行操作的方法不可行,于是选择使用pyautogui进行图像识别与键盘鼠标控制。 但是单独使用pyautogui测试效率很低,并且pyautogui图片识别并没有opencv识别率高,所以需要结合其他图像库使用。 在使用的过程中发现,仅仅使用图像识别有时匹配度比较低,使用opencv进行图像识别定位,是图像像素太小查找成功的几率大大降低,于是想到使用OCR文本识别的方法对其进行查找,结合在一起使用,大大提高了工作效率。 OCR图像识别我试过Tessract-ocr和paddleocr,发现Tessract-ocr识别正确率太低了,实在不推荐使用。 有关paddleocr的信息可以去github上查看:https://github.com/PaddlePaddle/PaddleOCR 于是想要记录一下,也提供给大家参考学习。 1、安装paddleocr使用以下命令进行安装: pip install paddleocr 2、安装PILPythonPIL(Python Image Library)是一款用来处理图像的开源库,可实现图像的读取、格式转换、简单编辑、保存等功能。在Python中使用PIL库可以很方便地对图像进行操作。 与 Pillow 相比,OpenCV 和 Scikit-image 的功能更为丰富,所以使用起来也更为复杂,主要应用于机器视觉、图像分析等领域,比如众所周知的“人脸识别”应用 。 在这里我们使用PIL对图像进行处理。 使用以下命令进行安装: pip install pillow 3、安装numpyNumPy(Numerical Python)是Python的一种开源的数值计算扩展。这种工具可用来存储和处理大型矩阵,比Python自身的嵌套列表(nested list structure)结构要高效的多(该结构也可以用来表示矩阵(matrix)),支持大量的维度数组与矩阵运算,此外也针对数组运算提供大量的数学函数库。 我们使用numpy用来处理屏幕截图,把其转换为矩阵,再进行下一步处理。 使用以下命令进行安装: pip install numpy 4、 安装pyautoguipyautogui是一个Python模块,可以模拟用户在屏幕上的鼠标和键盘操作。它可以自动化鼠标和键盘输入,可以用于各种自动化任务,例如GUI测试、自动化数据输入、自动化游戏玩法等。pyautogui提供了一组函数来控制鼠标和键盘,例如移动鼠标、单击、双击、右键单击、按下和释放键等。它还提供了一些额外的功能,例如捕捉屏幕截图、识别颜色和图像等,以及其他一些实用工具,例如获取屏幕尺寸和鼠标位置。 使用以下命令进行安装: pip install pyautogui 5、进行文本识别安装好库之后,在脚本文件开头导入 import numpy from pyautogui import * from PIL import Image import numpy as np from paddleocr import PaddleOCR, draw_ocr def get_curtime(time_format="%Y-%m-%d %H:%M:%S"): curTime = time.localtime() curTime = time.strftime(time_format, curTime) return curTime def ocr_img_text(path="", saveimg=False, printResult=False): ''' 图像文字识别 :param path:图片路径 :param saveimg:是否把结果保存成图片 :param printResult:是否打印出识别结果 :return:result,img_name ''' image = path # 图片路径为空就默认获取屏幕截图 if image == "": image = screenshot() #使用pyautogui进行截图操作 image = np.array(image) else: # 不为空就打开 image = Image.open(image).convert('RGB') ocr = PaddleOCR(use_angle_cls=True, lang="ch") # need to run only once to download and load model into memory result = ocr.ocr(image, cls=True) if printResult is True: for line in result: for word in line: print(word) # 识别出来的文字保存为图片 img_name = "ImgTextOCR-img-" + get_curtime("%Y%m%d%H%M%S") + ".jpg" if saveimg is True: boxes = [detection[0] for line in result for detection in line] # Nested loop added txts = [detection[1][0] for line in result for detection in line] # Nested loop added scores = [detection[1][1] for line in result for detection in line] # Nested loop added im_show = draw_ocr(image, boxes, txts, scores) im_show = Image.fromarray(im_show) im_show.save(img_name) return result, img_name在main中调用,不指定path路径,默认使用屏幕截图进行文本识别,设置输出识别结果到控制台,设置保存识别结果为图片,运行: if __name__ == '__main__': ocr_img_text(saveimg=True, printResult=True) 6、识别结果识别的屏幕截图为一篇博客:
等待3-10s输出结果,识别文本越多,速度越慢,运行结果如下: [2023/12/06 10:03:52] ppocr DEBUG: Namespace(help='==SUPPRESS==', use_gpu=False, use_xpu=False, use_npu=False, ir_optim=True, use_tensorrt=False, min_subgraph_size=15, precision='fp32', gpu_mem=500, gpu_id=0, image_dir=None, page_num=0, det_algorithm='DB', det_model_dir='C:\\Users\\qxk20/.paddleocr/whl\\det\\ch\\ch_PP-OCRv4_det_infer', det_limit_side_len=960, det_limit_type='max', det_box_type='quad', det_db_thresh=0.3, det_db_box_thresh=0.6, det_db_unclip_ratio=1.5, max_batch_size=10, use_dilation=False, det_db_score_mode='fast', det_east_score_thresh=0.8, det_east_cover_thresh=0.1, det_east_nms_thresh=0.2, det_sast_score_thresh=0.5, det_sast_nms_thresh=0.2, det_pse_thresh=0, det_pse_box_thresh=0.85, det_pse_min_area=16, det_pse_scale=1, scales=[8, 16, 32], alpha=1.0, beta=1.0, fourier_degree=5, rec_algorithm='SVTR_LCNet', rec_model_dir='C:\\Users\\qxk20/.paddleocr/whl\\rec\\ch\\ch_PP-OCRv4_rec_infer', rec_image_inverse=True, rec_image_shape='3, 48, 320', rec_batch_num=6, max_text_length=25, rec_char_dict_path='C:\\Users\\qxk20\\AppData\\Local\\Programs\\Python\\Python39\\lib\\site-packages\\paddleocr\\ppocr\\utils\\ppocr_keys_v1.txt', use_space_char=True, vis_font_path='./doc/fonts/simfang.ttf', drop_score=0.5, e2e_algorithm='PGNet', e2e_model_dir=None, e2e_limit_side_len=768, e2e_limit_type='max', e2e_pgnet_score_thresh=0.5, e2e_char_dict_path='./ppocr/utils/ic15_dict.txt', e2e_pgnet_valid_set='totaltext', e2e_pgnet_mode='fast', use_angle_cls=True, cls_model_dir='C:\\Users\\qxk20/.paddleocr/whl\\cls\\ch_ppocr_mobile_v2.0_cls_infer', cls_image_shape='3, 48, 192', label_list=['0', '180'], cls_batch_num=6, cls_thresh=0.9, enable_mkldnn=False, cpu_threads=10, use_pdserving=False, warmup=False, sr_model_dir=None, sr_image_shape='3, 32, 128', sr_batch_num=1, draw_img_save_dir='./inference_results', save_crop_res=False, crop_res_save_dir='./output', use_mp=False, total_process_num=1, process_id=0, benchmark=False, save_log_path='./log_output/', show_log=True, use_onnx=False, output='./output', table_max_len=488, table_algorithm='TableAttn', table_model_dir=None, merge_no_span_structure=True, table_char_dict_path=None, layout_model_dir=None, layout_dict_path=None, layout_score_threshold=0.5, layout_nms_threshold=0.5, kie_algorithm='LayoutXLM', ser_model_dir=None, re_model_dir=None, use_visual_backbone=True, ser_dict_path='../train_data/XFUND/class_list_xfun.txt', ocr_order_method=None, mode='structure', image_orientation=False, layout=True, table=True, ocr=True, recovery=False, use_pdf2docx_api=False, invert=False, binarize=False, alphacolor=(255, 255, 255), lang='ch', det=True, rec=True, type='ocr', ocr_version='PP-OCRv4', structure_version='PP-StructureV2') [2023/12/06 10:03:53] ppocr DEBUG: dt_boxes num : 95, elapsed : 0.4894998073577881 [2023/12/06 10:03:53] ppocr DEBUG: cls num : 95, elapsed : 0.6584289073944092 [2023/12/06 10:04:04] ppocr DEBUG: rec_res num : 95, elapsed : 10.509709119796753 [[[12.0, 14.0], [32.0, 14.0], [32.0, 32.0], [12.0, 32.0]], ('司', 0.8348841071128845)] [[[52.0, 12.0], [260.0, 12.0], [260.0, 32.0], [52.0, 32.0]], ('Cpython自动化神器:pyautogui-X', 0.9596936106681824)] [[[84.0, 54.0], [140.0, 54.0], [140.0, 75.0], [84.0, 75.0]], ('Q', 0.6443824172019958)] [[[272.0, 52.0], [794.0, 52.0], [794.0, 77.0], [272.0, 77.0]], (' o 日 https://blog.csdn.net/q_61260911/article/details/129885971', 0.9266524910926819)] [[[1570.0, 54.0], [1648.0, 54.0], [1648.0, 75.0], [1570.0, 75.0]], ('回器', 0.5518691539764404)] [[[342.0, 103.0], [410.0, 103.0], [410.0, 125.0], [342.0, 125.0]], ('文章目录', 0.9994025230407715)] [[[408.0, 133.0], [553.0, 129.0], [554.0, 157.0], [409.0, 161.0]], ('、pyautogui是什么?', 0.9903998374938965)] [[[418.0, 159.0], [494.0, 159.0], [494.0, 187.0], [418.0, 187.0]], ('使用步骤', 0.9996742010116577)] [[[1350.0, 151.0], [1386.0, 151.0], [1386.0, 175.0], [1350.0, 175.0]], ('目录', 0.9999495148658752)] [[[436.0, 185.0], [554.0, 185.0], [554.0, 212.0], [436.0, 212.0]], ('1.安装和引入库', 0.9996572732925415)] [[[436.0, 210.0], [520.0, 210.0], [520.0, 238.0], [436.0, 238.0]], ('2.基本操作', 0.9997453689575195)] [[[1350.0, 225.0], [1497.0, 220.0], [1498.0, 248.0], [1351.0, 252.0]], ('一、pyautogu是什么?', 0.9643535017967224)] [[[494.0, 240.0], [584.0, 240.0], [584.0, 262.0], [494.0, 262.0]], ('(1)鼠标控制', 0.9999212026596069)] [[[496.0, 266.0], [586.0, 266.0], [586.0, 288.0], [496.0, 288.0]], ('(2)键盘控制', 0.9985042810440063)] [[[1348.0, 261.0], [1443.0, 256.0], [1444.0, 283.0], [1349.0, 288.0]], ('二、使用步骤', 0.9997739791870117)] [[[494.0, 292.0], [586.0, 292.0], [586.0, 314.0], [494.0, 314.0]], ('(3)屏幕截图', 0.9958118200302124)] [[[1376.0, 298.0], [1478.0, 298.0], [1478.0, 320.0], [1376.0, 320.0]], ('1.安装和引入库', 0.9996544122695923)] [[[496.0, 318.0], [618.0, 318.0], [618.0, 339.0], [496.0, 339.0]], ('(4)图片位置识别', 0.9985911250114441)] [[[496.0, 343.0], [620.0, 343.0], [620.0, 365.0], [496.0, 365.0]], ('(6)获取鼠标位置', 0.9997221827507019)] [[[1374.0, 334.0], [1448.0, 334.0], [1448.0, 355.0], [1374.0, 355.0]], ('2.基本操作', 0.9990530014038086)] [[[492.0, 367.0], [556.0, 367.0], [556.0, 395.0], [492.0, 395.0]], ('(7)其他', 0.9966148138046265)] [[[1406.0, 369.0], [1490.0, 369.0], [1490.0, 391.0], [1406.0, 391.0]], ('(1)鼠标控制', 0.9988077878952026)] [[[392.0, 397.0], [556.0, 397.0], [556.0, 423.0], [392.0, 423.0]], ('三、自动发消息给对象', 0.9993067979812622)] [[[1408.0, 405.0], [1488.0, 405.0], [1488.0, 427.0], [1408.0, 427.0]], ('(2)键盘控制', 0.9968889951705933)] [[[436.0, 425.0], [520.0, 425.0], [520.0, 447.0], [436.0, 447.0]], ('1.截图操作', 0.9997608661651611)] [[[1408.0, 441.0], [1490.0, 441.0], [1490.0, 463.0], [1408.0, 463.0]], ('(3)屏幕截图', 0.9955319762229919)] [[[1894.0, 437.0], [1914.0, 437.0], [1914.0, 457.0], [1894.0, 457.0]], ('史', 0.6741142272949219)] [[[436.0, 449.0], [538.0, 449.0], [538.0, 476.0], [436.0, 476.0]], ('2.python代码', 0.9998586773872375)] [[[387.0, 472.0], [467.0, 477.0], [465.0, 505.0], [385.0, 500.0]], ('完整代码"', 0.9178546667098999)] [[[1404.0, 475.0], [1517.0, 470.0], [1518.0, 498.0], [1405.0, 503.0]], ('(4)图片位置识别', 0.9936147332191467)] [[[390.0, 504.0], [428.0, 504.0], [428.0, 528.0], [390.0, 528.0]], ('总结', 0.9999614357948303)] [[[1404.0, 511.0], [1521.0, 506.0], [1522.0, 534.0], [1405.0, 538.0]], ('(6)获取鼠标位置', 0.9689271450042725)] [[[1406.0, 550.0], [1460.0, 550.0], [1460.0, 572.0], [1406.0, 572.0]], ('(7)其他', 0.9757314920425415)] [[[340.0, 604.0], [575.0, 597.0], [576.0, 631.0], [341.0, 638.0]], ('一、pyautogui°是什么?', 0.9466922879219055)] [[[338.0, 641.0], [1290.0, 639.0], [1290.0, 667.0], [338.0, 669.0]], ('pyautogui是一个Python模块α,可以模拟用户在屏幕上的鼠标和键盘操作。它可以自动化鼠标和键盘输入,可以用于各种自动化任务,', 0.9859745502471924)] [[[1414.0, 633.0], [1442.0, 633.0], [1442.0, 649.0], [1414.0, 649.0]], ('目懿', 0.9915087223052979)] [[[1418.0, 651.0], [1458.0, 651.0], [1458.0, 665.0], [1418.0, 665.0]], ('龄2年', 0.9997161030769348)] [[[1474.0, 647.0], [1556.0, 647.0], [1556.0, 669.0], [1474.0, 669.0]], ('暂无认证', 0.9993581175804138)] [[[340.0, 667.0], [1310.0, 667.0], [1310.0, 695.0], [340.0, 695.0]], ('例如GUI测试、自动化数据输入、自动化游戏玩法等。pyautogui提供了一组函数来控制鼠标和键盘,例如移动鼠标、单击、双击、右键单', 0.9897662997245789)] [[[338.0, 691.0], [1306.0, 691.0], [1306.0, 717.0], [338.0, 717.0]], ('击、按下和释放键等。它还提供了一些额外的功能,例如捕捉屏幕截图、识别颜色和图像等,以及其他一些实用工具,例如获取屏幕尺寸', 0.9956715703010559)] [[[1406.0, 689.0], [1464.0, 689.0], [1464.0, 711.0], [1406.0, 711.0]], ('126万+', 0.9962350130081177)] [[[1456.0, 689.0], [1510.0, 689.0], [1510.0, 711.0], [1456.0, 711.0]], ('15万+', 0.9973534345626831)] [[[1524.0, 689.0], [1562.0, 689.0], [1562.0, 711.0], [1524.0, 711.0]], ('2万+', 0.9968100190162659)] [[[1360.0, 715.0], [1396.0, 715.0], [1396.0, 737.0], [1360.0, 737.0]], ('原创', 0.9999445676803589)] [[[1410.0, 717.0], [1460.0, 717.0], [1460.0, 735.0], [1410.0, 735.0]], ('周排名', 0.9998628497123718)] [[[1460.0, 715.0], [1512.0, 715.0], [1512.0, 737.0], [1460.0, 737.0]], ('总排名', 0.9999186396598816)] [[[1526.0, 715.0], [1562.0, 715.0], [1562.0, 737.0], [1526.0, 737.0]], ('访问', 0.9992227554321289)] [[[1586.0, 713.0], [1614.0, 713.0], [1614.0, 737.0], [1586.0, 737.0]], ('等级', 0.9991192817687988)] [[[342.0, 723.0], [430.0, 723.0], [430.0, 744.0], [342.0, 744.0]], ('和鼠标位置。', 0.9976329803466797)] [[[1364.0, 762.0], [1390.0, 762.0], [1390.0, 778.0], [1364.0, 778.0]], ('323', 0.9994524121284485)] [[[1420.0, 762.0], [1446.0, 762.0], [1446.0, 778.0], [1420.0, 778.0]], ('205', 0.9996988773345947)] [[[1478.0, 762.0], [1498.0, 762.0], [1498.0, 778.0], [1478.0, 778.0]], ('92', 0.9983443021774292)] [[[1534.0, 760.0], [1554.0, 760.0], [1554.0, 778.0], [1534.0, 778.0]], ('16', 0.9997827410697937)] [[[342.0, 770.0], [470.0, 770.0], [470.0, 798.0], [342.0, 798.0]], ('二、使用步骤', 0.9999136924743652)] [[[1588.0, 762.0], [1614.0, 762.0], [1614.0, 780.0], [1588.0, 780.0]], ('286', 0.9995718002319336)] [[[1362.0, 786.0], [1392.0, 786.0], [1392.0, 802.0], [1362.0, 802.0]], ('积分', 0.9998078942298889)] [[[1416.0, 786.0], [1446.0, 786.0], [1446.0, 802.0], [1416.0, 802.0]], ('粉丝', 0.999700665473938)] [[[1472.0, 786.0], [1504.0, 786.0], [1504.0, 802.0], [1472.0, 802.0]], ('获赞', 0.9995585680007935)] [[[1528.0, 786.0], [1560.0, 786.0], [1560.0, 802.0], [1528.0, 802.0]], ('评论', 0.999963641166687)] [[[1588.0, 786.0], [1614.0, 786.0], [1614.0, 802.0], [1588.0, 802.0]], ('收藏', 0.9930889010429382)] [[[1664.0, 812.0], [1692.0, 812.0], [1692.0, 836.0], [1664.0, 836.0]], ('目', 0.6718043088912964)] [[[340.0, 824.0], [470.0, 824.0], [470.0, 852.0], [340.0, 852.0]], ('1.安装和引入库', 0.9993049502372742)] [[[366.0, 859.0], [572.0, 864.0], [572.0, 898.0], [366.0, 893.0]], (' 1| pip install pyautogui', 0.9545071125030518)] [[[1664.0, 860.0], [1692.0, 860.0], [1692.0, 891.0], [1664.0, 891.0]], ('8', 0.7358648180961609)] [[[1404.0, 874.0], [1428.0, 874.0], [1428.0, 889.0], [1404.0, 889.0]], ('私信', 0.9994027018547058)] [[[1546.0, 874.0], [1572.0, 874.0], [1572.0, 889.0], [1546.0, 889.0]], ('关注', 0.9985920190811157)] [[[396.0, 925.0], [528.0, 927.0], [528.0, 949.0], [396.0, 947.0]], ('import pyautogui', 0.995620846748352)] [[[378.0, 991.0], [432.0, 991.0], [432.0, 1011.0], [378.0, 1011.0]], ('泪懿(', 0.8541081547737122)] [[[424.0, 991.0], [474.0, 991.0], [474.0, 1012.0], [424.0, 1012.0]], ('(关注', 0.8576037287712097)] [[[908.0, 991.0], [1096.0, 991.0], [1096.0, 1011.0], [908.0, 1011.0]], ('1073', 0.9963844418525696)] [[[1238.0, 991.0], [1302.0, 991.0], [1302.0, 1012.0], [1238.0, 1012.0]], ('专栏目录', 0.999904990196228)] [[[906.0, 1048.0], [926.0, 1048.0], [926.0, 1064.0], [906.0, 1064.0]], ('?', 0.508362352848053)] [[[1214.0, 1048.0], [1234.0, 1048.0], [1234.0, 1064.0], [1214.0, 1064.0]], ('W', 0.8730343580245972)] [[[1844.0, 1042.0], [1880.0, 1042.0], [1880.0, 1058.0], [1844.0, 1058.0]], ('10:03', 0.9939872026443481)] [[[1818.0, 1054.0], [1880.0, 1054.0], [1880.0, 1074.0], [1818.0, 1074.0]], ('2023/12/6', 0.9981465935707092)] 进程已结束,退出代码为 0信息比较多,我们提取一下,最终识别的结果如下,可以看出内容识别正确程度还是比较高的: [[[12.0, 14.0], [32.0, 14.0], [32.0, 32.0], [12.0, 32.0]], ('司', 0.8348841071128845)] [[[52.0, 12.0], [260.0, 12.0], [260.0, 32.0], [52.0, 32.0]], ('Cpython自动化神器:pyautogui-X', 0.9596936106681824)] [[[84.0, 54.0], [140.0, 54.0], [140.0, 75.0], [84.0, 75.0]], ('Q', 0.6443824172019958)] [[[272.0, 52.0], [794.0, 52.0], [794.0, 77.0], [272.0, 77.0]], (' o 日 https://blog.csdn.net/q_61260911/article/details/129885971', 0.9266524910926819)] [[[1570.0, 54.0], [1648.0, 54.0], [1648.0, 75.0], [1570.0, 75.0]], ('回器', 0.5518691539764404)] [[[342.0, 103.0], [410.0, 103.0], [410.0, 125.0], [342.0, 125.0]], ('文章目录', 0.9994025230407715)] [[[408.0, 133.0], [553.0, 129.0], [554.0, 157.0], [409.0, 161.0]], ('、pyautogui是什么?', 0.9903998374938965)] [[[418.0, 159.0], [494.0, 159.0], [494.0, 187.0], [418.0, 187.0]], ('使用步骤', 0.9996742010116577)] [[[1350.0, 151.0], [1386.0, 151.0], [1386.0, 175.0], [1350.0, 175.0]], ('目录', 0.9999495148658752)] [[[436.0, 185.0], [554.0, 185.0], [554.0, 212.0], [436.0, 212.0]], ('1.安装和引入库', 0.9996572732925415)] [[[436.0, 210.0], [520.0, 210.0], [520.0, 238.0], [436.0, 238.0]], ('2.基本操作', 0.9997453689575195)] [[[1350.0, 225.0], [1497.0, 220.0], [1498.0, 248.0], [1351.0, 252.0]], ('一、pyautogu是什么?', 0.9643535017967224)] [[[494.0, 240.0], [584.0, 240.0], [584.0, 262.0], [494.0, 262.0]], ('(1)鼠标控制', 0.9999212026596069)] [[[496.0, 266.0], [586.0, 266.0], [586.0, 288.0], [496.0, 288.0]], ('(2)键盘控制', 0.9985042810440063)] [[[1348.0, 261.0], [1443.0, 256.0], [1444.0, 283.0], [1349.0, 288.0]], ('二、使用步骤', 0.9997739791870117)] [[[494.0, 292.0], [586.0, 292.0], [586.0, 314.0], [494.0, 314.0]], ('(3)屏幕截图', 0.9958118200302124)] [[[1376.0, 298.0], [1478.0, 298.0], [1478.0, 320.0], [1376.0, 320.0]], ('1.安装和引入库', 0.9996544122695923)] [[[496.0, 318.0], [618.0, 318.0], [618.0, 339.0], [496.0, 339.0]], ('(4)图片位置识别', 0.9985911250114441)] [[[496.0, 343.0], [620.0, 343.0], [620.0, 365.0], [496.0, 365.0]], ('(6)获取鼠标位置', 0.9997221827507019)] [[[1374.0, 334.0], [1448.0, 334.0], [1448.0, 355.0], [1374.0, 355.0]], ('2.基本操作', 0.9990530014038086)] [[[492.0, 367.0], [556.0, 367.0], [556.0, 395.0], [492.0, 395.0]], ('(7)其他', 0.9966148138046265)] [[[1406.0, 369.0], [1490.0, 369.0], [1490.0, 391.0], [1406.0, 391.0]], ('(1)鼠标控制', 0.9988077878952026)] [[[392.0, 397.0], [556.0, 397.0], [556.0, 423.0], [392.0, 423.0]], ('三、自动发消息给对象', 0.9993067979812622)] [[[1408.0, 405.0], [1488.0, 405.0], [1488.0, 427.0], [1408.0, 427.0]], ('(2)键盘控制', 0.9968889951705933)] [[[436.0, 425.0], [520.0, 425.0], [520.0, 447.0], [436.0, 447.0]], ('1.截图操作', 0.9997608661651611)] [[[1408.0, 441.0], [1490.0, 441.0], [1490.0, 463.0], [1408.0, 463.0]], ('(3)屏幕截图', 0.9955319762229919)] [[[1894.0, 437.0], [1914.0, 437.0], [1914.0, 457.0], [1894.0, 457.0]], ('史', 0.6741142272949219)] [[[436.0, 449.0], [538.0, 449.0], [538.0, 476.0], [436.0, 476.0]], ('2.python代码', 0.9998586773872375)] [[[387.0, 472.0], [467.0, 477.0], [465.0, 505.0], [385.0, 500.0]], ('完整代码"', 0.9178546667098999)] [[[1404.0, 475.0], [1517.0, 470.0], [1518.0, 498.0], [1405.0, 503.0]], ('(4)图片位置识别', 0.9936147332191467)] [[[390.0, 504.0], [428.0, 504.0], [428.0, 528.0], [390.0, 528.0]], ('总结', 0.9999614357948303)] [[[1404.0, 511.0], [1521.0, 506.0], [1522.0, 534.0], [1405.0, 538.0]], ('(6)获取鼠标位置', 0.9689271450042725)] [[[1406.0, 550.0], [1460.0, 550.0], [1460.0, 572.0], [1406.0, 572.0]], ('(7)其他', 0.9757314920425415)] [[[340.0, 604.0], [575.0, 597.0], [576.0, 631.0], [341.0, 638.0]], ('一、pyautogui°是什么?', 0.9466922879219055)] [[[338.0, 641.0], [1290.0, 639.0], [1290.0, 667.0], [338.0, 669.0]], ('pyautogui是一个Python模块α,可以模拟用户在屏幕上的鼠标和键盘操作。它可以自动化鼠标和键盘输入,可以用于各种自动化任务,', 0.9859745502471924)] [[[1414.0, 633.0], [1442.0, 633.0], [1442.0, 649.0], [1414.0, 649.0]], ('目懿', 0.9915087223052979)] [[[1418.0, 651.0], [1458.0, 651.0], [1458.0, 665.0], [1418.0, 665.0]], ('龄2年', 0.9997161030769348)] [[[1474.0, 647.0], [1556.0, 647.0], [1556.0, 669.0], [1474.0, 669.0]], ('暂无认证', 0.9993581175804138)] [[[340.0, 667.0], [1310.0, 667.0], [1310.0, 695.0], [340.0, 695.0]], ('例如GUI测试、自动化数据输入、自动化游戏玩法等。pyautogui提供了一组函数来控制鼠标和键盘,例如移动鼠标、单击、双击、右键单', 0.9897662997245789)] [[[338.0, 691.0], [1306.0, 691.0], [1306.0, 717.0], [338.0, 717.0]], ('击、按下和释放键等。它还提供了一些额外的功能,例如捕捉屏幕截图、识别颜色和图像等,以及其他一些实用工具,例如获取屏幕尺寸', 0.9956715703010559)] [[[1406.0, 689.0], [1464.0, 689.0], [1464.0, 711.0], [1406.0, 711.0]], ('126万+', 0.9962350130081177)] [[[1456.0, 689.0], [1510.0, 689.0], [1510.0, 711.0], [1456.0, 711.0]], ('15万+', 0.9973534345626831)] [[[1524.0, 689.0], [1562.0, 689.0], [1562.0, 711.0], [1524.0, 711.0]], ('2万+', 0.9968100190162659)] [[[1360.0, 715.0], [1396.0, 715.0], [1396.0, 737.0], [1360.0, 737.0]], ('原创', 0.9999445676803589)] [[[1410.0, 717.0], [1460.0, 717.0], [1460.0, 735.0], [1410.0, 735.0]], ('周排名', 0.9998628497123718)] [[[1460.0, 715.0], [1512.0, 715.0], [1512.0, 737.0], [1460.0, 737.0]], ('总排名', 0.9999186396598816)] [[[1526.0, 715.0], [1562.0, 715.0], [1562.0, 737.0], [1526.0, 737.0]], ('访问', 0.9992227554321289)] [[[1586.0, 713.0], [1614.0, 713.0], [1614.0, 737.0], [1586.0, 737.0]], ('等级', 0.9991192817687988)] [[[342.0, 723.0], [430.0, 723.0], [430.0, 744.0], [342.0, 744.0]], ('和鼠标位置。', 0.9976329803466797)] [[[1364.0, 762.0], [1390.0, 762.0], [1390.0, 778.0], [1364.0, 778.0]], ('323', 0.9994524121284485)] [[[1420.0, 762.0], [1446.0, 762.0], [1446.0, 778.0], [1420.0, 778.0]], ('205', 0.9996988773345947)] [[[1478.0, 762.0], [1498.0, 762.0], [1498.0, 778.0], [1478.0, 778.0]], ('92', 0.9983443021774292)] [[[1534.0, 760.0], [1554.0, 760.0], [1554.0, 778.0], [1534.0, 778.0]], ('16', 0.9997827410697937)] [[[342.0, 770.0], [470.0, 770.0], [470.0, 798.0], [342.0, 798.0]], ('二、使用步骤', 0.9999136924743652)] [[[1588.0, 762.0], [1614.0, 762.0], [1614.0, 780.0], [1588.0, 780.0]], ('286', 0.9995718002319336)] [[[1362.0, 786.0], [1392.0, 786.0], [1392.0, 802.0], [1362.0, 802.0]], ('积分', 0.9998078942298889)] [[[1416.0, 786.0], [1446.0, 786.0], [1446.0, 802.0], [1416.0, 802.0]], ('粉丝', 0.999700665473938)] [[[1472.0, 786.0], [1504.0, 786.0], [1504.0, 802.0], [1472.0, 802.0]], ('获赞', 0.9995585680007935)] [[[1528.0, 786.0], [1560.0, 786.0], [1560.0, 802.0], [1528.0, 802.0]], ('评论', 0.999963641166687)] [[[1588.0, 786.0], [1614.0, 786.0], [1614.0, 802.0], [1588.0, 802.0]], ('收藏', 0.9930889010429382)] [[[1664.0, 812.0], [1692.0, 812.0], [1692.0, 836.0], [1664.0, 836.0]], ('目', 0.6718043088912964)] [[[340.0, 824.0], [470.0, 824.0], [470.0, 852.0], [340.0, 852.0]], ('1.安装和引入库', 0.9993049502372742)] [[[366.0, 859.0], [572.0, 864.0], [572.0, 898.0], [366.0, 893.0]], (' 1| pip install pyautogui', 0.9545071125030518)] [[[1664.0, 860.0], [1692.0, 860.0], [1692.0, 891.0], [1664.0, 891.0]], ('8', 0.7358648180961609)] [[[1404.0, 874.0], [1428.0, 874.0], [1428.0, 889.0], [1404.0, 889.0]], ('私信', 0.9994027018547058)] [[[1546.0, 874.0], [1572.0, 874.0], [1572.0, 889.0], [1546.0, 889.0]], ('关注', 0.9985920190811157)] [[[396.0, 925.0], [528.0, 927.0], [528.0, 949.0], [396.0, 947.0]], ('import pyautogui', 0.995620846748352)] [[[378.0, 991.0], [432.0, 991.0], [432.0, 1011.0], [378.0, 1011.0]], ('泪懿(', 0.8541081547737122)] [[[424.0, 991.0], [474.0, 991.0], [474.0, 1012.0], [424.0, 1012.0]], ('(关注', 0.8576037287712097)] [[[908.0, 991.0], [1096.0, 991.0], [1096.0, 1011.0], [908.0, 1011.0]], ('1073', 0.9963844418525696)] [[[1238.0, 991.0], [1302.0, 991.0], [1302.0, 1012.0], [1238.0, 1012.0]], ('专栏目录', 0.999904990196228)] [[[906.0, 1048.0], [926.0, 1048.0], [926.0, 1064.0], [906.0, 1064.0]], ('?', 0.508362352848053)] [[[1214.0, 1048.0], [1234.0, 1048.0], [1234.0, 1064.0], [1214.0, 1064.0]], ('W', 0.8730343580245972)] [[[1844.0, 1042.0], [1880.0, 1042.0], [1880.0, 1058.0], [1844.0, 1058.0]], ('10:03', 0.9939872026443481)] [[[1818.0, 1054.0], [1880.0, 1054.0], [1880.0, 1074.0], [1818.0, 1074.0]], ('2023/12/6', 0.9981465935707092)]保存图片结果如下:
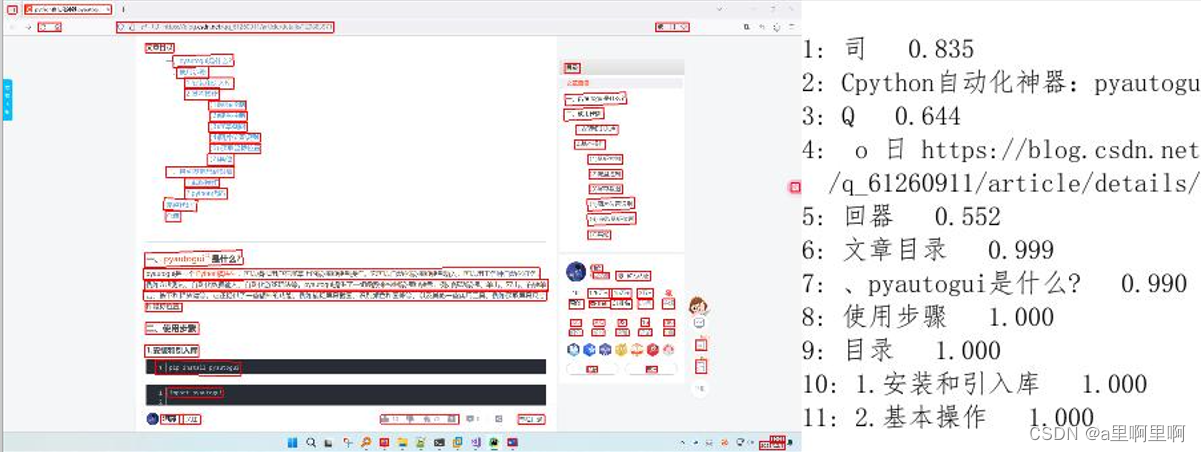
截取部分查看,可以看到识别的文字区域,识别文字,识别可信度:
我们可以看到识别完成的图像已经把文字区域框出来了,并且让我们仔细看输出的结果: [[1350.0, 151.0], [1386.0, 151.0], [1386.0, 175.0], [1350.0, 175.0]], ('目录', 0.9999495148658752)]我截取出“目录”的输出信息,发现输出的一个结果其实是由两个列表组成的,在这里为了方便我把这一个结果列表称为result,那么result[0]就是文字的四个角的位置,result[1]就是识别出的文字与confidence可信度。 那么要怎么样获取到某一个文字的位置呢? 可以看以下代码: def ocr_get_txt_pos(path="", text=""): ''' 获取文字与位置对应map :param path:图片路径,图片路径为空则默认获取当前屏幕截图 :param text: 筛选需要查找的内容,匹配所有位置 :return:list ''' result, img_path = ocr_img_text(path, saveimg=True) print("图片识别结果保存:", img_path) #把结果列表的两个值分别再存为两个list poslist = [detection[0][0] for line in result for detection in line] #取top一个点的位置 txtlist = [detection[1][0] for line in result for detection in line] # 用list存文字与位置信息 find_txt_pos = [] items = 0 if text == "": find_txt_pos = result else: for i in range(len(poslist)): if txtlist[i] == text: find_txt_pos.append(poslist[i]) items += 1 print(find_txt_pos) return find_txt_pos我们可以去通过输入想要寻找的文字,函数会返回文字的位置,关于图片的位置,我只取了一个点top去使用,如果有其他的需求可以取多个点自行修改。 跑一下: if __name__ == '__main__': ocr_get_txt_pos(text="目录")找到的位置已经输出了:
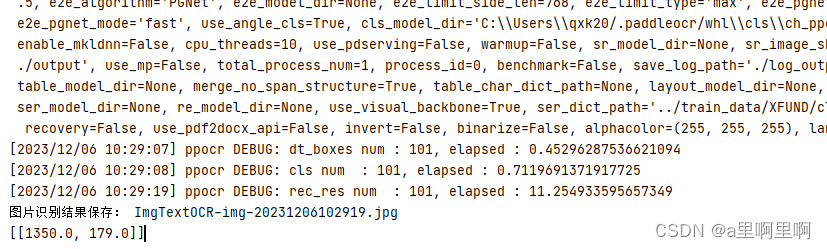
对于有多个同样的文字,则会返回一个列表,存所有对应文字的信息: if __name__ == '__main__': ocr_get_txt_pos(text="二、使用步骤") [2023/12/06 10:36:05] ppocr DEBUG: dt_boxes num : 102, elapsed : 0.44469285011291504 [2023/12/06 10:36:06] ppocr DEBUG: cls num : 102, elapsed : 0.7088828086853027 [2023/12/06 10:36:18] ppocr DEBUG: rec_res num : 102, elapsed : 11.481557846069336 图片识别结果保存: ImgTextOCR-img-20231206103618.jpg [[1350.0, 286.0], [342.0, 798.0]]获取到位置后就可以进行点击操作了! 8、pyautogui+paddleocr鼠标操作如果要进行点击,pos的值其实需要一些偏移量: if __name__ == '__main__': pos_list = ocr_get_txt_pos(text="总结") # 取一个点进行点击操作 pos_x, pos_y = pos_list[0] moveTo(pos_x + 5, pos_y + 5) click()结果如下:
这样就操作成功了! 9、完整代码 import numpy from pyautogui import * from PIL import Image import numpy as np from paddleocr import PaddleOCR, draw_ocr def get_curtime(time_format="%Y-%m-%d %H:%M:%S"): curTime = time.localtime() curTime = time.strftime(time_format, curTime) return curTime def ocr_get_txt_pos(path="", text=""): ''' 获取文字与位置对应map :param path:图片路径,图片路径为空则默认获取当前屏幕截图 :param text: 筛选需要查找的内容,匹配所有位置 :return:list ''' result, img_path = ocr_img_text(path, saveimg=True) print("图片识别结果保存:", img_path) poslist = [detection[0][0] for line in result for detection in line] txtlist = [detection[1][0] for line in result for detection in line] # 用list存文字与位置信息 find_txt_pos = [] items = 0 if text == "": find_txt_pos = result else: for i in range(len(poslist)): if txtlist[i] == text: find_txt_pos.append(poslist[i]) items += 1 print(find_txt_pos) return find_txt_pos def ocr_img_text(path="", saveimg=False, printResult=False): ''' 图像文字识别 :param path:图片路径 :param saveimg:是否把结果保存成图片 :param printResult:是否打印出识别结果 :return:result,img_name ''' image = path # 图片路径为空就默认获取屏幕截图 if image == "": image = screenshot() image = np.array(image) else: # 不为空就打开 image = Image.open(image).convert('RGB') ocr = PaddleOCR(use_angle_cls=True, lang="ch") # need to run only once to download and load model into memory result = ocr.ocr(image, cls=True) if printResult is True: for line in result: for word in line: print(word) # 识别出来的文字保存为图片 img_name = "ImgTextOCR-img-" + get_curtime("%Y%m%d%H%M%S") + ".jpg" if saveimg is True: boxes = [detection[0] for line in result for detection in line] # Nested loop added txts = [detection[1][0] for line in result for detection in line] # Nested loop added scores = [detection[1][1] for line in result for detection in line] # Nested loop added im_show = draw_ocr(image, boxes, txts, scores) im_show = Image.fromarray(im_show) im_show.save(img_name) return result, img_name if __name__ == '__main__': # test-1 ocr_img_text(saveimg=True, printResult=True) #test-2 pos_list = ocr_get_txt_pos(text="二、使用步骤") #test-3 pos_list = ocr_get_txt_pos(text="总结") # 取一个点进行点击操作 pos_x, pos_y = pos_list[0] moveTo(pos_x + 5, pos_y + 5) click() |


【本文地址】
今日新闻 |
推荐新闻 |