WPF中的用户控件和自定义控件详解 |
您所在的位置:网站首页 › 自定义组件封装怎么设置 › WPF中的用户控件和自定义控件详解 |
WPF中的用户控件和自定义控件详解
|
总目录
文章目录
总目录一、什么是用户控件和自定义控件1 用户控件和自定义控件2 相关知识点2 用户控件和自定义控件的适用场景
二、用户控件的使用1.通过依赖属性和路由事件封装用户控件的案例2.通过依赖属性+命令依赖属性封装用户控件的案例3.只对外提供属性不对外提供操作的用户控件封装案例
三、自定义控件的使用1. 创建普通类继承现有控件进行扩展 - 圆角的Button2. 创建自定义控件3.相关知识点
结语
一、什么是用户控件和自定义控件
1 用户控件和自定义控件
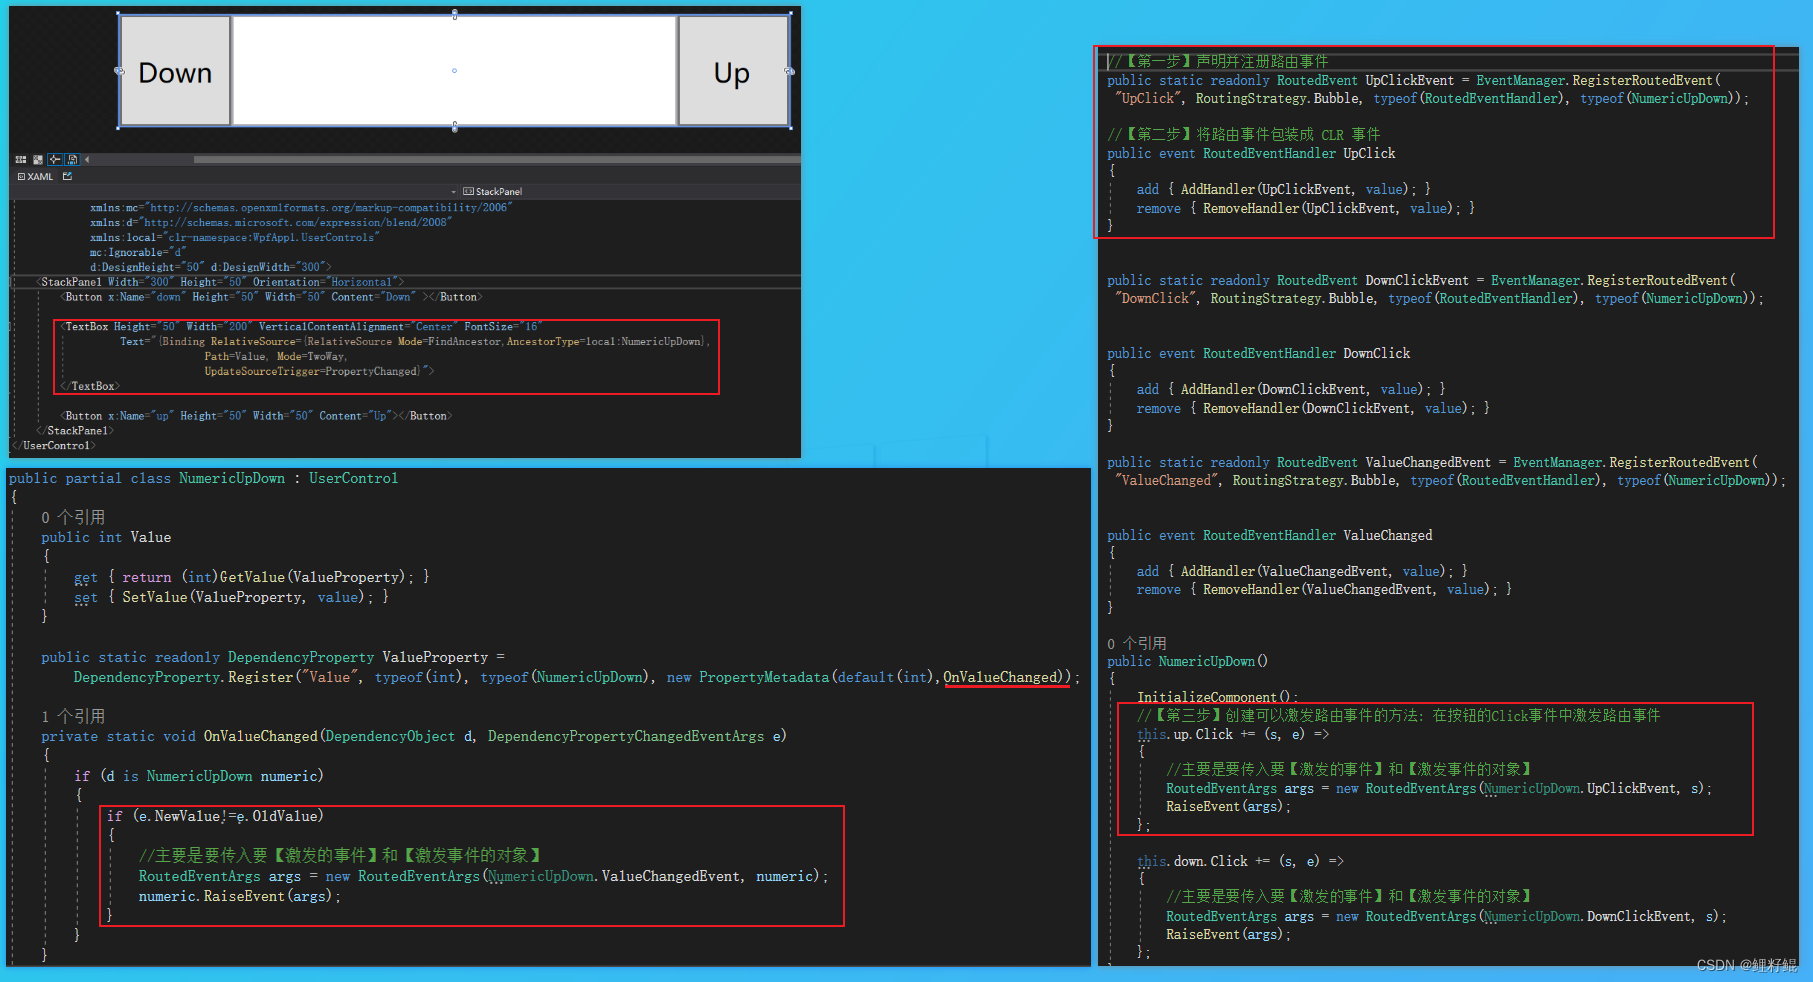
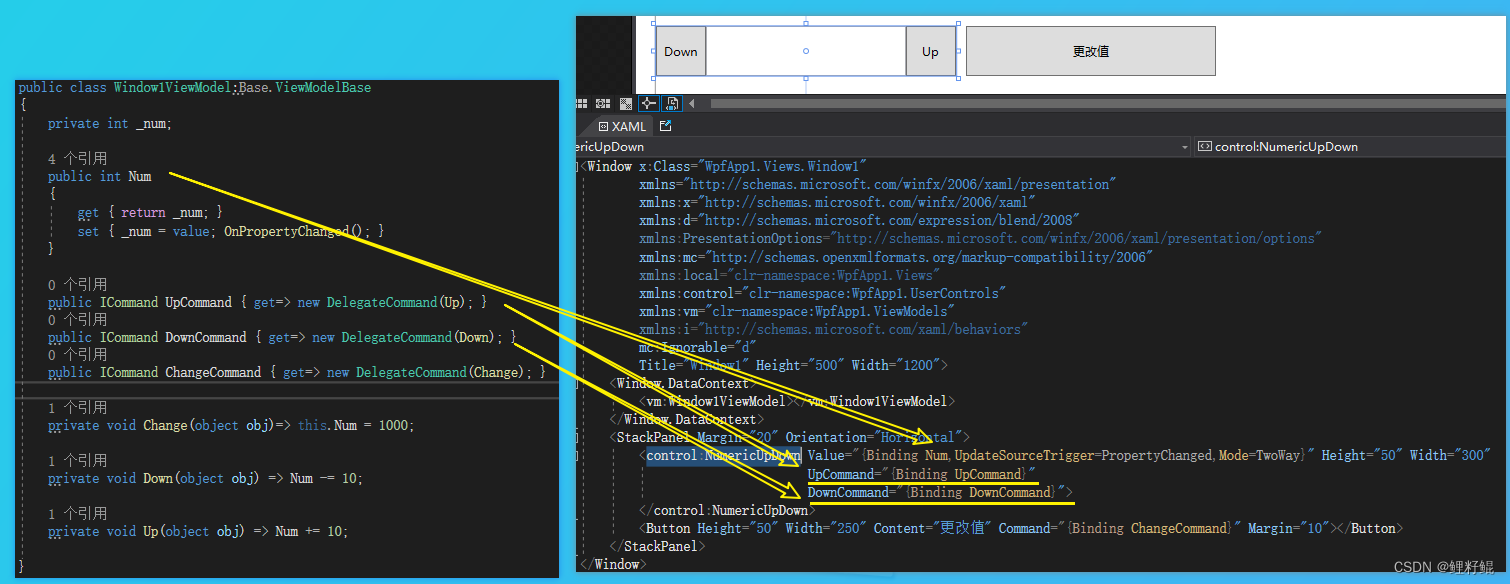
在WPF中,用户控件(UserControl)和自定义控件(CustomControl)都是对UI控件的一种封装方式,目的都是实现封装后控件的重用。 只不过各自封装的实现方式和使用的场景上存在差异。 不同点UserControlCustomControl是否为复合控件注重控件的复合,可以将多个控件组合成一个复合控件不是复合控件,而是通过继承已有控件,对控件的功能和外观进行扩展控件代码组成部分用户控件由XAML代码和后台代码组成且两者紧密绑定自定义控件由控件的类对象代码(后台代码) 以及Generic.xaml中的样式模板代码组成是否可模板重写不支持在外部对控件进行模板重写和样式的更改支持在外部对控件的进行模板重写和样式的修改继承关系继承自UserControl继承自Control编写过程可以在编辑器中实时查看控件效果,更直观不可实时查看控件效果,不直观 2 相关知识点在定义用户控件和自定义控件的过程中,会涉及到以下知识点: 当封装的控件,需要对外提供属性 以供设置的时候,我们需要通过 定义依赖属性或者附加属性来实现当封装的控件,需要对外提供路由事件的时候,我们需要通过定义自定义路由事件来实现当封装的控件,如果觉得路由事件不好用,希望直接对外提供命令的时候,我们需要通过依赖属性定义一个或多个对外的命令属性来实现 2 用户控件和自定义控件的适用场景当我们写一个控件的时候,考虑到该控件在当前项目的其他界面会重复使用,或者在后续其他的项目中还会得到复用的时候,我们就可以将该控件封装成一个 自定义的用户控件,或者直接封装成自定义控件。 如果希望封装的控件外观可以通过ControlTemplate 进行更改的时候,使用CustomControl如果希望控件的样式可以更改的时候,也可使用CustomControl反之,当我们界面元素较多,需要多个控件进行复合才可组成的时候,可以采用UserControl 二、用户控件的使用用户控件的封装无非以下三种形式,会分别通过三个案例说明: 需要对外提供属性和事件(复合控件内没有可以使用Command的控件)只需对外提供属性,属性除了正常的依赖属性外,还需包含ICommand 类型或其派生的依赖属性只对外提供属性值的设置,所有操作的业务逻辑全部封装到控件内部这三种形式的封装,有各自的适用场景。 1.通过依赖属性和路由事件封装用户控件的案例
1.1 先创建用户控件,然后在控件内定义依赖属性和路由事件
1.2 再者在引用用户控件的地方,绑定相关的值和命令
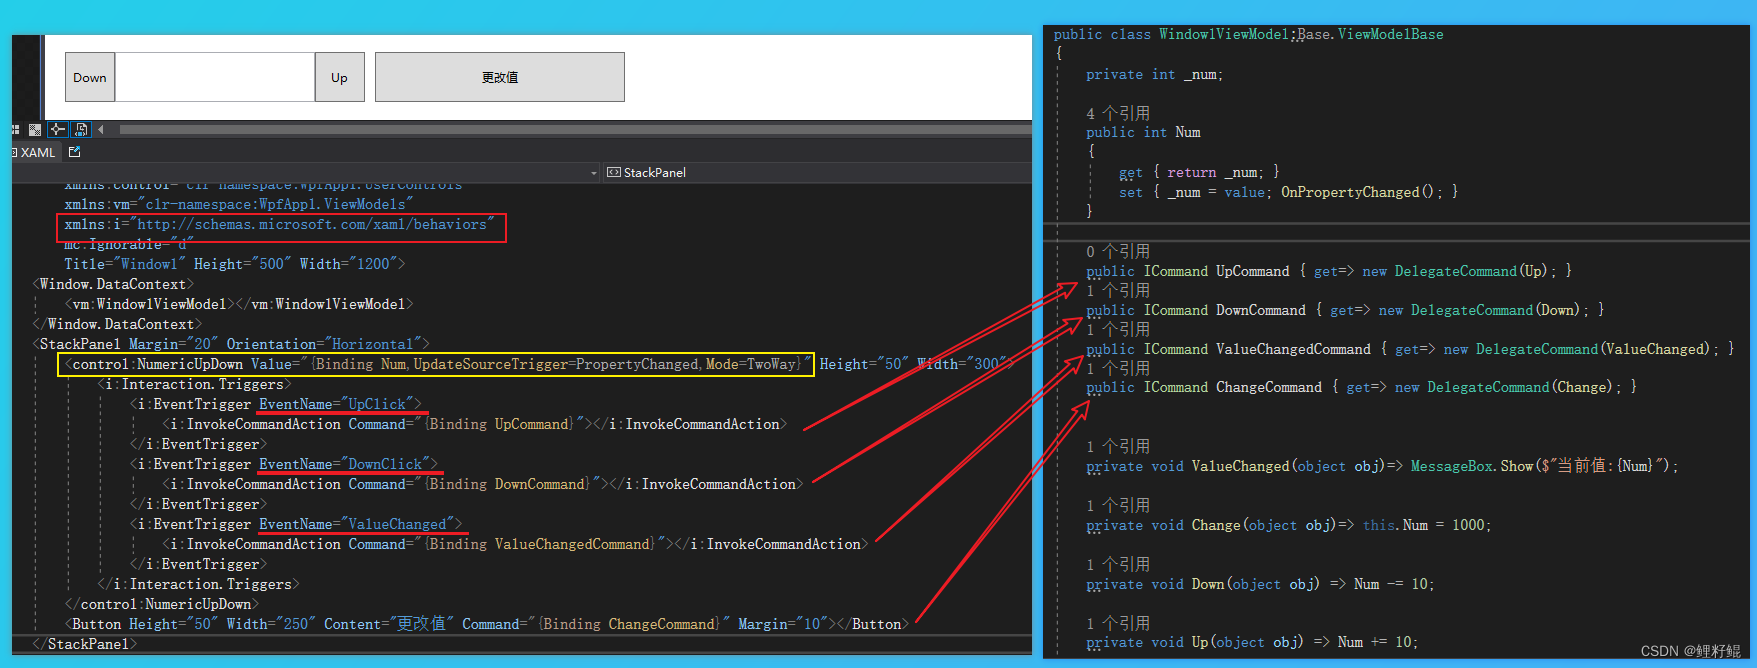
相对上面的封装方式,这种封装方式,可以在使用上给人感觉更方便,因为我们使用Command 不必像事件那样,还需要多一步转命令的操作。 1.1 再者在引用用户控件的地方,绑定相关的值和命令
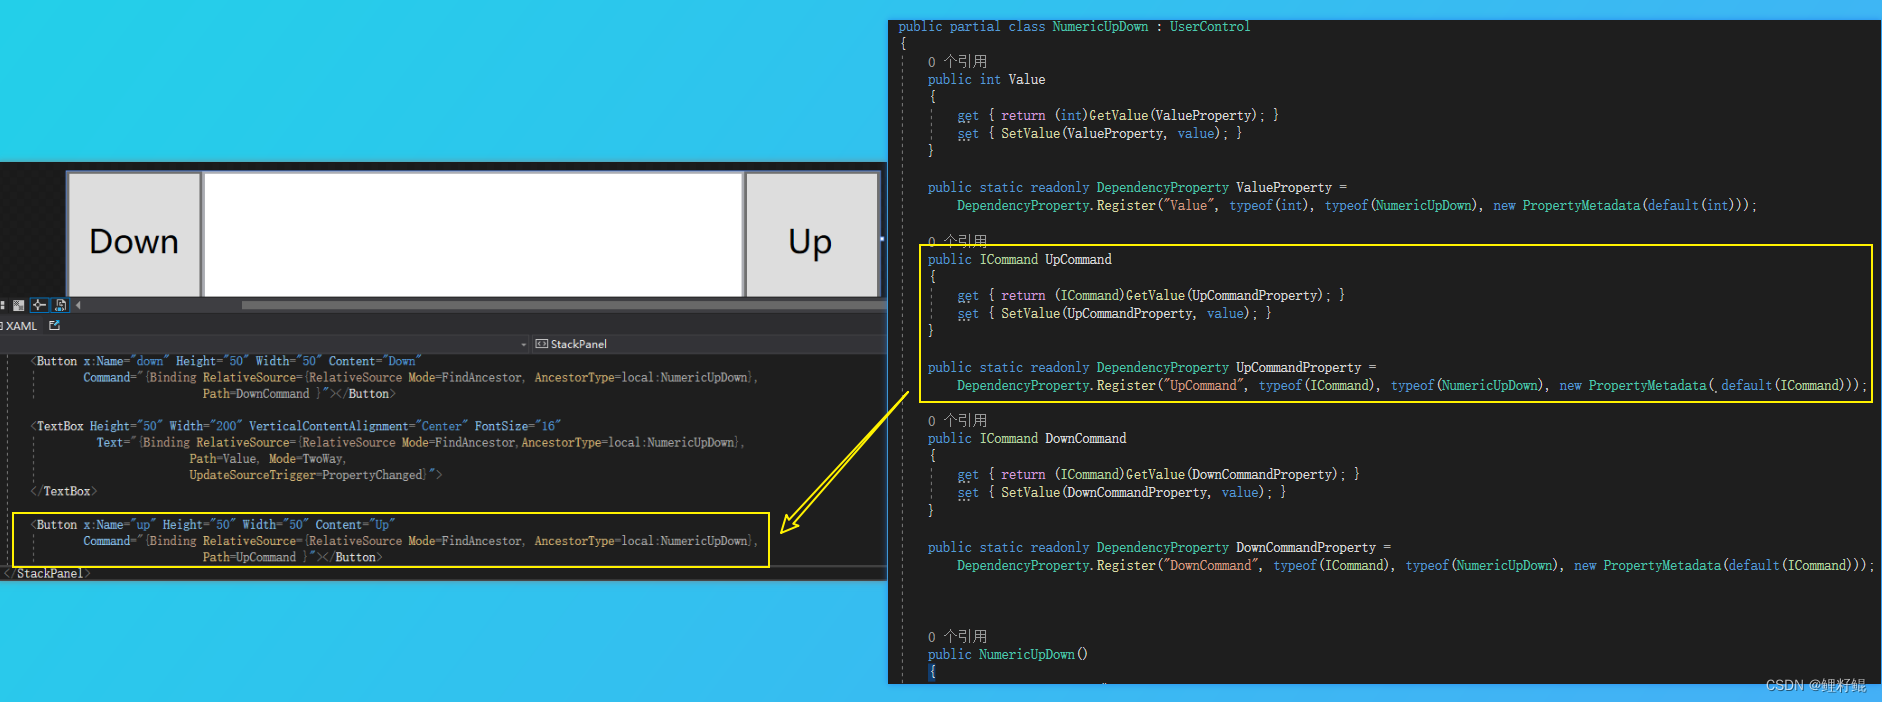
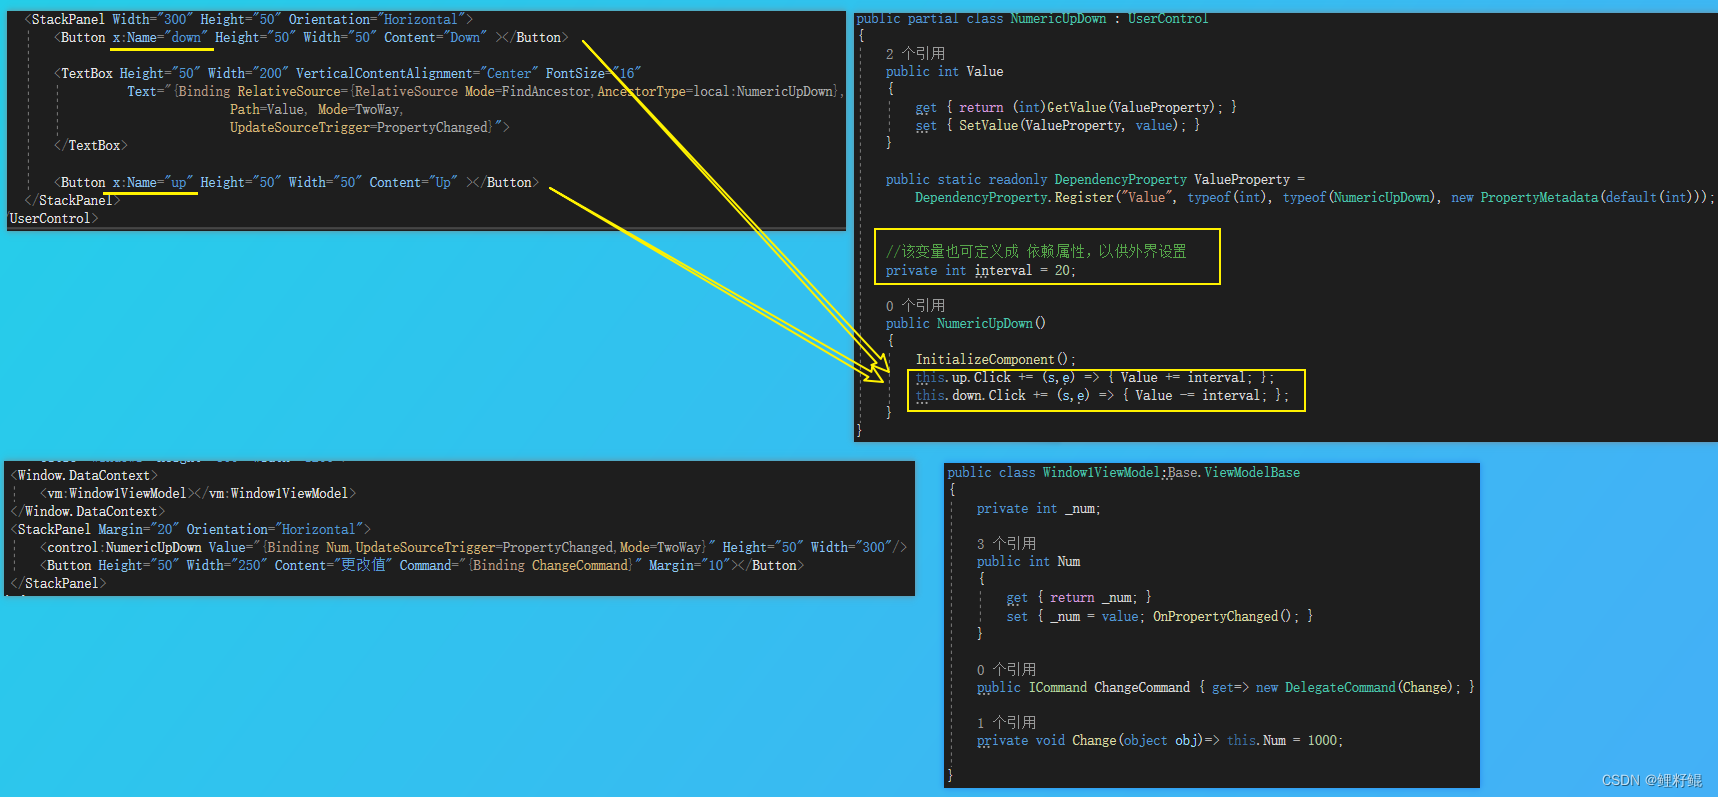
如果命令,需要传参,只需将命令参数也定义一个依赖属性即可,如下所示: //命令参数 public object CommandParemeter { get { return (object)GetValue(CommandParemeterProperty); } set { SetValue(CommandParemeterProperty, value); } } public static readonly DependencyProperty CommandParemeterProperty = DependencyProperty.Register("CommandParemeter", typeof(object), typeof(NumericUpDown), new PropertyMetadata(default(object))); 步骤2:在用户控件的xaml中予以绑定1.2 再者在引用用户控件的地方,绑定相关的值和命令
通过以上简单的两个步骤,我们就可以自定义一个简单好用的圆角按钮。 另外需额外补充一句:上面的圆角是通过在控件类内部定义依赖属性实现,当然我们也可以通过在一个公共的类中将圆角属性定义成附加属性,然后通过在样式中绑定附加属性来实现;如果我们很多地方都会使用到这个圆角属性,我们可以考虑将其放在公共的辅助类中,定义成附加属性。 2. 创建自定义控件
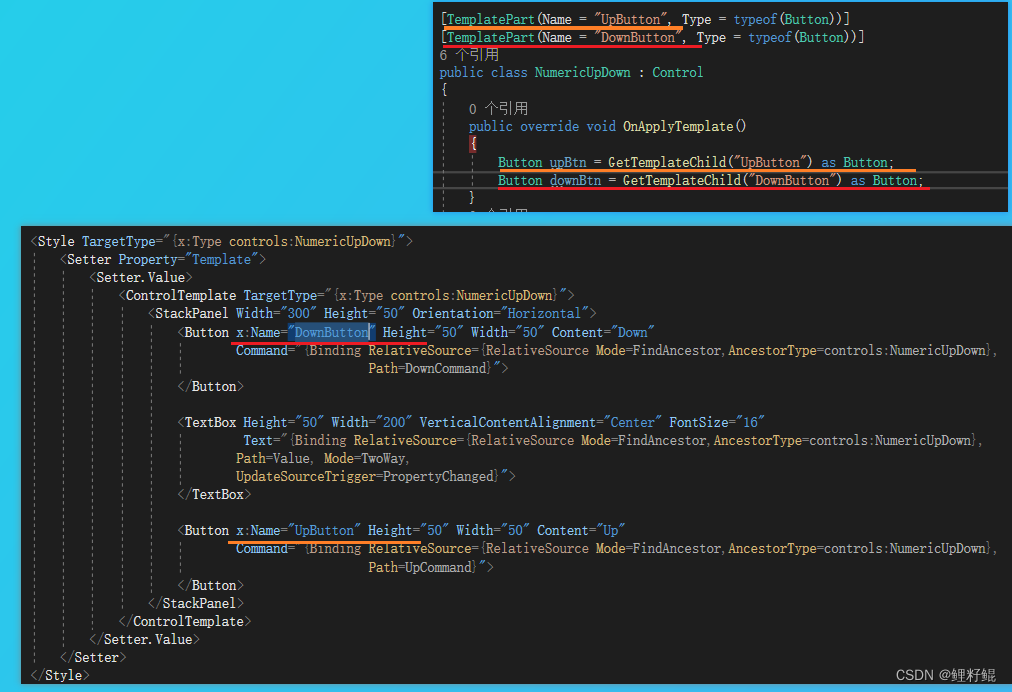
在NumericUpDown控件类中会自动生成以下代码: static NumericUpDown() { DefaultStyleKeyProperty.OverrideMetadata(typeof(NumericUpDown), new FrameworkPropertyMetadata(typeof(NumericUpDown))); }该代码是设置控件的默认样式,如果没有该代码,则无法展示在Generic.xaml中编写的控件默认样式。 另外我们是可以在该类中定义对外提供的依赖属性和事件/命令等以及编写控件相关的业务逻辑。 在Generic.xaml中编写的控件默认样式,该xaml文件中的样式,是不需要设置Key的,默认样式会通过TargetType去匹配。 具体案例如下: 当我们在Generic.xaml中编写的控件默认样式时,对模板内相关控件指定了名称,那么当我们通过右键菜单自动生成模板副本的时候,生成的样式中就会和默认样式中的结构以及控件名称一致,如上案例中,在默认样式中,定义了一个up 的Button,那么重写该控件模板的时候,模板内就会自动生成一个名为up的Button。 若要指定控件所需的 FrameworkElement 对象,可使用 TemplatePartAttribute,它指定预期元素的名称和类型。 若要指定控件的可能状态,可使用 TemplateVisualStateAttribute,它指定状态的名称及其所属的 VisualStateGroup。 将 TemplatePartAttribute 和 TemplateVisualStateAttribute 放置在控件的类定义中。 以下示例为 NumericUpDown 控件指定 FrameworkElement 对象和状态。 [TemplatePart(Name = "UpButtonElement", Type = typeof(RepeatButton))] [TemplatePart(Name = "DownButtonElement", Type = typeof(RepeatButton))] [TemplateVisualState(Name = "Positive", GroupName = "ValueStates")] [TemplateVisualState(Name = "Negative", GroupName = "ValueStates")] [TemplateVisualState(Name = "Focused", GroupName = "FocusedStates")] [TemplateVisualState(Name = "Unfocused", GroupName = "FocusedStates")] public class NumericUpDown : Control { public static readonly DependencyProperty BackgroundProperty; public static readonly DependencyProperty BorderBrushProperty; public static readonly DependencyProperty BorderThicknessProperty; public static readonly DependencyProperty FontFamilyProperty; public static readonly DependencyProperty FontSizeProperty; public static readonly DependencyProperty FontStretchProperty; public static readonly DependencyProperty FontStyleProperty; public static readonly DependencyProperty FontWeightProperty; public static readonly DependencyProperty ForegroundProperty; public static readonly DependencyProperty HorizontalContentAlignmentProperty; public static readonly DependencyProperty PaddingProperty; public static readonly DependencyProperty TextAlignmentProperty; public static readonly DependencyProperty TextDecorationsProperty; public static readonly DependencyProperty TextWrappingProperty; public static readonly DependencyProperty VerticalContentAlignmentProperty; public Brush Background { get; set; } public Brush BorderBrush { get; set; } public Thickness BorderThickness { get; set; } public FontFamily FontFamily { get; set; } public double FontSize { get; set; } public FontStretch FontStretch { get; set; } public FontStyle FontStyle { get; set; } public FontWeight FontWeight { get; set; } public Brush Foreground { get; set; } public HorizontalAlignment HorizontalContentAlignment { get; set; } public Thickness Padding { get; set; } public TextAlignment TextAlignment { get; set; } public TextDecorationCollection TextDecorations { get; set; } public TextWrapping TextWrapping { get; set; } public VerticalAlignment VerticalContentAlignment { get; set; } }
MSDN上的完成应用案例如下: Visible |
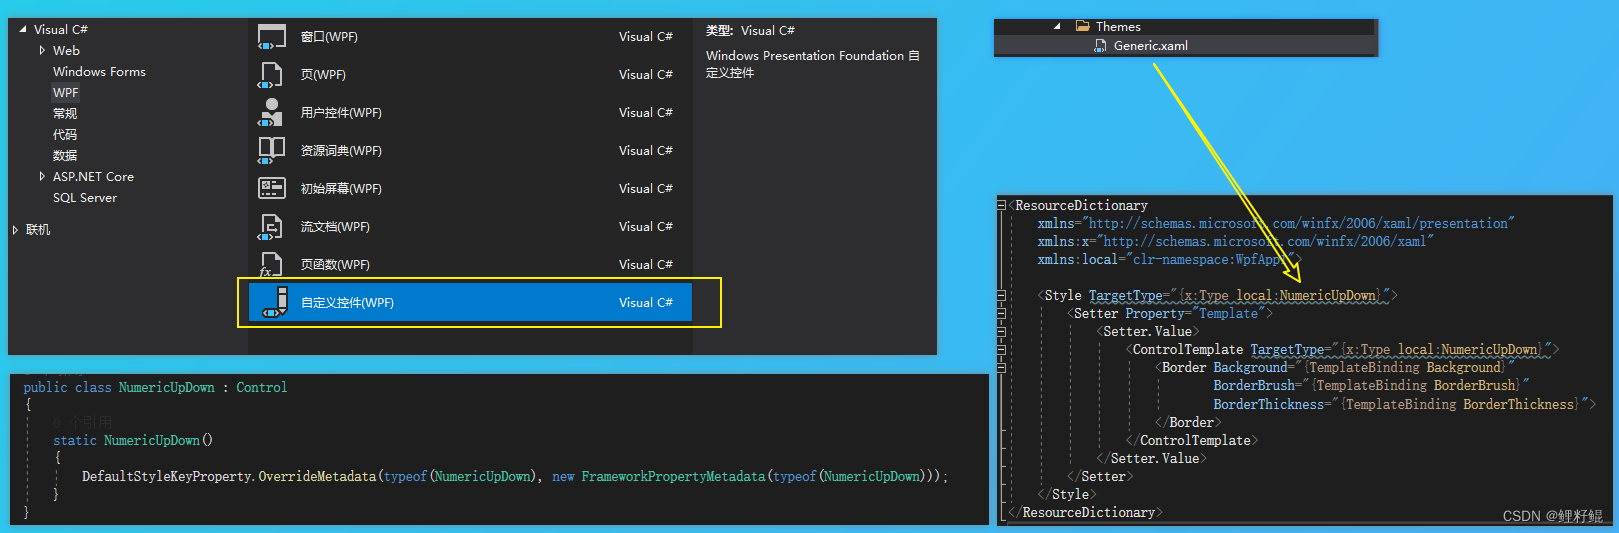 当我们通过新建项 创建 自定义控件NumericUpDown的时候,会生成以下内容:
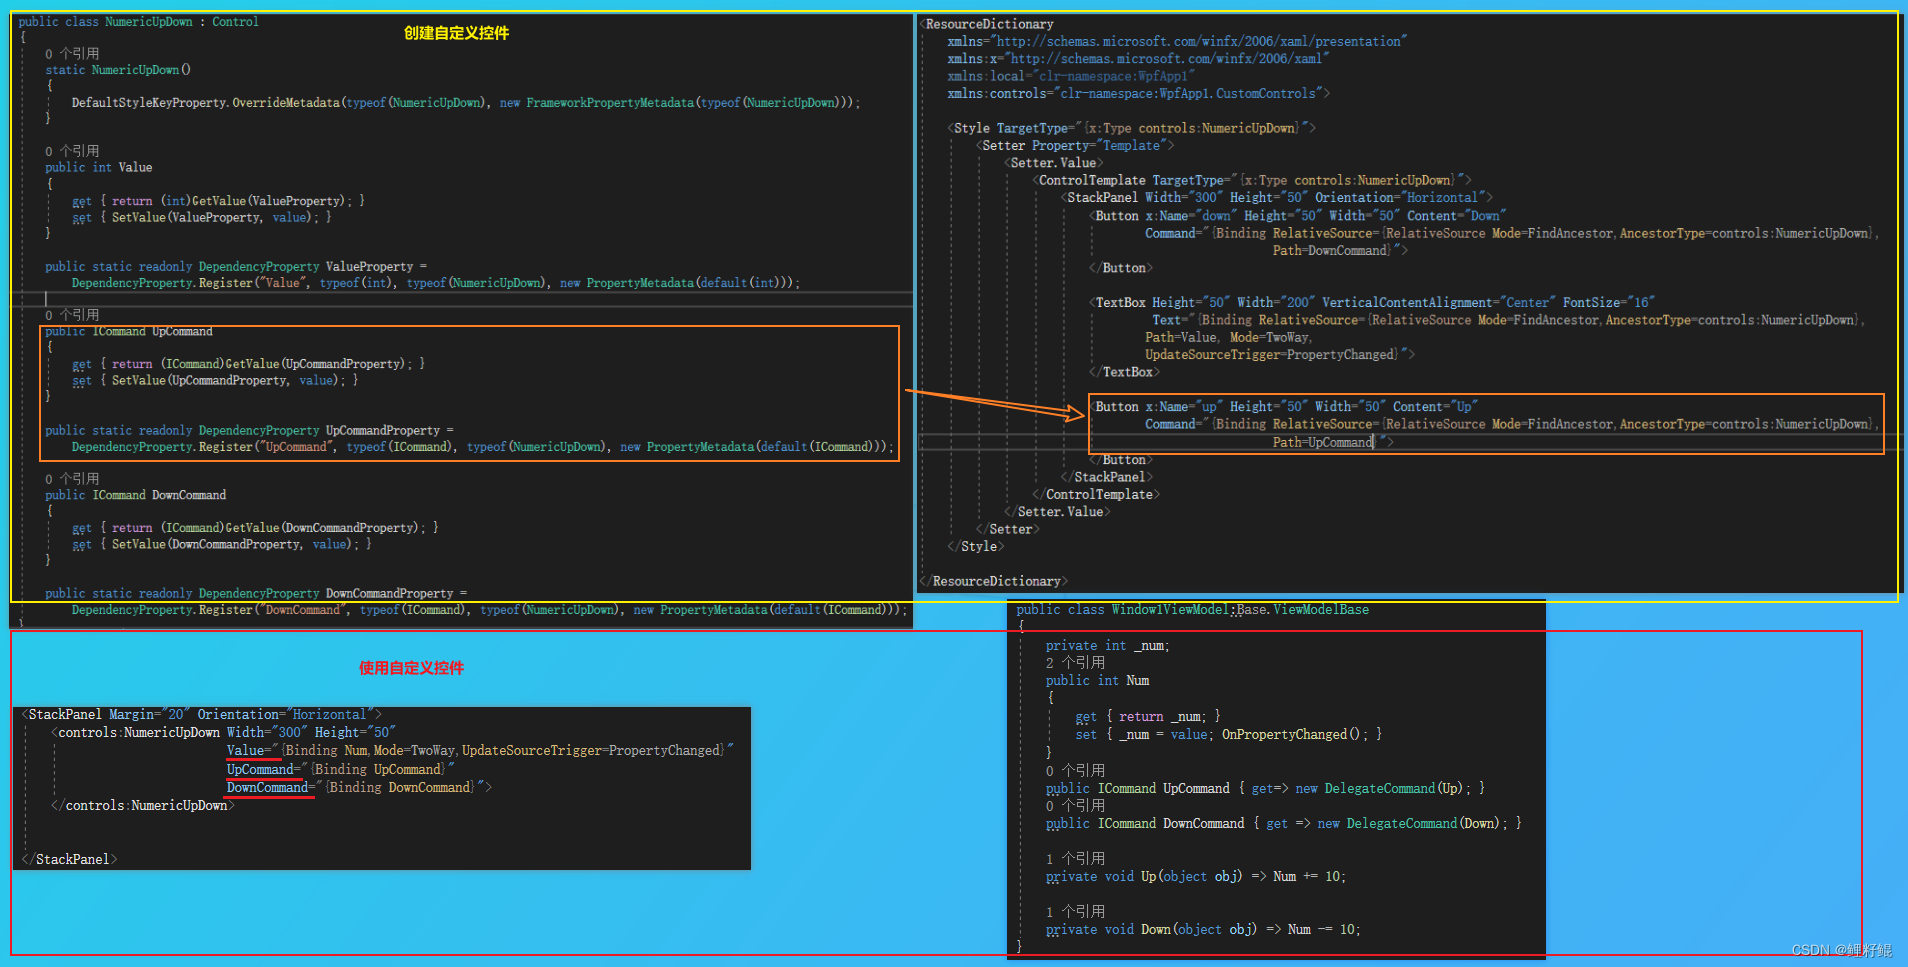
【本文地址】