使用Unity实现VR中在黑板上写字(初级篇) |
您所在的位置:网站首页 › 能在桌子上写字的笔 › 使用Unity实现VR中在黑板上写字(初级篇) |
使用Unity实现VR中在黑板上写字(初级篇)
|
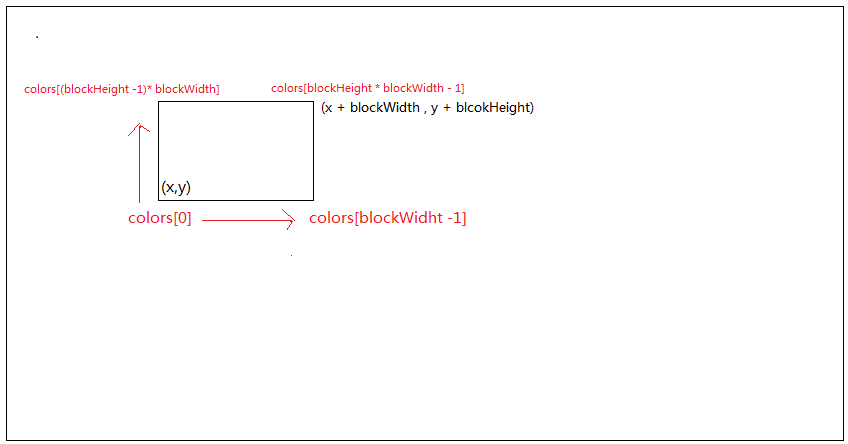
一、工具 1.开发用的是Unity 5.6.2版本 2.VR中的物理交互用的是VRTK插件,这个插件集成了比较好的物理交互功能; 3.HTC Vive 二、概述 实现的功能: 在一个白板上,用不同颜色的笔,在白板画出任何想要的图形; 因为只是一个初级篇所以只是用两个脚本简单的实现,而且并没有黑板擦等功能 ,也不能两个笔同时画画,这些功能将会在未来的升级篇中写出; 三、知识点 其实这个功能很简单,只是简单的运用Unity Texure2D类中的两个函数: public void SetPixels32(int x, int y, int blockWidth, int blockHeight, Color32[] colors, int miplevel = 0);
前面4个参数相当于一个矩形,x和y就是矩形的左下角的那个点,blockWidth和blockHeight分别是矩形的宽和高,这个矩形所代表的范围就是blockWidth*blockHeight个像素所在的位置,不妨称这个矩形范围为一个色块; colors这个参数的大小必须等于blockWidth*blockHeight,因为这个方法就是给坐标(x,y)开始,从左到右,从下到上,一行一行的对矩形范围内的每个像素赋值; 也就是把colors[0]~colors[blockWidth - 1]分别赋值到坐标为(x,y)~(x + blockWidth,y)的像素,以此类推;
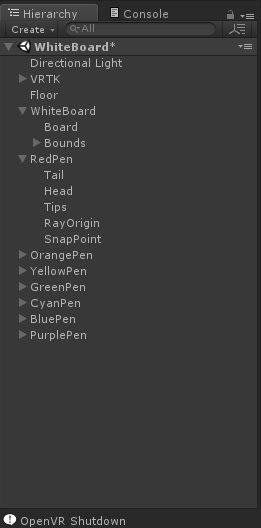
最后一个参数,因为我们用的图片把Generate Min Maps这个选项关闭了,所以用默认的可选参数0; public void Apply(bool updateMipmaps = true, bool makeNoLongerReadable = false); 当对图片改动完成以后,需要调用这个方法,才能让改动真正的应用在图片上; 四、场景搭建 1.画板 在场景中建一个Quad,把它的x和y方向的Scale分别设置为1.92和1.08(或者其它尺寸);注意这个Quad一定要用Mesh Collider作为碰撞体,不然到时候射线获取的纹理坐标有误,并为它设置一个Tag为Board; 2.笔 建一个尺寸合适的笔,创建一个空的子物体,命名为SnapPoint,并设置SnapPoint的Z方向指向笔尖方向,这个子物体就是,手柄拿笔的位置就是,并且保证笔的姿态是相当于人正常拿笔的样子; 3.其它 创建一个放笔的物体,让笔处于比较好拿的位置;
我的场景中代表画板的是WhiteBoard下的Board物体; 五、代码实现功能 这个脚本是挂在代表画板的物体上的:  using System.Linq;
using UnityEngine;
///
/// 画板
///
public class Board : MonoBehaviour
{
//当画笔移动速度很快时,为了不出现断断续续的点,所以需要对两个点之间进行插值,lerp就是插值系数
[Range(0, 1)]
public float lerp = 0.05f;
//初始化背景的图片
public Texture2D initailizeTexture;
//当前背景的图片
private Texture2D currentTexture;
//画笔所在位置映射到画板图片的UV坐标
private Vector2 paintPos;
private bool isDrawing = false;//当前画笔是不是正在画板上
//离开时画笔所在的位置
private int lastPaintX;
private int lastPaintY;
//画笔所代表的色块的大小
private int painterTipsWidth = 30;
private int painterTipsHeight = 15;
//当前画板的背景图片的尺寸
private int textureWidth;
private int textureHeight;
//画笔的颜色
private Color32[] painterColor;
private Color32[] currentColor;
private Color32[] originColor;
private void Start()
{
//获取原始图片的大小
Texture2D originTexture = GetComponent().material.mainTexture as Texture2D;
textureWidth = originTexture.width;//1920
textureHeight = originTexture.height;//1080
//设置当前图片
currentTexture = new Texture2D(textureWidth, textureHeight, TextureFormat.RGBA32, false, true);
currentTexture.SetPixels32(originTexture.GetPixels32());
currentTexture.Apply();
//赋值给黑板
GetComponent().material.mainTexture = currentTexture;
//初始化画笔的颜色
painterColor = Enumerable.Repeat(new Color32(255, 0, 0, 255), painterTipsWidth * painterTipsHeight).ToArray();
}
private void LateUpdate()
{
//计算当前画笔,所代表的色块的一个起始点
int texPosX = (int)(paintPos.x * (float)textureWidth - (float)(painterTipsWidth / 2));
int texPosY = (int)(paintPos.y * (float)textureHeight - (float)(painterTipsHeight / 2));
if (isDrawing)
{
//改变画笔所在的块的像素值
currentTexture.SetPixels32(texPosX, texPosY, painterTipsWidth, painterTipsHeight, painterColor);
//如果快速移动画笔的话,会出现断续的现象,所以要插值
if (lastPaintX != 0 && lastPaintY != 0)
{
int lerpCount = (int)(1 / lerp);
for (int i = 0; i
using System.Linq;
using UnityEngine;
///
/// 画板
///
public class Board : MonoBehaviour
{
//当画笔移动速度很快时,为了不出现断断续续的点,所以需要对两个点之间进行插值,lerp就是插值系数
[Range(0, 1)]
public float lerp = 0.05f;
//初始化背景的图片
public Texture2D initailizeTexture;
//当前背景的图片
private Texture2D currentTexture;
//画笔所在位置映射到画板图片的UV坐标
private Vector2 paintPos;
private bool isDrawing = false;//当前画笔是不是正在画板上
//离开时画笔所在的位置
private int lastPaintX;
private int lastPaintY;
//画笔所代表的色块的大小
private int painterTipsWidth = 30;
private int painterTipsHeight = 15;
//当前画板的背景图片的尺寸
private int textureWidth;
private int textureHeight;
//画笔的颜色
private Color32[] painterColor;
private Color32[] currentColor;
private Color32[] originColor;
private void Start()
{
//获取原始图片的大小
Texture2D originTexture = GetComponent().material.mainTexture as Texture2D;
textureWidth = originTexture.width;//1920
textureHeight = originTexture.height;//1080
//设置当前图片
currentTexture = new Texture2D(textureWidth, textureHeight, TextureFormat.RGBA32, false, true);
currentTexture.SetPixels32(originTexture.GetPixels32());
currentTexture.Apply();
//赋值给黑板
GetComponent().material.mainTexture = currentTexture;
//初始化画笔的颜色
painterColor = Enumerable.Repeat(new Color32(255, 0, 0, 255), painterTipsWidth * painterTipsHeight).ToArray();
}
private void LateUpdate()
{
//计算当前画笔,所代表的色块的一个起始点
int texPosX = (int)(paintPos.x * (float)textureWidth - (float)(painterTipsWidth / 2));
int texPosY = (int)(paintPos.y * (float)textureHeight - (float)(painterTipsHeight / 2));
if (isDrawing)
{
//改变画笔所在的块的像素值
currentTexture.SetPixels32(texPosX, texPosY, painterTipsWidth, painterTipsHeight, painterColor);
//如果快速移动画笔的话,会出现断续的现象,所以要插值
if (lastPaintX != 0 && lastPaintY != 0)
{
int lerpCount = (int)(1 / lerp);
for (int i = 0; i |
【本文地址】
今日新闻 |
推荐新闻 |