在 Windows 10 上关闭触摸板的 5 种方法 |
您所在的位置:网站首页 › 笔记本电脑的触摸板设置 › 在 Windows 10 上关闭触摸板的 5 种方法 |
在 Windows 10 上关闭触摸板的 5 种方法
|
触摸板在膝上型电脑中扮演着指点设备的角色,并取代了大型计算机中使用的外接鼠标。触摸板,也称为触控板,已经存在了 20 多年,但仍未完全取代外接鼠标的功能和易用性。 一些Windows笔记本电脑确实配备了出色的触摸板,但有些仅包含平均或低于标准的触摸板。因此,许多用户在执行任何类型的生产性工作时都会将外接鼠标连接到他们的笔记本电脑。
但是,拥有两个不同的指点设备供一个人使用也可能适得其反。触摸板通常会在您打字时妨碍您,并且意外的手掌或手腕点击它可能会使书写光标落在文档的其他位置。随着键盘(keyboard)和触摸板之间的接近,意外触摸的发生率和几率会增加。 由于上述原因,您可能想要禁用触摸板,幸运的是,在Windows 10笔记本电脑上禁用触摸板非常简单,只需几分钟。 我们强烈建议您在禁用触摸板之前将另一个指针设备(外接鼠标)连接到笔记本电脑。除非您知道键盘快捷键,否则没有外接鼠标和禁用的触摸板将使您的笔记本电脑几乎无法使用。(Absence of an external mouse and a disabled touchpad will render your laptop almost unusable)此外,您需要外接鼠标才能重新打开触摸板。您还可以选择在连接鼠标时自动禁用触摸板(disable the touchpad automatically)。 如何在 Windows 10 上禁用触摸板?(How to disable touchpad on Windows 10? )有很多方法可以禁用 Windows 10 笔记本电脑上的触摸板。可以挖掘Windows 设置(Windows Settings)和设备管理器(Device Manager)以禁用它,或者借助外部第三方应用程序避开触摸板。 虽然,最简单的方法是使用大多数笔记本电脑和键盘制造商采用的键盘快捷键/热键。启用-禁用触摸板键(如果存在)位于键盘的顶行,通常是 f 编号键之一(例如:fn 键 + f9)。该键将标有类似于触摸板或手指触摸正方形的图标。 此外,某些笔记本电脑(如惠普品牌的笔记本电脑)在触摸板的右上角包含一个物理开关/按钮,双击该按钮可禁用或启用触摸板。 转向更多以软件为中心的方法,我们首先通过Windows 设置(Windows Settings)禁用触摸板。 在 Windows 10 笔记本电脑上关闭触摸板的 5 种方法(5 Ways to Turn Off Touchpad on Windows 10 laptops) 方法一:通过 Windows 10 设置关闭触摸板(Method 1: Turn Off Touchpad Via Windows 10 Settings)如果您的笔记本电脑使用的是精密触摸板,您可以使用Windows 设置(Windows Settings)中的触摸板设置来禁用它。但是,对于带有非精密型触摸板的笔记本电脑,禁用触摸板的选项不直接包含在设置中。他们仍然可以通过高级(Advanced)触摸板设置禁用触摸板。 1.通过下面提到的任何方法启动Windows设置(Launch Windows Settings ) 一种。单击start/windows button,搜索设置(Settings)并按 Enter。 湾。按 Windows(Press Windows)键 + X(或右键单击开始按钮)并从高级用户菜单中选择设置。 C。按 Windows(Press Windows)键 + I 直接启动Windows Settings。 2. 找到设备(Devices )并点击打开。
3. 从列出所有设备的左侧面板中,单击触摸板(Touchpad)。
4. 最后,在右侧面板中,单击(click on the toggle)触摸板(Touchpad)下的切换开关将其关闭。 此外,如果您希望计算机在连接外接鼠标时自动禁用触摸板,请取消选中“连接鼠标(uncheck)时保持触摸板打开(Leave touchpad on when a mouse is connected)”旁边的框。 当您在触摸板设置中时,进一步向下滚动以调整其他触摸板设置,例如点击灵敏度、触摸板快捷方式等。您还可以自定义在触摸板上以不同方向滑动三指和四指时发生的操作。 对于带有非精密触摸板的触摸板,请单击右侧面板中的其他设置选项。(Additional settings)
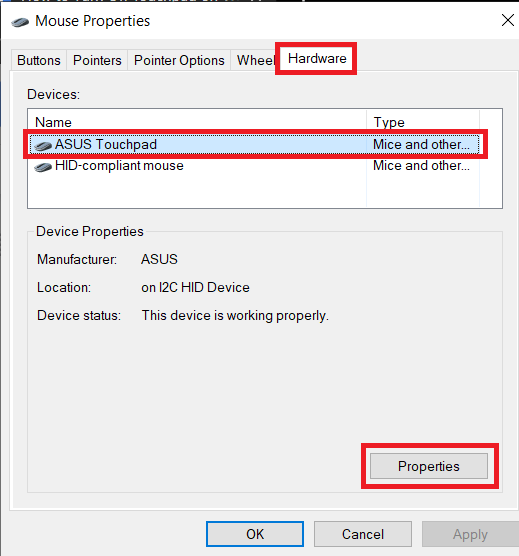
这将启动一个鼠标(Mouse) 属性(Properties)窗口,其中包含更多关于触控板的可自定义选项。切换到硬件(Hardware )选项卡。通过单击它突出显示/选择您的触摸板,然后单击窗口底部的“属性”按钮。(Properties )
在触摸板属性窗口中,单击常规选项卡下的更改设置(Change Settings)。
最后,切换到驱动程序(Driver )选项卡并单击禁用设备(Disable Device)以禁用笔记本电脑上的触摸板。
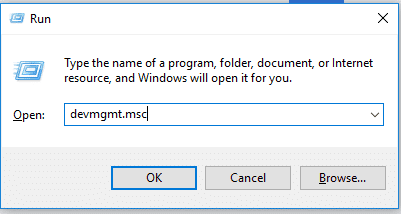
或者,您也可以选择卸载设备(Uninstall Device),但每次系统启动时, Windows都会要求您重新下载触摸板驱动程序。 方法二:通过设备管理器禁用触摸板(Method 2: Disable Touchpad Through Device Manager)设备管理器(Device Manager)可帮助 Windows 用户查看和控制连接到其系统的所有硬件。设备管理器可用于启用或禁用某个硬件(包括笔记本电脑上的触摸板),还可以更新或卸载设备驱动程序。要通过设备管理器禁用触摸板,请按照以下步骤操作: 1.通过以下方法之一打开设备管理器。(Open Device Manager ) 一种。按Windows Key + X(或右键单击开始菜单(menu)按钮)并从高级用户菜单中选择(menu)设备管理器(Device Manager) 湾。在运行命令中键入devmgmt.msc (Launch run by pressing Windows Key + R),然后单击确定。
C。Press Windows Key + S(或单击开始按钮),搜索设备管理器(Device Manager)并按 Enter。 2. 从已连接设备列表中,通过单击左侧箭头或双击标题展开鼠标和其他指针设备。(Mice and other pointing devices)
3. 您可能会在鼠标(Mice)和其他指针设备菜单下找到多个触摸板条目。如果您已经知道哪一个对应于您的触摸板,请右键单击它并选择禁用设备( Disable Device)。
但是,如果您有多个条目,请一一禁用它们,直到您成功关闭触摸板。 方法 3:在 Windows 上通过 BIOS 菜单关闭触摸板(Method 3: Turn Off Touchpad on Windows Via BIOS menu)此方法不适用于所有笔记本电脑用户,因为通过BIOS菜单禁用或启用触摸板的功能特定于某些制造商和OEM(OEMs)。例如:ThinkPad BIOS和Asus BIOS确实有禁用触控板的选项。 启动进入 BIOS 菜单(Boot into the BIOS menu)并检查是否存在禁用触控板的选项。要知道如何启动进入BIOS,只需谷歌“如何在您的笔记本电脑品牌和型号中进入(your laptop brand & model)BIOS ” 方法 4:禁用 ETD 控制中心(Method 4: Disable ETD Control Center)ETD控制中心是Elan Trackpad Device Control Center的缩写,很明显,它控制某些笔记本电脑中的触控板。当您的笔记本电脑启动时, ETD程序会自动启动;触摸板仅在ETD在后台运行时工作。在启动过程中阻止ETD控制中心启动将反过来禁用触摸板。但是,如果您的笔记本电脑上的触摸板不受ETD控制中心的监管,您最好尝试本文中提到的其他方法之一。 要防止ETD 控制中心(ETD Control Center)在启动时运行: 1.通过以下任一方法启动任务管理器(Launch Task Manager ): 一种。单击(Click)开始按钮,搜索任务管理器(Task Manager),然后在搜索返回时单击(Start)打开(Open) 湾。右键单击(Right-click)开始按钮(Start),然后从高级用户菜单中选择任务管理器。(Task Manager) C。按(Press)ctrl + alt + del 并选择任务管理器(Task Manager) d。按(Press)ctrl + shift + esc 直接启动任务管理器(Task Manager)
2. 切换到任务管理器中的启动选项卡。(Startup ) 启动选项卡列出了计算机启动时允许自动启动/运行的所有应用程序/程序。 3. 从程序列表中找到ETD 控制中心(ETD Control Center),然后单击将其选中。 4. 最后,点击任务管理器窗口右下角的禁用按钮。(Disable) (或者,您可以右键单击ETD 控制中心(ETD Control Center),然后从选项菜单中选择禁用)(Disable) 方法 5:使用第三方应用程序关闭触控板(Method 5: Turn off Touchpad using third-party applications )如果上述方法都没有为您解决问题,请考虑使用 Internet 上提供的众多第三方应用程序之一。在笔记本电脑中禁用触摸板的更流行的应用程序之一是Touchpad Blocker。它是一个免费且轻量级的应用程序,可让您设置快捷键来禁用和启用该应用程序。使用突触触摸板的用户还可以设置快捷键来禁用或启用触摸板本身。但是,应用程序仅在运行后台(或前台)中运行时才禁用触摸板。触摸板(Touchpad)拦截器在运行时可以从任务栏访问。 Touchpad Blocker中包含的其他功能包括在启动时自动运行、阻止意外点击和单击等。 要使用Touchpad Blocker(Touchpad Blocker)禁用触摸板: 1. 前往他们的网站Touchpad Blocker并单击“下载(Download )”按钮开始下载程序文件。
2. 双击下载的文件并按照屏幕上的说明在您的系统上安装 Touchpad Blocker 。(install Touchpad Blocker) 3. 安装后,根据您的偏好设置Touchpad Blocker ,然后按键盘快捷键(Fn + f9).打开 Blocker 。(Turn On Blocker)
另一组非常受欢迎的值得尝试的应用程序是Touchfreeze和Touch Tamer。虽然不像Touchpad Blocker那样功能丰富,但这两个应用程序确实有助于摆脱用户在打字时意外手掌触摸。在按下键盘上的键后,它们会在短时间内禁用或冻结触摸板。通过使用这两个应用程序中的任何一个,您不必担心每次要使用触摸板时禁用或启用触摸板,但也可以放心,因为它不会在键入作业论文或工作报告时造成任何问题。 推荐:(Recommended: )修复笔记本电脑触摸板不工作的 8 种方法(8 Ways to Fix Laptop Touchpad Not Working) 我们希望您成功禁用了 Windows 10 笔记本电脑上的触摸板,如果没有,请在下面的评论部分与我们联系,我们将为您提供帮助。另外,您是否知道任何其他应用程序,例如Touchpad Blocker或Touchfreeze?如果是,请在下面告诉我们和每个人。 5 Ways to Turn Off Touchpad on Windows 10The touchpad plays the role of a pointing dеvice in laptops and reрlaces thе external mouse used in bigger computers. The touchpad, also known аs the trackpаd, has been around for mоre than 20 years but still doesn’t entirely rеplacе the functionality and ease of using an extеrnal mouse. Some Windows laptops do come equipped with an exceptional touchpad but several contain only an average or below par touchpad. Many users, therefore, connect an external mouse to their laptops when performing any kind of productive work.
However, having two different pointing devices at one’s disposal can also be counter-productive. The touchpad can often get in your way while typing and an accidental palm or wrist click on it could land the writing cursor elsewhere on the document. The rate and chances of accidental touches increase with the proximity between the keyboard and the touchpad. For the above reasons, you might want to disable the touchpad and fortunately, disabling touchpad on a Windows 10 laptop is quite easy and only takes a couple of minutes. We strongly recommend you to have another pointing device, an external mouse, already connected to the laptop before disabling the touchpad. Absence of an external mouse and a disabled touchpad will render your laptop almost unusable unless you know your keyboard shortcuts. Also, you will require an external mouse to turn the touchpad back on. You also have the option to disable the touchpad automatically when the mouse is connected. How to disable touchpad on Windows 10?There are quite a few methods to disable the touchpad on your Windows 10 laptop. One can either dig around Windows Settings & the Device Manager to disable it or take the aid of an external third-party application to shun the touchpad. Although, the easiest method is to use the keyboard shortcut/hotkey that most laptop & keyboard manufacturers incorporate. The enable-disable touchpad key, if present, can be found in the top row of the keyboard and is usually one of the f-numbered keys (For example: fn key + f9). The key will be marked with an icon resembling the touchpad or a finger touching a square. Also, certain laptops like the HP branded ones contain a physical switch/button on the top right corner of the touchpad which when double-clicked disables or enables the touchpad. Moving on to the more software-focused methods, we start off by disabling touchpad via the Windows Settings. 5 Ways to Turn Off Touchpad on Windows 10 laptops Method 1: Turn Off Touchpad Via Windows 10 SettingsIf your laptop is using a precision touchpad, you can disable it by using the touchpad settings in the Windows Settings. However, for laptops with a non-precision type touchpad, the option to disable touchpad is not directly included in settings. They can still disable the touchpad through Advanced touchpad settings. 1. Launch Windows Settings by any of the methods mentioned below a. Click on the start/windows button, search for Settings and press Enter. b. Press Windows key + X (or right-click on the start button) and select Settings from the power user menu. c. Press Windows key + I to directly launch Windows Settings. 2. Locate Devices and click on the same to open.
3. From the left-panel where all the devices are listed, click on Touchpad.
4. Finally, in the right-panel, click on the toggle switch under Touchpad to turn it off. Also, if you would like your computer to automatically disable the touchpad when you connect an external mouse, uncheck the box next to ‘Leave touchpad on when a mouse is connected’. While you are here in touchpad settings, scroll down further to adjust other touchpad settings such as tap sensitivity, touchpad shortcuts, etc. You can also customize what actions occur when you swipe three-fingers and four-fingers in different directions on the touchpad. For the ones with a non-precision touchpad, click on Additional settings option found in the right-hand panel.
This will launch a Mouse Properties window with a greater number of customizable options concerning the trackpad. Switch over to the Hardware tab. Highlight/select your touchpad by clicking on it and click on the Properties button present at the bottom of the window.
In the touchpad properties window, click on Change Settings under the general tab.
Finally, switch to the Driver tab and click on Disable Device to disable the touchpad on your laptop.
Alternatively, you can also choose to Uninstall Device but Windows will request you to download the touchpad drivers back again every time your system boots up. Method 2: Disable Touchpad Through Device ManagerDevice Manager helps windows users view and control any and all hardware connected to their systems. The device manager can be used to enable or disable a certain piece of hardware (including the touchpad on laptops) and also update or uninstall device drivers. To disable touchpad through device manager, follow the below steps: 1. Open Device Manager by one of the below methods. a. Press Windows Key + X (or right-click on the start menu button) and select Device Manager from the power user menu b. Type devmgmt.msc in Run command (Launch run by pressing Windows Key + R) and click on OK.
c. Press Windows Key + S (or click on the start button), search for Device Manager and hit enter. 2. From the list of connected devices, expand Mice and other pointing devices by clicking on the arrow to its left or double-clicking on the title.
3. It is possible you might find more than one entry for touchpad under the Mice and other pointing devices menu. If you already know which one corresponds to your touchpad, right-click on it and select Disable Device.
However, if you have multiple entries, disable them one by one until you manage to successfully turn off your touchpad. Method 3: Turn Off Touchpad on Windows Via BIOS menuThis method won’t work for all laptop users as the feature to disable or enable touchpad through the BIOS menu is specific to certain manufacturers and OEMs. For example: ThinkPad BIOS and Asus BIOS do have the option to disable the trackpad. Boot into the BIOS menu and check if the option to disable trackpad is present or not. To know how to boot into BIOS, simply google ‘How to enter BIOS in your laptop brand & model’ Method 4: Disable ETD Control CenterThe ETD control center is short for Elan Trackpad Device Control Center and as obvious, controls the trackpad in certain laptops. The ETD program automatically starts when your laptop boots up; the touchpad only works when ETD is running in the background. Preventing the ETD control center from launching during boot up will, in turn, disable the touchpad. However, if the touchpad on your laptop isn’t regulated by the ETD control center, you are better off trying one of the other methods mentioned in this article. To prevent ETD Control Center from running on startup: 1. Launch Task Manager by any of the following methods: a. Click on the Start button, search for Task Manager and click on Open when the search returns b. Right-click on the Start button and select Task Manager from the power user menu. c. Press ctrl + alt + del and select Task Manager d. Press ctrl + shift + esc to directly launch Task Manager
2. Switch to the Startup tab in the Task Manager. The startup tab lists all the applications/programs that are allowed to automatically start/run when your computer boots up. 3. Locate the ETD Control Center from the list of programs and select it by clicking on it. 4. Finally, click on the Disable button at the bottom right corner of the task manager window. (Alternatively, you can right-click on ETD Control Center and then select Disable from the options menu) Method 5: Turn off Touchpad using third-party applicationsIf none of the above-mentioned methods did the trick for you, consider using one of the many third-party applications available on the internet. One of the more popular applications to disable touchpad in laptops is Touchpad Blocker. It is a free and lightweight application that lets you set shortcut keys to disable and enable the application. Users with a synaptic touchpad can also set a shortcut key to disable or enable the touchpad itself. However, the application only disables the touchpad when it is running in the running background (or foreground). Touchpad blocker, when running, can be accessed from the taskbar. Other features included in Touchpad Blocker include automatically run at startup, block accidental taps and clicks, etc. To disable the touchpad using Touchpad Blocker: 1. Head over to their website Touchpad Blocker and click on the Download button to start downloading the program file.
2. Double click on the downloaded file and follow the on-screen instructions to install Touchpad Blocker on your system. 3. Once installed, set up Touchpad Blocker according to your preference and Turn On Blocker by pressing the keyboard shortcut for the same (Fn + f9).
Another set of very popular applications worth trying are Touchfreeze and Touch Tamer. While not as feature-rich as Touchpad Blocker, both of these applications do help get rid of those accidental palm touches users make when typing. They disable or freeze the touchpad for a short amount of time after a key on the keyboard is pressed. By using any of the two applications, you don’t have to worry about disabling or enabling the touchpad every time you wish to use it but can also relax knowing that it won’t cause any issues when typing your homework essay or work report. Recommended: 8 Ways to Fix Laptop Touchpad Not Working We hope you were successful in disabling the touchpad on your Windows 10 laptop and if not, reach out to us in the comments section below and we shall help you out. Also, are you aware of any other applications like Touchpad Blocker or Touchfreeze? If yes, let us and everyone know below. |


【本文地址】
今日新闻 |
推荐新闻 |