百度地图 |
您所在的位置:网站首页 › 百度地图出行路线设置 › 百度地图 |
百度地图
|
地图缩放级别ZOOM的获取和设置之后,继续地址关键字模糊查询、出行路线规划以及路线规划折线自定义、图标自定义。 先贴上一些自定义全局方法,免得下面蒙圈: /** * @name: customMethods * @author: ASUS * @date: 2020-12-30 15:54 * @description:BMap自定义一些通用全局方法 * @update: 2020-12-30 15:54 */ const BMap = window.BMap; /** * 添加搜索自动完成对象 * @param {String} inputNode:input框节点 * 例:'routeStartAddress' * @param {Object} instance:当前地图实例 * 例:Ka {…} * @param {Function} onSearchCompleteCallBack:在input框中输入字符后,发起列表检索,检索完成后的回调函数 */ const BMapAutocomplete = (inputNode, instance, onSearchCompleteCallBack) => { return new BMap.Autocomplete({ // 建立一个自动完成的对象 input: inputNode, location: instance, onSearchComplete: onSearchCompleteCallBack ? onSearchCompleteCallBack : null }); }; /** * BMap onconfirm事件返回值拼接 */ const BMapOnconfirmJoinValue = e => { let _value = e.item.value, confirmValue = ""; if (_value.district === _value.business) { confirmValue = _value.province + _value.city + _value.district + _value.street; } else if (_value.city === _value.district) { confirmValue = _value.province + _value.city + _value.street + _value.business; } else { confirmValue = _value.province + _value.city + _value.district + _value.street + _value.business; } return confirmValue; }; /** * 获取选定地址经纬度坐标 * @param {Object} instance:当前地图实例 * 例:Ka {…} * @param {String} address:定位地址 * 例:'北京市东城区天安门' * @param {Function} callBack:搜索结果回调 */ const BMapGetPlacePoint = (instance, address, callBack) => { function myFun() { var point = local.getResults().getPoi(0).point; //获取第一个智能搜索的结果 instance.panTo(point); instance.setZoom(17); callBack(new BMap.Point(point.lng, point.lat)); } var local = new BMap.LocalSearch(instance, { //智能搜索 onSearchComplete: myFun }); local.search(address); }; /** * 添加定位标注 * @param {Object} instance:当前地图实例 * 例:Ka {…} * @param {Array} point:定位坐标 * 例:N {lng: 116.403963, lat: 39.915119}(天安门坐标) * @param {Boolean} markerClearState:标注是否可清除 * 例:true: 可清除;false: 不可清除 */ const BMapSetMarker = (instance, point, markerClearState) => { let marker = new BMap.Marker(point); // 定义标注对象 instance.addOverlay(marker); // 添加标注 marker.setAnimation(window.BMAP_ANIMATION_BOUNCE); // 标注动画,设置标注动画效果。如果参数为null,则取消动画效果。该方法需要在addOverlay方法后设置 if (!markerClearState) { marker.disableMassClear(); // 禁止覆盖物(标注)在map.clearOverlays方法中被清除 } }; /** * 添加自定义定位标注 * @param {Object} instance:当前地图实例 * 例:Ka {…} * @param {Array} point:定位坐标 * 例:N {lng: 116.403963, lat: 39.915119}(天安门坐标) * @param {Boolean} markerClearState:标注是否可清除 * 例:true: 可清除;false: 不可清除 */ const BMapSetCustomMarker = (instance, point, markerClearState) => { let myIcon = new BMap.Icon( require("../assets/images/location_fill.svg"), new BMap.Size(32, 32), { // 指定定位位置(图标中央下端的尖角位置)。 // 当标注显示在地图上时,其所指向的地理位置距离图标左上角各偏移(宽:图片宽的一半像素)和(高:图片的高度像素)。故此定位位置即(16,32) anchor: new BMap.Size(16, 32), // 设置图片偏移。当需要从一幅较大的图片中截取某部分作为标注图标时,则需要指定大图的偏移位置,此做法与css sprites类似。 imageOffset: new BMap.Size(0, 0) // 设置图片偏移 } ); let marker = new BMap.Marker(point, { icon: myIcon }); // 定义标注对象 instance.addOverlay(marker); // 添加标注 marker.setAnimation(window.BMAP_ANIMATION_BOUNCE); // 标注动画,设置标注动画效果。如果参数为null,则取消动画效果。该方法需要在addOverlay方法后设置 if (!markerClearState) { marker.disableMassClear(); // 禁止覆盖物(标注)在map.clearOverlays方法中被清除 } }; export default { BMapAutocomplete: BMapAutocomplete, BMapOnconfirmJoinValue: BMapOnconfirmJoinValue, BMapGetPlacePoint: BMapGetPlacePoint, BMapSetMarker: BMapSetMarker, BMapSetCustomMarker: BMapSetCustomMarker };一、地址关键字模糊查询 1、添加搜索自动完成对象 // 在input框中输入字符后,发起列表检索,检索完成后的回调函数。这里暂时没什么用,就占占位 getAutocompleteResult(val) { if (val.Hr.length) { console.log(val.Hr); } }, // 添加搜索自动完成对象 addAutocomplete() { this.routeStartAddress = this.customMethods.BMapAutocomplete( "routeStartAddress", this.mapInstance, this.getAutocompleteResult ); this.routeEndAddress = this.customMethods.BMapAutocomplete( "routeEndAddress", this.mapInstance ); let that = this; this.routeStartAddress.addEventListener("onconfirm", async function(e) { // 鼠标点击下拉列表后的事件,选择下拉列表内的地址项,进行地址值的解析、拼接,然后根据地址值获取选定地址经纬度坐标,最后设定标注 let confirmValue = that.customMethods.BMapOnconfirmJoinValue(e); that.customMethods.BMapGetPlacePoint( that.mapInstance, confirmValue, function(data) { that.customMethods.BMapSetMarker(that.mapInstance, data, false); that.routeStartAddress = data; } ); }); this.routeEndAddress.addEventListener("onconfirm", function(e) { let confirmValue = that.customMethods.BMapOnconfirmJoinValue(e); that.customMethods.BMapGetPlacePoint( that.mapInstance, confirmValue, function(data) { that.customMethods.BMapSetMarker(that.mapInstance, data, false); that.routeEndAddress = data; } ); }); },
从上面的路线规划看出,驾车和公交的折线显示很类似,不仔细看,看不出有多大区别;而步行路线由于是虚线,且颜色较浅,如果在一些绿植区域(公园等)很难看得分明。所以需要对这些折线图进行处理,使路线规划看起来更清晰,更明朗。 1、在各个交通方式实例内添加 折线添加完成后的回调函数(路线规划原API绘制) // 添加交通方式 addRouteStyle() { // 驾车 this.routeStyleObj.drivingRoute = new BMap.DrivingRoute( this.mapInstance, { renderOptions: { map: this.mapInstance, panel: "results", autoViewport: true }, onPolylinesSet: this.drivingRoutePolylinesSetCallback // 折线添加完成后的回调函数 } ); // 公交 this.routeStyleObj.transitRoute = new BMap.TransitRoute( this.mapInstance, { renderOptions: { map: this.mapInstance, panel: "results" }, onPolylinesSet: this.transitRoutePolylinesSetCallback } ); // 步行 this.routeStyleObj.walkingRoute = new BMap.WalkingRoute( this.mapInstance, { renderOptions: { map: this.mapInstance }, onPolylinesSet: this.walkingRoutePolylinesSetCallback } ); // 骑行,3.0版本新添加的 // this.routeStyleObj.ridingRoute = new BMap.RidingRoute(this.mapInstance, { // renderOptions: { map: this.mapInstance } // }); }, 2、定义折线添加完成后的回调函数,以及新折线绘制函数 // 驾车路线规划自定义显示(自定义的只是路线的显示样式,路线还是系统给定的路线) drivingRoutePolylinesSetCallback(result) { // 清除原路线规划显示,便于自定义路线规划显示 this.routeStyleObj.drivingRoute.clearResults(); this.setNewPolyline(result, { strokeColor: "#438EFF", strokeStyle: "solid" }); }, // 公交路线规划自定义显示 transitRoutePolylinesSetCallback(result) { this.routeStyleObj.transitRoute.clearResults(); this.setNewPolyline(result, { strokeColor: "#05cc2f" }); }, // 步行路线规划自定义显示 walkingRoutePolylinesSetCallback(result) { this.routeStyleObj.walkingRoute.clearResults(); this.setNewPolyline(result, { strokeColor: "#ff2806", strokeStyle: "solid" }); }, // 设置新路线折线 setNewPolyline( result, { strokeColor = "#438EFF", strokeWeight = 6, strokeOpacity = 0.8, strokeStyle = "solid" } ) { let points = []; result[0].Gr.map(function(item) { // 获取行程沿途路线节点坐标 points.push(new BMap.Point(item.lng, item.lat)); }); let polyline = new BMap.Polyline(points, { strokeColor: strokeColor, strokeWeight: strokeWeight, strokeOpacity: strokeOpacity, strokeStyle: strokeStyle }); // 创建路线折线 this.mapInstance.addOverlay(polyline); // 添加路线折线 },
在实际开发过程中有时不想用原有的标注图标,想自定义标注图标(标注图标有很多,常见的如:开始、结束、定位等),此时就可以用 BMap.Icon 类来自定义标注。 最上面全局方法中的 BMapSetCustomMarker() 就是标注(定位)自定义的封装。 封装自定义标注时有2个小坑需要注意:1、图标的引入:既然是自定义图标,不管是用雪碧图还是单个图片,都免不了要引入。而图片的引入一则直接网络请求,如:http://map.baidu.com/image/us_mk_icon.png;二则 require加载(动态加载) 或 import引入(静态引入)。注:千万 千万 千万不要直接写图片地址(不管是相对路劲还是绝对路劲),因为图片属于静态资源,本地服务启动或项目打包后图片资源都被整理到了 static 目录内,直接写入图片地址,方法是无论如何打死都找不到的(因为你写的图片地址方法压根找不到,而且该地址在项目内也不存在) // 直接网络请求 let myIcon = new BMap.Icon( "http://map.baidu.com/image/us_mk_icon.png", new BMap.Size(20, 25), { anchor: new BMap.Size(10, 25), imageOffset: new BMap.Size(-28, -70) // 设置图片位置偏移值 } ); // 雪碧图位置偏移值的设定,请转 https://blog.csdn.net/bingkingboy/article/details/51059209 // require加载 let myIcon = new BMap.Icon( require("../assets/images/location_fill.svg"), new BMap.Size(32, 32), { anchor: new BMap.Size(16, 32), imageOffset: new BMap.Size(0, 0) } ); // import引入 import location_fill from "../assets/images/location_fill_import.svg"; let myIcon = new BMap.Icon(location_fill, new BMap.Size(32, 32), { anchor: new BMap.Size(16, 32), imageOffset: new BMap.Size(0, 0) // 设置图片位置偏移值 });
2、图标大小及指定定位位置(anchor值) a:图标大小是指引入的图片的大小,由于标注一般不会显示很大,所以在选择图片的时候,也尽量选择小一些的。不然,很容易让人纠结半天,主要是因为图片过大,而 imageOffset 在没有正确设置的情况下,很容易出现看不到标注的情况(不是不显示,而是图片的背景是白色或透明时,又因为 imageOffset 没设置好,显示在地图上的正好就是透明的背景或白底区域,从而让人觉得我图片是不是没加载成功,折腾半天才发现是 imageOffset 的问题,所以选择图片尽量小一些,先让图片显示正常,再调整大小和位置)。 b:指定定位位置是指图片或标注 指示端(一般就是下面的尖角)定位的位置。引入的图片一般都是四四方方的,尖角指示端又一般在图片的底部正中位置,这时需要将指示端定位到我们的坐标位置,就需要给图片设定一个偏移值 anchor,使得尖角指示端刚好在坐标位置。故这个偏移值的 width 一般可设为该图片宽度的一半或一半稍少点,height 则可以直接是图片的高度【注:这里的图片是那种宽高刚好包裹图标内容的那种,雪碧图以及大图不在这个范畴内,需另行计算】 let myIcon = new BMap.Icon( require("../assets/images/location_fill.svg"), new BMap.Size(32, 32), { // 指定定位位置(图标中央下端的尖角位置)。 // 当标注显示在地图上时,其所指向的地理位置距离图标左上角各偏移(宽:图片宽的一半像素)和(高:图片的高度像素)。故此定位位置即(16,32) anchor: new BMap.Size(16, 32), imageOffset: new BMap.Size(0, 0) } ); 五、总结实际开发中,地址关键字模糊查询应该是应用比较广泛的,很多地方都会用到。因为通过地址关键字模糊查询返回的地址是API能很好识别的地址,然后再通过下拉列表选取的方式获得对应的地址值,用这个地址值可以精确的获取该地址的坐标,这个坐标要比单纯地用关键字匹配地址更精确也更容易定位 。单纯就用关键字进行定位,实测经常定位不准,不是跑靠近西非的大西洋就是靠近澳洲的东印度洋,或者直接定位失败,坐标都不知道跑哪去了。所以实际开发中尽量用坐标定位,非必要不要用关键字直接定位。 |
 (完成模糊搜索)
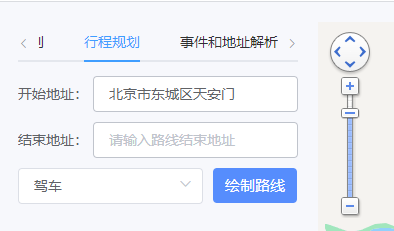 (地址选择,显示回调),
 (地址定位,添加定位标注)
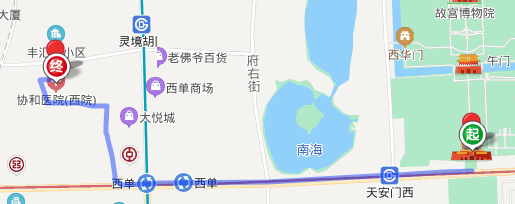 (驾车)、
(驾车)、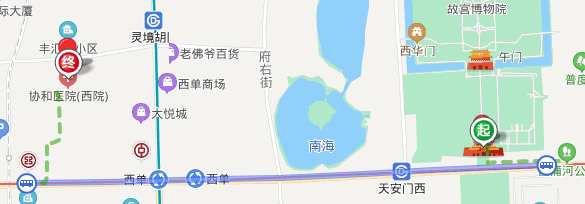 (公交)、
(公交)、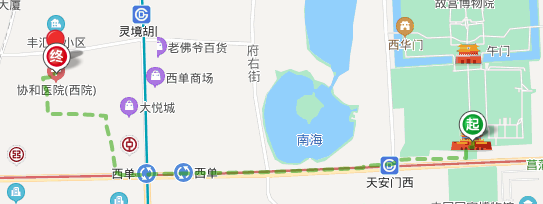 (步行)
(步行)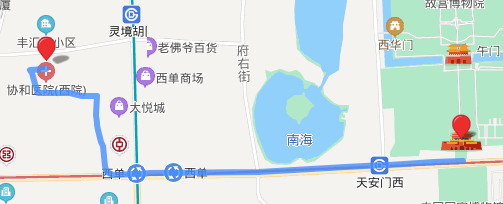 (驾车)、
(驾车)、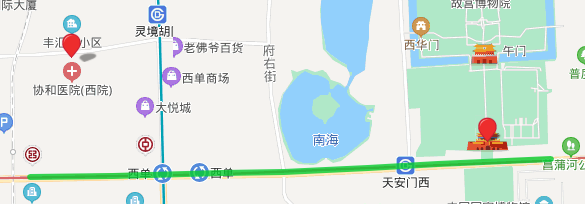 (公交)
(公交)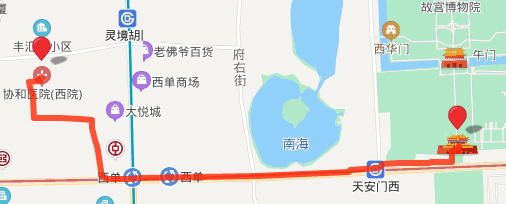 (步行),现在再来看,驾车、公交、以及步行,明显能看出来各自是不同的交通方式和行程路线上的区分。
 (直接网络请求)、
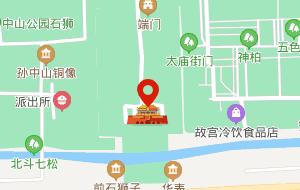 (require加载)、
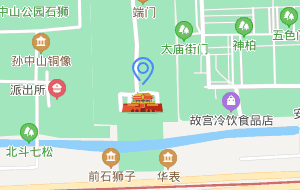 (import引入)
【本文地址】
今日新闻 |
推荐新闻 |