基于Arduino的蓝牙电子秤 |
您所在的位置:网站首页 › 电子秤的去皮功能怎么用 › 基于Arduino的蓝牙电子秤 |
基于Arduino的蓝牙电子秤
|
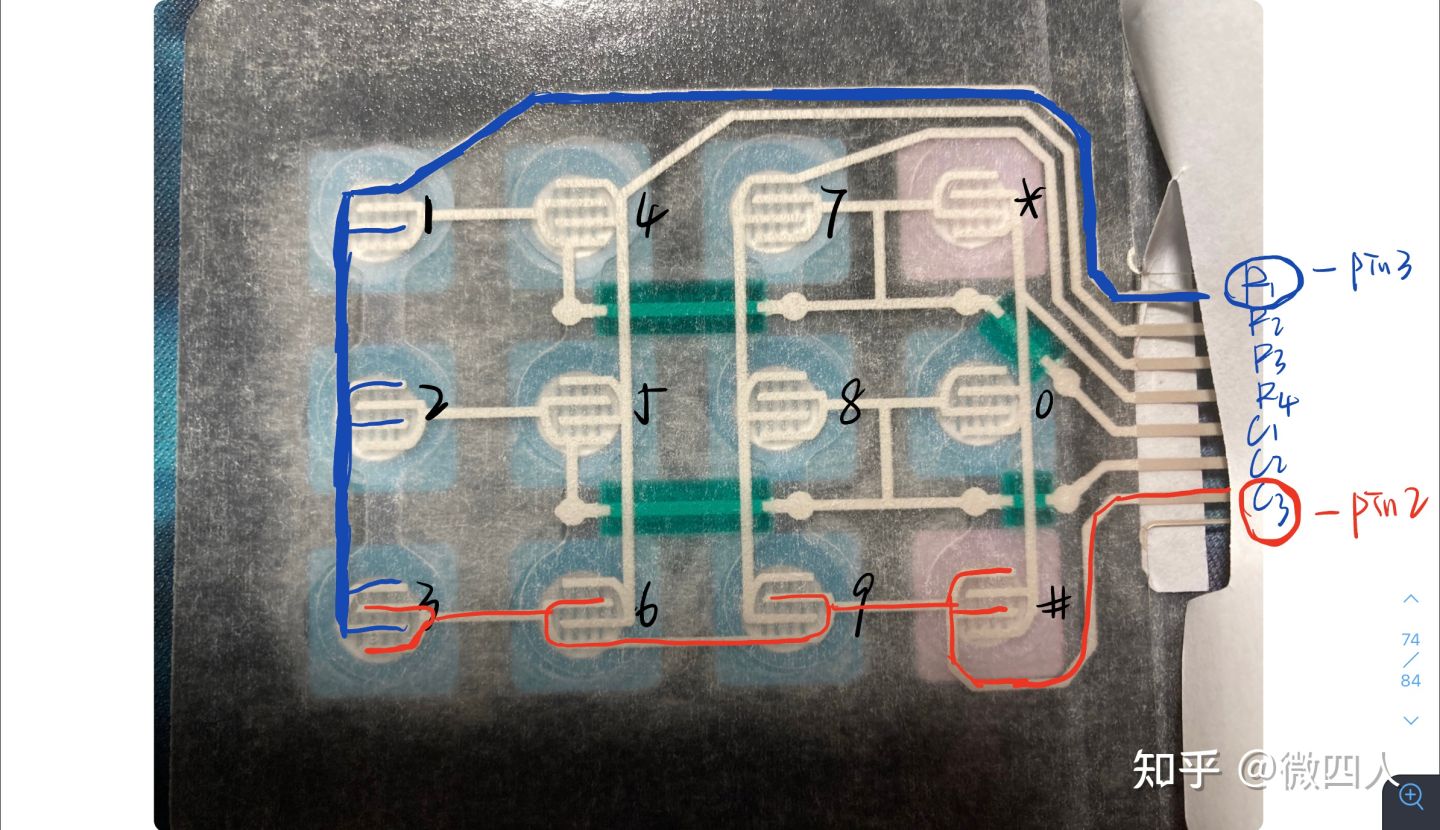
2022.3——2022.5课设项目,电子小白入门作品 目录 一、各模块使用 LCD1602模块 矩阵按键模块 HC—05蓝牙模块 二、待改进之处 LCD1602模块在项目后期使用IIC,省去了连一堆杜邦线的麻烦事。主要可操作的地方在于设置光标位置,清除功能。每行的范围事0-15一共16个格子,做到清除功能,用的是设置光标然后打印空格。一开始有考虑做滚屏功能,但后来发现用不上就没再深究。起初也是碰到了麻烦,滚屏我没法做到连续,这个日后解决。 下面是LCD1602寻找地址的代码。 #include void setup(){ Wire.begin(); Serial.begin(9600); Serial.println("\nI2C Scanner"); } void loop(){ byte error, address; int nDevices; Serial.println("Scanning..."); nDevices = 0; for (address = 1; address < 127; address++ ){ // The i2c_scanner uses the return value of // the Write.endTransmisstion to see if // a device did acknowledge to the address. Wire.beginTransmission(address); error = Wire.endTransmission(); if (error == 0){ Serial.print("I2C device found at address 0x"); if (address < 16) Serial.print("0"); Serial.print(address, HEX); Serial.println(" !"); nDevices++; }else if (error == 4){ Serial.print("Unknow error at address 0x"); if (address < 16) Serial.print("0"); Serial.println(address, HEX); } } if (nDevices == 0) Serial.println("No I2C devices found\n"); else Serial.println("done\n"); delay(5000); // wait 5 seconds for next scan } 矩阵按键模块这个模块折磨了我非常长的时间,主要是刚入门啥也不懂。
自己当时看的电路图 这里主要是想能够让程序实时检测到按键的输入,就想着加入外部中断功能,arudino uno只有两个中断引脚,分别是pin2和pin3。我还去稍稍了解了下矩阵按键的工作原理,说是行(或列)置高电平,列(或行)置低电平,当按键按下时,对应的行/列会发生电平的变化,就能判断是哪个按键被按下。这个场景我现在还记得,上图中pin2对应的那列(即3 6 9 #)按下很少能触发中断程序,其他按键能正常触发中断程序。希望以后能力提升能明白为啥。 #include "Keypad.h" const int ROWS = 4; const int COLS = 3; char keys[ROWS][COLS] = { {'1', '2', '3'}, {'4', '5', '6'}, {'7', '8', '9'}, {'*', '0', '#'} }; //每次使用记得修改引脚 byte rowPins[ROWS] = {6,5,4,3}; byte colPins[COLS] = {A2,2,A1}; Keypad keypad = Keypad( makeKeymap(keys), rowPins, colPins, ROWS, COLS ); //uno 的两个中断引脚 int pinInterrupt1 = 2; int pinInterrupt2 = 3; void onChange() { char key = keypad.getKey(); if (key != NO_KEY) { Serial.println(key); } } void setup() { Serial.begin(9600); pinMode( pinInterrupt1, INPUT); pinMode( pinInterrupt2, INPUT); //Enable中断管脚, 中断服务程序为onChange(), 监视引脚变化 attachInterrupt(digitalPinToInterrupt(pinInterrupt1), onChange, CHANGE); attachInterrupt(digitalPinToInterrupt(pinInterrupt2), onChange, CHANGE); } void loop() { //模拟长时间运行的进程/复杂的任务。 for (int i = 0; i < 100; i++) { delay(20); } }在后来又找到个解决方法,参考了个老哥的文章[Arduino 库] 适用于 Arduino Uno 的多任务调度程序 – Blanboom,使用多线程任务来解决,就是不停在检测是否有按键输入?后来我又看到定时中断,以后试试。 HC—05蓝牙模块这个模块关键是先进入AT模式,再就是上传时记得拔掉TX和RX引脚。和按键的操作逻辑稍有不同,以后深入使用时记得改成能直接调用按键那些代码。 二、待改进之处1矩阵按键原理部分 现在能力不够,还不太能看懂矩阵按键库的代码,也就没法解决为什么3*4按键和列引脚相连的那列按键很难触发中断程序,而其他却可以。 2代码冗长/难理解 代码中出现了很多那种只是保存一个Event的变量,少了还好,多了可能就让人很难读懂,还有就是写代码时确实花费了比较长时间,现在代码水平很低,又臭又长....看以后编程能力提升后能不能简洁一点。 //引用库函数 #include "Keypad.h" #include #include #include "TaskScheduler.h" //LCD1602设备地址 LiquidCrystal_I2C lcd(0x27, 16, 2); ///函数声明 extern unsigned long HX711_Read(void); extern long Get_Weight(); void Origin(); void Enter_Mode(); void BlueToothKey(); void Buzzer(); void LcdPrint(float a); void Pin_init(); void Blue_Tooth(); void Weight_only(); void Weight_price(); ///变量定义 const int ROWS = 4; const int COLS = 3; char keys[ROWS][COLS] = { {'1', '2', '3'}, {'4', '5', '6'}, {'7', '8', '9'}, {'*', '0', '#'} }; byte rowPins[ROWS] = {5, 4, 3, 2}; byte colPins[COLS] = { A0, A1, A2}; Keypad keypad = Keypad(makeKeymap(keys), rowPins, colPins, ROWS, COLS); float WeighNor = 0; //Weight when Normal float Weight = 0; float Display; //储存当前屏幕显示的是WeighNor还是Weight float normal = 0; // normal event static int event = 1; //judge Normal or Zero event double val;//Val per kg double Value;//store value above int cnt1; int cnt2;//To confirm the position of the . int Event;//First or Second press # int Mode;//Switch Mode int buzzer = 13; int HX711_SCK = 6; /// 作为输出口 int HX711_DT = 7; /// 作为输入口 long HX711_Buffer = 0; long Weight_Maopi = 0, Weight_Shiwu = 0; #define GapValue 399 ///该值需校准 每个传感器都有所不同 void setup() { lcd.init(); lcd.backlight(); Pin_init(); Serial.begin(38400); Serial.print("Welcome to use!\n"); delay(1500); Sch.init(); //添加任务,多线程 Sch.addTask(Origin, 0, 100, 1); Sch.addTask(BlueToothKey, 0, 10, 1); //优先抢断 Sch.addTask(Enter_Mode, 10, 10, 0); //启动任务调度器 Sch.start(); //获取毛皮重量 Weight_Maopi = HX711_Read(); Weight = Get_Weight(); } void loop() { Sch.dispatchTasks(); } ///ALL_Function //Origin loop function void Origin() { Buzzer(); Blue_Tooth(); if (Mode)Weight_only(); if (!Mode)Weight_price(); Weight = Get_Weight();//计算放在传感器上的重物重量 WeighNor = Get_Weight() + normal; } //变量定义 //============================================== int BlueKey_Event;//进入BlueToothKey中if的判断条件 int BlueKey;//储存蓝牙发送的信息 //============================================== void BlueToothKey() { if (BlueKey_Event) { BlueKey_Event = !BlueKey_Event; if (BlueKey == '#' ) { if (!Event) Serial.println("-----Enter_Mode:Begin-----"); if (Event && cnt2 != 0) { val = val / pow(10, cnt1 - cnt2); Value = val; } val = 0; cnt1 = 0; cnt2 = 0; Event = !Event; } else if (Event) { cnt1++; if (BlueKey != '*') { Serial.print(BlueKey); val = val * 10 + BlueKey - 48; Value = val; } else if (BlueKey == '*') { Serial.print("."); cnt2 = cnt1; } } } } //Enter_Mode void Enter_Mode() { char key = keypad.getKey(); static int sign; if (key != NO_KEY ) { if ((int)val == 2580) Mode = !Mode; //Zero and Normal if (key == '*') sign++; if (sign == 3 && event == 1) { normal = Display; //把当前屏幕读取的数值给normal Weight_Maopi = HX711_Read(); Serial.println("Zero"); sign = 0; event = 0; } if (sign == 3 && event == 0) { Weight += normal; Serial.println("Normal"); sign = 0; event = 1; } //Enter Value if (key == '#' ) { if (!Event) Serial.println("-----Enter_Mode:Begin-----"); if (Event && cnt2 != 0) { val = val / pow(10, cnt1 - cnt2); Value = val; } val = 0; cnt1 = 0; cnt2 = 0; Event = !Event; } else if (Event) { cnt1++; if (key != '*') { Serial.print(key); val = val * 10 + key - 48; Value = val; } else if (key == '*') { Serial.print("."); cnt2 = cnt1; } } } } //Weigh function long Get_Weight() { HX711_Buffer = HX711_Read(); ///读取此时的传感器输出值 Weight_Shiwu = HX711_Buffer; ///将传感器的输出值储存 Weight_Shiwu = Weight_Shiwu - Weight_Maopi; //获取实物的AD采样数值。 Weight_Shiwu = (long)((float)Weight_Shiwu / GapValue); //AD值转换为重量(g) return Weight_Shiwu; } unsigned long HX711_Read(void) //选择芯片工作方式并进行数据读取 { unsigned long count; ///储存输出值 unsigned char i; digitalWrite(HX711_DT, HIGH); // digitalWrite作用: DT=1; delayMicroseconds(1); digitalWrite(HX711_SCK, LOW); //digitalWrite作用: SCK=0; delayMicroseconds(1); count = 0; while (digitalRead(HX711_DT)); //当DT的值为1时,开始ad转换 for (i = 0; i < 24; i++) ///24个脉冲,对应读取24位数值 { digitalWrite(HX711_SCK, HIGH); // digitalWrite作用: SCK=0; /// 利用 SCK从0--1 ,发送一次脉冲,读取数值 delayMicroseconds(1); count = count 10.0) { digitalWrite(buzzer, HIGH); delay(20); lcd.setCursor(0, 1); lcd.print("Overload"); lcd.setCursor(0, 1); lcd.print(" ");//clear "Overload" } else if (float(Weight / 1000) < 10.0) { digitalWrite(buzzer, LOW); delay(10); } } //Pin_init void Pin_init() { pinMode(buzzer, OUTPUT); //buzzer pinMode(HX711_SCK, OUTPUT); //SCK 为输出口 ---输出脉冲 pinMode(HX711_DT, INPUT); //DT为输入口 ---读取数据 } //Display and Serialprint void LcdPrint(float a) { Serial.print(float(a / 1000), 3); //串口显示重量,3意为保留三位小数 Serial.print(" kg\n"); Serial.print("\n"); lcd.setCursor(0, 0); lcd.print(float(a / 1000), 3); lcd.print(" ");//清除多余数字 lcd.setCursor(7, 0); lcd.print("kg"); Display = a; } //BlueTooth void Blue_Tooth() { while (Serial.available()) { delay(100);//保证串口字符接收完毕 char c = Serial.read(); //一次只读一个字符,读完删除 switch (c) { case 'z': Serial.write("State: Zero"); normal = Display; //把当前屏幕读取的数值给normal Weight_Maopi = HX711_Read(); event = 0; break; case 'n': Serial.write("State: Normal"); Weight += normal; event = 1; break; case 'a': BlueKey_Event = !BlueKey_Event; BlueKey = '#'; break; case 'b': BlueKey_Event = !BlueKey_Event; BlueKey = '#'; break; case 'c': Mode = !Mode; break; case 'd': Mode = !Mode; break; case '0': BlueKey_Event = !BlueKey_Event; BlueKey = '0'; break; case '1': BlueKey_Event = !BlueKey_Event; BlueKey = '1'; break; case '2': BlueKey_Event = !BlueKey_Event; BlueKey = '2'; break; case '3': BlueKey_Event = !BlueKey_Event; BlueKey = '3'; break; case '4': BlueKey_Event = !BlueKey_Event; BlueKey = '4'; break; case '5': BlueKey_Event = !BlueKey_Event; BlueKey = '5'; break; case '6': BlueKey_Event = !BlueKey_Event; BlueKey = '6'; break; case '7': BlueKey_Event = !BlueKey_Event; BlueKey = '7'; break; case '8': BlueKey_Event = !BlueKey_Event; BlueKey = '8'; break; case '9': BlueKey_Event = !BlueKey_Event; BlueKey = '9'; break; case '.': BlueKey_Event = !BlueKey_Event; BlueKey = '*'; break; } ///对应功能 /* zero---z normal---n price input---a confirm---b Mode Weight---c Mode Price---d */ } } void Weight_only() { lcd.clear(); if (event == 0) { lcd.setCursor(9, 1); lcd.print(" ");//clear "Normal" lcd.setCursor(12, 1); lcd.print("Zero"); LcdPrint(Weight); } else if (event == 1) { lcd.setCursor(10, 1); lcd.print("Normal"); LcdPrint(WeighNor); } } void Weight_price() { if (event == 0) { lcd.setCursor(9, 1); lcd.print(" ");//clear "Normal" lcd.setCursor(12, 1); lcd.print("Zero"); LcdPrint(Weight); lcd.setCursor(0, 1); lcd.print(" "); lcd.setCursor(0, 1); lcd.print("Val:"); lcd.print((Weight / 1000) * Value, 1); lcd.setCursor(10, 0); lcd.print(Value); lcd.setCursor(9, 0); lcd.print("/"); } else if (event == 1) { lcd.setCursor(10, 1); lcd.print("Normal"); LcdPrint(WeighNor); lcd.setCursor(0, 1); lcd.print(" "); lcd.setCursor(0, 1); lcd.print("Val:"); lcd.print((WeighNor / 1000) * Value, 1); lcd.setCursor(10, 0); lcd.print(Value); lcd.print(" "); lcd.setCursor(9, 0); lcd.print("/"); } }3电路板绘制 怎么把这些元件安装起来也是个事,杜邦线一堆一堆很不稳定,在一开始其实不知道PCB是干啥的,慢慢看了些视频后慢慢觉得这个项目加个PCB也许会更简洁一些。看这两天学着画一个出来。画是画出来了,但画的时候出了一堆问题,第一是不知道我想要的元件去哪里找,二是我在标注的时候是一个个打上去的,感觉很麻烦,三是目前布线可以说是没有经验,又慢又难看,最后直接用了自动布线。
|
【本文地址】