树莓派换源2023教程及注意事项(更换为清华源) |
您所在的位置:网站首页 › 树莓派更换软件源 › 树莓派换源2023教程及注意事项(更换为清华源) |
|
复制链接打开查看源站(排版更清楚)➡ https://cxing.top/archives/21.html ###### 为啥要换源? :@(吐血倒地) 说白了就是为了加速。树莓派系统默认下载软件的服务器在国外,经常出现下载慢、无法更新的情况。(这个经常访问github的同志应该很清楚 :@(邪恶) )这就需要更换为国内的镜像站来加快速度。 ###### 换源前的准备事项 树莓派系统是是基于debian改造出来的,随着debian的版本更替,不同版本的树莓派要换的源也不同,但树莓派系统的换源流程大致一样的。这里是树莓派清华源的换源介绍文档 :@(鼓掌) [树莓派清华源](https://mirrors.tuna.tsinghua.edu.cn/help/raspbian/) ###### 换源的步骤 1、使用 `lsb_release -a` 命令查看树莓派的版本,使用 `uname -m` 查看树莓派的架构。 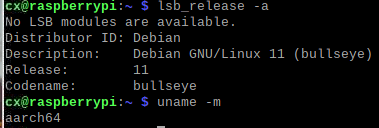 像我这里的版本是基于debian 11的bullseye版本,为aarch64架构,此时打开[树莓派清华源](https://mirrors.tuna.tsinghua.edu.cn/help/raspbian/)的教程,找到对应的版本和换源教程。 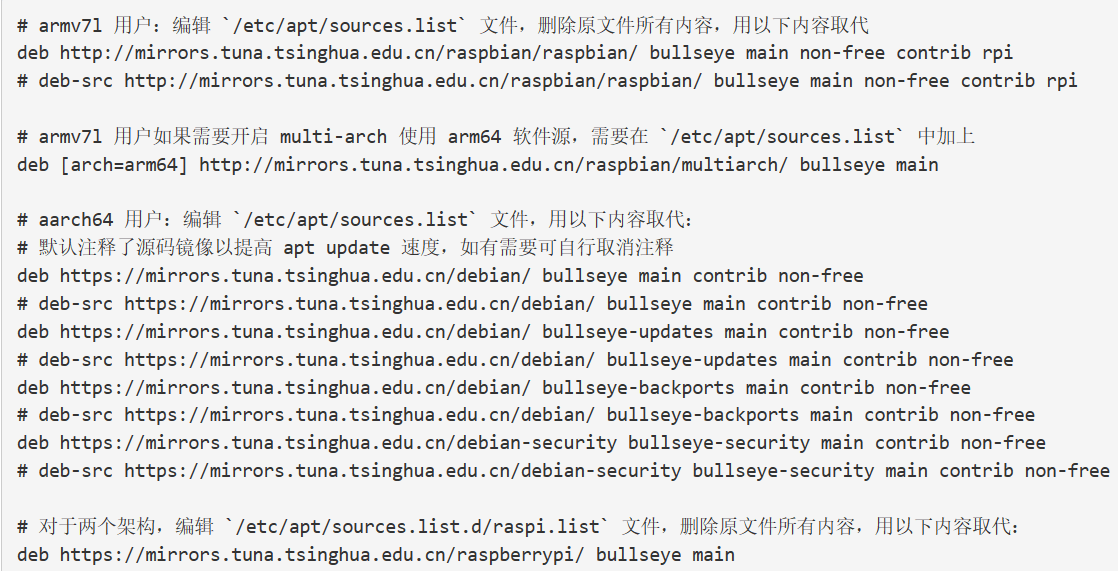 2、有了清华源的教程,我们使用一下命令进入Raspbian源。 ```c sudo nano /etc/apt/sources.list ``` 改为清华源提供的以下内容,再crtl+x保存退出。 ```c # 默认注释了源码镜像以提高 apt update 速度,如有需要可自行取消注释 deb https://mirrors.tuna.tsinghua.edu.cn/debian/ bullseye main contrib non-free # deb-src https://mirrors.tuna.tsinghua.edu.cn/debian/ bullseye main contrib non-free deb https://mirrors.tuna.tsinghua.edu.cn/debian/ bullseye-updates main contrib non-free # deb-src https://mirrors.tuna.tsinghua.edu.cn/debian/ bullseye-updates main contrib non-free deb https://mirrors.tuna.tsinghua.edu.cn/debian/ bullseye-backports main contrib non-free # deb-src https://mirrors.tuna.tsinghua.edu.cn/debian/ bullseye-backports main contrib non-free deb https://mirrors.tuna.tsinghua.edu.cn/debian-security bullseye-security main contrib non-free # deb-src https://mirrors.tuna.tsinghua.edu.cn/debian-security bullseye-security main contrib non-free ``` 3、使用以下命令进入树莓派基金会维护软件的源。 ```c sudo nano /etc/apt/sources.list.d/raspi.list ``` 改为清华源提供的以下内容,再crtl+x保存退出。
```c # 对于两个架构,编辑 `/etc/apt/sources.list.d/raspi.list` 文件,删除原文件所有内容,用以下内容取代: deb https://mirrors.tuna.tsinghua.edu.cn/raspberrypi/ bullseye main ``` {message type="warning" content="个人建议可以先把树莓派官方的给加#注释掉,以免改错还能原封不动改回来。"/} ###### 效果如下 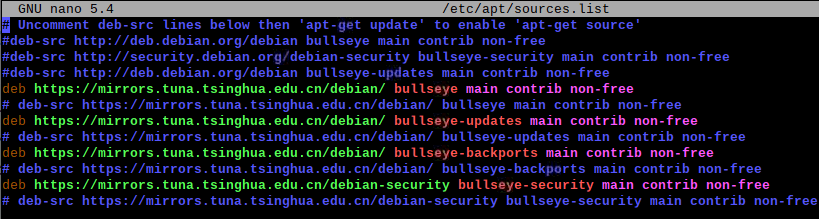  {message type="success" content="其余版本的换源以上述步骤为参考即可完成"/} 最后使用以下两个命令更新一下数据,不出现报错恭喜换源成功。 :@(喜极而泣) ```c sudo apt-get update sudo apt-get upgrade ``` 复制链接打开查看源站➡ https://cxing.top/archives/21.html |
| CopyRight 2018-2019 办公设备维修网 版权所有 豫ICP备15022753号-3 |