Ubuntu系统 |
您所在的位置:网站首页 › 显卡驱动怎样降级 › Ubuntu系统 |
Ubuntu系统
|
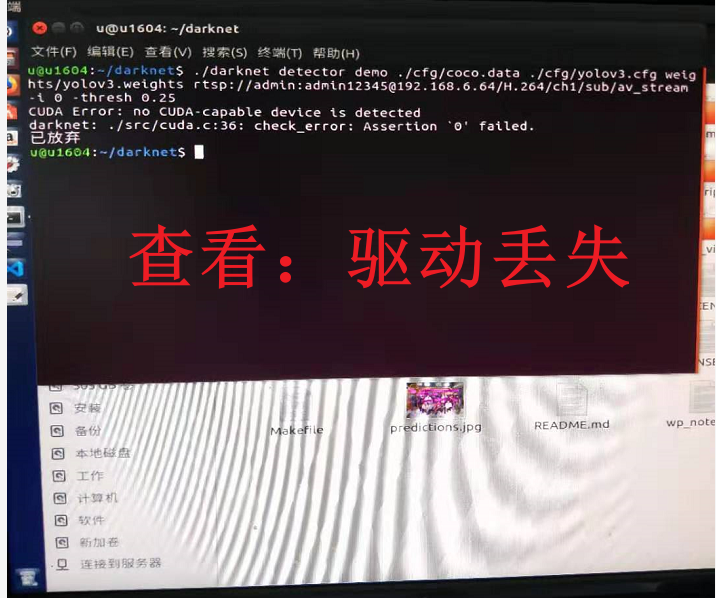
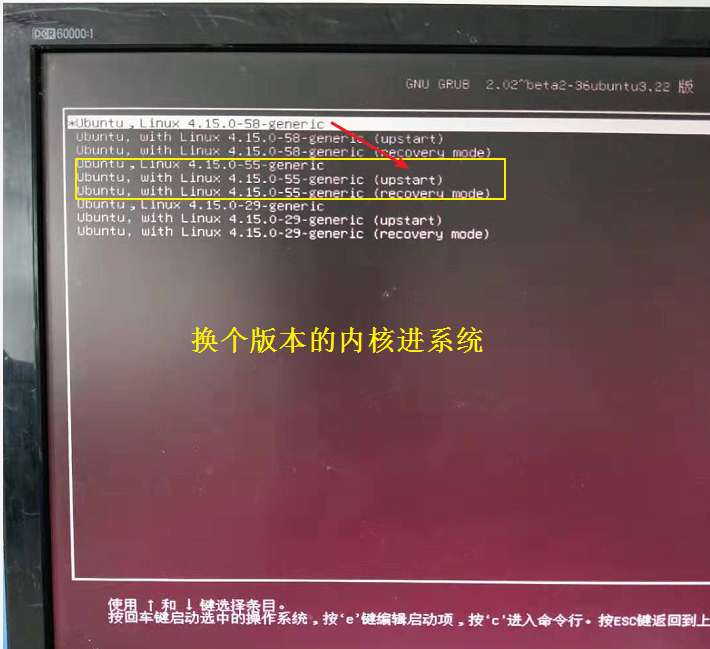
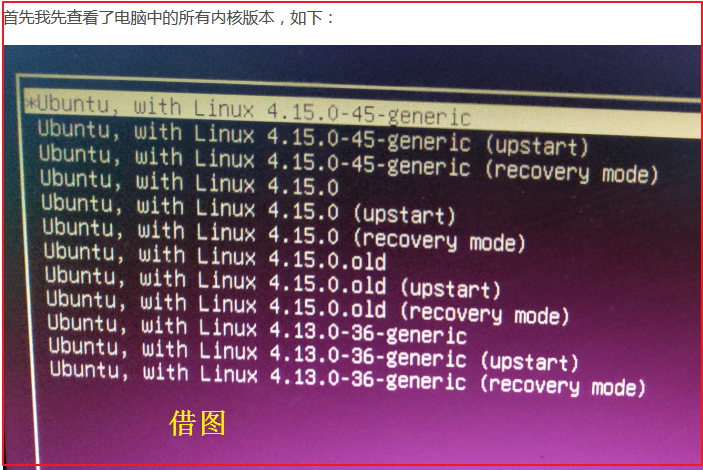
Ubuntu系统---系统驱动丢失、Kernel内核卸载、禁止更新 一早开机发现,ubuntu字体异常,字体很大,直接反应是驱动坏了。一查,确实丢失英伟达驱动,为什么呢?莫名的消失。想知道:1.英伟达驱动丢失的原因?2.如何解决和避免? 上次,英伟达驱动出现问题,是循环在登陆界面。这次,英伟达驱动丢失,是内核升级了,不知道何时自动升级了,导致内核和驱动不兼容。 摘至网络资源:”一般在运行apt upgrade时会自动更新Linux内核,但是有些时候更新内核后会出现驱动程序不兼容的情况。我们可以使用以下命令降级内核:设置为hold状态的软件包,对于 apt upgrade 命令不会升级,但是依然可以通过 apt install 命令将其升级并将其状态切换到install。因此,从安全性角度看,这样做其实效果不大,仅仅是避免了偶然的操作失误。本人还是推荐使用 apt install 来进行“定点升级”。 考虑到这个问题可能是因为ubuntu的自动更新造成的,于是重新启动,在启动界面选择“ubuntu 高级选项”后,发现有两个内核,并且系统默认从新内核启动,选择旧内核启动后顺利进入桌面。其实可以选择更改内核启动顺序来解决这个问题,但我选择直接删除新内核。该方法同样适用于卸载系统中无用的旧内核。” 最后:1.英伟达驱动丢失的原因?内核与驱动不匹配 2.如何解决和避免? 可以有的解决方式 重新装驱动 或 降低内核 或 选择匹配的内核,这里卸载内核并禁止更新,希望以后不要再出现错误。后附,解决问题时候些许笔记。 一、几个常用命令 1.查看ubuntu版本号: 方法一: cat /etc/issue 方法二: sudo lsb_release -a 方法三: cat /etc/lsb-release 2.查看内核版本号: 方法一: cat /proc/version 方法二:查看系统当前的内核版本 uname -a 方法三:仅仅查看内核版本 uname -r 方法四:查看系统安装的所有内核版本 sudo dpkg --get-selections | grep linux 3、删除内核 较新内核的版本为4.13.0-36,使用以下命令删除该内核: sudo apt-get purge linux-headers-x.x.x-x linux-image-x.x.x-x-generic 删除旧内核 sudo apt-get remove linux-image-x.x.x-x-generic sudo apt-get remove linux-image-extra-x.x.x-x-generic 或用这个命令移除 sudo dpkg --purge linux-image-x.x.x-x-generic 4、使用以下命令解除阻止: sudo apt-mark unhold linux-image-generic linux-headers-generic sudo apt update 5、更新grub sudo update-grub
二、查看详细问题 u@u1604:~$ sudo dpkg --get-selections | grep 'linux' [sudo] u 的密码: console-setup-linux install libselinux1:amd64 install linux-base install linux-firmware install linux-generic-hwe-16.04 install linux-headers-4.15.0-29 install linux-headers-4.15.0-29-generic install linux-headers-4.15.0-55 install linux-headers-4.15.0-55-generic install linux-headers-4.15.0-58 install linux-headers-4.15.0-58-generic install linux-headers-generic-hwe-16.04 install linux-image-4.15.0-29-generic install linux-image-4.15.0-55-generic install linux-image-4.15.0-58-generic install linux-image-generic-hwe-16.04 install linux-libc-dev:amd64 install linux-modules-4.15.0-29-generic install linux-modules-4.15.0-55-generic install linux-modules-4.15.0-58-generic install linux-modules-extra-4.15.0-29-generic install linux-modules-extra-4.15.0-55-generic install linux-modules-extra-4.15.0-58-generic install linux-signed-generic-hwe-16.04 install linux-sound-base install pptp-linux install syslinux install syslinux-common install syslinux-legacy install util-linux install u@u1604:~$先卸载headers。sudo apt-get purge linux-headers-4.15.0-58sudo apt-get purge linux-headers-4.15.0-58-generic 接着卸载image。sudo apt-get purge linux-image-4.15.0-58-genericsudo apt-get purge linux-modules-4.15.0-58-genericsudo apt-get purge linux-modules-extra-4.15.0-58-generic 或者:sudo apt-get purge linux-headers-4.15.0-58 \linux-headers-4.15.0-58-generic \linux-image-4.15.0-58-generic \linux-modules-4.15.0-58-generic \linux-modules-extra-4.15.0-58-generic 更新grub引导。sudo update-grub u@u1604:~$ sudo apt-get purge linux-headers-4.15.0-58 \ > linux-headers-4.15.0-58-generic \ > linux-image-4.15.0-58-generic \ > linux-modules-4.15.0-58-generic \ > linux-modules-extra-4.15.0-58-generic 正在读取软件包列表... 完成 正在分析软件包的依赖关系树 正在读取状态信息... 完成 下列软件包是自动安装的并且现在不需要了: amd64-microcode intel-microcode iucode-tool linux-image-4.15.0-29-generic linux-modules-4.15.0-29-generic linux-modules-extra-4.15.0-29-generic thermald 使用'sudo apt autoremove'来卸载它(它们)。 下列软件包将被【卸载】: linux-generic-hwe-16.04* linux-headers-4.15.0-58* linux-headers-4.15.0-58-generic* linux-headers-generic-hwe-16.04* linux-image-4.15.0-58-generic* linux-image-generic-hwe-16.04* linux-modules-4.15.0-58-generic* linux-modules-extra-4.15.0-58-generic* linux-signed-generic-hwe-16.04* 升级了 0 个软件包,新安装了 0 个软件包,要卸载 9 个软件包,有 119 个软件包未被升级。 解压缩后将会空出 334 MB 的空间。 您希望继续执行吗? [Y/n] (正在读取数据库 ... 系统当前共安装有 273212 个文件和目录。) 正在卸载 linux-signed-generic-hwe-16.04 (4.15.0.58.79) ... 正在卸载 linux-generic-hwe-16.04 (4.15.0.58.79) ... 正在卸载 linux-headers-generic-hwe-16.04 (4.15.0.58.79) ... 正在卸载 linux-headers-4.15.0-58-generic (4.15.0-58.64~16.04.1) ... 正在卸载 linux-headers-4.15.0-58 (4.15.0-58.64~16.04.1) ... 正在卸载 linux-image-generic-hwe-16.04 (4.15.0.58.79) ... 正在卸载 linux-modules-extra-4.15.0-58-generic (4.15.0-58.64~16.04.1) ... 正在清除 linux-modules-extra-4.15.0-58-generic (4.15.0-58.64~16.04.1) 的配置文件 ... 正在卸载 linux-image-4.15.0-58-generic (4.15.0-58.64~16.04.1) ... I: /vmlinuz.old is now a symlink to boot/vmlinuz-4.15.0-29-generic I: /initrd.img.old is now a symlink to boot/initrd.img-4.15.0-29-generic I: /vmlinuz is now a symlink to boot/vmlinuz-4.15.0-55-generic I: /initrd.img is now a symlink to boot/initrd.img-4.15.0-55-generic /etc/kernel/postrm.d/initramfs-tools: update-initramfs: Deleting /boot/initrd.img-4.15.0-58-generic /etc/kernel/postrm.d/zz-update-grub: Generating grub configuration file ... Found linux image: /boot/vmlinuz-4.15.0-55-generic Found initrd image: /boot/initrd.img-4.15.0-55-generic Found linux image: /boot/vmlinuz-4.15.0-29-generic Found initrd image: /boot/initrd.img-4.15.0-29-generic Found Windows Boot Manager on /dev/nvme0n1p1@/EFI/Microsoft/Boot/bootmgfw.efi Found Windows Boot Manager on /dev/sda1@/efi/Microsoft/Boot/bootmgfw.efi Found Ubuntu 18.04.2 LTS (18.04) on /dev/sda7 Adding boot menu entry for EFI firmware configuration done 正在清除 linux-image-4.15.0-58-generic (4.15.0-58.64~16.04.1) 的配置文件 ... rmdir: 删除 '/lib/modules/4.15.0-58-generic' 失败: 目录非空 正在卸载 linux-modules-4.15.0-58-generic (4.15.0-58.64~16.04.1) ... 正在清除 linux-modules-4.15.0-58-generic (4.15.0-58.64~16.04.1) 的配置文件 ... u@u1604:~$再次,查看当前信息: u@u1604:~$ sudo dpkg --get-selections | grep 'linux' console-setup-linux install libselinux1:amd64 install linux-base install linux-firmware install linux-headers-4.15.0-29 install linux-headers-4.15.0-29-generic install linux-headers-4.15.0-55 install linux-headers-4.15.0-55-generic install linux-image-4.15.0-29-generic install linux-image-4.15.0-55-generic install linux-libc-dev:amd64 install linux-modules-4.15.0-29-generic install linux-modules-4.15.0-55-generic install linux-modules-extra-4.15.0-29-generic install linux-modules-extra-4.15.0-55-generic install linux-sound-base install pptp-linux install syslinux install syslinux-common install syslinux-legacy install util-linux install u@u1604:~$禁止内核更新 sudo apt-mark hold linux-headers-4.15.0-55 \linux-headers-4.15.0-55-generic \linux-image-4.15.0-55-generic \linux-modules-4.15.0-55-generic \linux-modules-extra-4.15.0-55-generic echo "linux-headers-4.15.0-55 hold" | dpkg --set-selectionsecho "linux-headers-4.15.0-55-generic hold" | dpkg --set-selectionsecho "linux-image-4.15.0-55-generic hold" | dpkg --set-selectionsecho "linux-modules-4.15.0-55-generic hold" | dpkg --set-selectionsecho "linux-modules-extra-4.15.0-55-generic hold" | dpkg --set-selections u@u1604:~$ sudo update-grub Generating grub configuration file ... Found linux image: /boot/vmlinuz-4.15.0-55-generic Found initrd image: /boot/initrd.img-4.15.0-55-generic Found linux image: /boot/vmlinuz-4.15.0-29-generic Found initrd image: /boot/initrd.img-4.15.0-29-generic Found Windows Boot Manager on /dev/nvme0n1p1@/EFI/Microsoft/Boot/bootmgfw.efi Found Windows Boot Manager on /dev/sda1@/efi/Microsoft/Boot/bootmgfw.efi Found Ubuntu 18.04.2 LTS (18.04) on /dev/sda7 Adding boot menu entry for EFI firmware configuration done u@u1604:~$打开终端执行以下命令:lspci | grep VGA # 查看集成显卡lspci | grep NVIDIA # 查看NVIDIA显卡 NVIDIA提供了一个切换显卡的命令:sudo prime-select nvidia # 切换nvidia显卡sudo prime-select intel # 切换intel显卡sudo prime-select query # 查看当前使用的显卡 linux内核镜像包含的包 linux-image : 内核镜像 linux-image-extra : 额外的内核模块 linux-headers : 内核文件
参考并感谢:Linux安装NVIDIA显卡驱动的正确姿势@https://blog.csdn.net/wf19930209/article/details/81877822Linux内核卸载和禁止更新@https://blog.csdn.net/qq_40829288/article/details/96672970如何阻止apt更新Linux内核@https://blog.csdn.net/yyws2039725/article/details/90999447禁止ubuntu更新内核@https://www.cnblogs.com/medsci/p/8338170.htmlLinux禁止内核更新@https://blog.csdn.net/liuwinner/article/details/91043386Ubuntu删除多余内核@https://www.jianshu.com/p/f284bc90944fubuntu16.04 删除内核@https://www.cnblogs.com/sench/p/8567819.htmlubuntu16.04卸载自己安装的linux内核@https://jingyan.baidu.com/article/ff42efa9cdebecc19f220240.html ****《ubuntu18.04 内核自动更新导致驱动掉了》,考虑了一下是不是内核的问题,试了一下重启电脑选择低版本的内核,好用@https://blog.csdn.net/qq_43222384/article/details/90314297****Ubuntu设置默认内核启动版本,图文@https://blog.csdn.net/SweeNeil/article/details/87937269禁止ubuntu更新内核@https://blog.csdn.net/weixin_40522162/article/details/80302735ubuntu不同版本的内核与显卡驱动兼容问题@https://blog.csdn.net/chenhezhuyan/article/details/23453217ubuntu内核与驱动不兼容问题@https://blog.csdn.net/chaihuimin/article/details/71083397,将Ubuntu NVIDIA驱动卸载再重新安装即可Ubuntu下默认更新内核或更新NVIDIA显卡驱动导致的重启无法进入操作系统@https://blog.csdn.net/huang98778/article/details/89922052最全面解析 Ubuntu 16.04 安装nvidia驱动以及各种错误,进入blos关闭secure boot (华硕还有fast boot),否则无法安装成功@https://blog.csdn.net/u014561933/article/details/79958017Ubuntu16.04下安装显卡驱动+内核记录,@https://www.cnblogs.com/myblog1993/p/9284071.htmlubuntu循环登录问题的解决,@https://www.cnblogs.com/talugirl/p/5870875.htmlUbuntu16.04安装NVIDIA驱动时的一些坑与解决方案:一、循环登录;二、重启黑屏;三、驱动不工作@https://www.cnblogs.com/matthewli/p/6715553.html[诡异现象] 开机进ubuntu系统莫名驱动丢失@https://blog.csdn.net/mcmggradty/article/details/43129351ubuntu突然显卡消失,主要原因是ubuntu的内核发生改变,可能安装环境和软件的时候,系统内核也更新了@https://blog.csdn.net/zz2230633069/article/details/90553810ubuntu16.04掉显卡驱动解决方法@https://blog.csdn.net/xiaohuhu11/article/details/90339697ubuntu16.0.4 显卡驱动崩掉,如何重装@https://blog.csdn.net/u011345885/article/details/77329371
|

【本文地址】
今日新闻 |
推荐新闻 |