【C#】简单二维码制作和打印 |
您所在的位置:网站首页 › 文章链接怎么生成二维码图片和文字 › 【C#】简单二维码制作和打印 |
【C#】简单二维码制作和打印
|
系列文章
【C#】条码管理操作手册 本文链接:https://blog.csdn.net/youcheng_ge/article/details/126589496 【C#】IIS平台下,WebAPI发布及异常处理 本文链接:https://blog.csdn.net/youcheng_ge/article/details/126539836 【C#】简单二维码制作和打印 本文链接:https://blog.csdn.net/youcheng_ge/article/details/126884228 【C#】最全单据打印源码(打印模板、条形码&二维码、字体样式) 本文链接:https://blog.csdn.net/youcheng_ge/article/details/129415723 文章目录 系列文章前言一、问题描述二、解决方案2.1 需求分析2.2 实施方案 三、软件开发(源码展示)3.1 引入组件3.2 二维码图片绘制方法3.3 二维码图片调用(样例1)3.3 标签制作源码(核心)3.5 批量生成二维码3.6 底层库richTextBox打印类3.7 richTextBox打印的调用3.7.1 预览3.7.2 打印 四、程序运行效果五、资源链接 前言我能抽象出整个世界,但是我不能抽象你。 想让你成为私有常量,这样外部函数就无法访问你。 又想让你成为全局常量,这样在我的整个生命周期都可以调用你。 可惜世上没有这样的常量,我也无法定义你,因为你在我心中是那么的具体。 哈喽大家好,本专栏为【项目实战】专栏,有别于【底层库】专栏,本专栏介绍项目开发过程中,遇到问题的解决方案,是我实际项目开发过程,相对成熟、可靠方法的提炼,我将这些问题的处理思路梳理,撰写本文分享给大家,大家遇到类似问题,可按本文方案处理。 本专栏会持续更新,不断完善,大家有任何问题,可以私信我。本专栏之间关联性较弱(文章之间依赖性较弱,没有阅读顺序区分)。如果您对本专栏感兴趣,欢迎关注吧,我将带你用最简洁的代码,实现最复杂的功能。 ·提示:本专栏为项目实战篇,未接触项目开发的同学可能理解困难,不推荐阅读。 一、问题描述我入职的公司性质为生产型公司,对于原材料,有多家供应商供应,质量也就参差不齐,所以需要先检验,再入库。 目前,来料由物理实验室批量检测,再由部门文员,维护Excel表格,最后再将表格表格上传内部共享盘,此方法效率低、成本高、数据容易录错,且不满足日益增长的数据需要,尤其对于黄丝编号、AVE直径、AVE拉力、强度值(计算值)等录入容易出错。 于是,我设计了条码管理的方案:将来料编号生成二维码(打标),张贴在货物上(贴标),后道部门扫码获取物料信息(读标)。员工们只需拿一台手持机,即可完成一系列复杂的操作。
与业务部门沟通,进一步确定标签需要支持以下目标: ①公司存在保密要求,标签不便显示产品信息,但特定人员可以看懂。 ②编号要可以人工复核,双重保障,防止识别不出可以人工干预。 其实描述一大堆,你只需要在原有二维码的基础上增加文字信息,便于人工查看。那么如何制作【二维码标签】呢,说白了就是:对原生成的二维码进行重绘,增加文字信息,效果如下图: 标签识别效果: 二维码生成很简单,使用QRCodeEncoder可以生成一个【二维码】,但是它生成的仅仅是个【二维码】,没有文字信息记录,不符合我们的需要。 其实吧,有了【二维码】让客户放文档编辑编辑,二次加工也能符合他需求。但是吧,作为软件设计师宗旨:就是解决问题,让客户操作更便捷,能节省的步骤尽可能帮其他省略。 我的方案: ①生成【二维码】图片 ②画一个白底的图片,要比【二维码】图片大一些 ③把【二维码】图片放上去,底部留白的地方在加上文字说明。 编程需要用到的类: 使用 GDI+ 画图会用到的几个常用的类有:Graphics、Bitmap、Image。 其中 Graphics 是画板。这个类包含了许多画图的方法,包括画图片(DrawImage),画线(DrawLine),画圆(DrawEllipse、FillEllipse),写字(DrawString)等等。简单说使用这个类可以完成我们需要的大部分工作。 三、软件开发(源码展示) 3.1 引入组件安装QRCode组件,它支持一维码(条形码)、二维码生成。NuGet搜索一下,直接安装完事儿了。如果是离线状态下,你将ThoughtWorks.QRCode.dll组件,直接import进去好了。
我这里进行封装,传入参数标签编号,获得Bitmap对象。Bitmap对象可以用于富文本的展示。 private Bitmap DrawImage(string a_strLabel) { Thread.Sleep(500); string l_strMode = AppConfig.GetValue("qr_mode"); string l_strSize = AppConfig.GetValue("qr_size"); string l_strVersion = AppConfig.GetValue("qr_version"); string l_strCheckLevel = AppConfig.GetValue("qr_checklevel"); QRCodeEncoder qrCodeEncoder = new QRCodeEncoder(); // 生成二维码内容模式分为三种,数字,数字字母,字节,这个基本上都设置成Byte,支持汉字 qrCodeEncoder.QRCodeEncodeMode = (QRCodeEncoder.ENCODE_MODE)Enum.Parse(typeof(QRCodeEncoder.ENCODE_MODE), l_strMode); // 设置二维码的大小,默认4,在尺寸小的情况下,版本参数过高则设备难以识别二维码 qrCodeEncoder.QRCodeScale = int.Parse(l_strSize); // 设置二维码的版本,默认7 该值影响二维码最高数据容量 7大致对应40个汉字长度,内容超出择需提升该数值 qrCodeEncoder.QRCodeVersion = int.Parse(l_strVersion); // 设置错误校验级别,默认中等,二维码被遮挡住一部分实际上也是能扫出内容的,这个效验级别的意思就是 // 当遮挡部分最大占整体多少时仍然可以被扫出来,M大概在20%左右,H为30%,级别越高相应的数据容量会缩小 // 那些中间带图标的二维码,其实就是简单粗暴的用LOGO遮挡住了中间部分 qrCodeEncoder.QRCodeErrorCorrect = (QRCodeEncoder.ERROR_CORRECTION)Enum.Parse(typeof(QRCodeEncoder.ERROR_CORRECTION), l_strCheckLevel); return qrCodeEncoder.Encode(a_strLabel, Encoding.UTF8); } 3.3 二维码图片调用(样例1)行改变调用,我这里做成选择那一行编号,它就可以预览标签,支持一键打印的。 private void GV_Main_FocusedRowChanged(object sender, DevExpress.XtraGrid.Views.Base.FocusedRowChangedEventArgs e) { Bitmap image = null; int l_intFontSize = Convert.ToInt32(AppConfig.GetValue("qr_fontsize")); if (GV_Main.FocusedRowHandle > -1) { string l_strLabel = GV_Main.GetFocusedDataRow()["code_no"].ToString(); if (!string.IsNullOrWhiteSpace(l_strLabel)) { image = DrawImage(l_strLabel); richTextBox2.Clear(); richTextBox2.BackColor = Color.White; richTextBox2.ForeColor = Color.Blue; richTextBox2.SelectionColor = Color.White; richTextBox2.Font = new Font("黑体", l_intFontSize); richTextBox2.SelectionStart = richTextBox2.Text.Length; Clipboard.SetDataObject(image, false);//将图片放在剪贴板中 DataFormats.Format dataFormat = DataFormats.GetFormat(DataFormats.Bitmap); //将剪贴板中的内容贴入RichTextBox中 if (richTextBox2.CanPaste(dataFormat)) richTextBox2.Paste(dataFormat); richTextBox2.AppendText(Environment.NewLine + "编号:" + l_strLabel); image.Dispose(); Clipboard.Clear();//一定要清空剪切板,否则会报错 string str = "0";//指定字符串 int index = -1; while ((index = richTextBox2.Find(str, index + 1, RichTextBoxFinds.MatchCase)) != -1) { richTextBox2.Select(index, 1);//选中这个段落 richTextBox2.SelectionFont = new Font("黑体", l_intFontSize, FontStyle.Underline);//设置字体名称为“黑体”,字号为14号,字体样式为加粗 if (index + 1 == richTextBox2.Text.Length) { break; } } } } else { richTextBox2.Text = ""; } } 3.3 标签制作源码(核心)本文的核心内容,就是如何写标签,生成图片类, 传入参数:标签编号、文件路径。 AppConfig.GetValue()为读取配置文件中的参数信息,就是标签的宽度、高度、二维码的宽度、高度、二维码的坐标等。 private void CreatePicture(string a_strCodeNo,string a_strFilePath) { int l_intImgWidth = Convert.ToInt32(AppConfig.GetValue("img_width")); int l_intImgHeight = Convert.ToInt32(AppConfig.GetValue("img_height")); int l_intCodeWidth = Convert.ToInt32(AppConfig.GetValue("code_width")); int l_intCodeHeight = Convert.ToInt32(AppConfig.GetValue("code_height")); int l_intCodeX = Convert.ToInt32(AppConfig.GetValue("code_x")); int l_intCodeY = Convert.ToInt32(AppConfig.GetValue("code_y")); int l_intFontSize = Convert.ToInt32(AppConfig.GetValue("qr_fontsize")); int l_intFontX = Convert.ToInt32(AppConfig.GetValue("font_x")); int l_intFontY = Convert.ToInt32(AppConfig.GetValue("font_y")); Image image = null; Bitmap imagedata = new Bitmap(l_intImgWidth, l_intImgHeight); //创建画布150*150。 Graphics g = null; try { g = Graphics.FromImage(imagedata);//绘制 Rectangle c = new Rectangle(0, 0, l_intImgWidth, l_intImgHeight);//矩形框 g.FillRectangle(Brushes.White, c);//白色底色填充画布 image = DrawImage(a_strCodeNo); //获取二维码的 Bitmap,由于Image是Bitmap的父类自动转换 g.DrawImage(image, l_intCodeX, l_intCodeY, l_intCodeWidth, l_intCodeHeight);//绘制二维码到画布,留边距20像素 g.DrawString($"编号:{a_strCodeNo}", new Font("黑体", l_intFontSize, FontStyle.Regular), new SolidBrush(Color.Black), l_intFontX, l_intFontY); //绘制文字 imagedata.Save(a_strFilePath, System.Drawing.Imaging.ImageFormat.Jpeg);//保存图片 } catch (System.Exception ex) { throw ex; } finally { g.Dispose(); imagedata.Dispose(); image.Dispose(); } } 3.5 批量生成二维码按钮事件,点击批量生成一堆标签。 //批量下载 private void Mi_BatchSave_Click(object sender, EventArgs e) { DataTable l_dt = GC_Main.DataSource as DataTable; if (l_dt == null || l_dt.Rows.Count == 0) { return; } FolderBrowserDialog dialog = new FolderBrowserDialog(); dialog.Description = "请选择路径"; dialog.SelectedPath = AppDomain.CurrentDomain.BaseDirectory; if (dialog.ShowDialog() == DialogResult.OK) { string l_strDir = dialog.SelectedPath; foreach (DataRow dr in l_dt.Rows) { string l_strCodeNo = dr["code_no"].ToString(); string l_strFilePath = Path.Combine(l_strDir, l_strCodeNo + ".jpg"); CreatePicture(l_strCodeNo, l_strFilePath); } FrmTips.ShowTipsSuccess(this, "保存成功!"); System.Diagnostics.Process.Start(l_strDir); } } 3.6 底层库richTextBox打印类《底层库–richTextBox打印类》,创建类文件 richTextBoxPrintClass.cs,复制以下代码: using System; using System.Windows.Forms; using System.Drawing; using System.Runtime.InteropServices; using System.Drawing.Printing; namespace QRCodeProduce { public class richTextBoxPrintClass { public richTextBoxPrintClass() { InitializeComponent(); } #region 打印功用 //and the unit used by Win32 API calls (twips 1/1440 inch) private const double anInch = 14.4; [StructLayout(LayoutKind.Sequential)] private struct RECT { public int Left; public int Top; public int Right; public int Bottom; } [StructLayout(LayoutKind.Sequential)] private struct CHARRANGE { public int cpMin; //First character of range (0 for start of doc) public int cpMax; //Last character of range (-1 for end of doc) } [StructLayout(LayoutKind.Sequential)] private struct FORMATRANGE { public IntPtr hdc; //Actual DC to draw on public IntPtr hdcTarget; //Target DC for determining text formatting public RECT rc; //Region of the DC to draw to (in twips) public RECT rcPage; //Region of the whole DC (page size) (in twips) public CHARRANGE chrg; //Range of text to draw (see earlier declaration) } private const int WM_USER = 0x0400; private const int EM_FORMATRANGE = WM_USER + 57; [DllImport("USER32.dll")] private static extern IntPtr SendMessage(IntPtr hWnd, int msg, IntPtr wp, IntPtr lp); // Render the contents of the RichTextBox for printing // Return the last character printed + 1 (printing start from this point for next page) public static int Print(RichTextBox richTextBox, int charFrom, int charTo, PrintPageEventArgs e) { //Calculate the area to render and print RECT rectToPrint; rectToPrint.Top = (int)(e.MarginBounds.Top * anInch); rectToPrint.Bottom = (int)(e.MarginBounds.Bottom * anInch); rectToPrint.Left = (int)(e.MarginBounds.Left * anInch); rectToPrint.Right = (int)(e.MarginBounds.Right * anInch); //Calculate the size of the page RECT rectPage; rectPage.Top = (int)(e.PageBounds.Top * anInch); rectPage.Bottom = (int)(e.PageBounds.Bottom * anInch); rectPage.Left = (int)(e.PageBounds.Left * anInch); rectPage.Right = (int)(e.PageBounds.Right * anInch); IntPtr hdc = e.Graphics.GetHdc(); FORMATRANGE fmtRange; fmtRange.chrg.cpMax = charTo; //Indicate character from to character to fmtRange.chrg.cpMin = charFrom; fmtRange.hdc = hdc; //Use the same DC for measuring and rendering fmtRange.hdcTarget = hdc; //Point at printer hDC fmtRange.rc = rectToPrint; //Indicate the area on page to print fmtRange.rcPage = rectPage; //Indicate size of page IntPtr res = IntPtr.Zero; IntPtr wparam = IntPtr.Zero; wparam = new IntPtr(1); //Get the pointer to the FORMATRANGE structure in memory IntPtr lparam = IntPtr.Zero; lparam = Marshal.AllocCoTaskMem(Marshal.SizeOf(fmtRange)); Marshal.StructureToPtr(fmtRange, lparam, false); //Send the rendered data for printing res = SendMessage(richTextBox.Handle, EM_FORMATRANGE, wparam, lparam); //Free the block of memory allocated Marshal.FreeCoTaskMem(lparam); //Release the device context handle obtained by a previous call e.Graphics.ReleaseHdc(hdc); //Return last + 1 character printer return res.ToInt32(); } #endregion #region 初始化 public RichTextBox richTextBox; private PageSetupDialog pageSetupDialog1; private PrintDialog printDialog1; private PrintDocument printDocument1; private PrintPreviewDialog printPreviewDialog1; private void InitializeComponent() { richTextBox = new RichTextBox(); pageSetupDialog1 = new PageSetupDialog(); printDialog1 = new PrintDialog(); printDocument1 = new PrintDocument(); printPreviewDialog1 = new PrintPreviewDialog(); //尺寸大小(标签打印机尺寸,数值调大) //PaperSize size1 = new PaperSize("自定", 300, 130); PaperSize size1 = new PaperSize("自定", 350, 150); printDocument1.DefaultPageSettings.PaperSize = size1; //object aa = printDocument1.DefaultPageSettings.Margins; printDocument1.DefaultPageSettings.Margins = new System.Drawing.Printing.Margins(100, 100, 15, 5); //printDocument1.DefaultPageSettings.Landscape = true;(不能加) // // pageSetupDialog1 // pageSetupDialog1.Document = printDocument1; // // printDialog1 // printDialog1.Document = printDocument1; printDialog1.UseEXDialog = true; // // printDocument1 // printDocument1.PrintPage += new System.Drawing.Printing.PrintPageEventHandler(printDocument1_PrintPage); printDocument1.BeginPrint += new System.Drawing.Printing.PrintEventHandler(printDocument1_BeginPrint); // // printPreviewDialog1 // printPreviewDialog1.AutoScrollMargin = new System.Drawing.Size(0, 0); printPreviewDialog1.AutoScrollMinSize = new System.Drawing.Size(0, 0); printPreviewDialog1.ClientSize = new System.Drawing.Size(1800, 1200); printPreviewDialog1.Document = printDocument1; printPreviewDialog1.Enabled = true; // printPreviewDialog1.Icon = ((System.Drawing.Icon)(resources.GetObject("printPreviewDialog1.Icon"))); printPreviewDialog1.Name = "printPreviewDialog1"; printPreviewDialog1.Visible = false; } private int checkPrint; private void printDocument1_BeginPrint(object sender, System.Drawing.Printing.PrintEventArgs e) { checkPrint = 0; } private void printDocument1_PrintPage(object sender, System.Drawing.Printing.PrintPageEventArgs e) { // Print the content of RichTextBox. Store the last character printed. //checkPrint = richTextBoxPrintCtrl1.Print(checkPrint, richTextBoxPrintCtrl1.TextLength, e); checkPrint = richTextBoxPrintClass.Print(richTextBox, checkPrint, richTextBox.TextLength, e); // Check for more pages if (checkPrint pageSetupDialog1.ShowDialog(); } //打印预览功能 public void ShowShowPagePriviewDlg() { printPreviewDialog1.ShowDialog(); } //打印 public void ShowPrintDlg() { if (printDialog1.ShowDialog() == DialogResult.OK) printDocument1.Print(); } } } 3.7 richTextBox打印的调用 3.7.1 预览 /// /// 打印预览 /// /// /// private void BTN_PrintPreview_Click(object sender, EventArgs e) { richTextBoxPrintClass r = new richTextBoxPrintClass(); r.richTextBox = richTextBox2; r.ShowShowPagePriviewDlg(); }
项目源码 QRCodeProduce 链接:https://pan.baidu.com/s/1b1V3ge6EgYWkxEo2hQwAiA?pwd=9y2j 提取码:9y2j 本文为早期创作,标签设计具有局限性。大家阅读下面这篇文章,下文更加完美。 【C#】最全单据打印源码(打印模板、条形码&二维码、字体样式) 本文链接:https://blog.csdn.net/youcheng_ge/article/details/129415723 |
 提示:手持机它长这样子,可以理解为你淘汰的智能手机+键盘,某些科技企业已升级到工业pad,屏幕更大、性能更强。
 提示:这个编号是公司内部定的,特有定含义,并不是单纯的随机码、也不是流水号,就是说有份【数据字典】可以查询标签信息。这个我们就不用深究了,我做了标签识别功能,专门解析这个玩意。
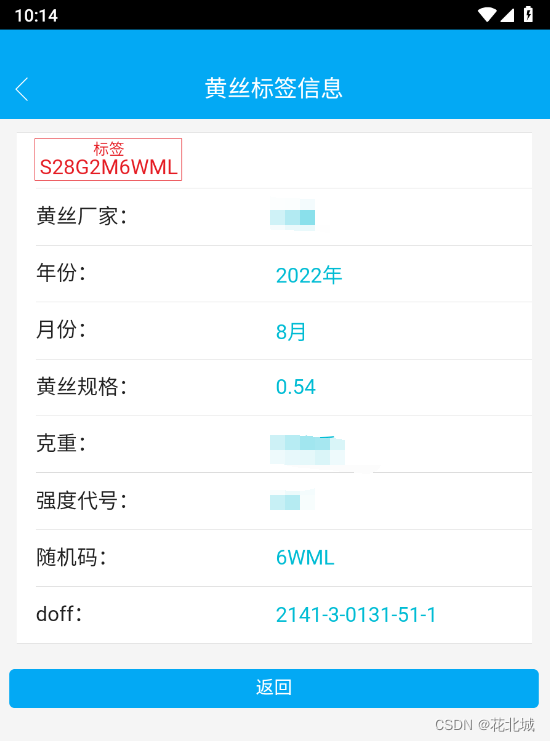 PS:补充一句,我标签采用图片绘制的方式,这不是通用的产品,我原本计划产品通用化,将做成模板,【二维码】制作成条码控件,标签信息制作成文本控件,支持颜色、位置、数值计算、控件拖拽调整,模板保存成xml文件,支持拷贝修改。但是时间有限,只完成了原型构建,后期有时间将改造这部分。


【本文地址】
今日新闻 |
推荐新闻 |