【unity】Pico VR 开发笔记(基础篇)包括射线 |
您所在的位置:网站首页 › 文本框类型设置为射线 › 【unity】Pico VR 开发笔记(基础篇)包括射线 |
【unity】Pico VR 开发笔记(基础篇)包括射线
|
Pico VR 开发笔记(基础篇)
XR Interaction Tooikit 版本 2.3.2 一、环境搭建其实官方文档已经写的很详细了,这里只是不废话快速搭建,另外有一项官方说明有误的,补充说明一下,在开发工具部分说明 插件安装——安装pico的sdk和XR Interaction Tooikit 环境配置——在场景里添加头显和手柄,并进行配置和项目配置 开发工具——Pico提供的串流开发工具,可以在不打包的情况的,使用手柄和头显进行调试。 1、插件安装pico SDK安装 pico SDK下载地址:SDK - PICO 开发者平台 (pico-interactive.com) SDK下载后解压 打开unity→Window→PackgeManager→Add Package From disk(左上角+)→选择解压后文件里的package.json
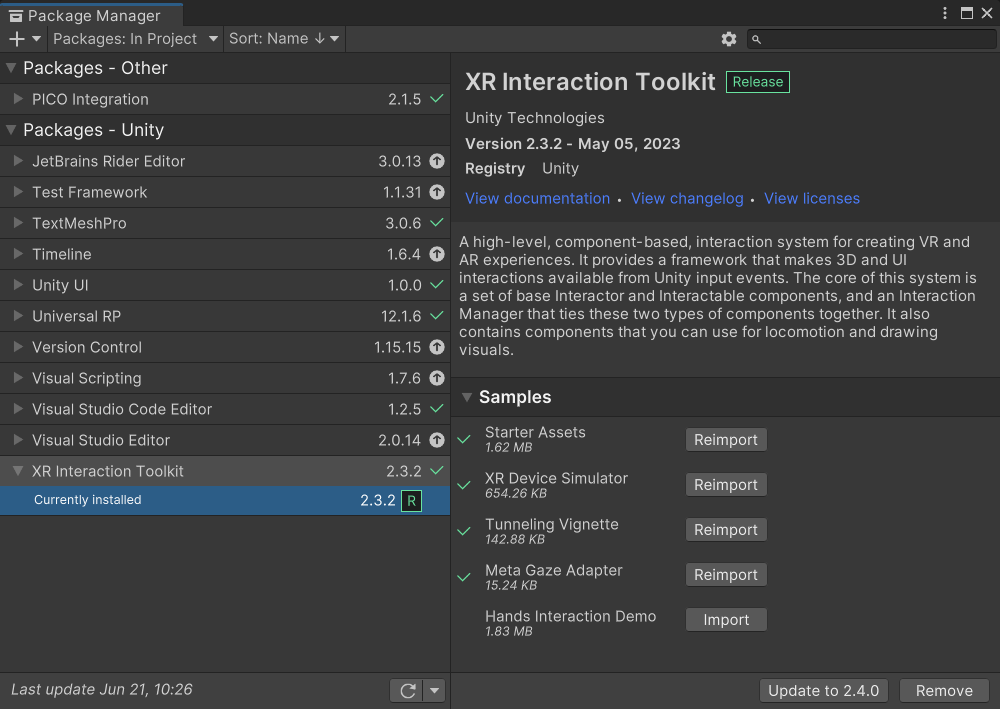
XR Interaction Tooikit安装 在packgeManager里搜索XR Interaction Tooikit
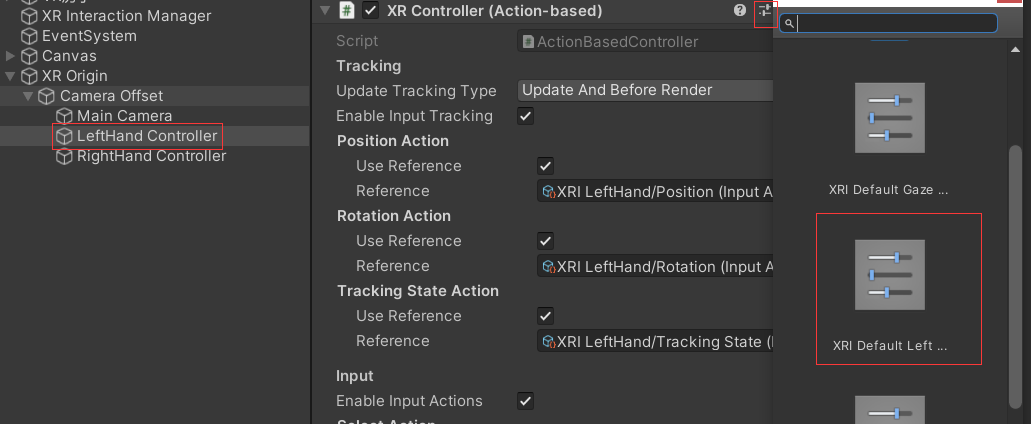
选择版本尽量高版本,不要低于2.1.0。 打开Samples 面板,导入 Starter Assets、**XR Device Simulater **和 Tunneling Vignette。 2、环境配置场景配置 添加XR Origin:Hierarchy→Add(左上角+)→XR→XR Origin(VR) 手柄设置 选中Hierarchy的XR Origin子物体LeftHand Controller 配置LeftHand Controller的控件XR Controller,点击在右上角的预设,选择XRI Default Left Controller (右手柄同样配置,选择XRI Default Right Controller )
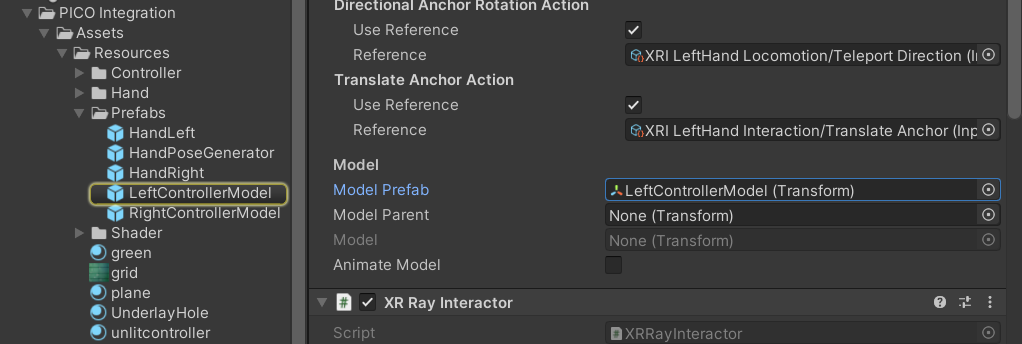
选择手柄模型,在XR Controller的Model Prefab选择LeftControllerModel(Tranform)
打包设置
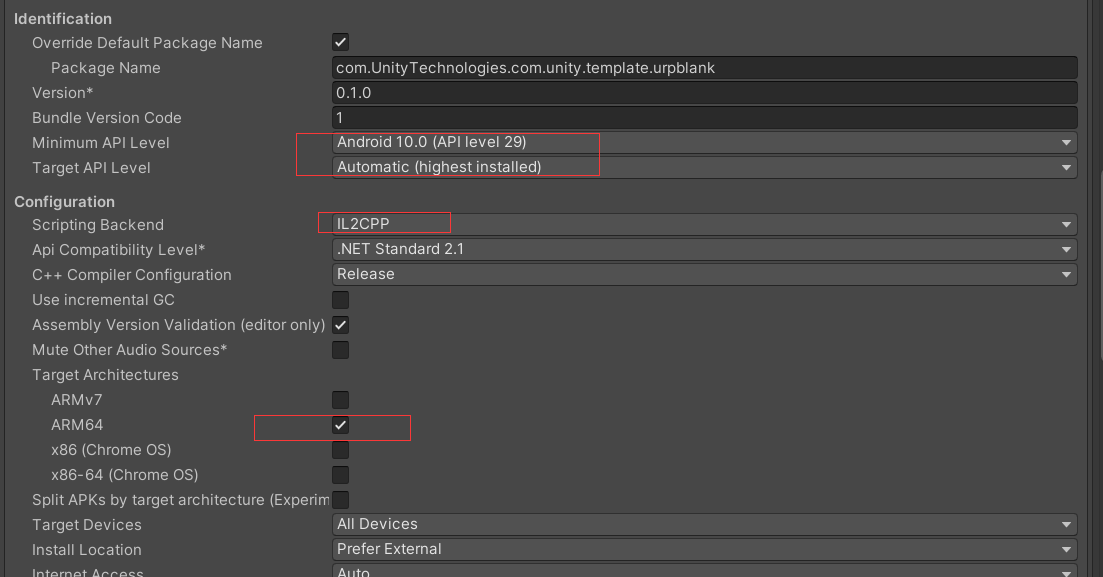
选择:Edit→Player→settings for Android→other Setting Minimum API Level 选择Android 10.0 Target API Level 选择Automatic(Highest installed) Scripting Backend 选择IL2CPP 勾选ARM64
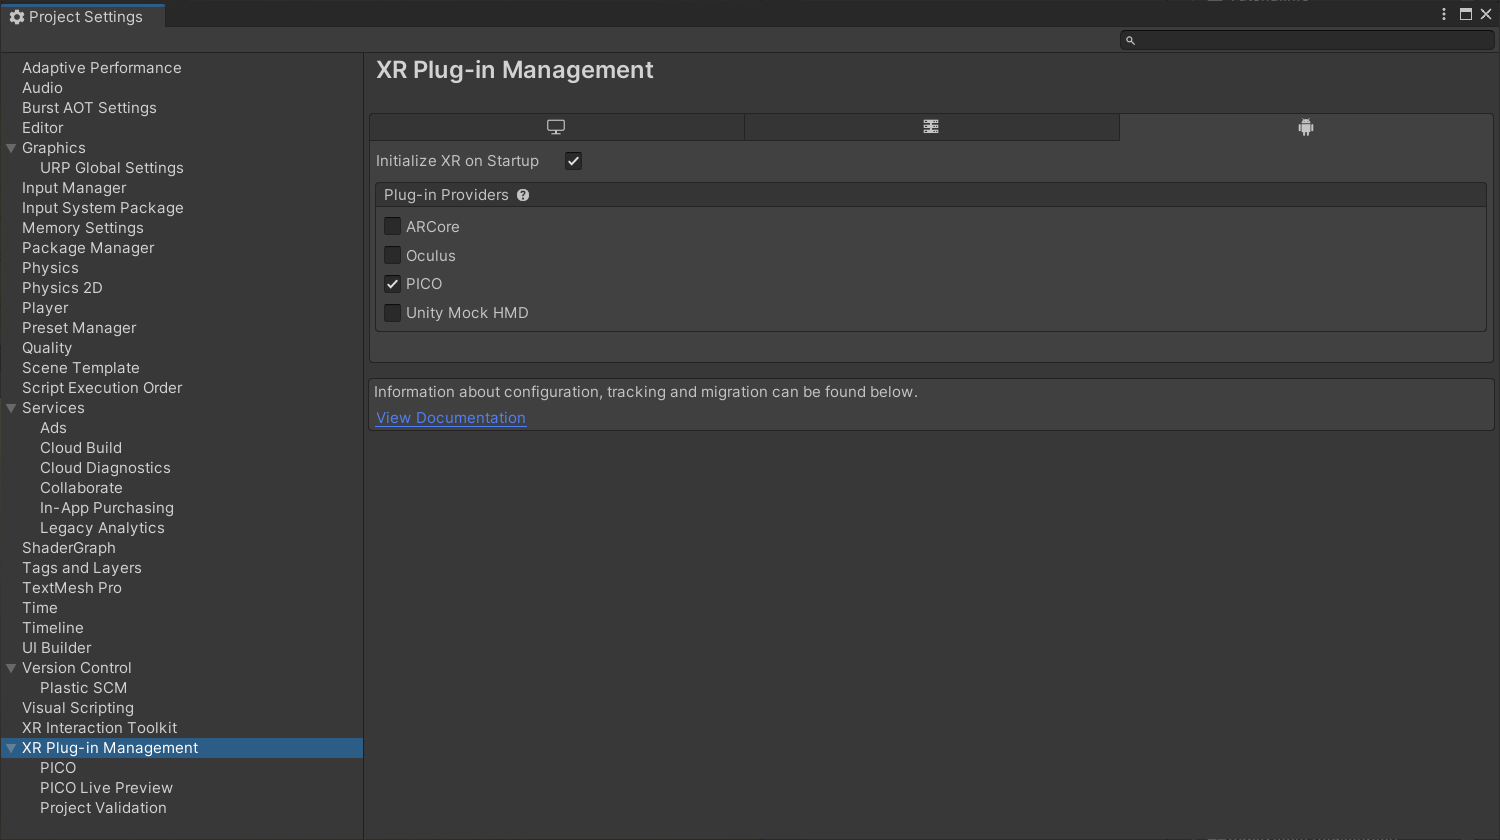
选择:Edit→Project Settings→XR Plug-in Management→Android Standalone Settings→选择PICO 3、开发工具SDK安装 下载地址:SDK - PICO 开发者平台 (PICO Unity Live Preview Plugin) SDK下载后解压 打开unity→Window→PackgeManager→Add Package From disk(左上角+)→选择解压后文件里的package.json
windows下载客户端 下载地址:SDK - PICO 开发者平台 (PICO Developer Center) 在本地安装后会安装steam串流工具 为一体机开启开发者模式 开启 PICO VR 一体机。前往 设置 > 通用。射线对准 设置 字段并连续点击多次,直到左侧导航栏下方出现 开发者 选项。点击 开发者,进入开发者选项界面。打开右上角的 USB 调试开关。*这里官方文档有误,开启开发者模型要多次点击设置键 项目设置
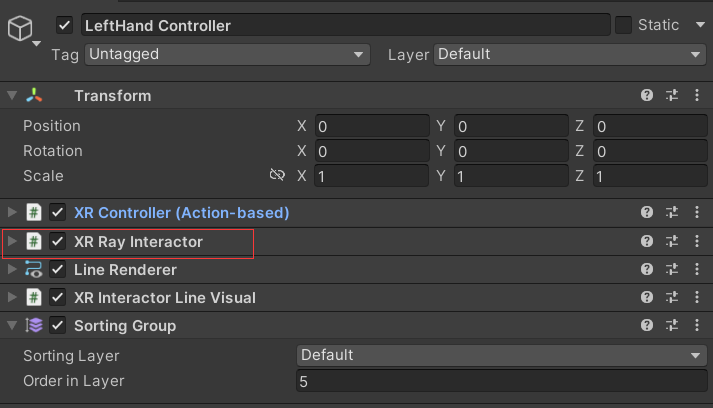
选择:Edit→Project Settings→XR Plug-in Management→ PC Standalone Settings→选择 PICO Live Preview 二、开发 1、手柄输入得到手柄 InputDevice deviceLeft;//左手柄 InputDevice deviceRight;//右手柄 private void Start() { deviceLeft = InputDevices.GetDeviceAtXRNode(XRNode.LeftHand); deviceRight = InputDevices.GetDeviceAtXRNode(XRNode.RightHand); }手柄触发核心方法 TryGetFeatureValue 手柄扳机键触发 /// /// 扳机键 /// /// 手柄 /// 触发委托 /// 触发参数 void triggerButton(InputDevice inputDevice, ref bool Value, Action action) { if (inputDevice.TryGetFeatureValue(CommonUsages.triggerButton,out Value)&&Value) { action(); } }扳机键力度 /// /// 扳机键力度 /// /// 手柄 /// 触发委托 /// 触发参数 void trigger(InputDevice inputDevice, ref float Value, Action action) { if (inputDevice.TryGetFeatureValue(CommonUsages.trigger, out Value)&& !Value.Equals(0)) { action(Value); } }抓握键 /// /// 抓握键 /// /// /// /// void gripButton(InputDevice inputDevice, ref bool Value, Action action) { if (inputDevice.TryGetFeatureValue(CommonUsages.gripButton, out Value) && Value) { action(); } }抓握键力度 /// /// 抓握键力度 /// /// /// /// void grip(InputDevice inputDevice, ref float Value, Action action) { if (inputDevice.TryGetFeatureValue(CommonUsages.grip, out Value) && !Value.Equals(0)) { action(Value); } }摇杆方向 /// /// 摇杆方向 /// /// /// /// void primary2DAxis(InputDevice inputDevice, ref Vector2 Value, Action action) { if (inputDevice.TryGetFeatureValue(CommonUsages.primary2DAxis, out Value) && !Value.Equals(Vector2.zero)) { action(Value); } }摇杆 /// /// 摇杆 /// /// /// /// void primary2DAxisClick(InputDevice inputDevice, ref bool Value, Action action) { if (inputDevice.TryGetFeatureValue(CommonUsages.primary2DAxisClick, out Value) && Value) { action(); } }X/A /// /// X/A /// /// /// /// void primaryButton(InputDevice inputDevice, ref bool Value, Action action) { if (inputDevice.TryGetFeatureValue(CommonUsages.primaryButton, out Value) && Value) { action(); } }Y/B /// /// Y/B /// /// /// /// void secondaryButton(InputDevice inputDevice, ref bool Value, Action action) { if (inputDevice.TryGetFeatureValue(CommonUsages.secondaryButton, out Value) && Value) { action(); } } 2、射线得到射线的方法 XRRayInteractor.TryGetCurrent3DRaycastHit(out hit)XRRayInteractor是手柄上挂载的XRRayInteractor脚本。
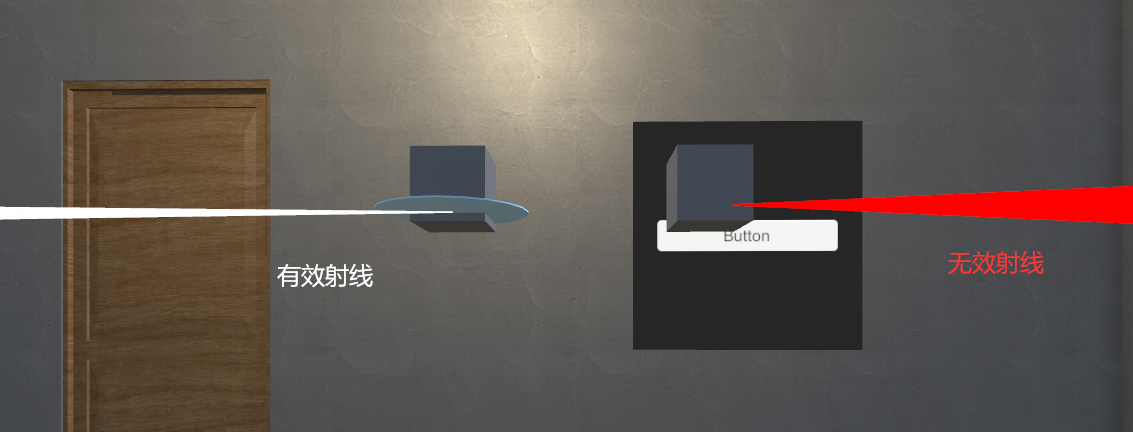
Demo public XRRayInteractor rayInteractor; RaycastHit hit; Vector3 getRayPoint() { if (rayInteractor.TryGetCurrent3DRaycastHit(out hit)) { string name = hit.collider.name; Debug.Log(name); return hit.point; } else { return Vector3.zero; } }补充设置 射线的类型 类型说明Staight Line直线Projectile Curve抛物线Bezier Curve贝塞尔曲线修改方法 rayInteractor.lineType = XRRayInteractor.LineType.ProjectileCurve;不同类型的射线还有自己的参数可以修改,比如Stailght Line的MaxRaycastDistance(最远射线距离)和ProjectileCurve的Additional Flight Time(射线飞行时间)都可以直接赋值。 有效射线和无效射线 当射线触碰到可触发的UI或者模型时,射线为有效射线,反馈则是使用了ValidColorGradient。否则是使用InvalidColorGradient。
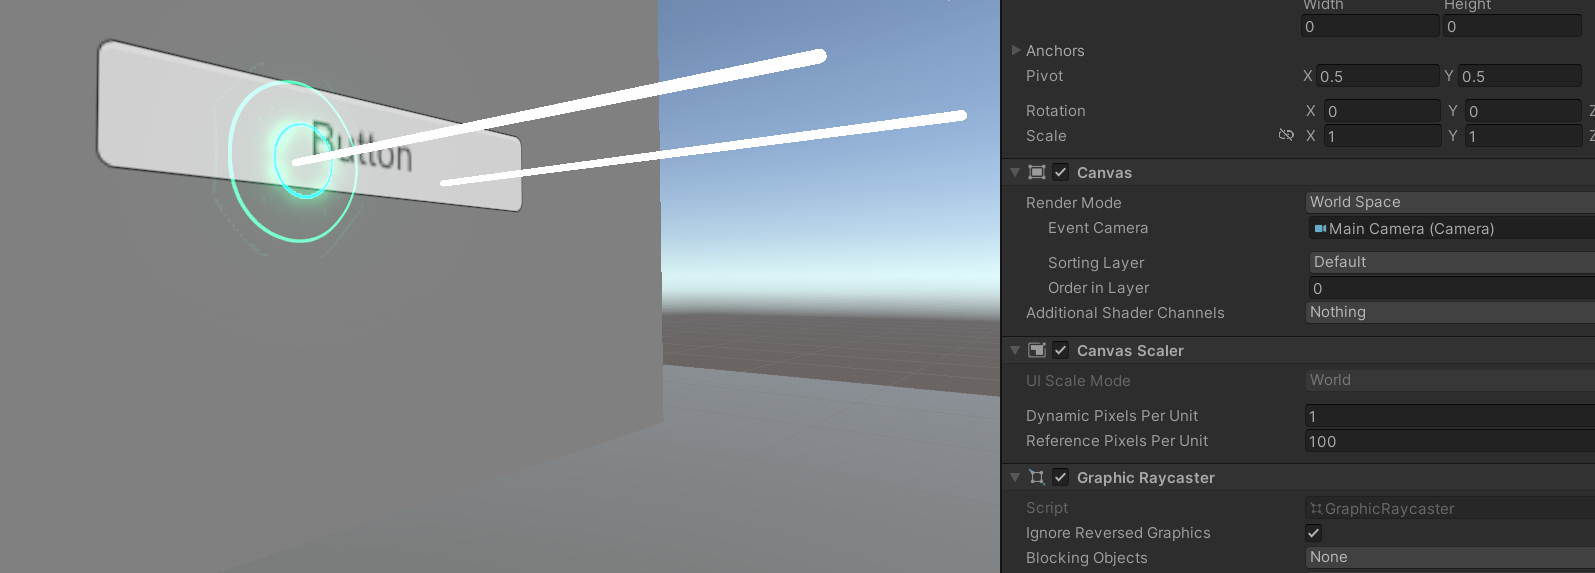
无效射线和有效射线触碰到有碰撞的模型时同样可以返回RaycastHit,区别在XR射线本身的设置上,比如碰撞Reticle。 实现有效碰撞,需要另外在模型上添加Tracked Device Physics Raycaster脚本等 Reticle (十字线) Reticle 是射线和模型(UI)碰撞的点。
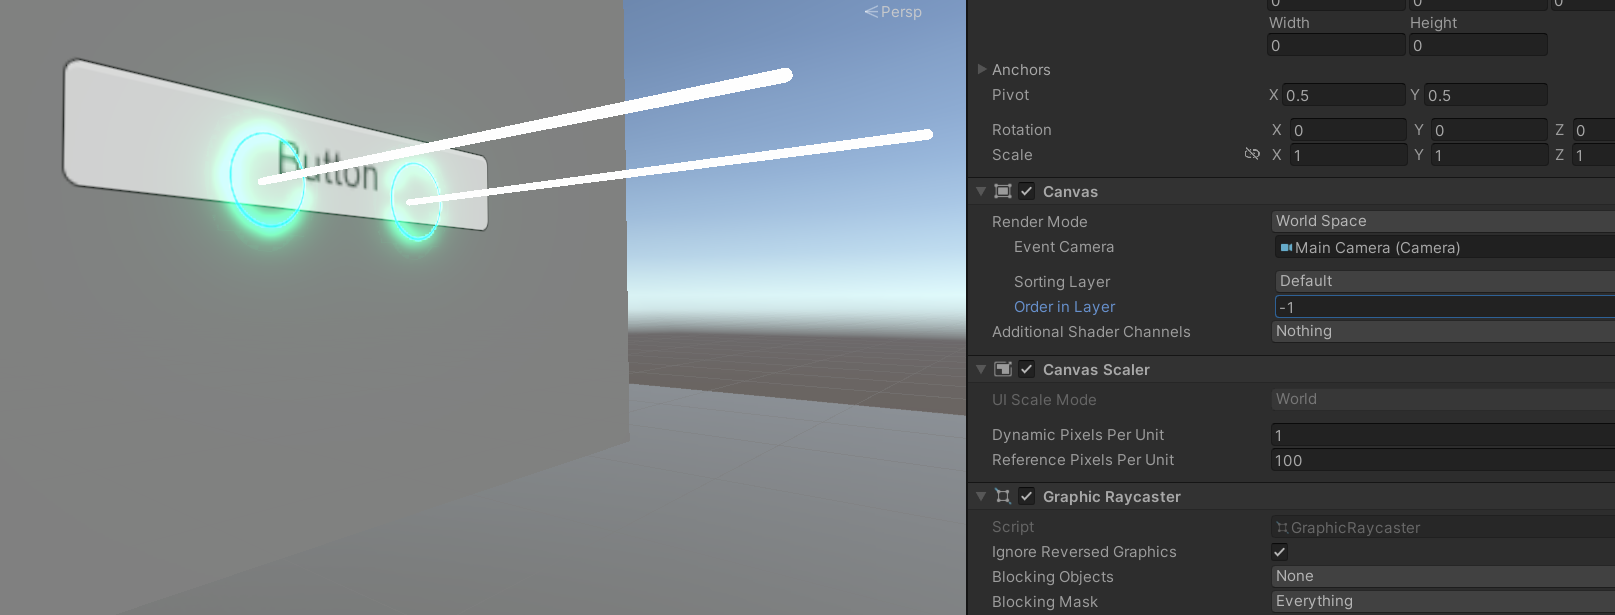
添加方法: 在手柄的上找到XR Interactor Line Visual脚本,创建Reticle 预制体后直接添加上。 3、UI触发触发条件 手柄射线要触发到UI,在完成VR基础场景搭建的前提下,需要挂载两个脚本。 在Canvas上增加Tracked Device Graphic Raycaster 替换EventSystem上的Standalone Input Module为XR UI Input Module(模型上添加的Tracked Device Physics Raycaster脚本也是受XR UI Input Module影响的) 注意事项 Canvas的Order in Layer 最好设置为负值。如果为0或者正值,十字线可能会被UI遮挡。
为0时
为-1时 |


【本文地址】
今日新闻 |
推荐新闻 |